
The 6th Division was an infantry division of the Australian Army. It was raised briefly in 1917 during World War I, but was broken up to provide reinforcements before seeing action. It was not re-raised until the outbreak of World War II, when it was formed as a unit of the Second Australian Imperial Force. Throughout 1940–41 it served in the North African Campaign, the Greek campaign, on Crete and in Syria, fighting against the Germans, Italians and Vichy French. In 1942, the division left the Middle East and returned to Australia to meet the threat of Japan's entry into the war. Part of the division garrisoned Ceylon for a short period of time, before the division was committed to the New Guinea campaign. In New Guinea, its component brigades had a major role in the successful counter-offensive along the Kokoda Track, at Buna–Gona and around Salamaua–Lae in 1942–43. Throughout late 1943–44, the division was re-organised in Australia before being committed as a complete formation to one of the last Australian operations of the war around Aitape–Wewak in 1944–45.

The Battle of Mars-la-Tour was fought on 16 August 1870, during the Franco-Prussian War, near the village of Mars-La-Tour in northeast France. One Prussian corps, reinforced by two more later in the day, encountered the entire French Army of the Rhine in a meeting engagement and, following the course of battle, the Army of the Rhine retreated toward the fortress of Metz.

The 2/6th Battalion was an infantry battalion of the Australian Army that served during the Second World War. Raised in October 1939 as part of the all-volunteer Second Australian Imperial Force, the battalion formed part of the 6th Division and was among the first troops raised by Australia during the war. Departing Australia in early 1940, the 2/6th were deployed to the Middle East where in January 1941, it took part in the first action of the war by Australian ground forces, the Battle of Bardia, which was followed by further actions around Tobruk. Later, the 2/6th were dispatched to take part in the Battle of Greece, although they were evacuated after only a short involvement in the campaign. Some members of the battalion subsequently fought on Crete with a composite 17th Brigade battalion, and the battalion had to be re-formed in Palestine before being sent to Syria in 1941–42, where they formed part of the Allied occupation force that was established there in the aftermath of the Syria–Lebanon campaign.

The 16th Brigade was an infantry brigade in the Australian Army. First raised in 1912 as a Militia formation to provide training under the compulsory training scheme, the brigade was later re-raised as part of the First Australian Imperial Force during World War I. Its existence was short-lived, as it was disbanded after about six months, before it could be committed to the fighting on the Western Front. Raised again in 1939 for service during World War II, the brigade was deployed to the Middle East in early 1940 and subsequently saw action in the Western Desert and in Greece in 1941. In 1942, it returned to Australia in response to Japan's entry into the war, and later the brigade played a prominent role in the Kokoda Track campaign and at Buna–Gona in Papua. Withdrawn to Australia in early 1943, the 16th Brigade was re-organised and received many replacements from disbanding formations, but it was not recommitted to combat operations until late in the war. In 1944–1945, the brigade was committed to the Aitape–Wewak campaign in New Guinea. After the war, the brigade was disbanded in 1946. Today, its name is perpetuated by the 16th Aviation Brigade which was raised on 2 April 2002.

The 2/1st Battalion was an infantry battalion of the Australian Army. Formed as part of the Second Australian Imperial Force at the start of World War II, the battalion was deployed to the Middle East in early 1940 and subsequently took part in the early fighting in the North African campaign, taking part in battles around Bardia and Tobruk before later being sent to Greece in early 1941. A lightning German advance quickly pushed the Allies back and forced them to evacuate after a very short campaign and the 2/1st was landed on Crete where they subsequently fought unsuccessfully to repel a German invasion in May. The majority of the battalion was captured on Crete, but the 2/1st was subsequently re-built from survivors in Palestine and returned to Australia in early 1942 following Japan's entry into the war. They then fought two campaigns against the Japanese in New Guinea, fighting in the Kokoda Track campaign during 1942–43 and the Aitape–Wewak campaign in 1944–45. Following the war, the 2/1st was disbanded.

The 2/3rd Battalion was an infantry battalion of the Australian Army. Raised for service during the Second World War as part of the Second Australian Imperial Force, it was formed in October 1939 in Sydney and was attached to the 16th Brigade, 6th Division, the first formation raised as part of the 2nd AIF during the war. Deploying to the Middle East in early 1940, it saw action in North Africa, Greece, Crete, and Syria in 1941–1942 before returning to Australia following Japan's entry into the war, and was one of only two Australian infantry battalions to fight against all the major Axis powers of the war: the Germans, Italians, Japanese and Vichy French.

The 2/4th Battalion was an infantry battalion of the Australian Army that was raised for service during World War II, as part of the Second Australian Imperial Force. Deploying to the Middle East in early 1940, the battalion took part in the early fighting in North Africa in early 1941 along with the rest of the 6th Division, before being sent to Greece and then Crete, where it was heavily engaged and suffered heavy losses. Rebuilt in Palestine, the battalion undertook occupation duties in Syria.

The 2/5th Battalion was an infantry battalion of the Australian Army that operated during World War II. It was raised at Melbourne, Victoria, on 18 October 1939 as part of the Second Australian Imperial Force, attached to the 17th Brigade of the 6th Division. The 2/5th was one of only two Australian infantry battalions to fight against all of the major Axis powers during the war, seeing action against the Germans and Italians in Egypt, Libya, Greece and Crete, and the Vichy French in Syria, before returning to Australia in 1942 to fight the Japanese following a period of garrison duties in Ceylon, where it formed part of an Australian force established to defend against a possible Japanese invasion.
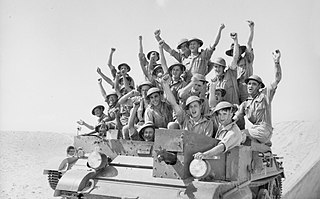
The 2/7th Battalion was an infantry battalion of the Australian Army raised for service during World War II. Formed as part of the 6th Division shortly after the outbreak of the war as part of the all-volunteer Second Australian Imperial Force, the 2/7th Battalion's initial personnel were recruited primarily from the state of Victoria, although later reinforcements were drawn from most other Australian states. Basic training was completed in Australia, after which the battalion embarked for the Middle East as part of the first batch of Australian troops to deploy overseas. Further training was undertaken in Palestine before the battalion went into action against the Italians in January 1941. After participating in the successful capture of Bardia and Tobruk, it was committed to the disastrous Battles of Greece and Crete, where the battalion was essentially destroyed after the majority of its personnel were captured.

The 2/8th Battalion was an infantry battalion of the Australian Army that served during World War II. Raised as part of the Second Australian Imperial Force at Melbourne, Victoria on 30 October 1939, the 2/8th was initially attached to the 17th Brigade, 6th Division. It was later transferred to the 19th Brigade and with this formation the battalion saw action in Egypt, Libya, Greece and Crete before returning to Australia. A period of garrison duty in Darwin followed in 1942–1943, after which the battalion concentrated with other 6th Division units on the Atherton Tablelands, remaining there throughout 1943–1944. In late 1944, the battalion was sent to New Guinea to fight the Japanese as part of the Aitape–Wewak campaign. The battalion was disbanded at Puckapunyal on 14 December 1945.

The 2/11th Battalion was an infantry battalion of the Australian Army which saw service during World War II. Raised shortly after the outbreak of war in 1939, the 2/11th was formed from Second Australian Imperial Force volunteers who were recruited mainly from the state of Western Australia. Assigned to the 6th Division, the 2/11th completed its training in Western Australia and New South Wales before deploying to the Middle East in 1940. Its first action came around Bardia in early January 1941, and this was followed by further actions in Libya, and then Greece and on Crete during which the 2/11th suffered heavy losses. After being re-formed, in late 1941 the battalion was deployed to Syria to undertake garrison duties there. In early 1942, it was brought back to Australia to help bolster the country's defences following Japanese advances in the Pacific, and it subsequently undertook defensive duties in Western Australia. The 2/11th did not see combat again until the final year of the war when it was committed to the Aitape–Wewak campaign. It was disbanded after the war in late 1945.
The 17th Brigade was an infantry brigade in the Australian Army. First raised in 1912 as a Militia formation to provide training under the compulsory training scheme, the brigade was later re-raised as part of the First Australian Imperial Force during World War I. Established in 1917 in the United Kingdom, it was broken up and disbanded without seeing action, and its personnel used as reinforcements for other formations. Reformed during World War II, it took part in fighting in Libya, Greece, Crete, Syria in 1941–1942. Following Japan's entry into the war, the Australian government pressed for the 6th Division's return, and the 17th Brigade was subsequently brought back from the Middle East, via Ceylon where they undertook defensive duties until July 1942. Following the brigade's return to Australia, it was deployed to New Guinea for two campaigns: the Salamaua–Lae campaign in 1943 and the Aitape–Wewak campaign in 1944–1945. After the war, the brigade was disbanded in January 1946. Today, its name is perpetuated by the 17th Sustainment Brigade, which was raised as a logistics formation in May 2006.

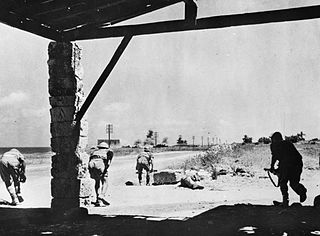
Farida Force was the name given to an ad hoc composite Australian Army unit formed during World War II. Largely consisting of Australian commandos, the force was established for the purpose for conducting an amphibious landing at Dove Bay, east of Wewak during the Aitape-Wewak campaign. Coming ashore in mid-May 1945, the force quickly established a beachhead and pushed inland, cutting the Wewak road. Afterwards, the commandos conducted patrolling operations before Farida Force was dissolved and its constituent units placed under the command of the 19th Brigade for further operations around Wewak.
The 19th Brigade was a formation of the Australian Army that was raised as part of the Second Australian Imperial Force for service during World War II. It was briefly raised in 1912 as a Militia formation providing training as part of the compulsory training scheme. Later, during World War II, the brigade was established in April 1940 in Palestine as a triangular formation, the brigade was created by transferring one infantry battalion from three other brigades. It was subsequently assigned to the 6th Division. Throughout 1941, the brigade fought in North Africa, Greece and on Crete, before undertaking garrison duties in Syria, remaining there until January 1942. Following the Japanese entry into the war, the 19th Brigade was withdrawn to Australia and subsequently undertook garrison duties in Darwin. It did not see combat again until late in the war, when it was committed to the Aitape–Wewak campaign in 1944–1945. The brigade was disbanded in December 1945 in Puckapunyal.

The 2/1st Field Regiment was an Australian Army artillery regiment raised as part of the all volunteer Second Australian Imperial Force during World War II. Formed in October 1939, the regiment was assigned to the 6th Division. Shortly after it was raised, the regiment was deployed to the Middle East, where it was briefly re-roled as an anti-aircraft regiment before returning to the field artillery role. In 1941, the regiment served in North Africa and in Greece, before being withdrawn back to Australia in early 1942, following Japan's entry into the war. In late 1942, and early 1943, the regiment took part in the defence of Port Moresby during the fighting along the Kokoda Track, before taking part in the Battle of Buna–Gona and the defence of Wau, remaining in New Guinea on garrison duties until August 1943. Withdrawn to Australia, a long period of training followed before the regiment took part in its final campaign of the war Aitape–Wewak campaign in 1945.
The 2/3rd Machine Gun Battalion was formed in June 1940 as part of the 7th Division and served in Egypt, Syria, the Netherlands East Indies and New Guinea during World War II. Under the command of Lieutenant Colonel Arthur Blackburn when it was raised, the battalion was primarily a South Australian unit, although it had sub-units formed in Victoria, Tasmania and Western Australia. After completing training in Australia, in April 1941 the battalion embarked for the Middle East. In June/July 1941 it saw action against Vichy French forces during the Syria–Lebanon campaign, during which time the battalion was heavily involved in supporting various elements of the 7th Division.

The 2/14th Field Regiment was an Australian Army artillery unit that served during the Second World War. Raised in late 1940 as part of the 8th Division, the regiment remained in Australia as a garrison force in Darwin when the division's infantry brigades were sent to various places around Southeast Asia to meet the threat posed by Japan. As a result, it did not deploy overseas until late 1943. In New Guinea, the regiment supported the 5th Division's operations on the Huon Peninsula throughout 1944 before deploying with them to New Britain in early 1945. From then, until the end of the war, the regiment engaged in operations against the large Japanese garrison on the island. At the end of the war, the 2/14th briefly undertook garrison duties on Rabaul as part of the 11th Division before returning to Australia and disbanding in January 1946.

The 2/2nd Field Regiment was an Australian Army field artillery regiment that was raised for service during the Second World War. Assigned to the 6th Division, the regiment was formed from Second Australian Imperial Force volunteers. Raised in October 1939, the regiment undertook basic training in Australia before departing for the Middle East in mid-1940. Further training was undertaken in Egypt, before the regiment saw action in the Western Desert in early 1941, and in Greece and on Crete in the middle of the year. Later, they provided a defensive garrison on Ceylon in mid-1942 before returning to Australia. It did not see further action until the final phase of the war, when it was deployed to Aitape–Wewak, fighting against the Japanese, in 1944–1945. It was disbanded in January 1946, after returning to Australia for demobilisation.

The 2/1st Anti-Tank Regiment was an Australian Army anti-tank artillery regiment that was raised for service during the Second World War as part of the all volunteer Second Australian Imperial Force. Formed in November 1939, it was sent to the United Kingdom in mid-1940, but was broken up and converted into infantry. In late 1940, the regiment was re-formed and deployed to the Middle East, joining the 6th Division. It took part in the Battle of Greece before being evacuated to Egypt. Later, the regiment took part in the Syria–Lebanon campaign. In early 1942, it was withdrawn back to Australia for service in the Pacific. En route the regiment was diverted to Ceylon for garrison duties. It served in New Guinea around Port Moresby and Milne Bay in 1942–1943 and then again in early 1945 during the Aitape–Wewak campaign, serving there until the end of the war.

The 2/3rd Anti-Tank Regiment was an Australian Army anti-tank artillery regiment that was raised for service during the Second World War as part of the all volunteer Second Australian Imperial Force. It was formed in July 1940, and was assigned to the 8th Division, but was later reassigned to the 9th Division. With this formation, the regiment took part in the Siege of Tobruk in 1941 and then the First and Second Battles of El Alamein in 1942. After returning to Australia in early 1943, the regiment became a corps-assigned unit, and its individual batteries served in New Guinea in 1943–1944, and then Borneo against the Japanese in 1945.


