The 2/9th Battalion was an infantrybattalion of the Australian Army during World War II. Raised in Queensland as part of the Second Australian Imperial Force (2nd AIF) shortly after the outbreak of the war, it formed part of the 18th Brigade and over the course of the war it was attached to the 6th, 9th and 7th Divisions due to several re-organisations. It served in the United Kingdom in 1940, forming part of a small Australian garrison sent there to help defend against a possible German invasion, before being transferred to North Africa where it took part in the Siege of Tobruk and then undertook garrison duties in Syria following the Syria–Lebanon campaign in 1941.
In early 1942, the 2/9th was brought back to Australia where it was re-organised for jungle warfare and took part in the New Guinea campaign. Throughout 1942–1944, the battalion was committed twice to the fighting against the Japanese in New Guinea. In 1942–1943, the 2/9th fought actions at Milne Bay and Buna–Gona before being withdrawn to Australia for rest prior to returning to New Guinea to take part in the advance through the Finisterre Range where the battalion took part in the Battle of Shaggy Ridge in 1943–1944. The battalion's final involvement in the war came during the Borneo campaign in mid-1945, when it took part in the landing at Balikpapan. It was disbanded shortly after the war in early 1946.
In terms of structure, the early months of the battalion's existence was a period of flux. The early 2nd AIF infantry battalions were established with a structure that was unique to the Australian Army; however, shortly after formation it was decided that they would adopt the British Army battalion structure.[7] Thus, by December 1940, the 2/9th had an authorised strength of around 900 personnel and consisted of four rifle companies (each consisting of three platoons with three sections), a battalion headquarters, a support company, and a headquarters company consisting of six platoons performing specialist roles including signals, mortar, and anti-tank. The four rifle companies were designated 'A' through to 'D'.[8][9] The colours chosen for the battalion's unit colour patch (UCP) were the same as those of the 9th Battalion, a unit which had served during World War I before being raised as a Militia formation in 1921. These colours were black over light blue, in a horizontal rectangular shape, although a border of gray was added to the UCP to distinguish the battalion from its Militia counterpart.[10]
Following training at Redbank and then later in New South Wales at Rutherford and Ingleburn, the 2/9th was among the force of 8,000 Australians sent to the United Kingdom in early 1940. It had been planned to send this force to France to serve alongside the British Expeditionary Force (BEF), but France had fallen by the time the Australians arrived in Scotland on 16 June 1940, so they remained in the United Kingdom to help defend against a possible German cross-Channel invasion, which was feared following the capture of part of the BEF in France and the loss of much of its equipment.[11][12]
After their arrival in the United Kingdom, the battalion was transported by rail to the south of England where it set up a camp at Lopcombe Corner, on Salisbury Plain in Wiltshire.[13] Amidst the backdrop of the Battle of Britain, the battalion's personnel used their integral Vickers machine-guns and Bren guns to provide self-defence against air attack and to bolster the anti-aircraft defences of local areas. They also undertook training exercises and formed a mobile striking force tasked with rapidly responding in the event of an invasion.[14] In September, the 18th Brigade was transferred to the 9th Division.[15][Note 3] On 14 October the battalion moved to Meeanee Barracks in Colchester, Essex, where it took over responsibility for a defence sector from a British officer training battalion. The 2/9th remained in Colchester until 10 November when orders came for the 18th Brigade to hand over to the 25th Brigade, and the 2/9th was relieved by the 2/31st Battalion.[17] With the threat of invasion passing as winter came, the decision was made to redeploy the Australians to North Africa where they might be actively employed in combat operations. Following this, preparations for embarkation began as orders were received for the battalion to entrain for Glasgow where, on 15 November 1940, it boarded HMT Strathaird.[18]
Middle East
Sailing via the longer, but safer southern route, on the way to the Middle East the convoy carrying the Australians made a port call at Durban, South Africa. While there, the battalion marched through the city under arms on 13 December 1940, before re-embarking. Disembarking in Alexandria, Egypt, on 31 December 1940, the battalion went into camp at Ikingi Maryut with 33 officers and 707 men.[19] In February 1941, the battalion was transferred once more, as the 18th Brigade was reassigned to the 7th Division.[20] Around the same time, the brigade was reduced to only three infantry battalions as part of an Army-wide re-organization, and the 2/11th Battalion was transferred to the 19th Brigade.[21] With the 7th Division the battalion fought its first major engagement of the war on 21 March 1941, when it led the 18th Brigade's assault on the Italian fortress at Giarabub, which was held by about 1,500 Italians.[22] Advancing from Siwa in Egypt, the battalion, supported by elements of the 2/10th and 2/12th Battalions, attacked from the south across marshland, while cavalry from the 6th Division Cavalry Regiment feigned an attack against the strongest point of the fortress. Amidst a sandstorm that limited visibility, heavy fighting ensued and the garrison surrendered at around 2:00pm; 250 Italians were killed, while 1,300 were taken as prisoners of war.[23] A total of 17 Australians were killed and 77 were wounded, with the majority of these being men from the 2/9th Battalion.[24] Afterwards, the battalion was sent to Ikingi Maryut[25] and the following month the 2/9th was transported to Tobruk by road and sea to reinforce the garrison there as German forces surrounded the strategic port in an effort to capture it.[26] The 2/9th would remain in there for the next five months as Tobruk fell under siege.[27]
Soldiers from the 2/9th hoist a flag consisting of the battalion's unit colour patch over the recently captured Italian fort at Giarabub.
On 3 May, the 2/9th Battalion launched a counter-attack on the German forces around "the Salient" in order to retake some of the posts that had previously been lost to the Germans. After being subjected to a heavy German artillery bombardment at their form up point, at 8:45pm the battalion attacked from the southern flank under the cover of considerable counter-battery fire from the British artillery.[28] After capturing a number of positions and inflicting heavy losses upon the defenders, the Australians were eventually forced to withdraw at around 3:00am on 4 May when it became apparent that they would not be able to complete the advance before daylight. Having lost three men killed, three missing and 51 wounded, at dawn the 2/9th Battalion returned to the "Blue Line",[Note 4] where it took over a defensive position south of Bianca.[30] Here a series of small skirmishes ensued during which time the battalion was able to extend their lines by about 0.5 miles (0.80km).[31]
For the rest of May the battalion undertook defensive construction tasks and raids into "no man's land" south-west of Bianca before being relieved by the 2/17th Battalion on the night of 4/5 June 1941. Following this, the 18th Brigade went into reserve and the battalion saw little action for the next month as it was moved back to the Bardia–El Adem Road junction.[32] In July, the battalion returned to "the Salient", where it spent a period of time in brigade reserve in the Pilastino sector. Later, it was moved back up to the "Red Line" in the El Adem sector where the battalion's personnel undertook aggressive patrols into no man's land, penetrating a number of minefields and moving booby traps.[33][34] On 23 July, the battalion launched a major raid in their sector in an effort to gauge German responses, penetrating over 800 metres (870yd) through the German lines, but after finding their objective unoccupied, the raiders withdrew.[35]
Following this the battalion went back into reserve for a period, before briefly returning to the "Red Line" at the start of August.[36] This was short-lived, though, for later in the month the decision was made to withdraw the 18th Brigade from Tobruk and the 2/9th Battalion was subsequently sent to Palestine to undertake training. Later the battalion was transferred to Syria where it was employed on occupation duties following the defeat of the Vichy French forces in that country in the recently concluded Syria–Lebanon campaign.[27][37]
Pacific
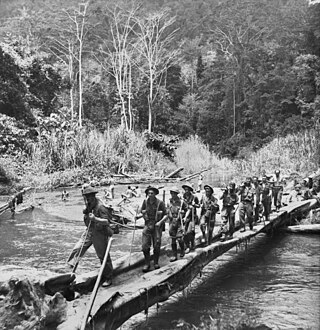
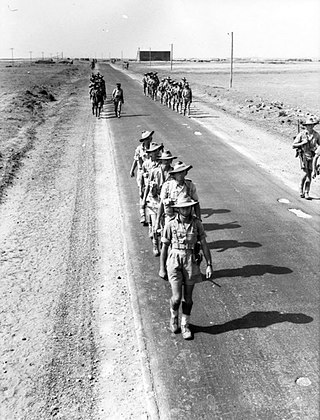
Troops from the 2/9th resting prior to joining the fighting around Shaggy Ridge, January 1944
In February 1942, along with the majority of the 2nd AIF, the 2/9th was withdrawn to Australia in response to the threat posed by Japan's entry into the war following the attacks on Pearl Harbor and in Malaya.[38][39] Returning via Bombay and Colombo, the 2/9th arrived in Australia, landing in Port Adelaide, South Australia, in March 1942 and from there proceeded to camp in Sandy Creek, near Gawler.[40] The battalion remained there until April when it was moved to Tenterfield, New South Wales, and then Kilcoy, Queensland,[41] where it carried out training prior to departure overseas.[27] At this time, the strategic situation in the Pacific was finely balanced. In July, the Japanese had landed on the northern New Guinea coast and had begun advancing along the Kokoda Track towards Port Moresby, amidst heavy fighting. On 6 August 1942, the order to deploy came and the battalion embarked from Brisbane along with the rest of the 18th Brigade,[42] bound for Milne Bay in New Guinea where the 2/9th arrived on 21 August to help reinforce the garrison there, due concerns about a possible Japanese landing there to secure the adjacent airfields.[43]
From the beginning of August the Japanese had been bombing the troops of the 7th Brigade which had initially been sent to garrison the Milne Bay area, and as a Japanese invasion force was expected, the three battalions of the 18th Brigade were quickly placed into positions where they could be most effective. The 2/9th was assigned the task of defending Milne Force Headquarters at Hagita House and the Number 1 Strip (also known as Gurney Field).[44] Upon arrival, the 2/9th Battalion was used to construct roads and lay steel matting on the airstrip as well as unloading stores from ships as they arrived, and carrying out patrolling operations.[45] Following the Japanese landing on 25 August, the battalion was placed on alert and increased its patrolling operations around the airfield; however, for five days no contact was made. On 3 September, the battalion moved from Gili Gili to KB Mission and alongside the 2/12th Battalion, which had launched a counteroffensive along the north coast of the bay, went into battle with the Japanese for the first time.[46] Over the course of the next two days the Japanese were beaten back and eventually a withdrawal was ordered by the Japanese commanders. This represented the first full-scale defeat of the Japanese on land during the war;[47][48] it came at a cost for the 2/9th, though, with the battalion losing 29 men killed and a further 86 wounded in action, seven of whom later died of wounds. Disease took a far greater toll, with a further 308 men being hospitalised due to illness.[49]
As the tide in the New Guinea campaign began to turn in favour of the Allies, the Japanese, having reached the zenith of their advance in New Guinea, were forced to withdraw back towards Buna and Gona. Fierce fighting subsequently followed as Australian and US troops fought to reduce the Japanese beachhead. After taking part in defeating the Japanese at Milne Bay, the 18th Brigade was transferred to Buna. The 2/9th arrived at Oro Bay aboard HMAS Broome on 14 December.[50][51] It was the first battalion of the brigade committed to this battle. Leading the attack of 18 December, with support of M3 Stuart tanks from the 2/6th Armoured Regiment, it made significant gains. The 18th Brigade (and the 2/9th) continued to fight, attached to the US 32nd Division until the fall of Buna at the start of January 1943. It was returned to command of the Australian 7th Division in time to participate in an attack on 12 January against Japanese positions on the Sanananda Track that had been holding up the Australian advance there. The battalion continued fighting in the Sanananda area until it concluded with an Allied victory on 22 January. By this time its strength had fallen from over 600 to just under 100 men due to the effects of tropical diseases and heavy fighting;[27][52] combat losses were recorded as 95 killed in action or died of wounds, 32 missing, and 247 wounded.[53] These losses were offset by the arrival of 300 reinforcements during the battle, but nevertheless losses were so heavy, particularly from disease, that in February the 2/9th Battalion was transported back to Port Moresby, before returning to Australia the next month.[27]
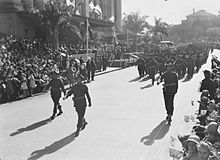
Members of the 2/9th march past Brisbane City Hall, August 1944
Following the battalion's return, it undertook further jungle training at Ravenshoe on the Atherton Tablelands.[54] In August 1943, after embarking at Townsville the 2/9th returned to Port Moresby, where it continued further training in the areas surrounding the port.[55] It remained there until 31 December when the battalion deployed into the Finisterre Range, being flown into Dumpu and joining the Allied advance inland. In early January 1944, the battalion took part in the Battle of Shaggy Ridge, capturing "Green Sniper's Pimple" on 21 January as part of a brigade-level operation to carry the ridge.[27][56][57] Following the conclusion of the fighting around Shaggy Ridge in February, the battalion occupied a position around the western side of the saddle before being relieved by the 57th/60th Battalion,[58][59] as the 15th Brigade relieved the 18th and continued the advance on Bogadjim as the Australians linked up with US forces on the coast, prior to capturing Madang and securing the Huon Peninsula in late April.[60] During this period the battalion occupied a defended locality about 15 kilometres (9.3mi) downstream from Dumpu, from which they conducted patrols long-range fighting patrols to prevent the Japanese from infiltrating back into the Ramu Valley over the months which followed. Training activities and work parties were also conducted.[61]
In May 1944, the battalion was brought back to Australia,[27] as part of a broader plan to return the three AIF divisions to Australia for "training and rehabilitation"[62] while the United States military assumed primary responsibility for combat operations in the Pacific.[62] A period of operational uncertainty followed regarding the future combat role of the Australian Army, and consequently a long period of training in Australia followed for the AIF battalions. After a period of leave the battalion's personnel concentrated at Strathpine, Queensland, in July. In August, the battalion moved to the Atherton Tablelands again, establishing themselves at Kairi. After this, the battalion conducted exercises which included collective training up to brigade level, while amphibious training was also undertaken at Trinity Beach near Cairns aboard the British troopship HMS Glenearn, working in concert with Royal Marines.[63] In December 1944, the battalion participated in a divisional exercise. During this period the unit was also introduced to several new weapons, including flame throwers and the PIAT anti-tank weapon, and undertook training in infantry/tank co-operation.[64] A range of training exercises, competitions, sporting events, and recreational activities continued early in the new year to keep the men busy and combat possible feelings of "anti-climax" and "boredom" that may have been associated with the granting of limited local leave after the delay of their expected deployment overseas.[65]
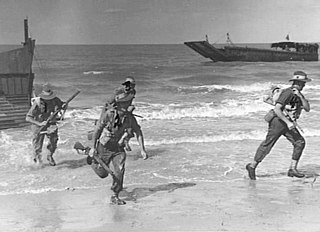
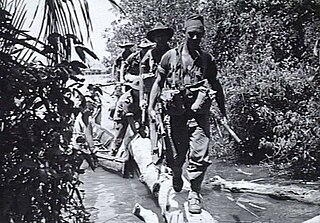
In the final months of the war, the battalion was committed to the Borneo campaign. Embarking from Cairns in May on several tank landing ships, the battalion concentrated on Morotai Island.[66] On 1 July 1945, the 2/9th took part in the landing at Balikpapan, the final Australian amphibious operation of the war.[27] At the start of the attack, the battalion was assigned the role of being the 18th Brigade's reserve;[67] however, by mid-morning on the opening day it was ordered forward to relieve the 2/10th Battalion, taking Klandasan before noon, and commencing house-to-house clearances in concert with a troop of tanks.[68] From there it forced a small Japanese force off Santosa Hill, before tying in its positions at 6:00pm and digging-in for the night.[68] On 5 July, the 2/9th landed on the western side of Balikpapan Bay. Along with a small force of armour, artillery, mortars and other supporting arms, it began to clear inland from Penadjam. Over the course of the following month the battalion sent detachments south along the coast towards the Semsumpu River and north towards the Riko River and onto the Parehpareh River via Separi.[69] By 12 August, posts had been established astride the Pamaluan–Bandjermasin Road, and a detachment from 'C' Company had reached Pamaluan, where the 2/9th linked up with elements from the 2/1st Pioneer Battalion.[70]
Disbandment
Finally, in mid-August, the fighting on Borneo came to an end following the atomic bombings of Hiroshima and Nagasaki and the subsequent surrender of Japan. After this the 2/9th Battalion carried out various garrison duties such as guarding prisoners of war and maintaining internal security while the demobilisation process took place.[27] As personnel were repatriated back to Australia or transferred to other units for further service, the battalion's strength dropped until it was finally disbanded on 3 January 1946 while still at Balikpapan.[27]
The following officers commanded the 2/9th during the war:[27]
Lieutenant Colonel James Eric Gifford Martin (1939–1941)
Lieutenant Colonel Clement James Cummings (1941–1944)
Lieutenant Colonel Arthur James Lee (1944–1945)
Notes
Footnotes
↑ By the start of World War II, the authorised strength of an Australian infantry battalion was 910 men all ranks; however, later in the war it fell to 803 after the Army adopted the jungle divisional establishment.[1]
↑ The numerical designation of 2nd AIF units was prefixed by "2/", which was used to set them apart from Militia units with corresponding numerical designations.[3]
↑ The division, when raised, consisted of the 18th and 25th Brigades. The latter was initially a temporary improvised formation. It was created by reorganising other divisional units of the 6th and some 450 infantry reinforcements that had also embarked with the convoy transporting the 18th Brigade. Consequently, these units had also been diverted to Britain.[16]
↑ The defence system at Tobruk consisted of several lines: the outer position consisted of scattered perimeter posts and reserve company positions and was dubbed the "Red Line", while the secondary defence system, which was about 2 miles (3.2km) behind the "Red Line", was dubbed the "Blue Line".[29]
↑ There is a discrepancy in these figures to those provided by the battalion historian, who lists the following: 218 killed in action, 69 died of wounds and a further 688 wounded.[72] Johnston's figures also vary, citing 218 killed in action, 72 died of wounds, eight died on active service and 755 wounded in action.[71]
↑ There is a discrepancy in these figures to those provided by the battalion historian, who lists the following awards: one VC, four DSOs, nine MCs, eighteen MMs, three DCMs and sixty-nine MIDs.[74]
The Second Australian Imperial Force was the volunteer expeditionary force of the Australian Army in the Second World War. It was formed following the declaration of war on Nazi Germany, with an initial strength of one infantry division and related auxiliary components. After considerable expansion of this force, three divisions were sent to the Middle East and North Africa, while the 8th Division was sent to garrison British Malaya and Singapore.
The 6th Division was an infantry division of the Australian Army. It was raised briefly in 1917 during World War I, but was broken up to provide reinforcements before seeing action. It was not re-raised until the outbreak of World War II, when it was formed as a unit of the Second Australian Imperial Force. Throughout 1940–41 it served in the North African Campaign, the Greek campaign, on Crete and in Syria, fighting against the Germans, Italians and Vichy French. In 1942, the division left the Middle East and returned to Australia to meet the threat of Japan's entry into the war. Part of the division garrisoned Ceylon for a short period of time, before the division was committed to the New Guinea campaign. In New Guinea, its component brigades had a major role in the successful counter-offensive along the Kokoda Track, at Buna–Gona and around Salamaua–Lae in 1942–43. Throughout late 1943–44, the division was re-organised in Australia before being committed as a complete formation to one of the last Australian operations of the war around Aitape–Wewak in 1944–45.
The 7th Division was an infantry division of the Australian Army. It was formed in February 1940 to serve in World War II, as part of the Second Australian Imperial Force. The division was raised on the British establishment of nine infantry battalions per division and consisted of two new brigades and three of the original 12 battalions of the 6th Division forming the third brigade. The division is sometimes known by the nickname "The Silent Seventh", due to a perception that its achievements were unrecognised, in comparison to the other Australian divisions. The origin of this belief appears to be censorship of the part played by the 7th Division in the fierce fighting in the 1941 Syria-Lebanon campaign. The 7th Division along with the 6th and 9th Australian Divisions were the only divisions to serve in both the Middle East and the South West Pacific Area. It was disbanded in 1946, following the end of the war.
The 9th Division was a division of the Australian Army that served during World War II. It was the fourth division raised for the Second Australian Imperial Force. The distinctions of the division include it being:
John Alexander French, VC was an Australian recipient of the Victoria Cross, the highest award for gallantry in the face of the enemy that can be awarded to British and Commonwealth forces. French was one of 20 Australians to receive the award for their actions during the Second World War. He was killed in action fighting against the Japanese during the Battle of Milne Bay in September 1942 while serving with the 2/9th Battalion.
The 9th Battalion, Royal Queensland Regiment is a Reserve light infantry battalion of the Australian Army, raised and based in the state of Queensland. It is part of the Royal Queensland Regiment and is currently attached to the 11th Brigade of the 2nd Division. 9 RQR can trace its history as far back as 1867 with the establishment Queensland Volunteer Rifle Corps, although it was not until 1911 that it was designated as the "9th Battalion". Over the course of its history, the battalion has served Australia in a number of conflicts including The Boer War, World War I and World War II, while more recently, members of the battalion have been involved in various peacekeeping operations and exercises around the Pacific region.
The Royal Tasmania Regiment (RTR) is a Reserve infantry regiment within the Australian Army consisting of a single battalion. Formed in 1960 following a review of military formations in Australia, the Regiment can trace its lineage back to the late 19th Century and has served Australia in a number of conflicts including the Boer War, World War I and World War II. Today it serves as a part of the Australian Army's 4th Brigade, 2nd Division.
The 2/2nd Battalion was an infantry battalion of the Australian Army raised for service as part of the all-volunteer Second Australian Imperial Force during World War II. Raised in October 1939, the battalion was deployed to the Middle East and in early 1941 took part in the first ground action undertaken by Australian troops during the war during the Battle of Bardia before helping to capture Tobruk. In April, the battalion briefly fought in Greece, before being evacuated after the Allied forces were overwhelmed by German forces. Some members of the battalion took part in the Battle of Crete, after which the battalion undertook garrison duties in Syria. In mid-1942, the 2/2nd undertook defensive duties in Ceylon before returning to Australia. They subsequently took part in the fighting against the Japanese along the Kokoda Track and then around Buna–Gona. After a period of reorganisation and training in Australia throughout 1943–44, late in the war the battalion was committed to the Aitape–Wewak campaign before being disbanded in early 1946 after the war.
The 2/3rd Battalion was an infantry battalion of the Australian Army. Raised for service during the Second World War as part of the Second Australian Imperial Force, it was formed in October 1939 in Sydney and was attached to the 16th Brigade, 6th Division, the first formation raised as part of the 2nd AIF during the war. Deploying to the Middle East in early 1940, it saw action in North Africa, Greece, Crete, and Syria in 1941–1942 before returning to Australia following Japan's entry into the war, and was one of only two Australian infantry battalions to fight against all the major Axis powers of the war: the Germans, Italians, Japanese and Vichy French.
The 2/10th Battalion was an infantry battalion of the Australian Army that was raised for overseas service as part of the all-volunteer Second Australian Imperial Force during World War II. Formed in October 1939, it was the first 2nd AIF unit raised from the state of South Australia during the war; after completing a period of training in Australia, the battalion embarked for overseas service. Initially, it had been intended that the 2/10th and its parent brigade – the 18th Brigade – would be sent to the Middle East to join the other brigades of the 6th Division, but instead the 18th Brigade was sent to strengthen the garrison in the United Kingdom after France capitulated in mid-1940. Re-assigned to the 9th Division, the 2/10th remained in the United Kingdom undertaking defensive duties until late 1940 when it finally arrived in the Middle East, where the 18th Brigade became part of the 7th Division.
The 18th Brigade was an infantry brigade of the Australian Army. The brigade briefly existed as a Militia formation prior to the First World War, but this was short-lived. During the Second World War, the brigade was raised on 13 October 1939 and was one of the first three infantry brigades of the Second Australian Imperial Force to be formed. Initially commanded by Brigadier Leslie Morshead, it served in the United Kingdom in 1940–1941, where it helped bolster the British garrison in anticipation of a possible German invasion following the Fall of France. In early 1941, the brigade was transferred to the Middle East where it later took part in fighting against the Italians in Libya and then helped to defend the besieged port of Tobruk before fighting against the Vichy French in the Syria–Lebanon campaign. The 18th Brigade was withdrawn to Australia in early 1942, and it later took part in the fighting against the Japanese in Pacific fighting several campaigns in New Guinea between late 1942 and early 1944. Its final involvement of the war came in mid-1945 when it took part in re-taking Balikpapan. Following the end of hostilities, the 18th Brigade was disbanded on 3 January 1946.
The 2/48th Battalion was an infantry battalion of the Australian Army which served during the Second World War. Raised in Adelaide in South Australia in August 1940, the battalion formed part of the 26th Brigade and was initially assigned to the 7th Division, although it was later transferred to the 9th Division in 1941 when it was deployed to the Middle East. While there, it saw action during the siege of Tobruk and the First and Second Battles of El Alamein before being returned to Australia to take part in the fighting in New Guinea following Japan's entry into the war.
The 25th Brigade was a brigade-sized infantry unit of the Australian Army that served during the Second World War. Raised in July 1940 and consisting of three infantry battalions, the 25th Brigade initially served in the United Kingdom, where it formed part of the garrison tasked with defending against a possible German invasion. In 1941, the brigade was redeployed to the Middle East where it took part in the Syria–Lebanon campaign fighting several actions around Merdjayoun and Jezzine.
The 2/12th Battalion was an infantry battalion of the Australian Army which served during World War II. Raised in late 1939 as part of the all volunteer Second Australian Imperial Force, the battalion's initial recruits were drawn primarily from the states of Queensland and Tasmania. Assigned to the 18th Brigade, the battalion completed basic training in Australia before embarking for overseas in May 1940.
The 24th Brigade was a brigade-sized infantry unit of the Australian Army. Formed on 1 July 1940 as part of the Second Australian Imperial Force, the unit was raised for service during World War II. Originally formed as part of the 8th Australian Division the brigade was subsequently transferred to the newly created 9th Australian Division in December. The brigade served during the Western Desert Campaign, forming part of the Allied garrison during the Siege of Tobruk. Later, the brigade was withdrawn to Syria for occupation duties, but then later took part in the First and Second Battles of El Alamein. In early 1943, the brigade was returned to Australia to fight against the Japanese in the Pacific. In 1943–1944, the brigade fought in New Guinea, taking part in the landing at Lae and the Huon Peninsula campaign. Its final campaign came late in the war, when it took part in the Labuan landings and the Battle of North Borneo in mid-1945. After the war, the brigade was disbanded in early 1946.
The 20th Brigade was a brigade-sized infantry unit of the Australian Army. First raised in 1912 as a Militia formation to provide training under the compulsory training scheme, the brigade was later re-raised on 7 May 1940 as part of the all volunteer Second Australian Imperial Force for service during the World War II. The brigade was initially assigned to the 7th Division, but was later transferred to the 9th Division in early 1941. They subsequently took part in the Siege of Tobruk that year, and then the First and Second Battles of El Alamein in 1942. In early 1943, the brigade was returned to Australia to join the fighting against the Japanese in the Pacific. In late 1943, the brigade took part in the capture of Lae and then the Huon Peninsula campaign. Withdrawn to Australia in early 1944, its final campaign came during the Battle of North Borneo in the final months of the war. It was disbanded in February 1946.
The 2/17th Battalion was an infantry battalion of the Australian Army. Raised in April 1940 in New South Wales, it formed part of the 20th Brigade, and was eventually allocated to the 9th Division. After completing basic training in Australia, the unit was deployed to the Middle East. In early 1941, it took part in the fighting at Tobruk, defending the port until relieved. A period of garrison duties followed in Syria and Lebanon before the battalion took part in the First and Second Battles of El Alamein in mid-1942. As the focus of the Australian Army's operations shifted to the Pacific theatre to fight the Japanese, the 2/17th Battalion returned to Australia early in 1943.
The 2/43rd Battalion was an infantry battalion of the Australian Army. Raised in July 1940 in South Australia as part of the 24th Brigade, the battalion was initially part of the 8th Division, until the 24th Brigade was re-allocated to the 9th Division in late 1940. It was with this formation that the 2/43rd saw service in the Middle East in 1941–1942, taking part in the fighting at Tobruk and in the First and Second Battles of El Alamein. It also undertook garrison duties in Syria, before returning to Australia early in 1943 to fight against the Japanese in the Pacific.
The 2/15th Battalion was an infantry battalion of the Australian Army that served during World War II. Formed in May 1940 primarily from Queensland volunteers, the battalion saw action in North Africa in 1941–1942 as part of the 20th Brigade, which was part of the 7th Division before being reassigned to the 9th Division.
The 2/13th Battalion was an infantry battalion of the Australian Army, which served during World War II. Formed in April 1940 from volunteers drawn primarily from New South Wales, as part of the 20th Brigade of the 7th Division, the battalion served in North Africa in 1941–1942, after being reassigned to the 9th Division. While most of the 9th Division was withdrawn from Tobruk, during October 1942, the battalion remained and fought alongside the new garrison built around the British 70th Division. Following the lifting of the siege, the battalion returned to Australia during 1943. It later took part in campaigns against the Japanese in New Guinea in 1943–1944 and Borneo in 1945, before being disbanded in 1946.
References
Bradley, Phillip (2004). On Shaggy Ridge: The Australian Seventh Division in the Ramu Valley from Kaiapit to the Finisterres. Melbourne, Victoria: Oxford University Press. ISBN978-0-19-555100-6.
Brune, Peter (2004) [2003]. A Bastard of a Place: The Australians in Papua. Crows Nest, New South Wales: Allen & Unwin. ISBN1-74114-403-5.
Coulthard-Clark, Chris (1998). Where Australians Fought: The Encyclopaedia of Australia's Battles (1sted.). St Leonards, New South Wales: Allen and Unwin. ISBN1-86448-611-2.
Dickens, Gordon (2005). Never Late: The 2/9th Australian Infantry Battalion 1939–1945. Loftus, New South Wales: Australian Military History Publications. ISBN1-876439-47-5.
Festberg, Alfred (1972). The Lineage of the Australian Army. Melbourne, Victoria: Allara Publishing. ISBN978-0-85887-024-6.
Harries, Meirion; Harries, Susie (1991). Soldiers of the Sun: The Rise and Fall of the Imperial Japanese Army. New York: Random House. ISBN978-0-679-75303-2.
Johnston, Mark (2008). The Proud 6th: An Illustrated History of the 6th Australian Division 1939–1945. Port Melbourne, Victoria: Cambridge University Press. ISBN978-0-521-51411-8.
Johnston, Mark (2007). The Australian Army in World War II. Botley, Oxford: Osprey Publishing. ISBN978-1-84603-123-6.
Johnston, Mark (2005). The Silent 7th: An Illustrated History of the 7th Australian Division 1940–46. Crows Nest, New South Wales: Allen & Unwin. ISBN1-74114-191-5.
Long, Gavin (1952). To Benghazi. Australia in the War of 1939–1945. Series 1– Army. Vol.I (1sted.). Canberra, Australian Capital Territory: Australian War Memorial. OCLC18400892. Retrieved 22 December 2015.
Milner, Samuel (1957). Victory in Papua. United States Army In World War II. Washington, DC: Center of Military History, United States Army. LCCN56-60004.
Spencer, Bill (1999). In the Footsteps of Ghosts: With the 2/9th Battalion in the African Desert and the Jungles of the Pacific. St Leonards, New South Wales: Allen & Unwin. ISBN1-86508-145-0.
Thompson, Peter (2008). Pacific Fury: How Australia and Her Allies Defeated the Japanese Scourge. North Sydney, New South Wales: William Heinemann. ISBN978-1-74166-708-0.
This page is based on this Wikipedia article Text is available under the CC BY-SA 4.0 license; additional terms may apply. Images, videos and audio are available under their respective licenses.