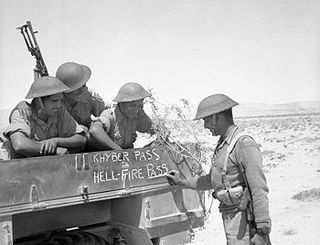
The Battle of Keren (Italian: Battaglia di Cheren) took place from 3 February to 27 March 1941.[1] Keren was attacked by the British during the East African Campaign of the Second World War. A force of Italian regular and colonial troops defended the position against British troops (mostly from Sudan and British India) and Free French forces. The town of Keren, in the colony of Italian East Africa, was of tactical importance to both sides. The road and railway through Keren were the main routes to the colonial capital of Italian Eritrea at Asmara and the Red Sea port of Massawa, which surrendered to the British after the battle.
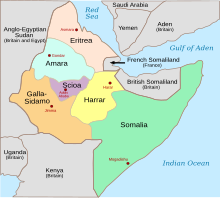
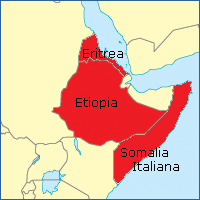
Colonised by the Italians in 1885, Italian Eritrea was used as a staging ground for Italian invasions of the Ethiopian Empire in the First and Second Italo-Abyssinian Wars. The second invasion began in 1935 and Ethiopia fell in 1936. Ethiopia, Italian Somaliland and Eritrea were combined to form Italian East Africa (Africa Orientale Italiana) part of the Italian Empire. Following the Italian declaration of war on 10 June 1940, Italian dictator Benito Mussolini ordered his troops to capture British Somaliland and border towns in the Sudan and Kenya.
Eritrea has three climate zones: a coastal region of sandy plain and low scrub, a cool and fertile highland plateau in the north and the hot and arid Afar Depression in the south. The coastal region runs inland for 16–32km (10–20mi) in the east with elevations of up to 500m (1,650ft) and is hot and humid for most of the year, with June, September and October the hottest months.[2] At Massawa the average temperature is 31°C (88°F) and in summer can reach 49°C (120°F) in the shade. Most rain falls in the summer monsoon, with occasional showers in the winter. In the escarpments and valleys, the climate is temperate with only summer monsoon rains, except close to the coast, where there is some winter rain.[2]
May is the hottest month. Approaching the highland plateau, the elevation rises steeply to 1,800m (6,000ft), with some peaks 3,000m (10,000ft) high and the ground declines to the west. It is cooler, with the monsoon from June to September and light rain in April and May. The temperature is highest during the dry season from November to April and above 2,600m (8,500ft), sub-alpine temperatures are found.[2] The high ground continues into northern Ethiopia, where the mountains and ravines make ideal defensive terrain.[3]
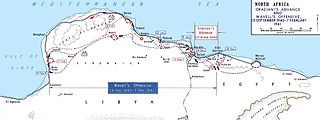
The British responded by building up a force of more than two divisions in Sudan and three in Kenya by early February 1941. The Sudan-based forces—commanded by Lieutenant-General William Platt and under the command of General Archibald Wavell (Commander-in-Chief British Middle East Command)—had invaded Eritrea through Kassala on 18 January and by 1 February had captured Agordat about 160km (100mi) further east.[4]
Anglo-Egyptian Sudan shared a 1,600km (1,000mi) border with Italian East Africa and on 4 July 1940, was invaded by an Italian force of about 6,500 men from Eritrea, which advanced on a railway junction at Kassala and forced the British garrison of 320 men of the Sudan Defence Force (SDF) and some local police to retire, after inflicting casualties of 43 killed and 114 wounded for ten casualties.[5][6] The Italians also drove a platoon of No 3 Company, Eastern Arab Corps (EAC) of the SDF, from the small fort at Gallabat, just over the border from Metemma, about 320km (200mi) south of Kassala and took the villages of Qaysān, Kurmuk and Dumbode on the Blue Nile. From there the Italians ventured no further into Sudan, owing to lack of fuel. They proceeded to fortify Kassala with anti-tank defences, machine-gun posts and strong-points, later establishing a brigade-strong garrison. The Italians were disappointed to find no strong anti-British sentiment among the native population.[7][8]
Prelude
Keren
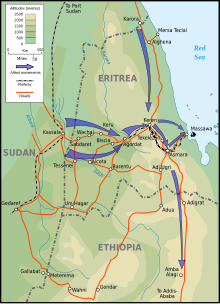
The advance of Platt's forces into Eritrea
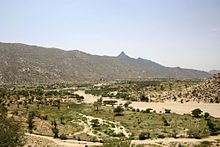
Keren was not fortified but it is surrounded on most sides by a jumble of steep granite mountains and sharp ridges which gave the defending forces on the high ground a distinct advantage. Control of the mountains provided the Italian artillery with perfect observation of an attack. The narrow Dongolaas Gorge at 15°45′34″N38°25′16.8″E / 15.75944°N 38.421333°E / 15.75944; 38.421333 (Dongolaas Gorge) through which the road and railway from Agordat to Keren passed was dominated on the south eastern side by the massif of Mount Zeban and Mount Falestoh on which stood the imposing defences of Fort Dologorodoc at 15°45′14.9″N38°25′30.6″E / 15.754139°N 38.425167°E / 15.754139; 38.425167 (Fort Dologorodoc). The other side of the gorge was commanded by the mass of Mount Sanchil with a saddle of secondary summits, Brig's Peak, Hog's Back and Flat Top stretching north-westwards toward Mount Sammana. In front of the Sanchil feature on its south western side was a secondary ridge, feature 1616, which became known as Cameron Ridge, overlooking the Ascidera Valley and the railway line.[9]
Northern front
The 5th Indian Infantry Division began to arrive in Sudan in early September 1940 and the 29th Indian Infantry Brigade was placed on the Red Sea coast to protect Port Sudan, the 9th Indian Infantry Brigade south-west of Kassala and the 10th Indian Infantry Brigade (William Slim) were sent to Gedaref with the divisional headquarters, to block an Italian attack on Khartoum from Goz Regeb to Gallabat, on a front of 320km (200mi). Gazelle Force (Colonel Frank Messervy) was formed on 16 October, as a mobile unit to raid Italian territory and delay an Italian advance.[10] Late on 30 January, Gazelle Force was ordered to make pursuit of the enemy retreating down the road to Keren.
As the British forces approached Keren, Brigadier-General Nicolangelo Carnimeo, commander of the 2nd Eritrean Division and the X Territorial Defence Command, drew in his 5th and 44th Colonial Brigades from positions to the north. 42nd Brigade had reached Keren from Agordat almost intact, and the 2nd Brigade—which had suffered greater casualties there—was reforming. The 11th Regiment of the Savoia Grenadiers and the Alpini battalion of the 10th Savoia Grenadiers had just arrived after a three-day non-stop truck journey from Addis Ababa while the 11th Colonial Brigade was also in place, having previously been called from reserve in Addis Ababa. Meanwhile, the 6th Brigade—having relinquished its responsibilities at Metemma—was also making its way to Keren.[11]
Sketch map of the Keren battlefield (not to scale)Keren battlefield todayIndian troops at a signal point in a fort overlooking Sanchil.
At 08:00 on 1 February 1941, Gazelle Force was held up in crossing the Baraka River about 60km (40mi) from Keren, where the Ponte Mussolini had been blown and the approaches to the river mined.[12] By noon on 2 February, they were across the river and winding up the Ascidera Valley, until brought to a halt at the Dongolaas Gorge, about 6km (4mi) from Keren, where the road had been blocked by the Italians, who blew down the overhanging crags, to fill the gorge with boulders and rocks.
The 11th Indian Infantry Brigade, (4th Indian Division) arrived on 3 February, reconnoitred the next day and attacked on the left of the gorge on 5 February. The 2nd Queen's Own Cameron Highlanders fought their way to the top of the ridge called feature 1616, in front of Sanchil and on the night of 6/7 February, the 3/14th Punjab Regiment passed through and advanced onto Brig's Peak. The Indians were counter-attacked by elements of the 65th Infantry Division "Granatieri di Savoia" (Grenadiers of Savoy) who forced them back towards Cameron Ridge, which was being consolidated by (Wellesley's) the 1st Battalion/6th Rajputana Rifles. The ridge was overlooked in front by Sanchil, to the left by Mount Sammana and from behind by other mountains along the Ascidera Valley. The Cameron Highlanders and Rajputana Rifles clung on, despite frequent attacks and having to carry food, water and ammunition up hill for 500m (1,600ft), across exposed terrain.[13]
By 6 February, the 5th Indian Infantry Brigade (4th Indian Division) had arrived and next day, attacked the Dologorodoc feature east of the gorge, looping right through the Scescilembi Valley (known as Happy Valley) and then attacking from the south-east toward Acqua Col joining Mount Zelele and Mount Falestoh. On the night of 7 February, a company of (Outram's) the 4th Battalion/6th Rajputana Rifles took the col until 4:30am, when they ran out of ammunition and were driven back to a lower feature. On 8 February, having spent most of the day under heavy artillery and mortar fire, they withdrew to their jumping-off positions.[14]
10–13 February
On the afternoon of 10 February, 3/1st Punjab Regiment attacked Brig's Peak and by the morning of 11 February were on top of Sanchil. The need for men to handle and carry supplies, ammunition and wounded meant there were only two platoons to hold the feature.[15] Having endured heavy shelling and mortar fire throughout the day, they were forced off Sanchil and Brig's Peak with heavy casualties by a determined counter-attack from the Savoia Grenadiers. Once again the attackers were thrown onto desperate defence on Cameron Ridge. Despite the failure by the Punjabis to hold the important observation posts on Sanchil, the renewed attack on Acqua Col—planned for 12 February—went ahead. The 29th Indian Infantry Brigade of the 5th Indian Infantry Division was brought up from Barentu and put under command of Major-General Beresford-Peirse (4th Indian Infantry Division) and held in readiness to exploit a break-through. At 05:30, supported by an intensive artillery barrage, the 4/6th Rajputana Rifles once again led the way. Richhpal Ram was less fortunate and having gained the crest, had a foot blown off and shortly thereafter was mortally wounded. He was awarded a posthumous Victoria Cross for his exploits on the Col. The 4/11th Sikh Regiment were pushing up around the side of Acqua Col but the attack could not be carried through, lacking the extra impact that might have come from the 2/5th Mahratta Light Infantry which had been diverted to reinforce the hard-pressed defences on Cameron Ridge.[15]
Platt decided to pause, regroup and train before making a further attempt at Keren. To release road transport to bring forward supplies for a new attack, the 5th Indian Infantry Division returned to Kessala where it could be maintained by the railhead for a period of intensive training until preparations were complete and the division could be brought forward again for the offensive. Skinners Horse and most of the Motor Machine Gun companies assembled in front of Arressa and Adi Ugri to pose a threat to the Italian line of reinforcement to Keren.[16] From the north, Briggsforce, comprising two battalions from the 7th Indian Infantry Brigade (Brigadier Harold Briggs) of the 4th Indian Infantry Division and two Free French battalions. After crossing the border into Eritrea on the Red Sea coast, Briggsforce had captured Karora and then moved south to take Kubkub. In late February, Marching Battalion nº 3 of the Free French Orient Brigade captured Kubkub, becoming the first French unit to engage in combat against Axis forces since the Fall of France. On 1 March, Briggsforce had broken through the Mescelit pass some 24km (15mi) north-east of Keren.[17] Briggsforce provided a third potential direction of attack to occupy the Keren defenders and created a threat to Massawa on the coast, pinning valuable reserves there.[18]
The 4th Indian Infantry Division (Major-General Noel Beresford-Peirse) concentrated on the Sanchil side of the gorge and the 5th Indian Infantry Division (Major-General Lewis Heath) brought forward from Kessala once again, on the Happy Valley side. The Keren defences had been reinforced with the arrival of 6th Colonial Brigade from Metemma and also the 11th Blackshirt Battalion of the Savoia Grenadiers. The defenders now totalled 25,000 facing an attacking force which had grown to more than 13,000.[18] Beresford-Pierce was to attack with the 11th Indian Brigade, expanded to five battalions, against the peaks of the Sanchil mass and 5th Brigade against Mount Sammana on the left of his front. On the 5th Division front, the Italian reinforcements on Dologorodoc meant Happy Valley was dominated by the defenders and the attackers' artillery had had to be withdrawn from their forward positions in the valley to safer locations.[18][19]
Without the artillery, it was no longer considered practical to continue the flanking attack through Acqua Col to threaten the Dologorodoc lines of supply. Instead, Heath determined that Fort Dologorodoc would be the main objective for his Indian 5th Infantry Division. Gaining the fort would not only give the attacking forces the artillery observation post to direct fire on both sides of the gorge but would expose the reverse slopes of the Dologorodoc mass (which had been immune to his artillery fire and so a haven to the defenders for supplies and reserves) to direct fire from the fort.[18][19] The two attacks were planned to take place one after the other on 15 March so that all of the artillery could be employed for the preliminary bombardment of them both. At the final meeting on 14 March with his commanders Platt said,
Do not let anybody think this is going to be a walkover. It is not. It is going to be a bloody battle: a bloody battle against both enemy and ground. It will be won by the side which lasts longest. I know you will last longer than they do. And I promise you I will last longer than my opposite number.[19]
15–27 March
At 07:00 on 15 March, the British and Commonwealth troops of 4th Indian Infantry Division attacked from Cameron Ridge making for Sanchil, Brig's Peak, Hog's Back and the three peaks of Mount Sammana. That night, the battle ebbed and flowed with attack and counter-attack inflicting very heavy casualties on both sides.[20] On the right, 5th Indian Infantry Division launched its attack on the Dologorodoc feature at 10:30 on 15 March. The 2nd Highland Light Infantry led the attack on the lower features ("Pimple" and "Pinnacle") but made no progress in the daylight because of fire from the overlooking Sanchil peak, where the Italian defenders had defeated the 11th Brigade assault. They were pinned down, suffering casualties and without supply until darkness provided the opportunity to withdraw.[19] By moonlight that evening, the attack on Dologorodoc was taken up by 9th Brigade, now commanded by the recently promoted Brigadier Messervy. Heath and Messervy planned a near two battalion attack on Pimple and Pinnacle, with a third battalion ready to pass through and attack the fort. The capture of Pinnacle that night by the 3/5th Mahratta Light Infantry led by Lieutenant-Colonel Denys Reid (with the 3/12th Frontier Force Regiment less two companies under command to take Pimple), was called
... one of the outstanding small actions of World War II, decisive in its results and formidable in its achievement... Next morning Messervy scrambled up Pinnacle to congratulate Reid and his Mahrattas and wondered how they had been able to scramble up with their equipment against fierce opposition, when he was finding it a pretty tough job without [either]... At the top, when he saw the victors, he was overcome by the splendour of their feat and his combative amber eyes filled with tears.[21]
In the early hours of 16 March, the defenders of Fort Dologorodoc counter-attacked Pinnacle and Pimple for several hours. The defences at the fort were depleted and during the counter-attack, the 2nd West Yorkshire Regiment made their way over a seemingly impossible knife-edge to surprise the defenders of the fort. The fort was captured after a determined defence by 06:30 with 40 prisoners taken.[19][22][23] Finally, Platt had the artillery observation point so greatly needed.
Through 16 March, the Italians counter-attacked while the 29th Brigade made an unsuccessful attack in the evening to Falestoh and Zeban, which was abandoned after dark on 17 March after a day exposed to blistering heat, fierce fighting and no supply.[22][19] For the next ten days, the 5th Indian Division position at Fort Dologorodoc—exposed to the enemy on three sides—was subject to intense fighting, as the Italians threw in more new units but failed to regain the position.[23]
On the Sanchil feature, the 4th Indian Division, with the 10th Indian Infantry Brigade under command, continued to batter away to no avail. On the night of 17/18 March, having suffered many casualties, they withdrew from the slopes of Sanchil and Brig's Peak and the 10th Brigade returned to the 5th Indian Division to reform. The 4th Indian Division continued to hold Hog's Back and Flat Top. Over the next three days, the Italian forces continued to counter-attacks on both sides of the gorge involving desperate, often hand to hand, fighting.[24]
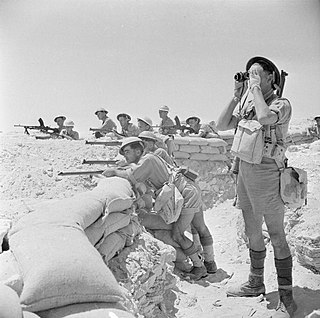
Indian soldiers in action before the capture of Keren in Eritrea, 1941.
Platt decided to regroup and concentrate his forces before attacking again and disbanded Gazelle Force (with Messervy taking over the 9th Indian Brigade) and brought the 5th Indian Infantry Division (which had been mopping up at Agordat) to the front. On 1 March his command was expanded by the arrival of Briggs Force from the north. Although it lacked the artillery for a big attack, Briggs Force drew off a significant part of the Keren garrison. This aided Platt's main offensive, which was being launched from the south-west. Briggs Force also menaced Massawa to the east, obliging the Italians to maintain a reserve on the coast.[25]
Platt and his commanders decided that the supreme attack should be made through the Dongolaas Gorge. Heath felt that, because of its physical defensive advantages, the Italians might have neglected its defence. On the nights of 16/17 and 17/18 March, escorted engineers reconnoitred the road block and attempted to make a start to clear it. This failed because of fire from the Italian lines. The information led Heath to decide that the key to the gorge was not Sanchil but two smaller features (the Railway Bumps) which overlooked the roadblock and could be approached, with much less opposition, along the railway line from the tunnel below Cameron Ridge.[26]
An attack on the defenders at the head of the gorge was planned to give the sappers and miners the 48 hours they needed, free of interference from mortar and machine gun fire, to clear the road. Heath had to wait until the 10th Indian Brigade had refitted after its mauling on the Sanchil feature. The plan was for the 10th Indian Brigade to advance into the gorge while the 9th Indian Brigade (which was holding the Fort Dologorodoc positions) would move down to take three smaller hills overlooking the far end of the gorge; The 29th Brigade would then attack to take Mount Zeban and Mount Canabai, beyond it to the east, which looked down on Keren and guarded the road to Asmara. Thomas "Pete" Rees was appointed to command the 10th Indian Brigade and his predecessor, Lieutenant-Colonel Bernard Fletcher was released to form Fletcher Force, a mobile force comprising the Central India Horse and six Matilda II tanks, which would be used to exploit the break-through in the gorge and move rapidly into the defenders' rear position to attack their reserves.[26]
On 24 March, diversionary attacks were made on Sanchil and just before midnight, the West Yorkshires and the 3/5th Mahrattas in Fort Dologorodoc moved down to take the lower hills overlooking the gorge. The West Yorkshires were able to take their hill unopposed but the Mahrattas met dug-in Italian opposition. By 07:30 the three hills were taken and the defences on the south eastern side of the gorge silenced.[26]
At 03:00 on 25 March, the 2nd Highland Light Infantry and the 4/10th Baluch Regiment on their right, advanced from the shelter of the railway tunnel, previously cleared by the sappers and miners, up the gorge. A hundred-gun artillery bombardment was raining down on the ridge on Sanchil above (to suppress any defensive fire from this dominating height) and the attack in the gorge achieved surprise, the defenders concentrating on Sanchil. The 3/2nd Punjab Regiment then advanced between the Baluchis and the West Yorkshires to clear the gorge. By 05:30, the railway bumps and most of the objectives were captured and the defenders no longer held positions from which to direct fire into the gorge below.[26][27]
The sappers and miners laboured on the road while the battles on the Sanchil and Dologorodoc features continued. By midday on 26 March, they had repaired the road through the gorge.[27] In the early hours of 27 March, the British artillery turned onto Zeban and Falstoh. The 29th Brigade passed through the 9th Indian Brigade to attack at 04:30 but found the defenders had withdrawn and were able to occupy Falestoh Ridge and the two Zeban summits unopposed.[26] The Italian position was untenable and by first light the Royal Air Force (RAF) was reporting their withdrawal along the road from Keren to Asmara. The defenders on the Sanchil ridge were less fortunate and the Savoia Grenadiers and Bersaglieri were cut off and left with no option but surrender. Fletcher Force was in Keren by 10:30 and was then sent in pursuit along the Asmara road.[26]
Aftermath
Analysis
Graves of unknown Eritrean Ascaris killed in 1941 during the Battle of Keren
From 27 March 1941, the route to Asmara and Massawa was open and Wavell was able to order the 4th Indian Division move to Port Sudan for transport back to Egypt. On 11 April, the US President, Franklin D. Roosevelt, rescinded the status of the Red Sea as a combat zone under the Neutrality Acts, freeing US merchant ships to use the route to carry supplies to the Middle East.[28]
Casualties
Ethiopians transporting supplies by camel through vegetation, 22 January 1941 (Photographer: FE Palmer, No 1 Army Film & Photographic Unit).
In the 4th Division history of 1948, Stevens gave 3,273 casualties, of whom about ten per cent were killed.[29] In 1951, Mackenzie wrote that in the final stages of the battle, the Italians had 5,000 casualties, of whom 1,135 men were killed.[24] In 1954, I. S. O. Playfair, the British official historian, recorded that Italian troops and Eritrean Ascari had 3,000 casualties.[30] In 1993, Raugh wrote that 3,000 Italian troops were killed and that British casualties were 536 men killed and 3,229 wounded.[31] An informal review of Bruttini and Puglisi (1957) found that about 3,000 Italian soldiers were killed, 4,500 wounded and sick, 9,000 Askari killed and nearly 20,000 wounded giving totals of 12,147 killed and 21,700 men wounded.[32]
Massawa
Rear-Admiral Mario Bonetti, commander of Italian Red Sea Flotilla and the garrison at Massawa, had 10,000 troops and about 100 tanks to defend the port.[33] During the evening of 31 March, three of the last six destroyers at Massawa put to sea, to raid the Gulf of Suez and then scuttle themselves but Leone ran aground and sank the next morning and the sortie was cancelled. On 2 April the last five destroyers left to attack Port Sudan and then sink themselves.[34] Heath telephoned Bonetti with an ultimatum to surrender and not block the harbour by scuttling ships. If this was refused, the British would leave Italian citizens in Eritrea and Ethiopia to fend for themselves. The 7th Indian Infantry Brigade Group sent small forces towards Adowa and Adigrat and the rest advanced down the Massawa road, which declined by 2,100m (7,000ft) in 80km (50mi) and the Indians rendezvoused with Briggs Force, which had cut across country, at Massawa by 5 April.[35]
Bonetti was called upon to surrender but refused again and on 8 April, an attack by the 7th Indian Infantry Brigade Group was repulsed. A simultaneous attack by the 10th Indian Infantry Brigade and the tanks of B Squadron 4th RTR broke through the defences on the west side. The Free French overran the defences in the south-west, taking Montecullo and Fort Umberto April 7 as the RAF bombed Italian artillery positions. Colonel Monclar of the 13th French Foreign Legion Demi-Brigade captured the Italian Admiralty building and accepted Bonetti's surrender, taking 9,590 prisoners and 127 guns. The harbour was found to have been blocked by the scuttling of two large floating dry docks, 16 large ships and a floating crane in the mouths of the north Naval Harbour, the central Commercial Harbour and the main South Harbour. The Italians had also dumped as much of their equipment as possible in the water. The British re-opened the Massawa–Asmara railway on 27 April and by 1 May, the port came into use to supply the 5th Indian Division.[35][lower-alpha 1] The Italian surrender ended organised resistance in Eritrea and fulfilled the strategic objective of ending the threat to shipping in the Red Sea.[28]
↑ Edward Ellsberg later wrote that after arriving in April, with a salvage crew and specialist equipment, the United States Naval Repair Base, Massawa opened on 8 May for repairs and maintenance.[36]
The First Battle of El Alamein was a battle of the Western Desert campaign of the Second World War, fought in Egypt between Axis forces of the Panzer Army Africa—which included the Afrika Korps under Field Marshal Erwin Rommel—and Allied forces of the Eighth Army under General Claude Auchinleck.
Gideon Force was a small British and African special force, a Corps d’Élite with the Sudan Defence Force, Ethiopian regular forces and Arbegnoch. Gideon Force fought the Italian occupation in Ethiopia, during the East African Campaign of the Second World War. The leader and creator of the force was Major Orde Wingate. At its peak, Gideon Force had fifty officers, twenty British NCOs, 800 trained Sudanese troops and 800 part-trained Ethiopian regulars, a few mortars but no artillery and no air support, except for intermittent bombing sorties.
Operation Battleaxe was a British Army offensive during the Second World War to raise the Siege of Tobruk and re-capture eastern Cyrenaica from German and Italian forces. It was the first time during the war that a significant German force fought on the defensive. The British lost over half of their tanks on the first day and only one of three attacks succeeded.
Operation Crusader was a military operation of the Western Desert Campaign during the Second World War by the British Eighth Army against the Axis forces in North Africa commanded by Generalleutnant (Lieutenant-General) Erwin Rommel. The operation was intended to bypass Axis defences on the Egyptian–Libyan frontier, defeat the Axis armoured forces near Tobruk, raise the Siege of Tobruk and re-occupy Cyrenaica.
The East African campaign was fought in East Africa during the Second World War by Allies of World War II, mainly from the British Empire, against Italy and its colony of Italian East Africa, between June 1940 and November 1941. The British Middle East Command with troops from the United Kingdom, South Africa, British India, Uganda Protectorate, Kenya, Somaliland, West Africa, Northern and Southern Rhodesia, Sudan and Nyasaland participated in the campaign. These were joined by the Allied Force Publique of Belgian Congo, Imperial Ethiopian Arbegnoch and a small unit of Free French Forces.
The Battle of Gazala was fought during the Western Desert Campaign of the Second World War, west of the port of Tobruk in Libya, from 26 May to 21 June 1942. Axis troops of the Panzerarmee Afrika consisting of German and Italian units fought the British Eighth Army composed mainly of British Commonwealth, Indian and Free French troops.
The Syria–Lebanon campaign, also known as Operation Exporter, was the invasion of Syria and Lebanon in June and July 1941 by British Empire forces, during the Second World War.
The 5th Indian Infantry Division was an infantry division of the Indian Army during World War II that fought in several theatres of war and was nicknamed the "Ball of Fire". It was one of the few Allied divisions to fight against three different armies - the Italian, German and Japanese armies.
The Battle of Damascus was the final action of the Allied advance on Damascus in Syria during the Syria–Lebanon campaign in World War II.
General Sir William Platt was a senior officer of the British Army during both the First and the Second World Wars.
Lieutenant General Sir Harold Rawdon Briggs, was a senior British Indian Army officer, active during the First World War, Second World War and the Malayan Emergency.
The Italian invasion of British Somaliland was part of the East African campaign (1940–1941) in which Italian, Eritrean and Somali forces of Fascist Italy entered the Somaliland Protectorate and defeated its garrison of British, Commonwealth and colonial forces supported by Somali irregulars. The Italian victory was based on mobility and speed but was hampered by the terrain, rainy weather and British resistance.
The Sussex Yeomanry is a yeomanry regiment of the British Army dating from 1794. It was initially formed when there was a threat of French invasion during the Napoleonic Wars. After being reformed in the Second Boer War, it served in the First World War and the Second World War, when it served in the East African Campaign and the Siege of Tobruk. The lineage is maintained by 1 Field Troop, 579 Field Squadron (EOD), part of 101 (London) Engineer Regiment (Volunteers).
The Italian invasion of Egypt was an offensive in the Second World War, against British, Commonwealth and Free French in the neutral Kingdom of Egypt. The invasion by the Italian 10th Army ended border skirmishing on the frontier and began the Western Desert Campaign (1940–1943) proper. The Italian strategy was to advance from Libya along the Egyptian coast to seize the Suez Canal. After numerous delays, the scope of the offensive was reduced to an advance as far as Sidi Barrani and the engagement of any British forces in the area.
The 3rd Indian Motor Brigade was formed in 1940 by the Indian Army during World War II. In 1941, the brigade was surrounded at Mechili by Axis forces during Operation Sonnenblume and suffered many casualties breaking out of the encirclement. One cavalry regiment took part in the Siege of Tobruk and then the brigade was reconstituted in Egypt. In August, the brigade, under Brigadier A. A. E. Filose, was re-equipped at Mena in Egypt and in September moved to north-east Syria. In May 1942, during the Battle of Gazala the brigade held a defensive box at Point 171 near Bir Hakeim and was again overrun by units of the Afrika Korps and Italian forces. On 28 May, the remnants of the brigade were sent back to Buq Buq to reform and about 800 of the men taken prisoner rejoined soon afterwards. The Axis had released 600 prisoners from captivity after 48 hours, due to a water-shortage, who reached the Free French fighting the Battle of Bir Hakeim (26 May – 11 June) and another 200 men were liberated by a British column.
The Attack on Nibeiwa took place on 9 December 1940 near Nibeiwa, Egypt, when the Italian fortified camp held by the Maletti Group, the armoured force of the 10th Army, was overrun by British and Indian troops. The attack was the opening engagement of Operation Compass, a British raid which, if successful, would be followed up to try to expel the Italians from Egypt. Italy had declared war on France and Britain on 10 June and in the Italian invasion of Egypt from 9 to 16 September 1940, the Italian 10th Army had reached the port of Sidi Barrani and dug in to await the completion of the Via della Vittoria, an extension of the Via Balbia, being built from the frontier. The Maletti Group garrisoned a camp at Nibeiwa,12 mi (19 km) south of the port of Sidi Barrani.
Operations on the Northern front, East Africa, 1940 in the Second World War, were conducted by the British in Sudan and the Armed Forces Command of Italian East Africa in Eritrea and Ethiopia. On 1 June 1940, Amedeo, Duke of Aosta the Viceroy and Governor-General of the Africa Orientale Italiana, commander in chief of the Armed Forces Command of the Royal Italian Army and General of the Air Force, had about 290,476 local and metropolitan troops and by 1 August, mobilisation had increased the number to 371,053 troops. General Archibald Wavell, General Officer Commanding-in-Chief (GOC-in-C) of Middle East Command, had about 86,000 troops at his disposal for Libya, Iraq, Syria, Iran and East Africa. About 36,000 troops were in Egypt and 27,500 men were training in Palestine.
The Battle of Agordat was fought near Agordat in Eritrea from 26 to 31 January 1941, by the Italian army and Royal Corps of Colonial Troops against British, Commonwealth and Indian forces, during the East African Campaign of the Second World War. The British had the advantage of breaking Italian codes and cyphers before the offensive and received copious amounts of information from Italian sources on the order of battle and plans of the Regia Aeronautica and the Italian army.
The Order of battle, Keren 1941 shows Italian army forces that participated in the Battle of Keren from February to March 1941 and British troops in Sudan on 20 January 1941, which participated in military operations against Eritrea during the East African Campaign 1940–1941.
The Battle of Tug Argan was fought between forces of the British Empire and Italy from 11 to 15 August 1940 in the Somaliland Protectorate. The battle determined the result of the Italian invasion of British Somaliland and the larger East African Campaign of the Second World War.
References
Brett-James, A. (1951). Ball of Fire: the Fifth Indian Division in the Second World War. Aldershot: Gale & Polden. OCLC4275700.
Bruttini, A.; Puglisi, G. (1957). L'Impero tradito (in Italian). Florence: La Fenice. OCLC493309049.
Mackenzie, C. (1951). Eastern Epic: September 1939 – March 1943 Defence. London: Chatto & Windus. OCLC634226581.
Playfair, I. (1954). The Mediterranean and Middle East: The early successes against Italy (to May 1941). London: HMSO. OCLC1067716752.
Prasad, B. (1963). Official history of the Indian Armed Forces in the second World War. Calcutta: Inter-Services Historical Section. OCLC606083160.
Raugh, H. E. (1993). Wavel in the Middle East, 1939–1941. London: Brassey's. ISBN978-1-57488-640-5.
Schreiber, G. (1995). Mediterranean, South-east Europe and North Africa, 1939–41. Germany and the Second World War. Vol.3. Oxford: Clarendon. ISBN978-0-19-822884-4.
Stevens, George Roy (1948). Fourth Indian Division. London: McLaren. OCLC35243128.
This page is based on this Wikipedia article Text is available under the CC BY-SA 4.0 license; additional terms may apply. Images, videos and audio are available under their respective licenses.