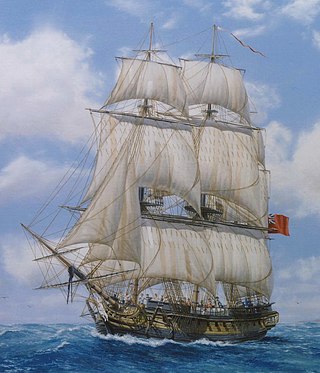
The Battle of Tory Island (sometimes called the Battle of Donegal, Battle of Lough Swilly or Warren's Action) was a naval action of the French Revolutionary Wars, fought on 12 October 1798 between French and British squadrons off the northwest coast of County Donegal, then in the Kingdom of Ireland. The last action of the Irish Rebellion of 1798, the Battle of Tory Island ended the final attempt by the French Navy to land substantial numbers of soldiers in Ireland during the war.
The Society of United Irishmen, led by Wolfe Tone, launched an uprising against British rule in Ireland in May 1798. At the request of the rebels, a small French force under General Humbert was landed at Killala, County Mayo, but by early September both this expedition and the rebellion had been defeated. Unaware of Humbert's surrender, the French despatched reinforcements on 16 September. Having missed one invasion force, the Royal Navy was on alert for another, and when the squadron carrying the reinforcements left Brest they were soon spotted. After a long chase, the French were brought to battle in a bay off the rugged County Donegal coast in the west of Ulster, very close to Tory Island. During the action the outnumbered French attempted to escape, but were run down and defeated piecemeal, with the British capturing four ships and scattering the survivors. Over the next fortnight, British frigate patrols scoured the passage back to Brest, capturing three more ships. Of the ten ships in the original French squadron, only two frigates and a schooner reached safety. British losses in the campaign were minimal.
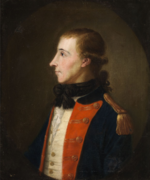
The battle marked the last attempt by the French Navy to launch an invasion of any part of the British Isles. It also ended the last hopes the United Irishmen had of obtaining outside support in their struggle with the British. After the action, Tone was recognised aboard the captured French flagship and arrested. He was brought ashore by the British at Buncrana, on the InishowenPeninsula. He was later tried for treason, convicted, and committed suicide while in prison in Dublin, hours before he was to be hanged.
Britain's enemies in continental Europe had long recognised Ireland as a weak point in Britain's defences. Landing troops there was a popular strategic goal,[3] not only because an invader could expect the support of a large proportion of the native population,[3] but also because at least initially they would face fewer and less reliable troops than elsewhere in the British Isles. Additionally, embroiling the British Army in a protracted Irish campaign would reduce its availability for other theatres of war.[4] Finally, French planners considered that a successful invasion of Ireland might act as the ideal platform for a subsequent invasion of Great Britain.[5]
The rhetoric of the French Revolution inspired many Irishmen to fight for similar principles of liberty, equality, and brotherhood in their own nation; liberty in this context largely meant independence from Great Britain.[6] With these goals in mind, in 1791 Dublin lawyer Wolfe Tone founded the Society of United Irishmen. Allying itself with the French Republic, the society was suppressed by the British authorities and forced to go underground when war broke out between France and Great Britain in 1793.[7] Tone and other members secretly travelled to France to convince the French National Convention to invade Ireland. Such an invasion, they argued, could rely on support from large numbers of Irish irregulars, and if successful would strike a severe blow to the British war effort—perhaps even severe enough to force Britain to seek peace.[8]
Invasion attempts
French political divisions made organising an operation against Ireland difficult. The process was further hampered by the French Atlantic Fleet's defeat in 1794 at the Glorious First of June and the disastrous Croisière du Grand Hiver operation in 1795. Having lost many of its best officers during the political purges of The Terror, these defeats bred a negative mentality in the French Navy, discouraging adventurous strategic thinking.[9] Eventually, the Expédition d'Irlande was despatched in December 1796 under AdmiralMorard de Galles, consisting of 17 ships of the line and 27 smaller vessels, and carrying as many as 25,000 men.[10] Despite elements of the force spending up to a week in Bantry Bay, not a single French soldier was successfully landed,[11] and the expedition was a total disaster, with 13 ships lost and over 2,000 men drowned.[9]
The following year, Tone and his companions tried again, this time persuading the government of the Batavian Republic, which was under French occupation, to prepare their own expedition.[12] During 1797, the Dutch fleet was readied and provisioned, intending to combine with the French fleet and launch a second invasion attempt. The Batavian fleet sailed on a preparatory raiding cruise in the North Sea in October 1797 and on their return were confronted off the Dutch coast by the Royal Navy's North Sea Fleet under AdmiralSir Adam Duncan. Duncan immediately attacked, and in the ensuing Battle of Camperdown captured or destroyed ten ships and scattered the rest, ending the Batavian invasion threat.[13]
Rebellion of 1798
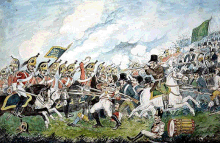
Hoping to capitalise on the spontaneous uprising that spread across Ireland in May 1798, CommodoreDaniel Savary led a third, and more successful, effort. He took a small frigate squadron flying false British colours to Killala, and in August landed 1,150 French troops under General Humbert.[14] A larger force would have been despatched, but the French had been caught unprepared—the Irish rebellion had originally been planned to coincide with a later French landing, but British intelligence operations had infiltrated the United Irishmen and arrested much of its leadership, prompting a precipitate revolt.[7] Although the uprising achieved some early successes, by the time Humbert arrived its outcome had already been decided with the defeat of successive rebel armies by British troops. Humbert's force was joined by many United Irishmen and had some initial success, but was unable to face superior British numbers at the Battle of Ballinamuck, and surrendered on 8 September.[15] Although its small size allowed it to reach Ireland unobserved, neither Savary's frigate squadron nor the army it carried were large enough to have a significant impact on the campaign.[16]
Map of Ireland with Tory Island and the battle location shown
Unaware that Humbert had surrendered and the rebellion been defeated, the French prepared a follow-up expedition under the command of CommodoreJean-Baptiste-François Bompart.[16] Three thousand men were embarked aboard the ship of the line Hoche and eight frigates, the force departing Brest on 16 September. However, having missed Savary's frigate squadron, the Royal Navy were more watchful; roving frigate patrols cruised off the principal French ports and in the approaches to Ireland, while squadrons of battleships from the Channel Fleet sailed nearby, ready to move against any new invasion force. In command of the squadron on the Irish station was CommodoreSir John Borlase Warren, a highly experienced officer (and politician) who had made a name for himself raiding the French coast early in the war.[17]
Aware of the British pursuit, Bompart nevertheless continued to the north. Countess followed closely, and was joined on 18 September by HMS Amelia under CaptainCharles Herbert. Initially north of the French, Amelia had spotted the chase the previous day and caught up during the night by passing silently through Bompart's squadron.[19] The next day, Bompart attempted to throw off his pursuers by feinting towards Lorient, and again the following day by feinting south, as if travelling towards the Antilles. However, the British captains remained on track, and by 20 September were only nine miles from Bompart's force, which was continuing south-west as though sailing for the Americas. HMS Anson, a large razee frigate under CaptainPhilip Charles Durham, joined the British force on 20 September.[20]
Despite Bompart's attempts to disguise his destination, by the evening of 23 September Countess had correctly deduced the French were heading for Ireland, and despatched the brigSylph to warn Commodore Warren and any other British ships she came across.[20] Two days later, on 25 September, Commodore Bompart was forced to haul to the east and lose ground to his pursuers when a 100-ship British convoy passed to the north. This convoy consisted of many well-armed East Indiamen, protected by several frigates, and posed a serious threat to Bompart's overloaded ships.[19] He then tried to drive off pursuit by feinting towards Countess's squadron, but the faster British ships simply withdrew to a safe distance, resuming their chase once the French had returned to their original course. On 29 September Bompart made a final bid to shake his pursuers; he attempted to engage the British frigates with three of his own—Immortalité, Loire and another. This plan failed after his flagship Hoche lost a topmast in heavy weather and fell behind the rest of the squadron, forcing the frigates to return to her protection.[19]
Unable to escape, Bompart finally abandoned his pretence of sailing for the Americas and instead turned north-west. During the next day high winds cost both Hoche and Anson a topmast, slowing both squadrons, but the repairs to Hoche were conducted faster and the French were able to pull ahead. For four more days pursuit continued directly north, until 4 October, when a storm descended and Bompart successfully outran Countess in the increasing darkness.[21] In the high winds, Amelia was driven off course and away from her compatriots on 7 October while Anson again suffered damage, this time losing two topmasts.[22]
On 11 October the weather cleared, and spotting two sails to the south, Countess took Ethalion to investigate. The ships were Amelia and a ship of the line of Warren's squadron, who having received Sylph's warning on 23 September, was sailing north in an attempt to intercept the French.[23] Warren's squadron of three ships of the line and the razee frigate HMS Magnanime had been joined the day before by two additional frigates stationed at Lough Swilly; HMS Melampus under CaptainGraham Moore and HMS Doris under CaptainLord Ranelagh. Warren attached Melampus to his squadron and detached Doris to scout along the Irish coast and warn the British garrisons, especially along the coast of County Donegal and the North-West of Ireland region generally. Doris was also to scout along part of the coast of the West of Ireland region, further south, where the previous French landing had been effected at Killala.[22]
Warren's pursuit
Having finally eluded his pursuers, Bompart made directly for Lough Swilly where the landing was scheduled to take place.[24] Unaware of the rebellion's defeat, he hoped that Humbert's army would be operating in the Lough Swilly area, as intended in the campaign planned before Humbert left France.[25] Arriving off the coast, Bompart searched for a suitable landing site but was unable to find one before dark on 10 October. He waited out the night close to Tory Island, but was surprised the next day by sails on the horizon; Warren's squadron had been joined by Countess's ships, and an overwhelming force was bearing down on the French. Abandoning all notions of landing the troops, Bompart hauled his ships close to the wind to give them room to manoeuvre and allow their captains as much opportunity as possible to escape the approaching British.[14]
Throughout the day, Warren's squadron closed from the north-east while Bompart made frantic efforts to reach open water. Both fleets were hindered by a gale which swept the sea shortly before 20:00. All three of Hoche's topmasts were blown down and her mizzensail shredded, leaving her substantially slower than her compatriots and forcing them to hold back in her defence.[26] Other ships suffered too, as the French Résolue sprang a severe leak and HMS Anson lost her mizzenmast and several topmasts.[27]
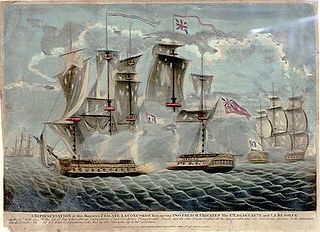
During the night, Bompart attempted to decoy the British by sending the schooner Biche with orders for the frigate Résolue, commanding Captain Jean-Pierre Bargeau to beach his ship and fire flares in the hope of distracting Warren from his pursuit. For unknown reasons this order was never carried out, and in the morning Warren was still hard behind Bompart, whose ships were now sailing in two uneven lines.[28] Warren's force was even more dispersed, with HMS Robust and HMS Magnanime4 nautical miles (7.4km) astern of the French and gaining fast, Amelia and Melampus shortly behind them and Warren's flagship HMS Canada with HMS Foudroyant under CaptainSir Thomas Byard, Kt., 8 nautical miles (15km) from the enemy. The other British ships were scattered throughout this formation except Anson, which was wallowing to the rear, far out of sight.[I]
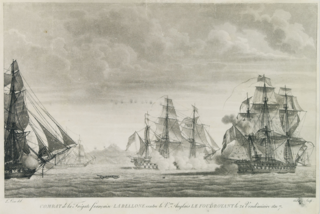
Realising that he could not escape and would have to fight his way past the British, Bompart formed his squadron into a battleline and turned westwards, waiting for Warren's signal for the attack.[2] Because of the dispersed nature of his squadron, Warren did not issue this signal until 07:00, when he ordered Robust to steer for the French line and attack Hoche directly.[29]CaptainEdward Thornbrough of Robust obeyed immediately and closed with the French, firing into the frigates Embuscade and Coquille as he passed, before closing with Hoche and, at 08:50, beginning a bitter close-range artillery duel.[30] Minutes later Magnanime joined the action, firing on the rear frigates and engaging the French van of Immortalité, Loire and Bellone, which had worn out of the line in an attempt to rake her.[27] The next three British ships into action, Ethalion, Melampus and Amelia, all raked the isolated Hoche as they passed, before pressing on sail to pursue the French frigates, now making distance to the south-west.[31]Canada and the subsequent British ships all ignored Hoche except to fire a few distant shots. By the time they passed, the ship was clearly a wreck, having been pounded repeatedly by Robust and Magnanime. Bompart finally surrendered at 10:50 with 270 of his crew and passengers killed or wounded.[2]
Embuscade was the next to surrender, having been battered in the opening exchanges by Magnanime, and further damaged by long-range fire from Foudroyant during the pursuit. Overhauled by several larger British ships, Captain de la Ronciére surrendered at 11:30 rather than allow his ship to be destroyed.[32]Magnanime, suffering the effects of her engagement with Hoche, took possession of Embuscade and continued to follow slowly behind the rest of the fleet, while Robust, which had suffered severely in her duel with Hoche, remained alongside her erstwhile opponent to take possession. The direction of the French squadron's flight, following the direction of the wind, took them across the path of the straggling British ships, beginning with the Foudroyant.[32] Most of the frigates were able outrun this ponderous enemy, but Bellone was less fortunate and a speculative shot from the battleship detonated a case of grenades in one of her topmasts. This began a disastrous fire which was eventually brought under control, but at a significant cost in speed. She was soon closely attacked by Melampus and suffered further damage. Nearby, the struggling Coquille surrendered after being outrun by the approaching Canada; Warren ordered the slowly following Magnanime to take possession.[32]
Ethalion took over pursuit of Bellone from Melampus, and for two hours maintained continuous fire with her bow-chasers on the French ship. Ethalion was faster than her quarry, and she slowly pulled parallel with Bellone during the afternoon, but could not get close enough for a decisive blow. It took another two hours of pursuit before the battered Bellone eventually surrendered.[33]Hoche apart, Bellone had suffered more casualties than any other ship present. To the south of this conflict, the struggling Anson discovered herself in danger when the surviving frigates of the French vanguard swept towards her en masse. Captain Durham was initially confused by their approach as he had been too distant to witness the action and the French ships flew false British ensigns, but he rapidly realised their true identity and at 16:00 opened fire on Loire.[33] The damaged Anson was severely hampered by her inability to manoeuvre, and so could do nothing when the French ships pulled back and sailed away, except to continue to fire until they were out of range. During the evening, the surviving French frigates gradually pulled away from their pursuers and disappeared into the gathering night, leaving behind four of their squadron, including their flagship, as captives.[34]
Chase
By nightfall some of the remaining French ships had entered Donegal Bay with Canada, Melampus and Foudroyant still in pursuit. The two forces repeatedly passed one another in the dark, and Canada almost drove ashore. Back at the battle site, Warren had ordered Robust to tow Hoche into Lough Swilly—this order later came under criticism, as Robust was in a battered state herself and the storms of the previous week had not abated.[30] When a gale struck the pair on 13 October, Hoche lost several masts and broke her tow, only being prevented from foundering by the combined efforts of the British prize crew and their French prisoners.[35] Eventually, on 15 October, Doris appeared and took Hoche in tow, arriving in Lough Swilly without further incident a few days later. Meanwhile, Ethalion saw Bellone safely into port, and Magnanime and Amelia brought in Coquille and Embuscade respectively.[35]
Melampus and Résolue
On the morning of 13 October, Warren sighted two of the French frigates standing out of Donegal Bay and went after them, directing Moore in Melampus to stay behind to search for stragglers.[34] Hindered by contrary winds, Melampus scoured the bay until well after nightfall, and at 23:30 was surprised by the sudden appearance directly in front of her of Immortalité and Résolue near St. John's Point. Immortalité soon spotted Melampus and made sail, but Captain Bargeau of Résolue had not seen the British ship, and was hesitant about following his compatriot in the dark.[36] In the gloom and confusion, he mistook Melampus for Immortalité and came alongside, only realising his mistake when Melampus opened fire. Because of the heavy seas, Résolue's guns had been tied down below decks, so the only return fire she could offer was from her handful of quarterdeck guns. Bargeau, whose ship was still leaking badly, recognised that further resistance was futile and surrendered in minutes, having lost ten men and much of his rigging. Melampus put aboard a prize crew and then departed in pursuit of Immortalité.[36]
Flight of Loire
Loire and Sémillante had escaped from the battle, heading south into Blacksod Bay on the coast of County Mayo, down in the West of Ireland, where they hoped to hide until they had a clear passage back to France. However, late on 15 October, a British frigate squadron under James Newman-Newman rounded the southern headland of the bay, forcing the French ships to flee to the north.[37] Pressing on sail in pursuit, Newman ordered HMS Révolutionaire to focus on Sémillante whilst he pursued Loire in HMS Mermaid, accompanied by the brig HMS Kangaroo under CommanderEdward Brace. Loire and Sémillante separated to divide their pursuers; Mermaid and Kangaroo lost track of Loire in the early evening, and Sémillante evaded Révolutionaire after dark.[38]
However, on the morning of 16 October Newman spotted Loire on the horizon and immediately ordered his ships in pursuit. Loire was faster than Mermaid in the high winds but was unable to outrun Kangaroo, which directly engaged the far larger frigate in a distant artillery duel. The difference in weight of shot between the combatants was greatly unbalanced, and Kangaroo eventually fell behind after suffering damage to her rigging.[37]Loire too had been damaged, and by 06:45 the following morning Captain Segond realised he could not escape his pursuers and instead shortened sail, intending to engage Mermaid—by then the only pursuer still within reach.[38]
Mermaid and Loire joined battle at 07:00, and the artillery exchange became close and furious after a boarding attempt by Loire was foiled by the helmsman of the British ship. Both ships took severe damage, Mermaid knocking away several of her opponent's spars, but suffering in turn from the musketry of the soldiers still aboard the Loire. At 09:15, the French vessel lost another spar, and Newman determined to rake his opponent. As he attempted to complete this manoeuvre, a shot from Loire brought down Mermaid's mizzenmast, making her unmanageable and disabling a number of her guns.[39] Seeing an opportunity to escape, the battered Loire disengaged, making significant distance before Newman's crew could clear the wreckage of the mast. High winds further hampered Mermaid's repair efforts by tearing away several sails and spars and drowning the ship's carpenter when he was blown overboard. By the time Mermaid was ready for action once more, Loire had escaped.[38]
Unfortunately for Captain Segond, when dawn broke on 18 October, HMS Anson was revealed only a short distance off, limping southwards after the damage its rigging and masts had suffered before the battle on 12 October.[40] Although his ship was almost unmanageable, Captain Durham was not prepared to lose a second opportunity to engage, and slowly brought his vessel to bear on Loire, which was unable to escape.[41] Accompanying Anson was Kangaroo, recovered from the damage of 16 October and ready for further action. At 10:30, Anson and Loire began firing on one another, neither able to effectively manoeuvre and both relying on firepower to overwhelm their opponent. Kangaroo closed on the unprotected stern of Loire, firing as she did so and repeatedly raking the immobile French ship.[38] By 12:00 Loire had lost her mainmast and was leaking badly, forcing Segond to surrender. His ship was towed to port as the sixth prize of the campaign.[42]
Fisgard and Immortalité
The four remaining survivors of the French fleet had mostly avoided pursuit, and by 19 October were nearing Brest in Brittany independently, hoping to slip through the tight British blockade around the harbour. Captain Mathieu-Charles Bergevin on Romaine had attempted to land the troops aboard his ship in Ireland on 13 October, but was forced to abandon this plan when the soldiers refused to be put ashore. He then sailed southwest and successfully avoided all contact with British forces, joining with the schooner Biche and arriving at Brest on 23 October. The same day, after outrunning Révolutionaire's pursuit, Sémillante arrived in Lorient—the last French ship to return home.[43]
Immortalité almost reached safety. On the morning of 20 October, Captain Jean-François Legrand was approaching Brest when he was spotted by CaptainThomas Byam Martin of HMS Fisgard. Fisgard, part of the inshore squadron of the Brest blockade, immediately offered battle. Immortalité initially attempted to flee but was forced to engage the faster Fisgard at 11:00.[44] During the bitter, close–range action, Fisgard took severe damage and almost lost her opponent. Immortalité, which had lost a mast and was in a sinking condition, surrendered at 15:00. Among the 115 casualties aboard Immortalité were Captain Legrand, his first lieutenant and General Monge (commander of the 250 soldiers on board), all dead. Fisgard, with the aid of other ships of the blockade squadron, successfully brought her prize into port.[44]
Savary's squadron
The French high command had not been idle during the destruction of their invasion force, and had prepared and despatched a second squadron of four frigates under CommodoreDaniel Savary. This force was initially ordered to support Bompart, but was later tasked with escorting the squadron's survivors back to France.[45] On 27 October, Savary learnt of the destruction of both Bompart's squadron and the Irish rebellion from sympathetic locals at Killala, and turned immediately south, hoping to avoid a similar fate. However, on 28 October, he was spotted by a three-ship squadron under CaptainSir James Saumarez, which included two ships of the line.[46] Saumarez immediately gave chase, and the squadrons exchanged long-distance cannon fire throughout the day. Late in the evening Saumarez's flagship HMS Caesar lost its foretopmast in strong winds, and command passed to Sir Richard Bickerton, 2nd Baronet, in HMS Terrible.
After another day's chase, late on 29 October Savary divided his squadron, sending two frigates to the south east and turning north west with two more. In response, Bickerton split his force, sending the frigate HMS Melpomene after the southern group and following Savary himself in Terrible. By 30 October, both British ships were within 2 nautical miles (3.7km) of their opponents and were preparing for action, when at 17:00 a severe storm lashed the area. Savary's ships had been extending their pursuit by throwing guns, horses and equipment overboard in an effort to lighten their ships, and were consequently better suited to the high winds.[47] The heavier British ships were unable to match their opponents' speed and fell behind. When the weather cleared, the French ships were out of sight, and all four eventually returned independently to Brest, ending the final French attempt to invade Ireland.[45]
An abortive effort to support the French invasion fleet was also made by the Navy of the Batavian Republic, which despatched the small frigates Furie and Waakzaamheid to Ireland with military supplies on 24 October. Within hours of leaving port, both these ships were intercepted and captured by the British frigate HMS Sirius under the young CaptainRichard King at the action of 24 October 1798.[38]
Savary's return to port marked the end of the last attempt by a continental nation to land troops in Ireland. French losses in the operation were so severe that a repeat effort was never seriously contemplated. Similarly, the huge Irish losses during the rebellion, combined with British reprisals against the Irish populace, ended any hopes of reigniting the uprising in the near future.[2] Most serious of all for the United Irishmen was the arrest of Wolfe Tone himself, who was discovered among the prisoners taken from Hoche at Buncrana. Tone was charged with treason and sentenced to death, though he committed suicide in Dublin before the sentence could be carried out.[48]
In Britain the engagement was considered a great success, with the thanks of Parliament bestowed on the entire force.[1] Numerous junior officers were promoted and all crew members received financial rewards from the sale of the captured vessels. Of these prizes, Immortalité and Loire were purchased and served in the Royal Navy under their own names for many years, while Hoche and Embuscade were renamed HMS Donegal and HMS Ambuscade respectively. Coquille was intended for purchase but suffered a catastrophic ammunition explosion in December 1798, which killed 13 people and totally destroyed the vessel.[1] The last two prizes, Résolue and Bellone, were deemed too old and damaged to be worthy of active service. They were, however, purchased by the Royal Navy to provide their captors with prize money, Bellone becoming HMS Proserpine and Résolue becoming HMS Resolue. Both ships served as harbour vessels for some years until they were broken up.[49] Five decades later, the battle was among the actions recognised by the clasp, "12th October 1798", attached to the Naval General Service Medal, awarded upon application to all British participants still living in 1847.[50]
Notes
I.^ The actual line and direction of the British approach has not been conclusively established due to the vagueness of Warren's post-battle report. Richard Brooks discusses these discrepancies and concludes that Warren's squadron, although widely dispersed, was probably approaching from approximately the north-west, from the North Atlantic towards Ireland. (Brooks, p.626)
Related Research Articles
HMS Arethusa was a 38-gun Minerva-class fifth-rate frigate of the Royal Navy built at Bristol in 1781. She served in three wars and made a number of notable captures before she was broken up in 1815.
The action of 23 April 1794 took place between a British squadron of five frigates under the command of Sir John Borlase Warren and three frigates and a corvette under the command of Chef d'escadre F. Desgarceaux during the French Revolutionary Wars. Three of the French ships were captured.
HMS Magnanime was a 64-gun third-rate ship of the line of the Royal Navy, launched on 14 October 1780 at Deptford Dockyard. She belonged to the Intrepid-class designed by Sir John Williams and later was razeed into a 44 gun frigate.
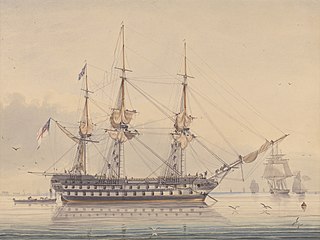
HMS Donegal was launched in 1794 as Barra, a Téméraire class 74-gun ship of the line of the French Navy. She was renamed Pégase in October 1795, and Hoche in December 1797. The British Royal Navy captured her at the Battle of Tory Island on 12 October 1798 and recommissioned her as HMS Donegal.
Bellone was an Iphigénie-class 32-gun frigate of the French Navy on plans by Léon-Michel Guignace. She took part in the American Revolutionary War in the Indian Ocean with the squadron under Suffren, and later in the French Revolutionary Wars. She was present at the Glorious First of June.
The Battle of Tory Island was a naval action fought on 12 October 1798 off the north coast of Ireland. The battle contested an attempted French invasion of Donegal in support of the Irish Rebellion of 1798, with a French squadron under Jean-Baptiste-François Bompart facing a hastily assembled Royal Navy blockade squadron under Sir John Borlase Warren. Bompart's force had been dispatched from Brest the month before with orders to reinforce a French army under Jean Humbert which had landed two months earlier.
Rear-Admiral George Countess (1743–1811) was an officer of the British Royal Navy who saw extensive service in the French Revolutionary and Napoleonic Wars. Made captain in 1790, he was in command of HMS Charon in 1794 and witnessed the Glorious First of June from her, although she was not engaged as she was a hospital ship. In 1798, Countess was instrumental in hunting down the French squadron under Jean-Baptiste-François Bompart. This squadron was intending to invade Ireland, and it was only the perseverance of Countess in HMS Ethalion which led the squadron under Sir John Borlase Warren right to the French. Countess was heavily engaged at the victory of the Battle of Tory Island which followed and was given large financial rewards for this service. In 1799 he captured two French 18-gun privateers cruising off Ireland.
Captain James Newman-Newman (1767–1811) of the British Royal Navy was an officer who served in numerous actions with distinction during the French Revolutionary and Napoleonic Wars before his death in the wreck of his ship of the line HMS Hero, which was lost with two other battleships off the Northern European coast during a storm in December 1811. Over 2,000 sailors lost their lives.
Loire was a 38-gun frigate of the French Navy. She was captured following the Battle of Tory Island by a Royal Navy frigate squadron and subsequently taken into British service as HMS Loire.
Résolue was an Iphigénie-class 32-gun frigate of the French Navy. The British captured her twice, once in November 1791 during peacetime, and again in 1798. The Royal Navy hulked her in 1799 and she was broken up in 1811.
HMS Ethalion was a 38-gun Artois-class fifth-rate frigate of the Royal Navy. She was built by Joseph Graham of Harwich and launched on 14 March 1797. In her brief career before she was wrecked in 1799 on the French coast, she participated in a major battle and in the capture of two privateers and a rich prize.
HMS Melampus was a Royal Navy fifth-rate frigate that served during the French Revolutionary and Napoleonic Wars. She captured numerous prizes before the British sold her to the Royal Netherlands Navy in 1815. With the Dutch, she participated in a major action at Algiers and, then, in a number of colonial punitive expeditions in the Dutch East Indies.
The French expedition to Ireland, known in French as the Expédition d'Irlande, was an unsuccessful attempt by the French Republic to assist the outlawed Society of United Irishmen, a popular rebel Irish republican group, in their planned rebellion against British rule during the French Revolutionary Wars. The French intended to land a large expeditionary force in Ireland during the winter of 1796–1797 which would join with the United Irishmen and drive the British out of Ireland. The French anticipated that this would be a major blow to British morale, prestige and military effectiveness, and was also intended to possibly be the first stage of an eventual invasion of Great Britain itself. To this end, the Directory gathered a force of approximately 15,000 soldiers at Brest under General Lazare Hoche during late 1796, in readiness for a major landing at Bantry Bay in December.
The Atlantic campaign of 1806 was a complicated series of manoeuvres and counter-manoeuvres conducted by squadrons of the French Navy and the British Royal Navy across the Atlantic Ocean during the spring and summer of 1806, as part of the Napoleonic Wars. The campaign followed directly from the Trafalgar campaign of the year before, in which the French Mediterranean fleet had crossed the Atlantic, returned to Europe and joined with the Spanish fleet. On 21 October 1805, this combined force was destroyed by a British fleet under Lord Nelson at the Battle of Trafalgar, although the campaign did not end until the Battle of Cape Ortegal on 4 November 1805. Believing that the French Navy would not be capable of organised resistance at sea during the winter, the First Lord of the Admiralty Lord Barham withdrew the British blockade squadrons to harbour. Barham had miscalculated – the French Atlantic fleet, based at Brest, had not been involved in the Trafalgar campaign and was therefore at full strength. Taking advantage of the reduction in the British forces off the port, Napoleon ordered two heavy squadrons to sea, under instructions to raid British trade routes while avoiding contact with equivalent Royal Navy forces.
HMS Decade was a 36-gun fifth-rate frigate of the Royal Navy. She was formerly the French 'Galathée-class frigateDécade, which the British had captured in 1798. She served with the British during the French Revolutionary and Napoleonic Wars, and was sold out of the service in 1811.
HMS Alcmene was a 32-gun Alcmene-class fifth rate of the Royal Navy. This frigate served during the French Revolutionary and Napoleonic Wars under the command of several notable officers. Alcmene was active in several theatres of the war, spending most of her time cruising in search of enemy vessels or privateers, and escorting convoys. She fought at the Battle of Copenhagen in 1801 and served in the blockade of the French coasts during the later Napoleonic Wars until she was wrecked on the French coast in 1809.
Concorde was a 32-gun frigate of the French Navy, lead ship of her class. Built in Rochefort in 1777, she entered service with the French early in the American War of Independence and was soon in action, capturing HMS Minerva in the West Indies. She survived almost until near the end of the war when HMS Magnificent captured her in 1783. Not immediately brought into service due to the draw-down in the navy after the end of the war, Concorde underwent repairs and returned to active service with the outbreak of war with France in 1793 as the fifth-rate HMS Concorde.
HMS Melpomene was a 38-gun frigate of the Royal Navy. Originally a French vessel, she was captured at Calvi on 10 August 1794 and first saw British service in the English Channel, where she helped to contain enemy privateering. In October 1798, she chased a French frigate squadron sent to find the French fleet under Jean-Baptiste-François Bompart, that was routed at the Battle of Tory Island and in August 1799, she joined Andrew Mitchell's squadron for the Anglo-Russian invasion of Holland.
HMS Triton was a 32-gun fifth-rate frigate of the Royal Navy designed by James Gambier and launched in 1796 at Deptford. Triton was an experimental ship and the only one built to that design; she was constructed out of fir due to wartime supply shortages of more traditional materials and had some unusual features such as no tumblehome. Her namesake was the Greek god Triton, a god of the sea. She was commissioned in June 1796 under Captain John Gore, with whom she would spend the majority of her active service, to serve in the Channel in the squadron of Sir John Warren.
HMS Sylph was a 16-gun Albatross-class brig-sloop of the Royal Navy designed by William Rule and launched in 1795 at Deptford Dockyard. Her namesake was the air spirit sylph. She commissioned in August 1795 under Commander John Chambers White, who would have her until the end of 1799. She was later commanded by Charles Dashwood.
Come, Donald R. (Winter 1952). "French Threat to British Shores, 1793–1798". Military Affairs. 16 (4). Society for Military History: 174–188. doi:10.2307/1982368. JSTOR1982368.
Ireland, Bernard (2000). Naval Warfare in the Age of Sail: War at Sea, 1756–1815. London: Harper Collins. ISBN978-0-00-414522-8.
James, William (2002) [1827]. The Naval History of Great Britain during the French Revolutionary and Napoleonic Wars, Vol. 2, 1797–1799. London: Conway Maritime Press. ISBN978-0-85177-906-5.
Manning, Thomas Davies; Charles Frederick Walker (1959). British Warship Names. London: Putnam. OCLC185426987.
Pakenham, Thomas (2000) [1997]. The Year of Liberty: The Story of the Great Irish Rebellion of 1798. London: Abacus. ISBN978-0-349-11252-7. Rev. ed.
Smith, Digby (1998). The Greenhill Napoleonic Wars Data Book. London: Greenhill. ISBN978-1-85367-276-7.
Tracy, Nicholas, ed. (1998). The Naval Chronicle: Contemporary Reports of the War at Sea. Vol. 1, 1793–1798, From the Occupation of Toulon to the Battle of the Nile. London: Chatham. ISBN978-1-86176-091-3.
Winfield, Rif (2008). British Warships in the Age of Sail 1793–1817: Design, Construction, Careers and Fates (2nded.). Barnsley: Seaforth. ISBN978-1-84415-717-4.
"No. 15072". The London Gazette. 21 October 1798. pp.987–990. Contemporary publication of Sir John Borlase Warren's despatch reporting the victory.
This page is based on this Wikipedia article Text is available under the CC BY-SA 4.0 license; additional terms may apply. Images, videos and audio are available under their respective licenses.