Blend modes

Last updated
A sketch colored digitally with use of several different blend modes in order to preserve the pencil lines and paper texture below the color layers. Digital colouring blend modes demonstration.png
A sketch colored digitally with use of several different blend modes in order to preserve the pencil lines and paper texture below the color layers.

Blend modes (alternatively blending modes [1] or mixing modes [2] ) in digital image editing and computer graphics are used to determine how two layers are blended with each other. The default blend mode in most applications is simply to obscure the lower layer by covering it with whatever is present in the top layer (see alpha compositing); because each pixel has numerical values, there also are many other ways to blend two layers.

Contents

Most graphics editing programs, such as Adobe Photoshop and GIMP, allow users to modify the basic blend modes, for example by applying different levels of opacity to the top "layer". The top "layer" is not necessarily a layer in the application; it may be applied with a painting or editing tool. The top "layer" also is called the "blend layer" and the "active layer".

In the formulas shown on this page, values go from 0.0 (black) to 1.0 (white).

Normal blend mode

This is the standard blend mode which uses the top layer alone, [3] without mixing its colors with the layer beneath it:[ example needed ]

where a is the value of a color channel in the underlying layer, and b is that of the corresponding channel of the upper layer. The result is most typically merged into the bottom layer using "simple" (b over a) alpha compositing (making the actual formula ), but other Porter-Duff operations are possible. [3] The compositing step results in the top layer's shape, as defined by its alpha channel, appearing over the bottom layer.

Dissolve

The dissolve mode takes random pixels from both layers. With top layer opacity greater than that of the bottom layer, most pixels are taken from the top layer, while with low opacity most pixels are taken from the bottom layer. No anti-aliasing is used with this blend mode, so the pictures may look grainy and harsh.

Adobe Photoshop generates a pseudo-random noise dither pattern on startup, with each pixel location in a 2D raster array assigned a gray value (R=G=B) and an alpha value of 1 ("on"). As the opacity of the top layer is reduced, the alpha value of some of the gray pixels is switched from 1 to 0 ("off"), with the result that image pixels corresponding to a gray-valued pixel in the raster array are either on (visible, opaque) or off (invisible, transparent), with no opacity gradation.

Multiply and Screen

Multiply and Screen blend modes are basic blend modes for darkening and lightening images, respectively. There are many combinations of them, such as Overlay, Soft Light (see below), Vivid Light, Linear Light, and Pin Light.

Multiply

Multiply blend mode takes the RGB channel values from 0 to 1 of each pixel in the top layer and multiplies them with the values for the corresponding pixel from the bottom layer. Wherever either layer was brighter than black, the composite is darker; since each value is less than 1, their product will be less than each initial value that was greater than zero.

where a is the base layer value and b is the top layer value.

This mode is commutative: exchanging two layers does not change the result. If the two layers contain the same picture, multiply blend mode is equivalent to a quadratic curve, or gamma correction with γ=2. For image editing it is sometimes more convenient to simply go to the Curves dialog of the software, because it gives more flexibility in the shape of the curves. Or one can use Levels dialog: the middle number is usually 1/γ, so one can just type 0.5.

If one layer contains a homogeneous color, such as the gray color (0.8, 0.8, 0.8), multiply blend mode is equivalent to a curve that is simply a straight line. This is also equivalent to using this gray value as opacity when doing "normal mode" blend with a black bottom layer.

Screen

With Screen blend mode, the values of the pixels in the two layers are inverted, multiplied, and then inverted again. The result is the opposite of Multiply: wherever either layer was darker than white, the composite is brighter.

where a is the base layer value and b is the top layer value.

This mode is commutative: exchanging two layers does not change the result. If one layer contains a homogeneous gray, Screen blend mode is equivalent to using this gray value as opacity when doing "normal mode" blend with white top layer.

Overlay

Overlay combines Multiply and Screen blend modes. [4] Where the base layer is light, the top layer becomes lighter; where the base layer is dark, the top becomes darker; where the base layer is mid grey, the top is unaffected. An overlay with the same picture looks like an S-curve.

where a is the base layer value and b is the top layer value.

When one gets linear interpolation between 0 and ; when one gets linear interpolation between and 1. This mode is not commutative. However, it can be made commutative by changing the condition to be either or .

Hard Light

Hard Light is also a combination of Multiply and Screen. Hard Light affects the blend layer's relationship to the base layer in the same way Overlay affects the base layer's relationship to the blend layer.

The inverse relationship between Overlay and Hard Light makes them "commuted blend modes". [ citation needed ]

Soft Light

Comparison of soft light blend modes Comparison of soft light blend modes.png
Comparison of soft light blend modes

Soft light is most closely related to Overlay and is only similar to Hard Light by name. Applying pure black or white does not result in pure black or white.[ example needed ]

There are a variety of different methods of applying a soft light blend. [5] All the flavors produce the same result when the top layer is pure black; same for when the top layer is pure neutral gray. The Photoshop and illusions.hu flavors also produce the same result when the top layer is pure white (the differences between these two are in how one interpolates between these 3 results).

These three results coincide with gamma correction of the bottom layer with γ=2 (for top black), unchanged bottom layer (or, what is the same, γ=1; for top neutral gray), and γ=0.5 (for top white).

The formula used by Photoshop as of 2012 has a discontinuity of local contrast, and other formulas correct it. Photoshop's formula is: [6]

where a is the base layer value and b is the top layer value. Depending on b, one gets a linear interpolation between three gamma corrections: γ=2 (for b=0), γ=1 (for b=0.5), and γ=0.5 (for b=1).

Pegtop's formula [6] is smoother and corrects the discontinuity[ better source needed ] at b = 0.5:

This is a linear interpolation between Multiply (for a=0) and Screen (for a=1) blend modes. It can also be seen as a linear interpolation between the gamma correction with γ=2 (for b=0), and a certain tonal curve (for b=1). (The latter curve is equivalent to applying γ=2 to the negative of image.)

A third formula defined by illusions.hu [7] corrects the discontinuity in a different way, doing gamma correction with γ depending on b:

For b=0, one still gets γ=2, for b=0.5 one gets γ=1, for b=1 one gets γ=0.5, but it is not a linear interpolation between these 3 images.

The formula specified by recent W3C drafts [3] for SVG and Canvas is mathematically equivalent to the Photoshop formula with a small variation where b≥0.5 and a≤0.25:

where:

This is also the formula used by Cairo, [8] and in earlier PDF documentation. [9]

It is still a linear interpolation between 3 images for b=0, 0.5, 1. But now the image for b=1 is not γ=0.5, but the result of a tonal curve which differs from the curve of γ=0.5 for small values of a: while gamma correction with γ=0.5 may increase the value of a many times, this new curve limits the increase of a by coefficient 4.

Dodge and burn

Dodge and burn change the lightness of the pictures, inspired by the dodging and burning performed in a darkroom. Dodging lightens an image, while burning darkens it. Dodging the image is the same as burning its negative (and vice versa).

Simple arithmetic blend modes

Divide

This blend simply divides pixel values of one layer with the other, but it's useful for brightening photos if the colour is on grey or less. It is also useful for removing a colour tint from a photo. If you create a layer that is the colour of the tint you wish to remove – such as a pale blue, for scenes that are too cool in colour temperature – Divide mode will return that colour to white in the resulting composite, as any value divided by itself equals 1.0 (white).

Addition

This blend mode simply adds pixel values of one layer with the other. In case of values above 1 (in the case of RGB), white is displayed. "Linear Dodge" produces the same visual result. Since this always produces the same or lighter colors than the input it is also known as 'plus lighter'. A variant subtracts 1 from all end values, with values below 0 becoming black; this mode is known as 'plus darker'.

Subtract

This blend mode simply subtracts pixel values of one layer with the other. In case of negative values, black is displayed. In some applications such as Krita, "Inverse Subtract" is also available. [1]

Difference

Difference subtracts the bottom layer from the top layer or the other way around, to always get a non-negative value. Blending with black produces no change, as values for all colors are 0. (The RGB value for black is (0,0,0).) Blending with white inverts the picture.

One of the main utilities for this is during the editing process, when it can be used to verify alignment of pictures with similar content. Exclusion is a very similar blend mode with lower contrast.

Darken Only

Darken Only creates a pixel that retains the smallest components of the foreground and background pixels. If the foreground pixel has the components , and the background has , the resultant pixel is: [10]

Lighten Only

Lighten Only has the opposite action of Darken Only. It selects the maximum of each component from the foreground and background pixels. The mathematical expression for Lighten Only is: [10]

Boolean arithmetic blend modes

A few applications, such as Aviary's Peacock and KDE's Krita, [1] supply boolean arithmetic blend modes. These combine the binary expansion of the hexadecimal color at each pixel of two layers using boolean logic gates. The top layer's alpha controls interpolation between the lower layer's image and the combined image.

Hue, saturation and luminosity

Photoshop's hue, saturation, color, and luminosity blend modes are based on a color space with hue, chroma and luma dimensions. Note: this space is different from both HSL and HSV, and only the hue dimension is shared between the three. See the article HSL and HSV for details.

Unlike all of the previous blend modes described, which operate on each image channel independently, in each of these modes, some dimensions are taken from the bottom layer, while the remainder are taken from the top layer. Colors which end up out of gamut are brought inside by mapping along lines of constant hue and luma. This makes the operations uninvertible – after a top layer has been applied in one of these blend modes, it is in some cases impossible to restore the appearance of the original (bottom) layer, even by applying a copy of the bottom layer in the same blend mode above both.

Because these blend modes are based on a color space which is much closer than RGB to perceptually relevant dimensions, it can be used to correct the color of an image without altering perceived lightness, and to manipulate lightness contrast without changing the hue or chroma. The Luminosity mode is commonly used for image sharpening, because human vision is much more sensitive to fine-scale lightness contrast than color contrast. (See Contrast (vision))

Few editors other than Photoshop implement this same color space for their analogs of these blend modes. [3] Instead, they typically base their blend modes on HSV (aka HSB) or HSL. Blend modes based on HSV are typically labeled hue, saturation, and brightness. Using HSL or HSV has the advantage that most operations become invertible (at least in theory), but the disadvantage that the dimensions of HSL and HSV are not as perceptually relevant as the dimensions of the space Photoshop uses.

Relation to masking

The result of applying several of these modes depends linearly on the pixel level of the top layer. In such cases, when the top layer is purely black, one gets a certain transformation of the bottom layer (which may be just a purely black or purely white image). When the top layer is purely white, one gets another such transformation. The intermediate gray values are described above using the opacity slider on the second transformation.

In such cases, applying the blending mode is equivalent to Normal blending:

(This assumes that the mask may be colored, with its R, G, B channels masking the channels of the image independently. Many image manipulation programs do not allow such masks; for them this equivalence holds only for grayscale top layers.)

Differences between layer and tool blending

Some applications allow the user to apply blending modes to painting tools, such as the Brush tool in Photoshop or any painting tools in GIMP. When blending modes are used with these tools, the result is calculated based on pixels already existing on the target layer. If no pixels currently exist, then the 'painted' pixels are created as if in Normal blending mode. Subsequent strokes that overlap are then calculated based on the tool's blending mode, and the result is applied directly to the layer. A key difference with tool blending versus layer blending is that the results of tool blends are generally not able to be adjusted after the stroke is made, with the exception of stepping backward with the application's Undo command; layer blends may be adjusted with opacity or even switched, as they are applied dynamically between layers. Put differently, painting tools alter the pixels on a layer; blend modes applied to two layers don't alter any pixels, but only affect the resulting visual image.

This distinction is useful to create various effects on a single layer, such as when applying dodge and burn techniques, where painting with a low opacity in screen or multiply modes allows the user to build up or reduce the results in a more organic way on a single layer.

See also

Related Research Articles

<span class="mw-page-title-main">Alpha compositing</span> Operation in computer graphics

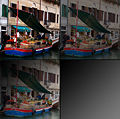
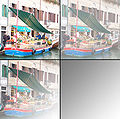
In computer graphics, alpha compositing or alpha blending is the process of combining one image with a background to create the appearance of partial or full transparency. It is often useful to render picture elements (pixels) in separate passes or layers and then combine the resulting 2D images into a single, final image called the composite. Compositing is used extensively in film when combining computer-rendered image elements with live footage. Alpha blending is also used in 2D computer graphics to put rasterized foreground elements over a background.

<span class="mw-page-title-main">Digital compositing</span>

Digital compositing is the process of digitally assembling multiple images to make a final image, typically for print, motion pictures or screen display. It is the digital analogue of optical film compositing. It’s part of the VFX processing.

<span class="mw-page-title-main">Raster graphics</span> Matrix-based data structure

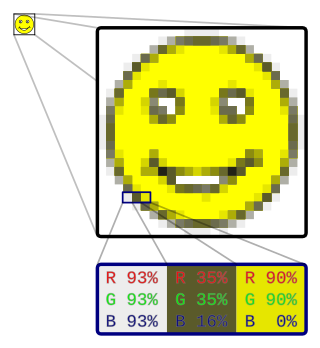
In computer graphics and digital photography, a raster graphic represents a two-dimensional picture as a rectangular matrix or grid of pixels, viewable via a computer display, paper, or other display medium. A raster is technically characterized by the width and height of the image in pixels and by the number of bits per pixel. Raster images are stored in image files with varying dissemination, production, generation, and acquisition formats.

<span class="mw-page-title-main">RGB color model</span> Color model based on red, green, and blue

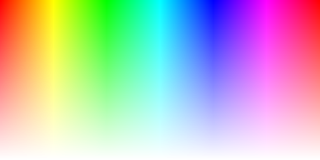
The RGB color model is an additive color model in which the red, green and blue primary colors of light are added together in various ways to reproduce a broad array of colors. The name of the model comes from the initials of the three additive primary colors, red, green, and blue.

<span class="mw-page-title-main">2D computer graphics</span> Computer-based generation of digital images

2D computer graphics is the computer-based generation of digital images—mostly from two-dimensional models and by techniques specific to them. It may refer to the branch of computer science that comprises such techniques or to the models themselves.

Gamma correction or gamma is a nonlinear operation used to encode and decode luminance or tristimulus values in video or still image systems. Gamma correction is, in the simplest cases, defined by the following power-law expression:

The BMP file format or bitmap, is a raster graphics image file format used to store bitmap digital images, independently of the display device, especially on Microsoft Windows and OS/2 operating systems.

<span class="mw-page-title-main">HSL and HSV</span> Alternative representations of the RGB color model

HSL and HSV are the two most common cylindrical-coordinate representations of points in an RGB color model. The two representations rearrange the geometry of RGB in an attempt to be more intuitive and perceptually relevant than the cartesian (cube) representation. Developed in the 1970s for computer graphics applications, HSL and HSV are used today in color pickers, in image editing software, and less commonly in image analysis and computer vision.

<span class="mw-page-title-main">CIELAB color space</span> Standard color space with color-opponent values

The CIELAB color space, also referred to as L*a*b*, is a color space defined by the International Commission on Illumination in 1976. It expresses color as three values: L* for perceptual lightness and a* and b* for the four unique colors of human vision: red, green, blue and yellow. CIELAB was intended as a perceptually uniform space, where a given numerical change corresponds to a similar perceived change in color. While the LAB space is not truly perceptually uniform, it nevertheless is useful in industry for detecting small differences in color.

<span class="mw-page-title-main">Grayscale</span> Image where each pixels intensity is shown only achromatic values of black, gray, and white

In digital photography, computer-generated imagery, and colorimetry, a grayscale image is one in which the value of each pixel is a single sample representing only an amount of light; that is, it carries only intensity information. Grayscale images, a kind of black-and-white or gray monochrome, are composed exclusively of shades of gray. The contrast ranges from black at the weakest intensity to white at the strongest.

<span class="mw-page-title-main">Transparency (graphic)</span> Capability of a computer graphic to allow whatever is "behind" it to be visible

Transparency in computer graphics is possible in a number of file formats. The term "transparency" is used in various ways by different people, but at its simplest there is "full transparency" i.e. something that is completely invisible. Only part of a graphic should be fully transparent, or there would be nothing to see. More complex is "partial transparency" or "translucency" where the effect is achieved that a graphic is partially transparent in the same way as colored glass. Since ultimately a printed page or computer or television screen can only be one color at a point, partial transparency is always simulated at some level by mixing colors. There are many different ways to mix colors, so in some cases transparency is ambiguous.

<span class="mw-page-title-main">Unsharp masking</span> Image sharpening technique

Unsharp masking (USM) is an image sharpening technique, first implemented in darkroom photography, but now commonly used in digital image processing software. Its name derives from the fact that the technique uses a blurred, or "unsharp", negative image to create a mask of the original image. The unsharp mask is then combined with the original positive image, creating an image that is less blurry than the original. The resulting image, although clearer, may be a less accurate representation of the image's subject.

sRGB Standard RGB color space

sRGB is a standard RGB color space that HP and Microsoft created cooperatively in 1996 to use on monitors, printers, and the World Wide Web. It was subsequently standardized by the International Electrotechnical Commission (IEC) as IEC 61966-2-1:1999. sRGB is the current defined standard colorspace for the web, and it is usually the assumed colorspace for images that are neither tagged for a colorspace nor have an embedded color profile.

<span class="mw-page-title-main">Color balance</span> Adjustment of color intensities in photography

In photography and image processing, color balance is the global adjustment of the intensities of the colors. An important goal of this adjustment is to render specific colors – particularly neutral colors like white or grey – correctly. Hence, the general method is sometimes called gray balance, neutral balance, or white balance. Color balance changes the overall mixture of colors in an image and is used for color correction. Generalized versions of color balance are used to correct colors other than neutrals or to deliberately change them for effect. White balance is one of the most common kinds of balancing, and is when colors are adjusted to make a white object appear white and not a shade of any other colour.

<span class="mw-page-title-main">Histogram equalization</span> Method in image processing of contrast adjustment using the images histogram

Histogram equalization is a method in image processing of contrast adjustment using the image's histogram.

<span class="mw-page-title-main">Error diffusion</span> Type of halftoning

Error diffusion is a type of halftoning in which the quantization residual is distributed to neighboring pixels that have not yet been processed. Its main use is to convert a multi-level image into a binary image, though it has other applications.

<span class="mw-page-title-main">Color gradient</span> Specifies a range of position-dependent colors

In color science, a color gradient specifies a range of position-dependent colors, usually used to fill a region.

<span class="mw-page-title-main">Image editing</span> Processes of altering images

Image editing encompasses the processes of altering images, whether they are digital photographs, traditional photo-chemical photographs, or illustrations. Traditional analog image editing is known as photo retouching, using tools such as an airbrush to modify photographs or editing illustrations with any traditional art medium. Graphic software programs, which can be broadly grouped into vector graphics editors, raster graphics editors, and 3D modelers, are the primary tools with which a user may manipulate, enhance, and transform images. Many image editing programs are also used to render or create computer art from scratch. The term "image editing" usually refers only to the editing of 2D images, not 3D ones.

This article provides introductory information about the RGB, HSV, and HSL color models from a computer graphics perspective. An introduction to colors is also provided to support the main discussion.

<span class="mw-page-title-main">Darktable</span>

Darktable is a free and open-source photography application and raw developer. Rather than being a raster graphics editor like Adobe Photoshop or GIMP, it comprises a subset of image editing operations specifically aimed at non-destructive raw image post-production. It is primarily focused on improving a photographer's workflow by facilitating the handling of large numbers of images. It is freely available in versions tailored for most major Linux distributions, macOS, Solaris and Windows and is released under the GPL-3.0-or-later.

References

  1. 1 2 3 "Blending Modes — Krita Manual 5.0.0 documentation". docs.krita.org. Retrieved 2022-03-24.
  2. "Blending Modes in Photoshop and Elements". Archived from the original on 2014-08-18. Retrieved 2014-08-27.
  3. 1 2 3 4 "W3C: Compositing and Blending 1.0" . Retrieved 9 November 2012.
  4. "Pegtop: overlay blend mode" . Retrieved 3 November 2012.
  5. "Developers - Image processing algorithms resources". Archived from the original on 2016-06-17. Retrieved 2012-11-03.
  6. 1 2 "Pegtop blend modes: soft light" . Retrieved 3 November 2012.
  7. "Illusions.hu: soft light blending". Archived from the original on 2013-02-17.
  8. "cairographics.org: Cairo's compositing operators" . Retrieved 9 November 2012.
  9. "Adobe.com: PDF Blend Modes: Addendum (to the PDF Reference, fifth edition, version 1.6" (PDF). Retrieved 9 November 2009.
  10. 1 2 "Gimp Advanced Guide - 5.6.4 The Darken Only and Lighten Only Blending Modes". Linuxtopia. Retrieved 28 March 2013.

Books