
Jacobus Herculaas de la Rey, better known as Koos de la Rey, was a South African military officer who served as a Boer general during the Second Boer War. De la Rey also had a political career and was one of the leading advocates of Boer independence.
The 1st Division is an infantry division of the British Army that has been formed and disestablished numerous times since 1809 and is still currently active as the 1st Division. Lieutenant-General Arthur Wellesley raised the division for service in the Peninsular War, which was part of the Coalition Wars of the Napoleonic Wars. The division was disestablished in 1814 but reformed the following year for service in the War of the Seventh Coalition. It then fought at the Battle of Waterloo, where it repulsed numerous attacks, including the final attack of the day that was launched by the French Imperial Guard. Following the battle, the division marched into France and became part of the Army of Occupation before being disbanded a few years later.

The 4th Infantry Division was a regular infantry division of the British Army with a very long history, seeing active service in the Peninsular War and Waterloo Campaign, the Crimean and Boer Wars and both World Wars. It was disbanded after the Second World War and reformed in the 1950s as an armoured formation before being disbanded and reformed again and finally disbanded on 1 January 2012.

The 6th Division is an active division of the British Army, which has been raised numerous times as needed over the last 200 years. It was first established by Lieutenant-General Arthur Wellesley in 1810, for service in the Peninsular War as part of the Anglo-Portuguese Army. Over the following four years, the division took part in numerous battles and sieges. Notably, on 22 July 1812, the division was heavily engaged during the Battle of Salamanca and suffered the most casualties of any allied formation in that battle. Following the invasion of France, the formation played a prominent role in the 1814 Battle of Toulouse where it assaulted and seized numerous French redoubts protecting the city. While successful, the formation suffered heavy losses from the fighting. This battle marked the end of the Peninsular War and the War of the Sixth Coalition, and the division was broken-up. It was reformed and active for most of the following year, during the War of the Seventh Coalition; held in reserve at the beginning of the Battle of Waterloo, it was committed in the evening to bolster the centre-left of the British line and suffered heavy casualties in the process.
This article details the history of the Scots Guards from 1805 to 1913. The Scots Guards (SG) is a regiment of the Guards Division of the British Army.

The Battle of Modder River was an engagement in the Boer War, fought at Modder River, on 28 November 1899. A British column under Lord Methuen, that was attempting to relieve the besieged town of Kimberley, forced Boers under General Piet Cronjé to retreat to Magersfontein, but suffered heavy casualties altogether.
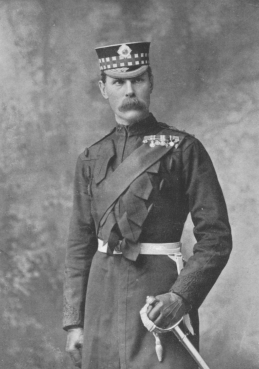
Field Marshal Paul Sanford Methuen, 3rd Baron Methuen,, was a British Army officer. He served in the Third Anglo-Ashanti War in 1873 and then in the expedition of Sir Charles Warren to Bechuanaland in the mid-1880s. He took a prominent role as General Officer Commanding the 1st Division in the Second Boer War. He suffered a serious defeat at the Battle of Magersfontein, during which he failed to carry out adequate reconnaissance and accordingly his artillery bombarded the wrong place leading to the Highland Brigade taking heavy casualties. He was later captured by the Boers at Tweebosch. After the war, he became General Officer Commanding-in-Chief in South Africa in 1908, Governor and Commander-in-Chief of Natal in 1910 and then Governor and Commander-in-Chief of Malta in 1915.

The Battle of Colenso was the third and final battle fought during the Black Week of the Second Boer War. It was fought between British and Boer forces from the independent South African Republic and Orange Free State in and around Colenso, Natal, South Africa on 15 December 1899.
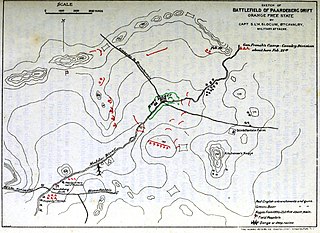
The Battle of Paardeberg or Perdeberg was a major battle during the Second Anglo-Boer War. It was fought near Paardeberg Drift on the banks of the Modder River in the Orange Free State near Kimberley.

The Battle of Magersfontein was fought on 11 December 1899, at Magersfontein, near Kimberley, South Africa, on the borders of the Cape Colony and the independent republic of the Orange Free State. British forces under Lieutenant General Lord Methuen were advancing north along the railway line from the Cape to relieve the siege of Kimberley, but their path was blocked at Magersfontein by a Boer force that was entrenched in the surrounding hills. The British had already fought a series of battles with the Boers, most recently at Modder River, where the advance was temporarily halted.

The Battle of Talana Hill, also known as the Battle of Glencoe, was the first major clash of the Second Boer War. A frontal attack by British infantry supported by artillery drove Boers from a hilltop position, but the British suffered heavy casualties in the process, including their commanding general Sir William Penn Symons.
The 14th Infantry Brigade was a British Army formation during the Second Boer War, World War I, when it served on the Western Front, and World War II, when it fought in Crete and Tobruk, and then as Chindits in Burma.

The Battle of Belmont was an engagement of the Second Boer War on 23 November 1899, where the British under Lord Methuen assaulted a Boer position on Belmont kopje.

The Battle of Diamond Hill (Donkerhoek) was an engagement of the Second Boer War that took place on 11 and 12 June 1900 in central Transvaal.

The siege of Kimberley took place during the Second Boer War at Kimberley, Cape Colony, when Boer forces from the Orange Free State and the Transvaal besieged the diamond mining town. The Boers moved quickly to try to capture the area when war broke out between the British and the two Boer republics in October 1899. The town was ill-prepared, but the defenders organised an energetic and effective improvised defence that was able to prevent it from being taken.

In the Battle of Nooitgedacht on 13 December 1900, Boer commandos led by Generals Koos de la Rey and Christiaan Beyers combined to deal a defeat to a British brigade under the command of Major General R. A. P. Clements during the Second Boer War.

The Battle of Tugela Heights, also known as the Battle of Pieters Hill, Battle of the Pieters, or the Battle of the Tugela River, consisted of a series of military actions lasting from 14 February through to 27 February 1900 in which General Sir Redvers Buller's British army forced Louis Botha's Boer army to lift the Siege of Ladysmith during the Second Boer War.
20th Brigade was an infantry formation of the British Army first organised in the Second Boer War. In the First World War, the brigade fought on the Western Front and on the Italian Front as part of 7th Division. The brigade was re-raised under during the Second World War and briefly served in France until being converted to an armoured formation.
21st Brigade was an infantry formation of the British Army first organised in the Second Boer War, when it took part in Ian Hamilton's March from Bloemfontein to Pretoria. Reformed in World War I it served under the command of first 7th Division and then 30th Division, fighting in most of the major battles on the Western Front from the First Battle of Ypres to the Armistice. It was briefly re-raised in the Sudan early in World War II before being transferred to the Indian Army.

The South Australian Mounted Rifles (SAMR) was a mounted infantry unit of the Colony of South Australia that served in the Second Boer War. The first contingent of South Australian Mounted Rifles was raised in 1899, followed by a second contingent in 1900.

