XXX Corps (United Kingdom)

Last updated

XXX Corps
XXX Corps 1944-1945 shoulder flash.jpg
XXX Corps formation badge; a rampant boar
CountryFlag of the United Kingdom.svg  United Kingdom
Branch Flag of the British Army.svg British Army
Type Corps
Engagements
Commanders
Notable
commanders
William Havelock Ramsden
Sir Oliver Leese
Gerard Bucknall
Sir Brian Horrocks

XXX Corps (30 Corps) was a corps of the British Army during the Second World War. The corps was formed in the Western Desert in September 1941. It provided extensive service in the North African Campaign and many of its units were in action at the Second Battle of El Alamein in late 1942. It then took part in the Tunisia Campaign and formed the left flank during the Allied invasion of Sicily in 1943.

Contents

It returned briefly to the United Kingdom; it then served in the Allied Invasion of Normandy in June 1944. In September 1944, it formed the Garden (cross land) contingent of Operation Market Garden; due to the failure of the Market (airborne) contingent to seize the bridge at Nijmegen, XXX Corps arrived too late at the subsequent (25 km (16 mi)) and ultimate  Arnhem bridge, effectively resulting in the loss of the British 1st Airborne Division in the prolonged Battle of Arnhem. [1] XXX Corps continued to serve in the Netherlands, and finally in Operation Veritable in Germany until May 1945.

North Africa Campaign

XXX Corps was formed in the Western Desert under Lieutenant-General Vyvyan Pope in September 1941. [2] It played a major role in the Western Desert Campaign, where it was initially formed for the British armoured units in North Africa in preparation for Operation Crusader, the last British attempt to relieve the siege of Tobruk. [3]

XXX Corps suffered many casualties, mainly because of obsolete British tank tactics (especially charging anti-tank guns), but finally forced the Panzerarmee Afrika to withdraw to El Agheila in Central Libya. In spring 1942, Rommel had counter-attacked and driven the British back to Gazala, a few miles west of Tobruk. The plan of the Eighth Army Commander Neil Ritchie was to have XIII Corps hold the line, while XXX Corps would stop any attempt to outflank the position south of Bir Hachiem, held by the 1st Free French Brigade. They managed to slow the Afrika Korps tanks into "The Cauldron", the gap left in the British Lines by the destruction of the 150th Infantry Brigade, part of the 50th (Northumbrian) Infantry Division in late May 1942. British counterattacks attempted to crush it but failed. Eventually, the Free French at Bir Hachiem were forced to withdraw and Rommel was able to break out of the Cauldron. XXX Corps was forced to retreat to Mersa Matruh, held by the new X Corps. [4] The Germans quickly broke through, surrounded X Corps (which fortunately for the British, managed to break out) and pushed XXX Corps back to El Alamein in June 1942. [5]

El Alamein

The depleted XXX Corps pulled back to El Alamein, the last defensible position west of the River Nile. It was the only place in the Western Desert campaign in which there would not be an open flank (a normal rule of desert warfare), due to the soft ground of the Qattara Depression, immediately south of the opposing forces and the Mediterranean Sea. The northern, coastal sector was assigned to XXX Corps. [5]

Due to casualties and equipment losses, XXX Corps was reinforced at Alamein by the attachment of units from other Commonwealth armies (that had been attached to XIII Corps), the 1st South African Infantry Division and the 9th Australian Infantry Division. The corps's other main unit was the British 23rd Armoured Brigade Group. [6]

In July 1942, XXX Corps again suffered many casualties, at the First Battle of El Alamein, although a major Axis offensive was repelled. Willoughby Norrie was replaced as corps commander by William Ramsden. [7]

In August, the Prime Minister, Winston Churchill, dismissed Claude Auchinleck as commander-in-chief of Middle East Command and General Officer Commanding (GOC), Eighth Army. Auchinleck was replaced as Allied commander by Harold Alexander and as GOC, Eighth Army by William Gott (previously commander of XIII Corps). Gott was killed soon afterwards, when the aircraft carrying him was shot down; he was replaced by Bernard Montgomery. [8]

At the end of August, Rommel again decided to attempt a breakthrough, this time at the southern end of the line in the Battle of Alam Halfa. While this was directed mainly at XIII Corps, XXX Corps was the subject of several diversionary raids. In September, Ramsden was replaced by Oliver Leese. [9]

XXX Corps was to be the focus of Montgomery's first offensive, codenamed Operation Lightfoot. The 2nd New Zealand Division (previously XIII Corps), the 51st (Highland) Infantry Division and the 4th Indian Infantry Division, along with the 9th Armoured Brigade were added to the corps. [10]

On the night of 24/25 October, Lightfoot commenced with a prolonged and intense artillery bombardment, XXX Corps attacked and quickly suffered many casualties but the Australian, New Zealand, South African and Highland divisions continued to attack, creating several gaps in the minefields, before German resistance stopped further advances. To bring XXX Corps up to strength, the 50th (Northumbrian) Infantry Division (XIII Corps) was added. [11]

Early on the morning of 2 November, X Corps and XXX Corps launched the fourth phase of Lightfoot, codenamed Operation Supercharge. By 4 November the tanks of X Corps had broken through and the British had won the Second Battle of El Alamein. [12]

The 9th Australian Division was transferred to the South West Pacific theatre. The 1st South African Division was left in Egypt. After El Alamein, XXX Corps pushed forward steadily. It stopped its advance at the Mareth Line in Tunisia in late February 1943. [13]

Tunisia

On 19 March, XXX Corps launched an attack on the Mareth Line as part of Operation Pugilist, with the 50th (Northumbrian) Infantry Division and the 51st (Highland) Infantry Division in the lead. They managed to create a gap but it was quickly contained by the 15th Panzer Division. During Operation Supercharge II a force commanded by Lieutenant-General Brian Horrocks composed of the New Zealand Corps and the 1st Armoured Division from X Corps exploited a flanking position established by the New Zealanders during Pugilist and broke the German flank defences on the night of 26/27 March, forcing the outflanked German forces to withdraw northwards to Wadi Akarit. [14]

In mid-April, XXX Corps attempted to attack the position head on but made little progress against determined German and Italian resistance. By that time the First Army had broken through the German line on their left in central Tunisia and the Axis forces were forced to surrender. [15]

Sicily

On 10 July 1943, XXX Corps was part of the Allied invasion of Sicily. The corps (under Lieutenant General Oliver Leese) was to compose the left flank of the Eighth Army. It was reinforced with the 1st Canadian Infantry Division, the 1st Canadian Armoured Brigade, and the 231st Infantry Brigade of units from Malta. [16]

XXX Corps landed near Pachino and made early gains against the Italian 206th Coastal Division and the 54th "Napoli" Division. By 18 July, it was halfway to Messina. Progress slowed considerably after that because Sicily's mountainous terrain favoured well-equipped defenders (like the German forces in Group Schmalz) and they managed to move very little. The Axis began withdrawing troops from Sicily and the Germans put up a brave fighting withdrawal. By 17 August, the last German troops had crossed the straits of Messina and the Allies were in control of Sicily. XXX Corps was then pulled out of the line and sent to the United Kingdom to re-fit and re-train for Operation Overlord. [17]

North West Europe

Order of Battle

The order of battle was as follows: [18]
General Officer Commanding Lt-Gen Gerard Bucknall (to 3 August 1944)
Lt-Gen Brian Horrocks (from 4 August 1944)

Normandy

In Normandy XXX Corps, now commanded by Lieutenant-General Gerard Bucknall, again included the 50th Division which landed on Gold Beach. It quickly overwhelmed the German defenders of the 716th Infantry Division and had linked up with the I Corps by the end of D-Day. Following D-Day the corps launched Operation Perch. It made slow gains facing stiff resistance but by 10 June had linked up with US forces advancing from Omaha Beach. On 12 June, an opportunity arose. The Germans had a gap in their front lines near the Town of Caumont-l'Éventé. The 7th Armoured Division was sent to exploit the gap and head towards Villers-Bocage to outflank the German Panzer-Lehr-Division and force them to withdraw, resulting in the Battle of Villers-Bocage. This attack was thwarted by elements of the Panzer Lehr Division and the 101st SS Heavy Panzer Battalion. Bucknall was heavily criticised for his decisions during the operation and battle. [32]

XXX Corps was then involved in a battle of attrition with only minor gains being made. Up to 24 July, the front line remained relatively unchanged. The next day the Americans launched Operation Cobra, an attack on German positions on the western end of the Contentin Peninsula. They made considerable progress and the Second Army launched Operation Bluecoat to support the attack and to exploit the momentum. VIII Corps, on the right flank made considerable progress but XXX Corps was sluggish. Montgomery sacked Bucknall and replaced him with Lieutenant-General Brian Horrocks, a distinguished veteran of North Africa. After the sacking of Bucknall, the performance of XXX Corps improved considerably and it managed to keep up with the other British corps during the Battle for the Falaise Gap. After the German collapse, XXX Corps quickly advanced north-east and liberated Brussels and Antwerp in Belgium. There the advance was halted because of a shortage of fuel. Elements of the Guards Armoured Division and the 2nd Household Cavalry Regiment managed to secure a bridge across the Maas-Schelde canal into the Netherlands. This bridge was nicknamed Joe's Bridge in honour of Lieutenant Colonel Joe Vandeleur of the 2nd Battalion, Irish Guards who captured the bridge. [33]

Operation Market Garden

After the success in France and Belgium, General Montgomery commanding the 21st Army Group turned his attention to outflanking the Siegfried Line and invading the Ruhr in a pincer movement. The northern part of the pincer would be near Arnhem at the Dutch–German border. Allied troops would concentrate at this point to form the northern part of the pincer. XXX Corps, consisting of approximately 50,000 men, would advance along the main axis of the Second Army and reach Arnhem within 48 hours, and continue on to the Dutch–German border. XXX Corps was to be the GARDEN part of the operation to advance past Arnhem. This required crossing water obstacles, the last of them a road bridge at Arnhem. When the pincer closed, this would allow the British to trap the 15th Army, splitting it from the 1st Parachute Army on the way around the northern flank of the Siegfried Line. [34]

The MARKET part of the operation was to seize the bridges up to Arnhem. Montgomery requested from General Dwight D. Eisenhower, the Supreme Allied Commander on the Western Front, to deploy the First Allied Airborne Army. The 101st Airborne Division (Major General Maxwell D. Taylor) was dropped at Eindhoven, to secure the Son and Wilhelmina Canal bridges, the 82nd Airborne Division (Brigadier General James M. Gavin), dropped at Nijmegen, to secure the Grave and Nijmegen bridges, while the British 1st Airborne Division (Major-General Roy Urquhart), dropped at Arnhem, to secure the bridgehead over the Neder Rijn. Attached to the 1st Airborne Division was the 1st Polish Parachute Brigade (Major-General Stanisław Sosabowski). [35]

Vehicles of the Guards Armoured Division of XXX Corps passing through Grave having linked up with the US 82nd Airborne Division. XXX Corps passing through Grave.jpg
Vehicles of the Guards Armoured Division of XXX Corps passing through Grave having linked up with the US 82nd Airborne Division.

Operation Market Garden commenced at 14:00H on Sunday 17 September 1944, with the artillery preparation by 350 guns at 14:35. [36] It was to be the most ambitious ground offensive operation by the British Army in the war so far. It was beset by problems. The ground was assessed to be too soft to accommodate the Sherman tanks of the leading Irish Guards Battle Group, forcing the entire Guards Armoured Division to stay on the single highway. As XXX Corps advanced north-east, it became obvious that the highway was prone to traffic jams and was extremely vulnerable to enemy counter-attacks. [37]

The lead elements of XXX Corps, the Guards Armoured Division (Major-General Allan Adair) were ambushed by German anti-tank defences, causing delays to the advance. As a result, they were far short of the 82nd Airborne Division objectives, having not even reached the 101st Airborne Division by the end of the first day. On the second day of GARDEN, the Guards Armoured Division continued northwards to Eindhoven, where they met elements of the 2nd Battalion, 506th Parachute Infantry Regiment of the 101st Airborne Division. They soon discovered that 101st had failed to secure the bridge at Son intact, creating more delays before XXX Corps engineers arrived to build a Bailey bridge. [38]

On the morning of 19 September the Guards Armoured Division advanced without facing much resistance reaching the Nijmegen Bridge on schedule the same day, where they found that the U.S. 82nd Airborne Division had failed to capture the road bridge at Nijmegen, with troops only at the southern end of the bridge. XXX Corps brought up boats used by bridge engineers, allowing two companies of the 3rd Battalion, 504th Parachute Infantry Regiment (Major Julian Cook) to cross the river to assault the bridge from the northern end. XXX Corps captured the Nijmegen bridge by running their tanks over. The Guards Armoured Division advanced and quickly established positions on the north bank to secure the bridge. [39]

Further south, in the 101st Airborne Division sector, many units from XXX Corps had to be detached to fight off repeated attempts by the German 106th Panzerbrigade to cut the highway. The 231st Infantry Brigade (from the 50th Division) and the 4th Armoured Brigade spent most of the time during Operation Market Garden reacting to these probes by German Panther tanks and panzergrenadiers. This created traffic jams and delayed reinforcements reaching the Guards Armoured Division–particularly the 43rd (Wessex) Infantry Division (Major-General Ivor Thomas) and the 69th and 151st Brigades of the 50th Division, which further slowed down the XXX Corps advance. [40]

By 21 September the Guards Armoured Division was exhausted and Horrocks also took ill, with XXX Corps periodically being commanded by its Brigadier General Staff (BGS) Brigadier Harold Pyman, for which he would be made Chief of Staff of the Second Army after the operation. They had fought continuously for five days, much of it against fierce German resistance and were unable to continue the offensive. The 43rd Division was brought up to continue and managed to defeat elements of the 10th SS Panzer Division that penetrated to Nijmegen area and advanced to the Neder Rijn and the area called "the Island". There the 4th Battalion, Dorset Regiment crossed the Rhine as a diversion, so that the remnants of the 1st Airborne Division could withdraw more safely but many men of the 4th Dorsets were left behind on the north bank of the Rhine when the division withdrew. [41]

The failure of the 82nd Airborne Division to seize the Nijmegen bridge caused a long delay for the XXX Corps to arrive at the Arnhem bridge as planned. This caused the 1st Airborne Division, which was surrounded in the Battle of Arnhem and suffered many casualties, to retreat from the Arnhem bridge after the delay enabled the Germans to reinforce with armoured divisions. Most of the 1st Airborne Division was killed, surrendered or withdrew to the 1st Polish Parachute Brigade positions, which ended the offensive. [42]

Ardennes

During the Battle of the Bulge, units of XXX Corps moved to secure the bridges over the Meuse. [43] On 27 December the Corps pushed the 2nd Panzer Division out of Celles. On 31 December they captured Rochefort at the western end of the salient. [43]

The Rhineland Campaign

Lieutenant-General Horrocks addresses XXX Corps staff at Rees on the banks of the Rhine, 26 May 1945. British Generals 1939-1945 BU2411.jpg
Lieutenant-General Horrocks addresses XXX Corps staff at Rees on the banks of the Rhine, 26 May 1945.

XXX Corps was involved in the fighting that preceded Operation Plunder the Rhine crossings. Under command of the 1st Canadian Army and with additional divisions, it was responsible for the difficult advance through the Reichswald Forest that was the first phase of Operation Veritable in February 1945. The subsequent phases were renamed Operation Blockbuster. The terrain now allowed a two corps front, with XXX Corps taking the western side until meeting at Geldern with elements of the 9th US Army on 3 March. [44] on 23rd March XXX Corps began Operation Turnscrew within the framework of Operation Plunder the Rhine Crossing at Rees. [45] [46]

General Officers Commanding

Commanders included: [47]

See also

Notes

  1. The British 1st Airborne Division saw no more combat thereafter, though it later served as a police force in Allied occupied Norway
  2. "Units & Formations 1930 - 1956: Corps". British Military History. Retrieved 3 August 2020.
  3. Murphy 1961, pp. 103–105.
  4. Mellenthin 1956, p. 126.
  5. 1 2 "A 5 minute history of the Battle of El Alamein". Imperial war Museum. Retrieved 3 August 2020.
  6. Hughes, Ryan & Broshot 2001, pp. 37–41.
  7. "William Ramsden". Liddell Hart Centre for Military Archives. Archived from the original on 2 October 2012. Retrieved 2 June 2020.
  8. Colin Smith, War Without Hate synopsis
  9. Mead 2007, p. 242.
  10. Moreman & Anderson 2007, p. 27.
  11. "Operation Supercharge" (PDF). 2nd Battalion, 5th Marines. Retrieved 3 August 2020.
  12. Playfair 2004, pp. 86–87.
  13. "The Enemy Is Turned Back". The US Army in World War II. Retrieved 3 August 2020.
  14. Playfair 2004, pp. 347–351.
  15. Delaforce 2008, p. 133.
  16. Copp, McGreer & Symes 2008, pp. 5–42.
  17. "XXX Corps" (PDF). British Military History. Retrieved 3 August 2020.
  18. Forty 1998, p. 346.
  19. 73 Anti-Tank Regiment RA (TA)
  20. 27 Light AA Regiment RA (TA)
  21. 4 (Durham) Survey Regiment RA (TA)
  22. Watson & Rinaldi 2018, p. 133.
  23. Morling 1972, pp. 181–183.
  24. 5th AGRA
  25. 4 RHA
  26. 7 Medium Regiment RA
  27. 64 Medium Regiment RA (TA)
  28. 84 (Sussex) Medium Regiment RA (TA)
  29. 121 (West Riding) Medium Regiment RA (TA)
  30. 52 (Bedfordshire Yeo) Heavy Regiment RA (TA)
  31. 1 2 3 Palmer, Robert. "XXX CORPS (HISTORY & PERSONNEL)" (PDF). BritishMilitaryHistory.co.uk. Archived from the original (PDF) on 5 December 2020. Retrieved 26 June 2022.
  32. Reynolds 2001, p. 107.
  33. "Joe's Bridge". Traces of War. Retrieved 3 August 2020.
  34. Hibbert 2003, pp. 29–30.
  35. "Stanisław Sosabowski". Pegasus Archive. Retrieved 3 August 2020.
  36. Horrocks 1960, p. 211.
  37. Gill & Groves 2006, p. 71.
  38. Randel 1945, p. 33.
  39. Nijmegen: U.S. 82nd Airborne Division – 1944 by Tim Saunders
  40. "Route to Victory :: History". Routetovictory.info. Archived from the original on 5 August 2016. Retrieved 26 September 2008.
  41. "The 4th and 5th Battalions The Dorsetshire Regiment in World War Two". The Keep Military Museum. Retrieved 28 December 2015.
  42. Middlebrook 1994, pp. 414–417.
  43. 1 2 Blockmans, Guy (6 May 2002). "The British in the Battle of the Ardennes". Archived from the original on 23 August 2012. Retrieved 10 July 2015.
  44. "Operation Blockbuster". The Daily Chronicles of World War II. Retrieved 3 August 2020.
  45. Tim Saunders 2008 "Operation Varsity", p. 61,.
  46. National Army Museum Archive 2005-01-43 Report by Captain Parker p.8
  47. Army Commands Archived 5 July 2015 at the Wayback Machine

Related Research Articles

<span class="mw-page-title-main">Second Battle of El Alamein</span> Battle in the Western Desert Campaign of the Second World War

The Second Battle of El Alamein was a battle of the Second World War that took place near the Egyptian railway halt of El Alamein. The First Battle of El Alamein and the Battle of Alam el Halfa had prevented the Axis from advancing further into Egypt.

<span class="mw-page-title-main">Operation Market Garden</span> 1944 World War II military operation

Operation Market Garden was an Allied military operation during the Second World War fought in the German-occupied Netherlands from 17 to 25 September 1944. Its objective was to create a 64 mi (103 km) salient into German territory with a bridgehead over the Nederrijn, creating an Allied invasion route into northern Germany. This was to be achieved by two sub-operations: seizing nine bridges with combined US and British airborne forces ("Market") followed by British land forces swiftly following over the bridges ("Garden").

<span class="mw-page-title-main">Battle of Arnhem</span> Failed British airborne operation in Arnhem, Netherlands. Part of Operation Market Garden

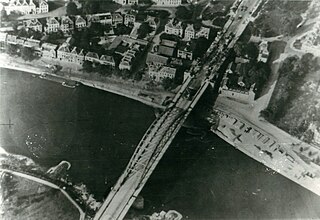
The Battle of Arnhem was a battle of the Second World War at the vanguard of the Allied Operation Market Garden. It was fought in and around the Dutch city of Arnhem, the town of Oosterbeek, the villages Wolfheze and Driel and the vicinity from 17 to 26 September 1944. The Allies were poised to enter the Netherlands after sweeping through France and Belgium in the summer of 1944, after the Battle of Normandy. Operation Market Garden was proposed by Field Marshal Sir Bernard Montgomery, who favoured a single push northwards over the branches of the Lower Rhine River, allowing the British Second Army to bypass the Siegfried Line and attack the Ruhr. US Airborne troops were dropped in the Netherlands to secure bridges and towns along the line of the Allied advance. Farthest north, the British 1st Airborne Division landed at Arnhem to capture bridges across the Nederrijn, supported by men of the Glider Pilot Regiment and the 1st Polish Parachute Brigade. The British XXX Corps were expected to reach the British airborne forces in two to three days.

<span class="mw-page-title-main">I Corps (United Kingdom)</span> Inactive British Army formation

I Corps was an army corps in existence as an active formation in the British Army for most of the 80 years from its creation in the First World War until the end of the Cold War, longer than any other corps. It had a short-lived precursor during the Waterloo Campaign. It served as the operational component of the British Army of the Rhine during the Cold War, and was tasked with defending West Germany.

<span class="mw-page-title-main">21st Army Group</span> WWII United Kingdom military formation

The 21st Army Group was a British headquarters formation formed during the Second World War. It controlled two field armies and other supporting units, consisting primarily of the British Second Army and the First Canadian Army. Established in London during July 1943, under the command of Supreme Headquarters Allied Expeditionary Force (SHAEF), it was assigned to Operation Overlord, the Western Allied invasion of Europe, and was an important Allied force in the European Theatre. At various times during its existence, the 21st Army Group had additional British, Canadian, American and Polish field armies or corps attached to it. The 21st Army Group operated in Northern France, Luxembourg, Belgium, the Netherlands and Germany from June 1944 until August 1945, when it was renamed the British Army of the Rhine (BAOR).

<span class="mw-page-title-main">Guards Armoured Division</span> Military unit

The Guards Armoured Division was an armoured division of the British Army during the Second World War. The division was created in the United Kingdom on 17 June 1941 during the Second World War from elements of the Guards units, the Grenadier Guards, Coldstream Guards, Scots Guards, Irish Guards, Welsh Guards, and the Household Cavalry.

<span class="mw-page-title-main">Brian Horrocks</span> British Army general (1895–1985)

Lieutenant-General Sir Brian Gwynne Horrocks, was a British Army officer, chiefly remembered as the commander of XXX Corps in Operation Market Garden and other operations during the Second World War. He also served in the First World War and the Russian Civil War, was taken prisoner twice, and competed in the modern pentathlon at the 1924 Paris Olympics. Later he was a television presenter, wrote books on military history, and was Black Rod in the House of Lords for 14 years.

This is the complete order of battle of Allied and German forces involved during Operation Market Garden.

<span class="mw-page-title-main">Operation Veritable</span> Battle of World War II

Operation Veritable was the northern part of an Allied pincer movement that took place between 8 February and 11 March 1945 during the final stages of the Second World War. The operation was conducted by Field Marshal Bernard Montgomery's Anglo-Canadian 21st Army Group, primarily consisting of the First Canadian Army under Lieutenant-General Harry Crerar and the British XXX Corps under Lieutenant-general Brian Horrocks.

<span class="mw-page-title-main">Operation Bluecoat</span>

Operation Bluecoat was a British offensive in the Battle of Normandy, from 30 July until 7 August 1944, during the Second World War. The geographical objectives of the attack, undertaken by VIII Corps and XXX Corps of the British Second Army, were to secure the road junction of Vire and the high ground of Mont Pinçon.

<span class="mw-page-title-main">Battle of the Mareth Line</span> Battle of World War II fought in Tunisia

The Battle of the Mareth Line or the Battle of Mareth was an attack in the Second World War by the British Eighth Army in Tunisia, against the Mareth Line held by the Italo-German 1st Army. It was the first big operation by the Eighth Army since the Second Battle of El Alamein 4+12 months previously. On 19 March 1943, Operation Pugilist, the first British attack, established a bridgehead but a break-out attempt was defeated by Axis counter-attacks. Pugilist established an alternative route of attack and Operation Supercharge II, an outflanking manoeuvre via the Tebaga Gap was planned. Montgomery reinforced the flanking attack, which from 26 to 31 March, forced the 1st Army to retreat to Wadi Akarit, another 40 mi (64 km) back in Tunisia.

<span class="mw-page-title-main">43rd (Wessex) Infantry Division</span> Military unit

The 43rd (Wessex) Infantry Division was an infantry division of Britain's Territorial Army (TA). The division was first formed in 1908, as the Wessex Division. During the First World War, it was broken-up and never served as a complete formation. It was reformed in the TA in 1920, and then served in the campaign in North West Europe from June 1944 until May 1945, during the Second World War. The division suffered heavy casualties and gained an excellent reputation. After the Second World War, the division formed part of the postwar TA, and became the 43rd (Wessex) Division/District in 1961. It was finally disbanded in 1967.

<span class="mw-page-title-main">22nd Armoured Brigade (United Kingdom)</span> Armoured brigade of the British Army

The 22nd Armoured Brigade was an armoured brigade of the British Army that saw service during and after the Second World War. The brigade was formed on the outbreak of war on 3 September 1939 from Territorial Army (TA) armoured regiments. It saw a considerable amount of action during the war, beginning with the Western Desert Campaign where it was engaged in Operation Crusader and at the Battles of Gazala, Mersa Matruh, First Alamein and Alam el Halfa. It then joined the 7th Armoured Division for the Second Battle of El Alamein. It remained part of 7th Armoured for the rest of the war, including the campaigns in Tunisia, Italy and North West Europe. It continued in the postwar TA until 1956. The brigade's identity was re-established in the Regular Army between 1981 and 1993.

<span class="mw-page-title-main">8th Armoured Brigade (United Kingdom)</span> Military unit

The 8th Armoured Brigade was an armoured brigade of the British Army formed in August 1941, during the Second World War and active until 1956. The brigade was formed by the renaming of 6th Cavalry Brigade, when the 1st Cavalry Division based in Palestine converted from a motorised formation to an armoured unit, becoming 10th Armoured Division.

<span class="mw-page-title-main">Second Battle of El Alamein order of battle</span>

The Second Battle of El Alamein was a battle of the Second World War that took place near the Egyptian railway halt of El Alamein. The First Battle of El Alamein and the Battle of Alam el Halfa had prevented the Axis from advancing further into Egypt.

<span class="mw-page-title-main">Operation Perch</span> British offensive of the Second World War

Operation Perch was a British offensive of the Second World War which took place from 7 to 14 June 1944, during the early stages of the Battle of Normandy. The operation was intended to encircle and seize the German occupied city of Caen, which was a D-Day objective for the British 3rd Infantry Division in the early phases of Operation Overlord. Operation Perch was to begin immediately after the British beach landings with an advance to the south-east of Caen by XXX Corps. Three days after the invasion the city was still in German hands and the operation was amended. The operation was expanded to include I Corps for a pincer attack on Caen.

<span class="mw-page-title-main">Battle of Alam el Halfa order of battle</span>

This is the order of battle for the Battle of Alam el Halfa, a World War II battle between the British Commonwealth and the Axis Powers of Germany and Italy in North Africa between 30 August and 5 September 1942. The forces were the Eighth Army and the Panzer Armee Afrika

<span class="mw-page-title-main">1st Airlanding Light Regiment</span> WW2 British Army artillery unit

The 1st Airlanding Light Regiment was an airborne forces unit of the British Army's Royal Artillery during the Second World War.

<span class="mw-page-title-main">Battle of the Nijmegen salient</span> Battle in the Netherlands during WW2

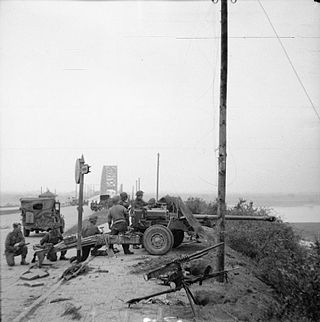
The Battle of the Nijmegen salient or the Defence of the Nijmegen bridgehead was a series of engagements that took place in the Netherlands during World War II between 30 September and 8 October 1944. The battle occurred in the aftermath of Operation Market Garden, a failed attempt by the Allies to cut off German forces in the Netherlands and end the war quickly.

<span class="mw-page-title-main">179th Field Regiment, Royal Artillery</span> Military unit

The 179th Field Regiment was a unit of the Royal Artillery, formed by the British Army during World War II. First raised in 1940 as infantry of the Worcestershire Regiment, after serving in the garrison of Iceland it was converted to the field artillery role in 1942. It fought with 43rd (Wessex) Division in the campaign in North West Europe. It was disbanded after the war.

References

External sources