The 11th Battalion was an Australian Armybattalion that was among the first infantry units raised during World War I for the First Australian Imperial Force. It was the first battalion recruited in Western Australia, and following a brief training period in Perth, the battalion sailed to Egypt where it undertook four months of intensive training. In April 1915 it took part in the invasion of the Gallipoli Peninsula, landing at Anzac Cove. In August 1915 the battalion was in action in the Battle of Lone Pine. Following the withdrawal from Gallipoli, the battalion returned to Egypt where it was split to help form the 51st Battalion. In March 1916, the battalion was deployed to the Western Front in France and Belgium where it took part in trench warfare until the end of the war in November 1918.
The battalion was disbanded in 1919, but since 1921 has been re-activated and merged several times as a reserve unit, initially as the 11th Battalion (City of Perth Regiment), which fought a brief campaign against the Japanese on New Britain during World War II. Other units that have maintained the traditions of the original 11th Battalion include the 11th/44th Battalion (City of Perth Regiment), 'A' (City of Perth) Company, 1st Battalion, Royal Western Australia Regiment and the current 11th/28th Battalion, Royal Western Australia Regiment.
World War I
Formation
The 11th Battalion was formed on 17 August 1914, less than two weeks after the declaration of war on 4 August,[1][2] and was among the first infantry units raised during World War I for the all-volunteer First Australian Imperial Force. Along with the 9th, 10th and 12th Battalions, it formed Colonel Ewen Sinclair-MacLagan's 3rd Brigade, which was assigned to the 1st Division.[3][4] The first battalion raised in Western Australia, under the command of Lieutenant Colonel James Lyon-Johnston, the 11th concentrated at Blackboy Hill, Western Australia. Drawing personnel from around the state with the majority coming from Perth and the goldfields,[5] recruits came from all elements of society, with the majority being former labourers and agricultural workers or miners. Seventy-three percent of original enlistments were Australian-born, with the remaining recruits being mainly English-born with smaller numbers coming from other parts of the British Isles.[5] By 24 September it had reached its authorised strength of 1,023 officers and other ranks.[6] On formation, the battalion consisted of eight rifle companies, designated 'A' to 'H', and a headquarters company with signals, transport, medical and machine-gun sections.[7][8]
The majority of the battalion's non-commissioned officers were long-serving Citizens Forces soldiers or regular personnel.[1][9] Some had previously fought in South Africa during the Boer War and others had previously served in the British Army.[10] Rudimentary training was undertaken at Bellevue, Western Australia, and at the end of October it sailed from Fremantle on the SSAscanius and SSMedic. Originally bound for the United Kingdom, where they were to complete training, after stopovers in the Cocos Islands and Colombo, their orders were changed due to concerns about overcrowding in training camps in the United Kingdom and at the start of December, the battalion arrived at Mena Camp in Cairo, Egypt.[11][12] There, the battalion's eight companies were reorganised into the four that existed under the British Army establishment and further training was undertaken. The battalion remained in Egypt until early March 1915 when it sailed on SSSuffolk and SSNizam from Alexandria to the island of Lemnos in the Aegean Sea, in preparation for the Landing at Anzac Cove.[13]
Gallipoli
Landing at Anzac Cove
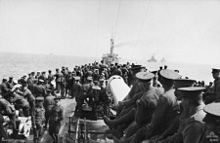
On 24 April 1915, the battalion disembarked from Suffolk and boarded HMSLondon, which was bound for Gallipoli in the Dardanelles.[14] At 4:30 on the morning of 25 April, 'A' and 'C' Companies of the battalion landed at North Beach, north of Ari Burnu Knoll, a mile south of Fisherman's Hut,[15] on the left flank of the first wave. Under heavy machine gun and rifle fire, the battalion stormed the cliffs, driving the Turks back. However, the battalion became disorganised during the landing and mixed with other units. Small sections of the battalion were engaged in firefights all along the Australian front.[16] Major Edmund Drake-Brockman, one of the battalion's senior officers, tried to sort the scattered men into their battalions: 9th on the right, 10th in the middle and 11th on the left.[17] Meanwhile, the second half of the battalion landed further north of the first wave, directly under heavy machine-gun fire from Turks fully prepared and alerted by the first wave.[18]
Over the next few days, the battalion dug in on the first and second ridges under heavy fire from the Turks. Casualties were heavy, but a defensive line was established. On 30 April, the battalion was withdrawn and moved into reserve on the beach. The next day, it reoccupied its section of the front. At this stage, the battalion was 450-strong.[19] By 1 May, 30 officers and 940 other ranks from the battalion had landed.[20]
Troops from the Australian 11th and 12th Battalions on board HMS London en route to Gallipoli. 24 April 1915. AWM Photo
Raid on Gaba Tepe
On 4 May 1915, a party of 100 men from the battalion, led by Captain Raymond Leane and a detail of engineers, launched an unsuccessful attack on a Turkish fort at Gaba Tepe,[19] which was being used to observe artillery fire onto Australian positions around Anzac Cove. The Turks opened heavy fire on the party which was forced to withdraw. The Australians lost four killed, including an officer, and 19 others were wounded. The raid was the AIF's first of the war.[4][21] At this point, the battalion estimated that it had suffered 38 killed, 200 wounded and 197 missing. On 15 May, the battalion received 244 reinforcements,[19] bringing its total strength to 23 officers and 723 other ranks.[21]
In the early morning on 19 May, Turkish forces launched an attack against the left flank of the Australian lines, which developed into a major battle along the whole Australian front. The attack was repulsed with heavy losses. The 11th Battalion suffered nine killed and eight wounded,[19] mainly from shrapnel. One Turkish officer and five soldiers surrendered. On 21 May, a truce was declared and a burial party from the 12th Battalion was sent out. However, it was fired at by the Turks and as a result burial parties were discontinued. A similar truce was declared on 24 May.[19] A line was drawn halfway between the two lines and each side sent out parties to bury the dead and collect equipment.[21]
Lone Pine
On 27 July 1915, after two weeks in reserve, the battalion relieved the 12th Battalion at Tasmanian Post, on the right on the Australian front line. On 31 July, a party of around 200 men led by Leane were ordered to capture a section of Turkish trenches in front of the battalion's position. After engineers detonated three mines prepared near Turkish communications trenches, the storming party captured the Turkish trench following a bayonet charge, with the loss of one officer and 36 other ranks killed. Seventy-three other members of the battalion were wounded during the attack, including Leane, who was mentioned in despatches. Turkish casualties were estimated by the battalion to be 60 killed.[22][23]
On 6 August, the battalion held off a fierce Turkish counterattack on the trench, which became known as "Leane's Trench" during the Battle of Lone Pine. Heavy casualties were sustained on both sides. The battalion suffered 41 killed, 94 wounded and 19 missing.[24] By the end of the month, the 11th Battalion's strength, despite having received six batches of reinforcements, had fallen to just over 500 men, approximately half its authorised strength.[25] The following month, command of the battalion passed to Leane when Lyon-Johnston took over as brigade commander. As the health of the men deteriorated, the battalion's strength fell further to just over 300. The arrival of winter in October brought heavy rain and even harsher conditions.[25]
Withdrawal
In November, the battalion supported the 5th Light Horse around "Chatham Post" until it was withdrawn, with the 9th Battalion, from Anzac Cove. The withdrawal had been planned for the 14th, but due to bad weather this was delayed until the night of the 16/17 November 1915. From Anzac Cove, it sailed to Lemnos where it recuperated at Sampi Camp, following seven months in the trenches. The battalion's war diary records particularly bad weather on Lemnos during this period, noting "Mudros seems a most unsuitable place to send troops for a rest". During this rest period, the battalion reported its first and only case of diphtheria, following which the whole brigade was quarantined.[26] On 17 December, the battalion's last casualty of the campaign, a soldier named Private Hayes, died from meningitis.[27] The battalion lost a total of 353 men killed during the campaign.[28]
Western Front
In early 1916, the battalion sailed to Alexandria on the Empress of Britain. From Alexandria, it travelled by train to bivouac at Tall al Kabir.[29] At this time, the battalion received 367 reinforcements from Australia before undertaking defensive duties around Gebel Habieta, guarding the Suez Canal.[30] In February, the AIF was re-organised and expanded. This saw the veteran battalions split to provide cadres for new battalions and as a part of this process, the 11th Battalion provided personnel to the 51st Battalion,[31] by transferring the even numbered sections to the new battalion.[32] At this time, the battalion received four Lewis Guns for organic direct fire support.[33]
On 30 March 1916, as the AIF's infantry divisions were transferred to Europe, the battalion sailed from Alexandria aboard the HMT Corsican.[34] It arrived at Marseilles, France, on 5 April and then moved by train to Flêtre where it was billeted until the 19th when it moved to Sailly, where it commemorated Anzac Day on 25 April.[35] In mid-May, after a period of acclimatisation and training to prepare them for the European battlefield, the 11th Battalion moved up to the front line around Petillon in the Fleurbaix sector, with a strength of 27 officers and 929 other ranks. A further draft of reinforcements, totalling 69 men all ranks, arrived on 25 May,[36] and on 30 May the battalion had its first experience of combat on the Western Front.[37] Late that evening, German artillery bombarded the Allied line around the Cordonnerie salient, before infantry launched a raid on the 11th Battalion's trenches. In the fighting that followed the 11th Battalion lost four men captured, 37 killed and 70 wounded.[36]
Pozières and Mouquet Farm
Throughout June, the 11th Battalion was placed in support of the front as it was brought back up to strength. At this time, the battalion's organic fire support was increased by the addition of two extra Lewis Guns. The following month, they moved to the Somme and were committed to the fighting around Pozières. After arriving at Albert on 19 July amidst a gas attack, the battalion spent the next couple of days preparing to attack, working to improve trenches and cache stores, during which they were subjected to heavy artillery bombardment.[38] The attack was put in just before midnight on 23 July and was a costly success. Amidst heavy casualties, the 11th Battalion took the forward German trenches and amidst the confusion of the fighting advanced beyond their limit of exploitation, entering Pozières and moving beyond where they became embroiled in close quarters fighting. After capturing five artillery pieces, the battalion's officers and non-commissioned officers eventually managed to regain control of the advance and the battalion was brought back into a defensive line along their first objective. At dawn, patrols from the battalion entered the village again and cleared out the cellars beneath the battered remains of the village's buildings, capturing over 40 prisoners.[38]
During the night of 24/25 July, the Australians attacked again, but after establishing a new defensive line, the 11th was forced to withdraw after suffering heavily from both friendly and enemy shelling. In the morning of 25 July, further casualties were sustained by German artillery. German infantry then launched a counterattack on the battalion's right, but the Australians managed to hold their ground. They remained in the line throughout the day, before the 19th Battalion arrived as part of the 5th Brigade's relief of the 3rd Brigade. Having lost 19 officers and 512 other ranks killed, wounded or missing, the battalion had suffered the most of all the 3rd Brigade's battalions and was moved back to Berteaucourt to be rebuilt.[38][39]
After re-organising, in mid-August the 11th Battalion moved to La Boisselle where they were placed into brigade reserve. Just before dawn on 21 August, about 200 men from the 11th took part in an attack around Mouquet Farm; casualties amounted to 20 killed and 40 wounded and afterwards the battalion was moved to Belgium.[40] The 11th Battalion spent the remainder of 1916 in the Ypres sector, in Flanders, but was moved back to the Somme at the end of the year as the worst winter in 40 years descended on the front.[4][41]
Louverval
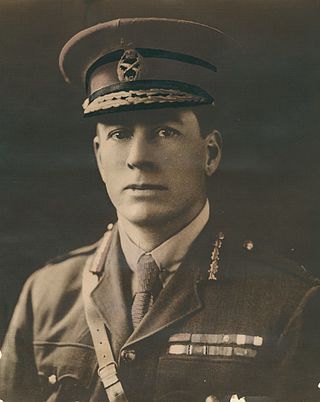
Lieutenant Charles Pope, the 11th Battalion's sole Victoria Cross recipient.
In early 1917, the Germans fell back towards the Hindenburg Line in an effort to shorten their lines and move into prepared positions.[42] As the Allies pursued the withdrawing Germans, in late February the 11th Battalion captured Le Barque, conducting mopping-up operations before advancing to Thilloy where they fought a minor engagement before being relieved by the 3rd Battalion, having lost 12 killed and 30 wounded during the fighting and a further 10 men killed and 13 wounded by artillery. Sickness also took a heavy toll during this time due to the bad weather.[43] In March, Lieutenant Colonel Rupert Rafferty took over as commanding officer and the following month, as the Allied line was pushed further forward towards the Hindenburg Line, the 11th Battalion played a supporting role during the 3rd Brigade's attack around Boursies, before occupying the front around the village of Louverval.[44] On 15 April 1917, during the Battle of Lagnicourt, Lieutenant Charles Pope, of 'A' Company, was in command of an important picket post on the right of the battalion's positions outside Louverval, with orders to "hold the position at all costs".[45] The Germans attacked the position with overwhelming numbers and surrounded the post. Having used up their ammunition, the remainder of the post charged with fixed bayonets into the surrounding German positions. Pope's body was later found with those of his men, having killed 80 Germans. Pope was posthumously awarded the Victoria Cross,[45] Australia's highest award for gallantry in the face of the enemy.[46]
Bullecourt and the Third Battle of Ypres
In early May, the 11th Battalion moved to Norieul, where they occupied a recently captured portion of the German line. A couple of days later, during the Second Battle of Bullecourt, their position was attacked by German "shock troops". In response to the attack, supporting artillery was called down, and the attack repulsed. The Germans laid down a heavy bombardment in retaliation. An attack was ordered, but the order was rescinded when the senior officer in the forward trench, Major Aubrey Darnell, expressed concerns about the state of the soldiers in the assault wave. The Germans then put in another attack, which was once again turned back, before the 11th launched a limited counterattack and regained the ground that had been lost. The battalion, having lost 68 men killed, two captured and 140 wounded, was down to a strength of just over 400 men. They were relieved and then moved back to Bapaume, where they received a draft of over 100 reinforcements.[47]
Over the next couple of months, the battalion was rebuilt, reaching a strength of 44 officers and 1,002 other ranks by late August. The following month they were committed to the Third Battle of Ypres. Their first attack came around Glencorse Wood on 20 September, during which the 11th Battalion lost 46 killed and 100 wounded, before moving to Westhoek Ridge in early October. Another move saw them transferred to Broodeseinde Ridge, where they conducted a raid on German positions around Celtic Wood on 6/7 October in concert with the 12th Battalion.[48] The following day, the 11th Battalion moved to a position on "Anzac Ridge", before later moving to Zonnebeke at the end of the month where they suffered heavy casualties from German artillery. Throughout November and the first part of December, the battalion remained out of the line, resting around Bologne, before returning to the front around Messines in late December, remaining there over New Years. The battalion's strength during this time was 32 officers and 687 other ranks.[49]
German Spring Offensive and the final Hundred Days
In early 1918, after the capitulation of the Russian Empire the Germans, having moved the bulk of their forces to the Western Front, launched the Spring Offensive, striking against the British forces in the Somme.[50] The initial onslaught pushed the Allied forces back and the Australian divisions, which had been merged into the Australian Corps, were thrown into the line in an effort to stem the tide.[51] In early March, the 11th Battalion moved to the Hollebeke sector, where they were subjected to gas attacks before being sent south to Amiens at the start of April, joining the rest of the 1st Division in defence of Hazebrouck in the middle of the month.[52] For the next couple of months the battalion rotated through the line in a defensive role as the German offensive was blunted. In June, as the Allies sought to regain some of the initiative, they undertook a series of Peaceful Penetration raids.[53] On 2 June, the 11th Battalion attacked Mont de Merris, which resulted in the capture of a large amount of German equipment and over 200 prisoners for the loss of 16 men killed and 74 wounded. A lesser attack was launched on the German trenches opposite the battalion on 22 June.[54] Around this time, a small group of US soldiers was attached to the 11th Battalion to gain experience. The following month, the battalion captured Gerbedoen Farm before supporting the 10th Battalion's successful attack on Merris.[55]
On 8 August, the Allies launched their own offensive, known as the Hundred Days Offensive, around Amiens.[56] The 11th Battalion did not take part in the opening phase of the offensive, moving to Hamel and establishing themselves in a defensive position around Harbonnieres. On 10 August, the battalion was committed to a strong attack around Lihons; although successful, the attack lasted three days and resulted in heavy casualties, including 58 killed and 140 wounded. On the night of 12/13 August, the 11th was withdrawn to the support line just behind the front. Later, they were moved to Vaire and then Cerisy, before supporting the 9th and 12th Battalions around Chuignolles and Proyart on 23 August and then around Chuignes and Cappy two days later, where further losses were experienced.[57] The 11th Battalion's final attack came against the Hindenburg Outpost Line on 18 September when they launched a three-company attack around Fervaque Farm and Carpeza Copse near Villeret. Despite being severely understrength– each company had an average strength of just 76 men– they advanced over 3,000 yards (2,700m) and took over 120 prisoners and large quantities of German equipment, for the loss of 18 men killed. Further casualties came on 24 October when German aircraft attacked the battalion headquarters, killing a number of officers, including Darnell, who was the acting commanding officer.[58] The heavy casualties that the Australians had suffered during the final year of the war, and the decrease in volunteers arriving from Australia, meant that the battalion was desperately understrength. In October, they were withdrawn from the line for rest and reorganisation, at the insistence of the Australian prime minister, Billy Hughes. At this time, the battalion was reorganised into a two-company structure. In early November, the battalion prepared to return to the front around St. Quentin, but before they could return to the fighting, an armistice came into effect, bringing the war to an end.[59]
By the end of the war, a total of over 9,000 men had served in the 11th Battalion, of which 1,115 were killed and 2,424 wounded.[60] Members of the battalion received the following decorations for their service during the war: one Victoria Cross, one Companion of the Order of the Bath, two Companions of the Order of St Michael and St George, seven Distinguished Service Orders, one Officer of the Order of the British Empire, 30 Military Crosses and one Bar, 25 Distinguished Conduct Medals with one Bar, 96 Military Medals with two Bars, three Meritorious Service Medals, 85 Mentions in Despatches and seven foreign awards.[4] Following the armistice, the 11th Battalion was moved to Chaelet, in Belgium, where the demobilisation process began. The battalion's personnel were slowly repatriated to Australia, while those that waited undertook training to prepare them for civilian life. On 6 February 1919, the 11th Battalion was amalgamated with the 12th, to form the 11th/12th Battalion; a further amalgamation occurred on 27 March when the 11th/12th merged with the 9th/10th Battalion, forming the 3rd Australian Infantry Brigade Battalion. A short time later, the battalion disbanded.[61] The 11th Battalion's final commanding officer was Major Jack O'Neil, an original member of the battalion who had been appointed a company sergeant major during the battalion's formative period at Blackboy Camp.[62]
Inter war years and World War II
In 1921, following the conclusion of the demobilisation of the AIF, the government undertook a review of Australia's military requirements and the part-time military force, the Citizens Forces, was reorganised to perpetuate the numerical designations of the AIF units.[63] As a result, the 11th Battalion was reformed in Perth, drawing personnel and lineage from the 2nd Battalion, 11th Infantry Regiment and the 2nd Battalion, 51st Infantry Regiment.[64] Upon formation, the battalion was assigned to the 13th Brigade,[65] and inherited the battle honour of "South Africa, 1899–1902", which it bore for the 1st and 2nd Battalions, West Australian Infantry. In 1927, territorial designations were introduced and the battalion adopted the title of the "Perth Regiment"; it was also awarded battle honours for World War I, receiving a total of 23. Its motto at this time was Vigilans.[66]
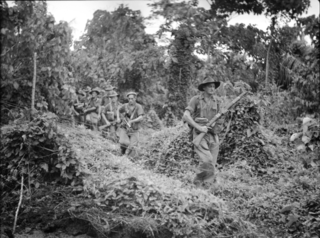
Battalion headquarters at Jacquinot Bay, New Britain, December 1944
Upon establishment, the Citizens Forces units were manned through both voluntary and compulsory service;[67] but, in 1929–30, following the election of the ScullinLabor government, the compulsory service scheme was abolished and the Citizens Forces was replaced with an all volunteer "Militia".[68] As a result of the economic pressures of the Great Depression the number of volunteers fell, and consequently a number of infantry battalions had to be disbanded or amalgamated.[68] The 11th Battalion was one of those amalgamated, being joined with the 16th Battalion in 1930 to become the 11th/16th Battalion. The two units remained linked until 1 October 1936, when the 11th Battalion (City of Perth Regiment) was re-formed in its own right,[64] as part of an expansion of the Militia due to concerns about war in Europe.[69]
During World War II, like most Militia units, the 11th Battalion performed garrison duties for most of the war. It was mobilised for war service at Melville, Western Australia, in December 1941.[65] In the early part of the war, the battalion remained in Western Australia, and was assigned to the 4th Division, as part of the 13th Brigade, before later moving to the Northern Territory in 1943,[70] where the 13th Brigade was deployed to defend Darwin, replacing the 3rd Brigade.[71] Later in 1943, the battalion was gazetted as an AIF battalion, after more than 65 percent of its personnel volunteered to serve outside Australian territory.[64] As the threat to Darwin passed, its garrison was reduced and the 13th Brigade was reorganised to prepare it for operations in the Pacific. The battalion, along with the rest of the 13th Brigade, was later transferred to the 5th Division and saw service against the Japanese during 1945 in the New Britain Campaign. Due to the large size of Japanese forces on New Britain, the Australian campaign was focused mainly upon containment.[72] After landing at Jacquinot Bay the battalion was based around the Tol Plantation and conducted patrolling operations to restrict the Japanese to the Gazelle Peninsula. Little contact was made and actual combat was limited; the battalion's casualties amounted to three dead and four wounded.[70] Following the end of the war, the 11th Battalion occupied Rabaul,[71] before being disbanded on 11 April 1946.[64]
Post World War II
In 1948, Australia's part-time military force was re-raised in the guise of the Citizens Military Force.[73] At this time, the 11th/44th Battalion (City of Perth Regiment) was formed. From 1960, following a reorganisation of the Army that saw the adoption of the Pentropic divisional establishment, the 11th/44th was reduced to a company-sized element and 'A' (City of Perth) Company, 1st Battalion, Royal Western Australia Regiment maintained the traditions of the 11th Battalion.[66] The following year, the 11th Battalion was awarded the 15 battle honours that had been earned by the 11th and 2/11th Battalions during World War II.[66] A separate 11th Battalion, Royal Western Australia Regiment was reformed in 1966, being formed through a designation of the 2nd Battalion, Royal Western Australia Regiment.[74] Ten years later, the battalion was reduced to an independent company and in 1987, the 11th Independent Rifle Company was amalgamated with the 28th Independent Rifle Company to form the current 11th/28th Battalion, Royal Western Australia Regiment.[75][76]
The First Australian Imperial Force was the main expeditionary force of the Australian Army during the First World War. It was formed as the Australian Imperial Force (AIF) following Britain's declaration of war on Germany on 15 August 1914, with an initial strength of one infantry division and one light horse brigade. The infantry division subsequently fought at Gallipoli between April and December 1915, with a newly raised second division, as well as three light horse brigades, reinforcing the committed units.
The New Zealand and Australian Division was a composite army division raised for service in the First World War under the command of Major General Alexander Godley. Consisting of several mounted and standard infantry brigades from both New Zealand and Australia, it served in the Gallipoli Campaign between April and December 1915.
The Battle of Beersheba was fought on 31 October 1917, when the British Empire's Egyptian Expeditionary Force (EEF) attacked and captured the Ottoman Empire's Yildirim Army Group garrison at Beersheba, beginning the Southern Palestine Offensive of the Sinai and Palestine campaign of World War I.
The landing at Anzac Cove on Sunday, 25 April 1915, also known as the landing at Gaba Tepe and, to the Turks, as the Arıburnu Battle, was part of the amphibious invasion of the Gallipoli Peninsula by the forces of the British Empire, which began the land phase of the Gallipoli campaign of the First World War.
The 2nd Division of the Australian Army, also known as the 2nd (Australian) Division, commands all the Reserve brigades in Australia. These are the 4th in Victoria and Tasmania, the 5th in New South Wales, the 11th in Queensland, the 13th in Western Australia, and the 8th spread across the country. The division is also responsible for the security of Australia's northern borders through its Regional Force Surveillance Units.
The 1st Division, also known as the 1st (Australian) Division, is headquartered in Enoggera, a suburb of Brisbane. The division was first formed in 1914 for service during the First World War as a part of the Australian Imperial Force (AIF). It was initially part of the Australian and New Zealand Army Corps (ANZAC) and served with that formation during the Gallipoli campaign, before later serving on the Western Front. After the war, the division became a part-time unit based in New South Wales. During the Second World War it undertook defensive duties in Australia. It was disbanded in 1945.
Brigadier General Sir Raymond Lionel Leane, was an Australian Army officer who rose to command the 48th Battalion then 12th Brigade during World War I. For his performance during the war, Leane was described by the Australian Official War Historian Charles Bean as "the foremost fighting leader" in the Australian Imperial Force (AIF), and "the head of the most famous family of soldiers in Australian history", among other accolades. After the war, he served as Commissioner of the South Australia Police from 1920 to 1944, for which he was knighted.
The 2nd Battalion was an infantry battalion of the Australian Army. It was initially raised for service during the First World War as part the Australian Imperial Force and saw action at Gallipoli before being sent to the Western Front in mid-1916, where it spent the next two-and-a-half years taking part in the fighting in the trenches of France and Belgium. Following the conclusion of hostilities, the battalion was disbanded in early 1919 as part of the demobilisation process.
The 7th Battalion was an infantry battalion of the Australian Army. Raised in 1914 as part of the Australian Imperial Force during the First World War, the battalion was completely recruited from the state of Victoria and formed the 2nd Brigade, 1st Division. The battalion served during the Gallipoli campaign where it had the distinction of having four of its members awarded the Victoria Cross. In 1916, it was transferred to Europe, fighting in the trenches along the Western Front for the next two and a half years.
The 10th Battalion was an infantry battalion of the Australian Army that served as part of the all-volunteer Australian Imperial Force during World War I. Among the first units raised in Australia during the war, the battalion was recruited from South Australia in August 1914 and formed part of the 3rd Brigade, 1st Division. After basic training, the battalion embarked for Egypt where further training was undertaken until the battalion was committed to the Gallipoli campaign. During the landing at Anzac Cove, it came ashore as part of the initial covering force. Members of the 10th Battalion penetrated the furthest inland of any Australian troops during the initial fighting, before the Allied advance inland was checked. After this, the battalion helped defend the beachhead against a heavy counter-attack in May, before joining the failed August Offensive. Casualties were heavy throughout the campaign and in November 1915, the surviving members were withdrawn from the peninsula. In early 1916, the battalion was reorganised in Egypt at which time it provided a cadre staff to the newly formed 50th Battalion. It was transferred to the Western Front in March 1916, and for the next two-and-a-half years took part in trench warfare in France and Belgium until the Armistice in 1918. The last detachment of men from the 10th Battalion returned to Australia in September 1919.
The 19th Battalion was an infantry battalion of the Australian Army. Although the unit's numerical designation was bestowed upon it during World War I, the unit can trace its origins back to 1860 when a Volunteer Rifle corps was raised in South Sydney. During World War I, the 19th Battalion was raised as a unit of the Australian Imperial Force, attached to the 5th Brigade, of the 2nd Division. The unit was formed in 1915 and was first sent to Gallipoli where it fought against the Turks, before being withdrawn from the peninsula and being sent to France in early 1916, where it served in the trenches along the Western Front. Over the next two years the battalion fought in many major battles and won numerous battle honours. In April 1918, it took part in defending against the German Spring Offensive, before the Allies launched their own last-ditch effort as part of the Hundred Days Offensive. The battalion was disbanded in October 1918 due to manpower shortages in the AIF and most of its men were sent to reinforce the other three battalions of the 5th Brigade.
The 26th Battalion was an infantry battalion of the Australian Army. Originally raised in April 1915 for service in World War I as part of the Australian Imperial Force (AIF), it was assigned to the 7th Brigade and consisted of personnel recruited from the states of Queensland and Tasmania. The battalion fought at Gallipoli in the latter stages of that campaign before being withdrawn to Egypt in late 1915. In mid-1916, it was sent to Europe where it served in the trenches of the Western Front in France and Belgium for the rest of the war, fighting in most of the battles that the Australians took part in between 1916 and 1918. At the end of the war, it was disbanded in May 1919 as part of the demobilisation of the AIF.
The 3rd Light Horse Brigade was a mounted infantry brigade of the Australian Imperial Force (AIF), which served in the Middle Eastern theatre of World War I. The brigade was initially formed as a part-time militia formation in the early 1900s in Victoria. In 1914, the brigade was re-constituted as part of the AIF. The brigade first saw action while serving with the Australian and New Zealand Army Corps during the Gallipoli campaign where they were noted for their attack during the Battle of the Nek. After being withdrawn to Egypt in February 1916 they were involved in the Sinai and Palestine Campaign until the end of the war. They were attached to a number of different formations being part of the Anzac Mounted Division in March 1916 and the Australian Mounted Division in June 1917, who they remained with until the end of the war. After the war, the AIF light horse regiments were demobilised and disbanded; however, the brigade briefly existed as a part-time militia formation in New South Wales until 1921 when its regiments were reorganised into cavalry brigades.
The Battle of el Buqqar Ridge took place on 27 October 1917, when one infantry regiment and cavalry troops of the Yildirim Army Group, attacked the 8th Mounted Brigade of the Egyptian Expeditionary Force (EEF) in the last days of the stalemate in Southern Palestine during the Sinai and Palestine campaign of World War I.
The 13th Battalion was an infantry battalion of the Australian Army. Originally raised for the 1st Australian Imperial Force during the First World War, it was formed just six weeks after the start of the war. Along with the 14th, 15th and 16th Battalions which were recruited from New South Wales, it formed the 4th Brigade. The battalion saw service initially at Gallipoli before being transferred to France in 1916. For the next two years it fought in the trenches of the Western Front, earning numerous battle honours in the process.
The 32nd Battalion was an infantry battalion of the Australian Army. It was first raised in 1915 as part of the all-volunteer Australian Imperial Force for service during the First World War, and was initially made up of personnel from South Australia and Western Australia. The battalion served in France and Belgium in 1916–1918 before being disbanded in 1919.
The 27th Battalion was an infantry battalion of the Australian Army. It was initially raised in 1915 as part of the all-volunteer First Australian Imperial Force for service during World War I. During the conflict, the battalion saw action briefly at Gallipoli before later fighting on the Western Front between 1916 and 1918. It was disbanded in 1919, but was re-raised in 1921 as part of the Citizens Force, which later became the "Militia". During World War II the battalion was used mainly in a garrison role until the last year of the war when it was committed to the fighting against the Japanese during the Bougainville campaign. Following the end of hostilities it was disbanded in May 1946. Between 1948 and 1965 the battalion was re-raised and disbanded a number of times before eventually becoming part of the Royal South Australia Regiment. It was disbanded for a final time in 1987, when it was amalgamated with the 10th Battalion, Royal South Australia Regiment to form the 10th/27th Battalion, Royal South Australia Regiment.
The 15th Battalion was an infantry battalion of the Australian Army. Formed in 1914 as part of the all-volunteer Australian Imperial Force from Queensland and Tasmanian recruits, the battalion fought during the Gallipoli Campaign and on the Western Front during the First World War. It was disbanded after the war in 1919, but later re-raised as a part-time Citizens Forces unit based in Queensland in 1921, consisting of a mixture of volunteers and conscripts. Economic pressures and limited manpower resulted in the battalion being amalgamated with other battalions a couple of times during the inter-war years. In mid-1939, as rising tensions in Europe led to an expansion of the Australian military, the battalion was re-formed in its own right. During the Second World War the 15th Battalion was mobilised for wartime service and initially undertook defensive duties in Australia before taking part in the fighting against the Japanese in New Guinea and Bougainville in 1943–1945. The battalion was disbanded in 1946 and never re-raised.
The 28th Battalion was an infantry battalion of the Australian Army. It was raised in early 1915 as part of the First Australian Imperial Force for service during the First World War and formed part of the 7th Brigade, attached to the 2nd Division. It fought during the final stages of the Gallipoli campaign in late 1915 and then on the Western Front between 1916 and 1918. At the end of the war, the 28th was disbanded in 1919 but was re-raised in 1921, as a part-time unit based in Western Australia. During the Second World War, the 28th undertook defensive duties in Australia for the majority of the conflict, before seeing action against the Japanese in the New Britain campaign in 1944–1945. The battalion was disbanded in March 1946 but was re-formed in 1948 as an amalgamated unit with the 16th Battalion, before being unlinked in 1952 and re-raised as a full battalion following the reintroduction of national service. It remained on the Australian Army's order of battle until 1960 when it was subsumed into the Royal Western Australia Regiment, but was later re-raised in 1966 as a remote area infantry battalion. In 1977, the 28th was reduced to an independent rifle company, and in 1987 was amalgamated into the 11th/28th Battalion, Royal Western Australia Regiment.
The third attack on Anzac Cove was an engagement during the Gallipoli Campaign of the First World War. The attack was conducted by the forces of the Ottoman Turkish Empire, against the forces of the British Empire defending the cove.
Bean, Charles (1941b). The Australian Imperial Force in France, 1916. Official History of Australia in the War of 1914–1918. Vol.III (12thed.). Canberra, Australian Capital Territory: Australian War Memorial.
Belford, Walter (1992) [1940]. "Legs-Eleven": Being the Story of the 11th Battalion (A.I.F.) in the Great War of 1914–1918. Swanbourne, Western Australia: John Burridge Military Antiques. OCLC221479550.
Festberg, Alfred (1972). The Lineage of the Australian Army. Melbourne, Victoria: Allara Publishing. ISBN978-0-85887-024-6.
Gill, Ian (2004). Fremantle to France: 11th Battalion A.I.F. 1914–1919 (2nded.). Myaree, Western Australia: Advance Press. ISBN0-9750588-0-0.
Hurst, James (2005). Game to the Last: The 11th Australian Infantry Battalion at Gallipoli. South Melbourne, Victoria: Oxford University Press. ISBN0-19-555331-4.
Keogh, Eustace (1965). South West Pacific 1941–45. Melbourne, Victoria: Grayflower Publications. OCLC7185705.
Kuring, Ian (2004). Redcoats to Cams: A History of Australian Infantry 1788–2001. Loftus, New South Wales: Australian Military History Publications. ISBN1-876439-99-8.
Shaw, Peter (2010). "The Evolution of the Infantry State Regiment System in the Army Reserve". Sabretache. LI (4). Military Historical Society of Australia. ISSN0048-8933.
Stevenson, Robert (2013). To Win the Battle: The 1st Australian Division in the Great War, 1914–1918. Port Melbourne, Victoria: Cambridge University Press. ISBN978-1-107-02868-5.
This page is based on this Wikipedia article Text is available under the CC BY-SA 4.0 license; additional terms may apply. Images, videos and audio are available under their respective licenses.