Battle of Kandahar (1880)

Last updated
Battle of Kandahar
Part of the Second Anglo-Afghan War
Battle in Afghanistan.jpg
Kandahar: 92nd Highlanders storming Gundi Mulla Sahibdad, Richard Caton Woodville
Date1 September 1880
Location 31°37′N65°43′E / 31.617°N 65.717°E / 31.617; 65.717
Result British Victory
Belligerents
Flag of the United Kingdom.svg  United Kingdom
British Raj Red Ensign.svg  India
Flag of Afghanistan (1880-1901).svg Afghanistan
Commanders and leaders

Flag of the United Kingdom.svg Frederick Roberts

Flag of the United Kingdom.svg Henry Francis Brooke  
Flag of Afghanistan (1880-1901).svg Ayub Khan
Strength
10,000 [1] 13,000 [1]
Casualties and losses
100 killed
218 wounded
1,000 killed
2,000 wounded

The Battle of Kandahar, 1 September 1880, was the last major conflict of the Second Anglo-Afghan War. The battle in southern Afghanistan was fought between the British forces under command of General Roberts and the Afghan forces led by Ayub Khan. It ended with a British victory.

Contents

Background

In May 1879, after the death of the Amir Sher Ali Khan, Sir Louis Cavagnari negotiated and signed the Treaty of Gandamak with his successor, Mohammad Yaqub Khan. The treaty obliged the Afghans to admit a British resident governor at Kabul; a position Cavagnari himself took up in July. However, on 3 September, Cavagnari and the other European members of the mission were massacred in a sudden rising of Afghan rebel troops.

After Yakub Khan had been dethroned and exiled by the British for suspected collusion in the murder of Cavagnari, feelers were put out for two replacement candidates: his younger brother, Ayub Khan the Governor of Herat, and his nephew, Abdur Rahman Khan. However, in May 1880, a new British Liberal government recalled the Viceroy of India, Lord Lytton and replaced him with Lord Ripon who had instructions to bring all troops out of Afghanistan. These plans for the evacuation were disrupted by Ayub Khan, who after stirring up anti-British feeling, [2] had sallied out of Herat in early June with 10,000 followers. 1,500 British and Indian troops, together with Afghan levies, were sent to intercept this force.

The British, commanded by Brigadier George Burrows, met Ayub Khan at Maiwand, on 27 July. However many of the Indian troops in British service were new, inadequately trained recruits, and crumpled under pressure; the Afghan levies had already switched sides, unwilling to fight against their countrymen. [2] Despite a heroic last stand by the 66th Regiment, and inflicting 2,500 casualties on his enemy, General Burrows was defeated by a determined adversary.

Prelude

After the disastrous defeat at Maiwand, the remnants of General Burrows’ battle-wearied army began the 45 mile retreat to the city of Kandahar. Armed local irregulars, exhaustion and thirst contributed to the breakdown of the column's discipline, and were it not for Captain Slade's rear guard action, far fewer would have made it to the refuge of the city:

All over the wide expanse of desert are to be seen men in twos and threes retreating. Camels have thrown their loads; sick men, almost naked, are astride donkeys, mules and camels; the bearers have thrown down their dhoolies (palanquins) and left the wounded to their fate. The guns and carriages are crowded with the helpless wounded suffering the tortures of the damned; horses are limping along with ugly wounds and men are pressing eagerly to the rear in the hope of finding water. Hordes of irregular horsemen are to be seen amongst our baggage animals, relentlessly cutting our men down and looting. A few alone remain with Brigadier Burrows to try to turn the rout into an orderly retreat. [3] – Captain Slade.

Of the approximately 2,500 British and Indian troops at Maiwand, a little over 960 succumbed in either the battle or the ensuing retreat. Only 161 of the wounded reached the citadel of Kandahar.

The siege of Kandahar

The remnants of the straggling column reached Kandahar on the 28th raising the garrison numbers to 4,360 — the Afghan population of 12,000 were compelled to leave. With the abandonment of the cantonments, the whole garrison withdrew behind the walls of the fortified city and organised preparations for its defence. These defences included improving communications along the city's walls, plugging breaches, constructing gun platforms and the laying of wire obstacles outside the walls to entangle their foe. The Afghans determined to harass and hinder the defenders’ preparations throughout.

On 8 August, Ayub Khan, the victor at Maiwand, opened fire on the citadel from Picquet hill north west of the city; a few days later other guns fired from the villages of Deh Khoja and Deh Khati on the east and south. An attempt to neutralise the village of Deh Khoja, led by Brigadier-General Brooke on the 16th, proved unsuccessful. During the extrication, both Brooke and Captain Cruickshank fell, adding to the casualty total of over 100.

Relief column

9th Lancers on the march to Kandahar, water-colour by Orlando Norie. The troops would march in the early morning to avoid the full heat of the sun, halting a few minutes every hour. In this way, the column managed to cover up to 20 miles a day Caton Woodville - Battle of Kandahar.jpg
9th Lancers on the march to Kandahar, water-colour by Orlando Norie. The troops would march in the early morning to avoid the full heat of the sun, halting a few minutes every hour. In this way, the column managed to cover up to 20 miles a day

The Maiwand disaster had altered military plans for the evacuation of the Kabul garrison from Afghanistan.

...the present question is the relief of Kandahar and the defeat of Ayub. I have a fine force ready for the work, and Bobs would go in command of it. [4] – General Donald Stewart, Kabul.

The 'Bobs' in question, General Roberts, would personally lead a division from Kabul to rectify the recent calamity and relieve the besieged city of Kandahar. It was also arranged that General Phayre would march from Quetta in northern India with the same intention, and that General Stewart would proceed to evacuate the rest of the garrison back to India as originally planned. The Viceroy of Afghanistan was informed that Roberts would march on the 8 August with the expectation of reaching Kandahar by 2 September.

"Lord Roberts of Kabul and Kandahar on his Celebrated Charger," by Richard Caton Woodville (Harper's Magazine, European Edition, December 1897, p27). For his services, General Roberts received the thanks of Parliament, and was appointed both Knight Grand Cross of the Order of the Bath (GCB) and Companion of the Order of the Indian Empire (CIE) in 1880, becoming a baronet the following year Lord roberts of kandahar.jpg
"Lord Roberts of Kabul and Kandahar on his Celebrated Charger," by Richard Caton Woodville (Harper's Magazine, European Edition, December 1897, p27). For his services, General Roberts received the thanks of Parliament, and was appointed both Knight Grand Cross of the Order of the Bath (GCB) and Companion of the Order of the Indian Empire (CIE) in 1880, becoming a baronet the following year

Of the 10,000 men under Robert's command, a little over 2,800 were Europeans. Because of the unforgiving terrain of the Afghan country, and the necessity of speed, all troops were ordered to travel light (20-30 lbs of kit per trooper) and controversially, no wheeled transport taken, with 6- and 9-pounder mountain guns being the only artillery. 8,500 mules, donkeys, and ponies would be utilised to carry the main supplies.

The march from Kabul to Kandahar is approximately 320 miles [5] (although the chosen route through the Logar Valley was not the shortest, the valley's fertile land would supplement their supplies). The army paid for everything they took throughout the march including grain, fresh animals and even firewood – the local Afghans more than pleased to barter with the troops.

The stop at Ghazni proved to be brief; the column set off again very early in the cool of the morning of the 16th. By the end of the day's march in the early afternoon, the temperatures had exceeded 100 °F with very little shade; sore feet and the constant scarcity of water adding to the extreme discomfort.

"The method, of such marching as was now put in practice is not easy to describe; it combined the extreme of freedom in movement with carefully regulated halts, and the closest control in every portion of the column; it employed the individual intelligence of each man composing the masses in motion, and called on all for exertion in overcoming the difficulties of the march, in bearing its extraordinary toil, and in aiding the accomplishment of the object in view." [4] – General Chapman.

By the 24th, the relief column had reached Khelat-i-Ghilzai. General Roberts received a letter from General Primrose at Kandahar describing the sortie in the village of Deh Khoja earlier on the 16th, and informing Roberts of the situation. On the 25th, the relief column, joined now by the garrison of Kelat-i-Ghilzai, resumed their march towards Kandahar. General Phayre's relief column however had suffered many problems from his arduous trek and was still some distance from Kandahar.

The following day Roberts' relief force reached Tir Andaz. It was here that Roberts learned that Ayub Khan had lifted the siege of Kandahar and had retired north to the village of Mazra in the Urgundab valley. On the 27th, General Hugh Gough proceeded to Robat with two cavalry regiments, whilst the remainder of the force, moving somewhat slower, joined them in Robat on the 28th. It was now only 19 miles to Kandahar.

The long march from Kabul to Kandahar of the entire column of men, followers and baggage took 20 days – an average of just over 15 miles/day. The followers alone included nearly 2,200 dhooly-bearers, 4,700 transport men and over 1,200 servants. Although the march was unhindered by the Afghans, it was a historic and remarkable feat of human endurance and organisation.

Battle

On the morning of the 31 August 1880, the relief force reached Kandahar. However, for the last part of the trek General Roberts, struck down with fever, had to be carried in a dhooly (though for dignity's sake, the general had forced himself upon a horse when within sight of the city).

Ayub Khan's position

A rugged and precipitous spur separates the Arghandab valley from the Kandahar plain. Both valley and plain are linked via the Murcha Pass at the end of the spur, and the Babawali Pass cutting through it. The section of the spur from Babawali Pass to its tip, is known as the Pir Paimal Hill.

Behind this spur lies the village of Mazra, around which Ayub Khan had camped. As well as the spur, the Afghans had other geographic advantages. Directly behind Pir Paimal Hill lies the Kharoti Hill (both of which providing excellent firing positions) and, between the hills, deep irrigation channels offered excellent defensive cover.

A reconnaissance of the area on the afternoon of the 31st, carried out by General Gough and Colonel Chapman, garnered valuable information of these Afghan positions. However, their retirement from the reconnaissance came under concerted attack from Afghan regulars and irregulars. The Sikh infantry were so hard pressed that elements of the 1st and 3rd brigades were ordered into the action.

Battle plan

Armed with this hard-won military intelligence, Roberts decided to attack the following day – the morning of 1 September 1880. While the Babawali Pass would be bombarded by artillery, 1st and 2nd Infantry Brigades (3rd in Reserve) would attack the enemy between the Pir Paimal and Kharoti hills and push up the Urgundab valley towards Ayub Khan's main camp at Mazra. The Murcha and Babawali passes were to be covered by cavalry elements supported by General Primrose's infantry and artillery. Gough's cavalry would move across the Urgundab, so as to reach by a wide circuit the anticipated line of the Afghan retreat.

Battle begins in earnest

A little after 9am, the artillery to the right of Picquet Hill began its bombardment of the Babawali pass – the Afghans replied with a three field-gun battery. However, before Roberts could push his army forward, Afghan positions in the villages of Gundi Mulla Sahibdad on the British right and Gundigan on the British left, had to be cleared.

British and Sikh troops at Kandahar 1880. Artillery support was frequently ineffective and on occasions the Afghan artillery proved to be better equipped than the British Troops at Kandahar 1880.jpg
British and Sikh troops at Kandahar 1880. Artillery support was frequently ineffective and on occasions the Afghan artillery proved to be better equipped than the British

The battle at Gundi Mulla Sahibdad was hard-fought. General Macpherson advancing his 92nd Highlanders and 2nd Gurkhas met determined resistance to the attack that included a bayonet charge by the Highlanders. Both sides suffered casualties, but the Afghans came off far worse – possibly losing up to 200 men. After the village had been pacified, the brigade pushed towards the southwesterly point of Pir Paimal, constantly harassed by determined Afghan resistance.

The British infantry carried the single shot, breech loading, .45 Martini-Henry rifle. It first entered service in 1871 replacing the Snider Martini henry rifle 0213.png
The British infantry carried the single shot, breech loading, .45 Martini-Henry rifle. It first entered service in 1871 replacing the Snider

Whilst General Macpherson advanced against Gundi Mulla Sahibdad, General Baker moved against Gundigan – the 72nd Highlanders and the 2nd Sikh Infantry in the van. Again the fighting was hard-fought – the Afghans holding well-defended positions that only a concerted effort by the attackers could dislodge. However, the left wing of the 72nd (supported by 5th Gurkhas) finally took the village, whilst the right wing supported the Sikhs, battling through the orchards between the two villages. As General Baker's brigade moved forward into the open it came under artillery fire from the extremity of the Pir Paimal hill and massed attacks from Ghazis; the latter resolutely repelled by the Highlanders and Sikhs.

The two brigades could now together move forward. Macpherson's brigade moved close around the spur to take the village of Pir Paimal. Having passed the village, the 92nd Highlanders under command of Major White met with determined resistance south west of the Babawali Pass. Despite reinforcements from Ayub Khan's main camp at Mazra, Macpherson stormed the position - Major White's Highlanders in the van supported by the 5th Gurkhas and 23rd Pioneers. Again a determined resistance and steady fire from the Afghans (many of whom firing from the slopes of the Pir Paimal hill) caused many Highlander casualties, but despite heavy losses, the British dispersed some 8,000 Afghans at bayonet point.

While Macpherson's brigade advanced close under the ridge, Baker's troops swept wider on the left; Colonel Money having been assigned to take possession of the Kharoti hill. From the northern end of the hill, Colonel Money could see Ayub Khan abandon his camp at Mazra in the face of the advancing forces of Macpherson and Baker.

Roberts had by now ordered MacGregor's 3rd brigade to Pir Paimal village to where he himself and General Ross (commander of the whole infantry division) were to move. Here, General Ross, unable to discern the situation, ordered the forward brigades to halt and replenish their spent ammunition. However, this delay provided Ayub Khan some respite. When the British finally entered the camp at 1pm, it was deserted, save for the smartly abandoned detritus of an army in retreat.

Ayub Khan's army was now in full rout. Although the plan for General Gough's cavalry to intercept the retreating Afghans did not work in practice, it was clear the British had achieved a decisive victory.

Aftermath

A rare coin minted during the occupation of Kandahar. British Crown within wreath on the obverse, Arabic inscription in four lines on the reverse. These issues were struck under local authorities who routinely recalled and devalued the coppers. This practice lead to a great variety of types, often featuring various animal or flower motifs. Accordingly, the types on this coin were likely not ordered by the British authorities, but rather placed by an opportunistic engraver eager to please the British Coin minted in Kandahar during its occupation during the Second Anglo-Afghan War.jpg
A rare coin minted during the occupation of Kandahar. British Crown within wreath on the obverse, Arabic inscription in four lines on the reverse. These issues were struck under local authorities who routinely recalled and devalued the coppers. This practice lead to a great variety of types, often featuring various animal or flower motifs. Accordingly, the types on this coin were likely not ordered by the British authorities, but rather placed by an opportunistic engraver eager to please the British
British and allied forces at Kandahar after the battle, at a time when the city was still protected by a large defensive wall Kandahar-1881.jpg
British and allied forces at Kandahar after the battle, at a time when the city was still protected by a large defensive wall

The Battle of Kandahar brought a close to the Second Anglo-Afghan War. Ayub Khan had been decisively beaten. He had lost the whole of his artillery, his camp, enormous quantities of ammunition, and about 1,000 men killed. Ayub Khan became a fugitive along with the small remnants of his battered army.

Roberts left Kandahar on 9 September 1880 and marched to Quetta with part of his division. On the 15 October 1880, at Sibi, he resigned his command, and sailed from Bombay on the 30th, taking sick leave in England. The exploits of General Roberts in Afghanistan greatly boosted his reputation as a skillful and enterprising soldier. Many years later, Roberts' heroic march was commemorated by a statue in Glasgow's Kelvingrove Park upon which the motto Virtute et valore (by Virtue and Courage) is inscribed.

The British appointed Abdur Rahman who was an opponent of the British, was thus securely established as emir of Afghanistan, under a protected state which gave Britain control of Afghanistan's foreign policy. Abdur Rahman Khan now the ruling Amir, was viewed as the real victor of the Second Anglo-Afghan War. [6] Despite attempts for the British to hold on to Kandahar, they decided to return it back to Afghanistan. Rahman confirmed the Treaty of Gandamak, whereby the British took control of the territories ceded by Yaqub Khan. Having thus achieved many of their war aims besides the aim of maintaining a British resident in Kabul, the British withdrew from Afghanistan, the last troops leaving in April 1881. The Afghan tribes maintained internal rule and local customs, and provided a continuing buffer between the British Raj and the Russian Empire. [7] Ironically many of these polices had been desired by Sher Ali Khan, and war could have been prevented had they been implemented earlier. [6] The war was expensive for Britain, spending some 17 million pounds during the war, which was three times the estimated cost. The costs rose just before the British left in March 1881, estimating to be around 19.5 million pounds. [8]

Despite attempts from the British to dissuade Afghanistan from Russian influence, Abdur Rahman Khan adopted an autocratic government similar to the Tsars of Russia, inspired by Peter the Great from his time in exile in Turkestan. Alongside this, despite the British attempting to prop up Afghanistan as a key ally, Abdur Rahman Khan often acted against the British, with atrocities horrifying even Queen Victoria, and he became known as the 'Iron Amir'. He also refused to give information regarding his troops, with his own autobiography criticizing British policy, while also violating the Lyall agreement by instead of allowing the British to oversee his diplomatic affairs, held them himself with numerous countries including Iran, the Ottoman Empire, and the German Empire. Abdur Rahman also wrote in pamphlets, encouraging Jihad against the British and the Russians, claiming both wished to end Afghanistan as a state. Senior British officials found it extremely difficult to further cooperate with Abdur Rahman Khan and Afghanistan due to the Turkestan atrocities, as well as his actions against the Hazaras. The British believed that Abdur Rahman Khan had strong support from the Afghans and feared further conflict with them. This scored a diplomatic victory for Abdul Rahman. [9]

Ayub Khan subsequently raised a fresh rebellion against Abdur Rahman, but was swiftly defeated and taken as a political prisoner by British India. He was later poisoned in India after people were calling for his return. This political settlement was to endure until the Third Anglo-Afghan War in 1919.

Order of battle

Regiments From Kabul 8 August 1880
1st Infantry Brigade2nd Infantry Brigade3rd Infantry BrigadeCavalry BrigadeArtillery Division
General Macpherson General Baker General MacGregor General Gough Colonel Johnson
92nd Highlanders 72nd Highlanders 2nd/60th Rifles 9th Queen's Royal Lancers 6/8 Royal Artillery
23rd Sikh Pioneers 2nd Sikh Infantry 15th Sikhs 3rd Bengal Cavalry 11/9 Royal Artillery
24th Punjabis 3rd Sikh Infantry 25th Punjabis 3rd Punjab Cavalry 22nd (Derajat) Mountain Battery (Frontier Force)
2nd Gurkhas 5th Gurkhas 4th Gurkhas Central Indian Horse
Garrison at Kelat-i-Ghilzai that joined the relief force on 25 August
C/2 Royal Artillery 66th Foot 3rd Sind Horse 2nd Baluch Regiment

Notes

Related Research Articles

<span class="mw-page-title-main">Abdur Rahman Khan</span> Emir of Afghanistan from 1880 to 1901

Abdur Rahman Khan also known by his epithets, The Iron Amir, or The Dracula Amir, was Amir of Afghanistan from 1880 to his death in 1901. He is known for uniting the country after years of internal fighting and negotiation of the Durand Line Agreement with British India.

<span class="mw-page-title-main">European influence in Afghanistan</span> Overview of the influence of European colonial powers in Afghanistan

European influence in Afghanistan has been present in the country since the Victorian era, when the competing imperial powers of Britain and Russia contested for control over Afghanistan as part of the Great Game.

<span class="mw-page-title-main">Second Anglo-Afghan War</span> 1878–1880 war between the British Empire and the Emirate of Afghanistan

The Second Anglo-Afghan War was a military conflict fought between the British Raj and the Emirate of Afghanistan from 1878 to 1880, when the latter was ruled by Sher Ali Khan of the Barakzai dynasty, the son of former Emir Dost Mohammad Khan. The war was part of the Great Game between the British and Russian empires.

<span class="mw-page-title-main">Treaty of Gandamak</span> 1879 treaty ending the first phase of the Second Anglo-Afghan War

The Treaty of Gandamak officially ended the first phase of the Second Anglo-Afghan War. Mohammad Yaqub Khan ceded various frontier areas as well as Afghanistan's control of its foreign affairs to Britain.

<span class="mw-page-title-main">Battle of Maiwand</span> 1880 battle of the Second Anglo-Afghan War

The Battle of Maiwand, fought on 27 July 1880, was one of the principal battles of the Second Anglo-Afghan War. Under the leadership of Ayub Khan, the Afghan forces defeated a much smaller British force consisting of two brigades of British and Indian troops under Brigadier-General George Burrows, albeit at a high price: between 2,050 and 2,750 Afghan warriors were killed, and probably about 1,500 wounded. British and Indian forces suffered 1,200 dead.

<span class="mw-page-title-main">Mohammad Yaqub Khan</span> Emir of Afghanistan

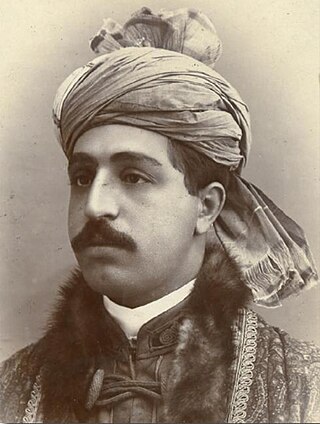
Mohammad Yaqub Khan was Emir of Afghanistan from February 21 to October 12, 1879. He was a Pashtun and the son of the previous ruler, Sher Ali Khan.

<span class="mw-page-title-main">Ayub Khan (Emir of Afghanistan)</span> Victor of Maiwand

Ghazi Mohammad Ayub Khan also known as The Victor of Maiwand or The Afghan Prince Charlie was, for a while, the governor of Herat Province in the Emirate of Afghanistan. He was Emir of Afghanistan from 12 October, 1879 to 31 May, 1880. He also led the Afghan troops during the Second Anglo-Afghan War and defeated the British Indian Army at the Battle of Maiwand. Following his defeat at the Battle of Kandahar, Ayub Khan was deposed and exiled to British India. However, Ayub Khan fled to Persia. After negotiations in 1888 with Sir Mortimer Durand, the ambassador at Tehran, Ayub Khan became a pensioner of the British Raj and traveled to British India in 1888, where he lived until his death in 1914 in Lahore, Punjab. He was buried in Peshawar and had eleven wives, fifteen sons, and ten daughters. Two of his grandsons, Sardar Hissam Mahmud el-Effendi and Sardar Muhammad Ismail Khan, served as brigadiers in the Pakistan Army.

<span class="mw-page-title-main">Battle of Ahmed Khel</span> 1880 battle of the Second Anglo-Afghan War

The Battle of Ahmed Khel took place during the Second Anglo-Afghan War. It was fought on 19 April 1880, on the road between Kandahar and Kabul in central Afghanistan between Afghan tribesmen and soldiers of the British Empire, including forces from both British and Indian armies.

<span class="mw-page-title-main">Maiwand</span> Village in Kandahar Province, Afghanistan

Maiwand is a village in Afghanistan within the Maywand District of Kandahar Province. It is located 50 miles northwest of Kandahar, on the main Kandahar–Lashkargah road.

<span class="mw-page-title-main">Siege of the Sherpur Cantonment</span> 1879 battle of the Second Anglo-Afghan War

The siege of the Sherpur Cantonment was a battle fought in December 1879, during the Second Anglo-Afghan War.

The Second Battle of Charasiab was fought on 25 April 1880 between the British Empire and Afghan tribesmen, during the Second Anglo-Afghan War.

<span class="mw-page-title-main">Vereker Monteith Hamilton</span> English painter

Vereker Monteith Hamilton was a Scottish artist of military and historical works.

Malalai of Maiwand, also known as Malala, or Malalai Anna is a national folk hero of Afghanistan who rallied Pashtun fighters during the Battle of Maiwand. She fought alongside Ayub Khan and was responsible for the Afghan victory at the Battle of Maiwand on 27 July 1880, during the Second Anglo-Afghan War. She is also known as "The Afghan Jeanne d'Arc" or as "The Afghan Molly Pitcher" to the Western world. There are many schools, hospitals, and other institutions named after her in Afghanistan. Her story is told in Afghan school text books.

<span class="mw-page-title-main">Kabul Field Force</span> British force during the Second Afghan War

The Kabul Field Force was a field force created in September 1879 during the Second Anglo-Afghan War, under the command of General Frederick Roberts. It combined British Army and British Indian Army regiments, and initially numbered around 7,500 men, but later reached about 14,000.

<span class="mw-page-title-main">Kabul to Kandahar Star</span> Award

The Kabul to Kandahar Star, also known as the Roberts Star or Kandahar Bronze Star was awarded to those British and Indian troops who participated in the 320 mile march from Kabul to Kandahar in Afghanistan between 9–31 August 1880, under the command of Lieutenant-General Sir Frederick Roberts who rode horseback on his horse Vonolel In addition, it was awarded to the troops stationed en route at Kelat-i-Ghilzie, who accompanied General Roberts on the final ninety miles to Kandahar.

<span class="mw-page-title-main">Siege of the British Residency in Kabul</span> 1879 battle of the Second Anglo-Afghan War

The siege of the British Residency in Kabul was a military engagement of the Second Anglo-Afghan War. The British resident, Sir Louis Cavagnari and his escort were massacred after an 8-hour siege by mutinous Afghan troops inside their Residency in Kabul. This event triggered the second phase of the war, during which an Anglo-Indian army invaded Afghanistan and captured Kabul.

Nazir Muhammad Sarwar Khan was the Governor of Herat from August 1882 to November 1886. A loyal supporter of Abdur Rahman, he accompanied the future Amir into exile and was rewarded with high office upon their return to Afghanistan. However, he was stripped of his role after accusations of corruption, and died in prison.

<span class="mw-page-title-main">George Frederick Blackwood</span> British army officer

Major George Frederick Blackwood (1838–1880) of the Royal Horse Artillery was a Scottish artillery officer in the service of the East India Company and the Raj. He was killed in action at the Battle of Maiwand, a major British defeat.

<span class="mw-page-title-main">Henry Francis Brooke</span> Irish officer in the British Army (1836–1880)

Brigadier-General Henry Francis Brooke (1838–1880), commanding the 2nd Infantry Brigade, Kandahar Field Force, was an Irish officer in the British Army. He was killed in a sortie from Kandahar on 16 August 1880, while endeavouring to save the life of a fellow officer.

References