Photographic lighting

Last updated
The model was lit on the left with a strobe. The light was warmed with an orange gel to match the sunset. Model in Field during Sunset.jpg
The model was lit on the left with a strobe. The light was warmed with an orange gel to match the sunset.

Photographic lighting refers to how a light source, artificial or natural, illuminates the scene or subject that is photographed. Photographers can manipulate the positioning and the quality of a light source to create visual effects, potentially changing aspects of the photograph such as clarity, tone and saturation to create an accurate rendition of the scene. [1]

Contents

Lighting determines exposure and can be used to create effects such as low-key and high-key lighting, both of which involve the contrast between darker and lighter elements in a scene. [2] Lighting is especially important for monochrome photography, where there is limited to no color information, and exclusively includes the interplay of highlights and shadows.

Main sources

The main sources of light for photography are:

Basic lighting patterns

Perceptual cause and effect

Lighting creates the 2D pattern of contrast that the brain interprets in order to recognize 3D objects in photographs. When viewing something in-person, the brain relies on stereoscopic vision, parallax, shifting focal in addition to the clues created by the highlight and shadow patterns the light on the object creates. [4] When viewing a photo, however, the brain tries to match the patterns of contrast and color it sees to other sensory memories. [3]

The baseline for what seems "normal" in lighting is often the direction and character of natural and artificial light as well as the context provided by other clues. In the picture above, the photographer added a warming gel on the flash of the woman standing in a field in late afternoon light. The viewer knows the time of day from the angle of the shadows; therefore, neutral color balance would have seemed odd in that context. However, if masked out and put on a plain white or neutral gray background, the image of the woman would seem abnormally yellow.

While the goal of photography is not necessarily to create an impression of normality, knowing what the audience normally expects to see is required to pull off a lighting strategy that fools the brain. [6] Light direction relative to the camera can make a round ball appear to be a flat disk or a sphere. The position of highlights and direction and length of shadows will provide other clues to shape and can even indicate the time of day. The tone of the shadows on an object also can provide contextual clues about the time of day, the environment in which the photo was taken, and even the mood of the person.

A skilled photographer can manipulate how a viewer is likely to react to the content of a photo by manipulating the lighting. [6] When shooting outdoors, changing locations may be required, as well as waiting for the ideal time of day (or even the ideal time of year in some cases) for the lighting to create the desired impression in the photo. Photographers may also manipulate natural lighting by using reflectors or flash. In a studio setting, however, there is no limit to the options a photographer has for lighting. Objects can be made to either look normal as "seen by the eye" or surreal as the goals for the photograph require. Usually, the viewer's reaction will depend on whether or not the lighting seems normal/natural compared to other clues.

Mixing natural and artificial light can be a difficult process. A mistake less-skilled photographers often make when mixing flash and natural lighting is not matching the light from the flash with the highlight and shadow clues seen in a background lit with ambient light. [6] For example, if the background is illuminated by the setting sun, but the face in the foreground appears to have been photographed at noon, it will not seem normal, as the lighting clues do not match.

The natural light baseline

The sun hitting the front of objects facing the camera acts as a "key light," creating highlights and casting shadows. [3] Detail in shadows can be seen due to the reflection of sunlight off water vapor and dust in the atmosphere creating omni-directional "fill". In open shade, 3D objects will also usually cast shadows because the downward vector of skylight is usually stronger than the sideways vectors illuminating the sides. When a photographer puts the sun behind an object, however, its role in the lighting strategy changes from modeling the front of the object to defining its outline (silhouette) and creating the impression of physical separation and 3D space that a frontally illuminated scene normally lacks. To differentiate that role from that of "key" modeling in which a lighting source is place behind the subject, it is typically called a "rim" or "accent" light. In portrait lighting, it also called a "hair" light because it is used to create the appearance of physical separation between the subject's head and background. In natural lighting, the tone of the background is influenced by its reflective qualities and whether it is illuminated by the sun directly or skylight indirectly. Therefore, either the sun or sky, or a combination of both, can be considered "background" lighting.

Midday sunlight can be challenging to use, as light may be too bright and shadows too dark. The degree of overexposure depends on the film and the camera used, as well as their different dynamic features. [7] These characteristics are particularly important for portrait photography, in which an extra flash is often used to balance the light on the face or other parts of the body and to soften contrasting shadows in order to properly balance photographic exposure.

Creating natural-looking artificial lighting

Artificial lighting strategies that seem most "natural" duplicate the same contrast pattern clues seen on 3D objects in various lighting conditions. A typical studio lighting configuration will consist of a fill source to control shadow tone, a single frontal key light to create the highlight modeling clues on the front of objects facing the camera over the shadows the fill illuminates, one or more rim/accent lights to create separation between foreground and background, and one or more background lights to control the tone of the background and separation between it and the foreground.

There are two significant differences between natural lighting and artificial sources: the character of the fill and the fall-off in intensity. In nature, light from the sky is omni-directional and usually brighter from above. That "wrap around" characteristic is difficult to duplicate with a directional artificial source. In a fixed studio location, it is possible to bounce fill backwards off a white wall to flood the space with indirect reflected light similar to how the sun reflects off the atmosphere. Another way is to supplement a fill source from the direction of the camera with reflectors placed near the sides of the foreground subject.

The Inverse-Square Law describes the predictable way a point light source radiates and changes in intensity with distance. As the distance from a source doubles, the area of the footprint of light increases by a factor of four, the square ^2 of the distance. [6] Because the same number of photons are spread over four times the area when distance is doubled, the intensity at any point will be 1/ distance ^2 or 1/4 the strength. Photographic light sources are not point light sources, so the law does not strictly apply. However, it does explain why the distance of artificial sources affects the character of lighting and lighting strategies in ways not seen in nature. [6]

If the distance of a light source is changed in the following distance increments 1, 1.4, 2, 2.8, 4, 5.6, 8, 11, 16, 22, 32, 45, 64 the intensity will decrease by one f/stop. [3] Notice how each step increases by the square root of 2. In practical terms, it means that if one face in a group portrait is 4 metres from the "key" light and another is 5.6 m away, the face further from the light will be one f/stop darker. In an outdoor portrait of a group of 200 people taken on an overcast day, the lighting of all the faces will be equal. The same group photographed indoors would be far more difficult to light evenly. The simplest strategy requiring the least flash equipment would be to get above the group with the camera, have them look up, and bounce the lighting off the ceiling. This way every face is as equidistant as possible to the apparent source of the light, much as with an overcast day.

Even something as basic as a head and shoulders portrait must take inverse-square fall-off into account by posing the front of the subject's face as close or closer to the "key" light than the shoulder or any other body part if the goal is to make the front of the face the most strongly contrasting focal point on a darker background. The position of the fill source relative to the face will also affect whether the nose shadow is the lightest (when fill is centered near camera) or darkest (when fill is placed to the side) one on the face. The distance of the key light and fill sources to the face will affect the rate at which the shadows transition from light to dark on the face.

Creating surreal lighting

Natural and surreal lighting are different sides of the same coin. Understanding what makes lighting seem natural makes it easier to understand how to create other desired reactions. Natural light usually comes from above, so strategies which place the key light below the face will appear to be unusual or unnatural. The brain adapts color perception in a way that makes color balance seem neutral on white clothing and faces. The eyes also adapt to brightness as they scan and usually perceive a full range of detail in most environments. Lighting a scene with a tonal range or color cast which is out of context with what would typically be expected will cause the viewer to notice the environment and make other than normal assumptions about it. It is also possible to create the impression of environmental context where none is seen in the photograph, such as the look of a person standing under a streetlight at night by using a grid flash attached to the ceiling of the studio with no fill source.

Three light setup

The three light setup is a common method used in photography. This method uses three separate lighting positions to give the photographer a great deal of control in illuminating the subject. It is formed by a main light known as the "key", the fill light, and the backlight. [4]

Reflected light

This is when a flash is directed upwards or sideways. The light is reflected from a wall, the ceiling, or a reflector, and gives more nuances to the subject. The main advantage is that the subject does not face the light source. [8]

Related Research Articles

<span class="mw-page-title-main">Flash (photography)</span> Device producing a burst of artificial light

A flash is a device used in photography that produces a brief burst of light at a color temperature of about 5500 K to help illuminate a scene. A major purpose of a flash is to illuminate a dark scene. Other uses are capturing quickly moving objects or changing the quality of light. Flash refers either to the flash of light itself or to the electronic flash unit discharging the light. Most current flash units are electronic, having evolved from single-use flashbulbs and flammable powders. Modern cameras often activate flash units automatically.

<span class="mw-page-title-main">Underwater photography</span> Genre of photography

Underwater photography is the process of taking photographs while under water. It is usually done while scuba diving, but can be done while diving on surface supply, snorkeling, swimming, from a submersible or remotely operated underwater vehicle, or from automated cameras lowered from the surface.

<span class="mw-page-title-main">Macro photography</span> Photography genre and techniques of extreme close-up pictures

Macro photography is extreme close-up photography, usually of very small subjects and living organisms like insects, in which the size of the subject in the photograph is greater than life size . By the original definition, a macro photograph is one in which the size of the subject on the negative or image sensor is life size or greater. In some senses, however, it refers to a finished photograph of a subject that is greater than life size.

<span class="mw-page-title-main">Three-point lighting</span> Lighting technique

Three-point lighting is a standard method used in visual media such as theatre, video, film, still photography, computer-generated imagery and 3D computer graphics. By using three separate positions, the photographer can illuminate the shot's subject however desired, while also controlling the shading and shadows produced by direct lighting.

<span class="mw-page-title-main">Fill flash</span> Photographic technique

Fill flash is a photographic technique used to brighten deep shadow areas, typically outdoors on sunny days, though the technique is useful any time the background is significantly brighter than the subject of the photograph, particularly in backlit subjects. To use fill flash, the aperture and shutter speed are adjusted to correctly expose the background, and the flash is fired to lighten the foreground.

<span class="mw-page-title-main">Golden hour (photography)</span> First and last hour of sunlight during the day

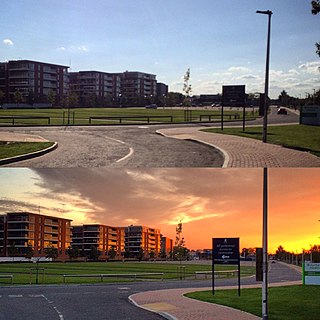
In photography, the golden hour is the period of daytime shortly after sunrise or before sunset, during which daylight is redder and softer than when the sun is higher in the sky.

<span class="mw-page-title-main">Key light</span> First light in a photographic or filmmaking lighting scheme

The key light is the first and usually most important light that a photographer, cinematographer, lighting cameraman, or other scene composer will use in a lighting setup. The purpose of the key light is to highlight the form and dimension of the subject. The key light is not a rigid requirement; omitting the key light can result in a silhouette effect. Many key lights may be placed in a scene to illuminate a moving subject at opportune moments.

<span class="mw-page-title-main">Fill light</span> Lighting used to reduce the contrast of a scene

In television, film, stage, or photographic lighting, a fill light may be used to reduce the contrast of a scene to match the dynamic range of the recording media and record the same amount of detail typically seen by eye in average lighting and considered normal. From that baseline of normality, using more or less fill will make shadows seem lighter or darker than normal, which will cause the viewer to react differently, by inferring both environmental and mood clues from the tone of the shadows.

<span class="mw-page-title-main">Photographic studio</span>

A photographic studio is often a business owned and represented by one or more photographers, possibly accompanied by assistants and pupils, who create and sell their own and sometimes others’ photographs.

<span class="mw-page-title-main">Rembrandt lighting</span> Lighting technique that is used in studio portrait photography

Rembrandt lighting is a standard lighting technique that is used in studio portrait photography and cinematography; it is also used in contrast with butterfly lighting It can be achieved using one light and a reflector, or two lights, and is popular because it is capable of producing images which appear both natural and compelling with a minimum of equipment. Rembrandt lighting is characterized by an illuminated triangle under the eye of the subject on the less illuminated side of the face. It is named for the Dutch painter Rembrandt, who occasionally used this type of lighting.

<span class="mw-page-title-main">Hard and soft light</span> Types of lighting in photography and filmmaking

Hard and soft light are different types of lighting that are commonly used in photography and filmmaking. Soft light is light that tends to "wrap" around objects, projecting diffused shadows with soft edges, whereas hard light is more focused and produces harsher shadows.

<span class="mw-page-title-main">Backlighting (lighting design)</span>

In lighting design, backlighting is the process of illuminating the subject from the back. In other words, the lighting instrument and the viewer face each other, with the subject in between. This creates a glowing effect on the edges of the subject, while other areas are darker. The backlight can be a natural or artificial source of light. When artificial, the back light is usually placed directly behind the subject in a 4-point lighting setup. A back light, which lights foreground elements from the rear, is not to be confused with a background light, which lights background elements.

<span class="mw-page-title-main">Light painting</span> Light painting is photographic art created by tracing light sources during long exposures

Light painting, painting with light,light drawing, or light art performance photography are terms that describe photographic techniques of moving a light source while taking a long-exposure photograph, either to illuminate a subject or space, or to shine light at the camera to 'draw', or by moving the camera itself during exposure of light sources. Practiced since the 1880s, the technique is used for both scientific and artistic purposes, as well as in commercial photography.

<span class="mw-page-title-main">Portrait photography</span> Type of photography aimed at expressing the personality of the human subject(s)

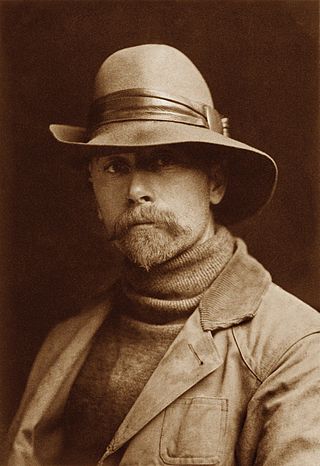
Portrait photography, or portraiture, is a type of photography aimed toward capturing the personality of a person or group of people by using effective lighting, backdrops, and poses. A portrait photograph may be artistic or clinical. Frequently, portraits are commissioned for special occasions, such as weddings, school events, or commercial purposes. Portraits can serve many purposes, ranging from usage on a personal web site to display in the lobby of a business.

<span class="mw-page-title-main">Forensic photography</span> Art of producing an accurate reproduction of a crime scene

Forensic photography may refer to the visual documentation of different aspects that can be found at a crime scene. It may include the documentation of the crime scene, or physical evidence that is either found at a crime scene or already processed in a laboratory. Forensic photography differs from other variations of photography because crime scene photographers usually have a very specific purpose for capturing each image. As a result, the quality of forensic documentation may determine the result of an investigation, in that with the absence of good documentation, investigators may find it impossible to conclude what did or did not happen.

<span class="mw-page-title-main">Available light</span>

In photography and cinematography, available light refers to any available source of light that is not explicitly supplied by the photographer for the purpose of taking pictures. The term usually refers to light sources in the surrounding environment that are present naturally or artificial lighting that are already pre-existing. It generally excludes flashes, although arguably flash lighting provided by other photographers shooting simultaneously in the same space could be considered available light. Light sources that affect the scene and are included in the actual frame are called practical light sources, or simply practicals.

Architectural photography is the sub genre of the photography discipline where the primary emphasis is made to capturing photographs of buildings and similar architectural structures that are both aesthetically pleasing and accurate in terms of representations of their subjects. Architectural photographers are usually skilled in the use of specialized techniques and cameras for producing such specialized photography.

<span class="mw-page-title-main">Reflector (photography)</span> Reflective surface used to redirect light towards a given subject or scene, used in photography

In photography and cinematography, a reflector is an improvised or specialised reflective surface used to redirect light towards a given subject or scene.

<span class="mw-page-title-main">Beauty dish</span> Photographic lighting device

A beauty dish is a photographic lighting device that uses a parabolic reflector to distribute light towards a focal point. The light created is between that of a direct flash and a softbox, giving the image a wrapped, contrasted look, which adds a more dramatic effect.

<span class="mw-page-title-main">Low-key photography</span> Photography genre consisting of shooting dark-colored scenes

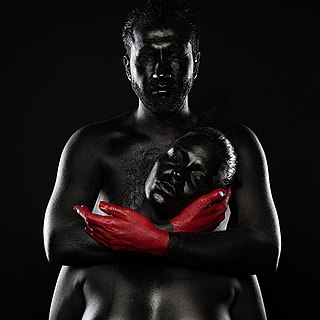
Low-key photography is a genre of photography consisting of shooting dark-colored scenes by lowering or dimming the "key" or front light illuminating the scene, and emphasizing natural or artificial light only on specific areas in the frame. This photographic style is usually used to create a mysterious atmosphere, that only suggests various shapes, often graphic, letting the viewer experience the photograph through subjective interpretation and often implies painting objects or the human body with black non-toxic dyes or pigments.

References

  1. Team, Format (2020-09-21). "12 Types of Lighting in Photograph". www.format.com. Retrieved 2022-03-23.
  2. "The Basics of Low-Key & High-Key Lighting | Adobe Australia". www.adobe.com. Retrieved 2022-03-23.
  3. 1 2 3 4 5 6 Hunter, Fil (9 January 2015). Light : science & magic : an introduction to photographic lighting. Biver, Steven,, Fuqua, Paul (Fifth ed.). Burlington, MA. ISBN   978-1-317-96357-8. OCLC   902744560.
  4. 1 2 3 Harrington, Robert. Photographic Lighting. ISBN   978-1-78145-240-0. OCLC   927103792.
  5. Sawalich, William. "Classic Portrait Light". Digital Photo Magazine. Retrieved 13 January 2021.{{cite web}}: CS1 maint: url-status (link)
  6. 1 2 3 4 5 Stoppee, Brian. (2009). Stoppees' guide to photography & light : what digital photographers, illustrators, and creative professionals must know. Stoppee, Janet. Burlington, MA: Elsevier/Focal Press. ISBN   978-0-240-81063-8. OCLC   499056478.
  7. Dam, Peter. "Guide to Exposure Compensation". Photography-Raw. Retrieved 13 January 2021.{{cite web}}: CS1 maint: url-status (link)
  8. Yamamoto, Haruka. "Flash Technique. Creating a Pop Art-inspired Night Portrait". Snapshot. Retrieved 13 January 2021.{{cite web}}: CS1 maint: url-status (link)