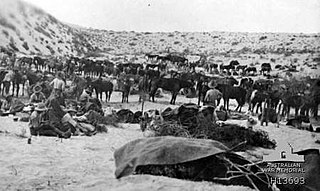
The Battle of Romani was the last ground attack of the Central Powers on the Suez Canal at the beginning of the Sinai and Palestine campaign during the First World War. The battle was fought between 3 and 5 August 1916 near the Egyptian town of Romani and the site of ancient Pelusium on the Sinai Peninsula, 23 miles (37 km) east of the Suez Canal. This victory by the 52nd (Lowland) Division and the Anzac Mounted Division of the Egyptian Expeditionary Force (EEF) over a joint Ottoman and German force, which had marched across the Sinai, marked the end of the Defence of the Suez Canal campaign, also known as the Offensive zur Eroberung des Suezkanals and the İkinci Kanal Harekâtı, which had begun on 26 January 1915.

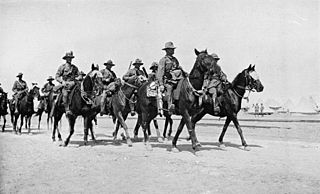
The Australian and New Zealand Mounted Division was a mounted infantry division of the British Empire during the First World War. The division was raised in March 1916 and was assigned to the I ANZAC Corps. On establishment, it consisted of four brigades comprising three Australian Light Horse and one New Zealand mounted rifles, supported by British horse artillery. In 1917, one of the Australian brigades was replaced by a British yeomanry brigade. After April 1917, the standard order of battle was reduced to two Australian brigades and one New Zealand brigade, although the Imperial Camel Corps Brigade and other British mounted brigades were temporarily attached several times during operations.

The Battle of Rafa, also known as the Action of Rafah, fought on 9 January 1917, was the third and final battle to complete the recapture of the Sinai Peninsula by British forces during the Sinai and Palestine campaign of the First World War. The Desert Column of the Egyptian Expeditionary Force (EEF) attacked an entrenched Ottoman Army garrison at El Magruntein to the south of Rafah, close to the frontier between the Sultanate of Egypt and the Ottoman Empire, to the north and east of Sheikh Zowaiid. The attack marked the beginning of fighting in the Ottoman territory of Palestine.

The New Zealand Expeditionary Force (NZEF) was the title of the military forces sent from New Zealand to fight alongside other British Empire and Dominion troops during World War I (1914–1918) and World War II (1939–1945). Ultimately, the NZEF of World War I became known as the First New Zealand Expeditionary Force. The NZEF of World War II was known as the Second New Zealand Expeditionary Force (2NZEF).

The New Zealand Mounted Rifles Brigade was a brigade of the New Zealand Army during the First World War. Raised in 1914 as part of the New Zealand Expeditionary Force, it was one of the first New Zealand units to sail for service overseas.

The Canterbury Mounted Rifles Regiment was a mounted infantry regiment from New Zealand, raised for service during the First World War. It was assigned to the New Zealand Mounted Rifles Brigade, and formed part of the New Zealand Expeditionary Force.

The Wellington Mounted Rifles Regiment was a mounted infantry regiment from New Zealand, raised for service during the First World War. It was assigned to the New Zealand Mounted Rifles Brigade, part of the New Zealand Expeditionary Force.

The Auckland Mounted Rifles Regiment was a mounted infantry regiment from New Zealand raised, in August 1914, for service during the First World War. It was assigned to the New Zealand Mounted Rifles Brigade, part of the New Zealand Expeditionary Force.
The Capture of Jericho occurred between 19 and 21 February 1918 to the east of Jerusalem beginning the Occupation of the Jordan Valley during the Sinai and Palestine Campaign of the First World War. Fighting took place in an area bordered by the Bethlehem–Nablus road in the west, the Jordan River in the east, and north of a line from Jerusalem to the Dead Sea. Here a British Empire force attacked Ottoman positions, forcing them back to Jericho and eventually across the Jordan River.

Brigadier General William Meldrum was a New Zealand lawyer, farmer, military leader, magistrate and local politician.

Major Norman Frederick Hastings, DSO served as Officer Commanding New Zealand's 6th (Manawatu) Squadron, Wellington Mounted Rifles Regiment. After serving with British military units during the Second Anglo-Boer War in South Africa, he worked as an engineering fitter with the New Zealand Railways Department workshops at Petone. He enlisted in the New Zealand Expeditionary Force at the outbreak of World War I, and served with distinction before dying of wounds after the attack on Chunuk Bair, Gallipoli, in August 1915. He was awarded the Distinguished Service Order, was Mentioned in Despatches, and was one of only 14 members of the New Zealand Army to receive the French Legion of Honour decoration during the war. The memorial flagstaff at Petone railway station appears to have been erected in his honour, and was the site of New Zealand's first public Anzac Day ceremony on 25 April 1916.
Chaytor's Force named after its commander, Major General Edward Chaytor, was a composite division-sized force which served in the British Egyptian Expeditionary Force during the Sinai and Palestine Campaign of the First World War. The force of 11,000 men, consisted of a division headquarters, three mounted and one infantry brigades, four independent infantry battalions and four artillery batteries and was detached from the Desert Mounted Corps for deception operations.

The Capture of Jisr ed Damieh took place on 22 September 1918 during the Third Transjordan attack of the Battle of Nablus which, along with the main Battle of Sharon formed the Battle of Megiddo fought during the Sinai and Palestine Campaign of the First World War. Units of Chaytor's Force under the commanded by Brigadier-General William Meldrum, and known as "Meldrum's Force", attacked and captured the bridge. This successful attack cut the most direct line of retreat from the Judean Hills for the Seventh and remnants of the Eighth Armies, while units from these two armies were moving towards, and crossing the Jisr ed Damieh bridge over the Jordan River. This victory by Meldrum's Force opened the way for Chaytor's Force to advance along the main Nablus to Es Salt road to capture Es Salt and to continue on to the victory at the Second Battle of Amman.

The First Battle of Amman was fought from 27 to 31 March 1918 during the First Transjordan attack on Amman of the Sinai and Palestine Campaign of the First World War. The 60th (London) Division and the Anzac Mounted Division attacked the Ottoman garrison at Amman deep in enemy occupied territory, 48 kilometres (30 mi) from their front line, after capturing Es Salt and Shunet Nimrin. The Egyptian Expeditionary Force (EEF) was successfully counterattacked by Ottoman Empire forces forcing them to retreat back to the bridgeheads captured on the Jordan River.
The Second Battle of Amman was fought on 25 September 1918 during the Third Transjordan attack as part of the Battle of Nablus which together with the main Battle of Sharon form the major set piece offensive known as the Battle of Megiddo of the Sinai and Palestine Campaign in World War I. After cutting the road from Nablus to Es Salt on 22 September Chaytor's Force captured the bridge over the Jordan River at Jisr ed Damieh while units of the Seventh Army and remnants of the Eighth Army were still in retreating towards the bridge from the Judean Hills. Having cut this line of retreat, Chaytor's Force proceeded eastwards to attack and capture Es Salt, before riding on to attack and capture the Ottoman rearguard of the Fourth Army defending Amman. These British Empire victories of the Third Transjordan attack over Yildirim Army Group forces, followed two unsuccessful EEF attacks across the Jordan River in March and April 1918.

The Desert Column was a First World War British Empire army corps which operated in the Sinai and Palestine Campaign from 22 December 1916. The Column was commanded by Lieutenant General Philip W. Chetwode and formed part of Eastern Force. When Chetwode took command of Eastern Force after the Second Battle of Gaza, Harry Chauvel took command and oversaw the expansion of the column to three divisions.

The Battle of Ayun Kara was an engagement in the Sinai and Palestine Campaign during the First World War. The battle was fought between the New Zealand Mounted Rifles Brigade and a similar-sized rearguard from the Turkish 3rd Infantry Division, which was part of the XXII Corps of the Ottoman Eighth Army under Kress von Kressenstein.

The third attack on Anzac Cove was an engagement during the Gallipoli Campaign of the First World War. The attack was conducted by the forces of the Ottoman Turkish Empire, against the forces of the British Empire defending the cove.
The Battle of Bir el Abd or the Abd well was fought between the forces of the British Empire and the Ottoman Empire, during the Sinai and Palestine Campaign of the First World War.

The Battle for No.3 Post was fought during the Gallipoli Campaign in the First World War, between the forces of the New Zealand Mounted Rifles Brigade and the Turkish 19th Division.

