The Battle of Romani was the last ground attack of the Central Powers on the Suez Canal at the beginning of the Sinai and Palestine campaign during the First World War. The battle was fought between 3 and 5 August 1916 near the Egyptian town of Romani and the site of ancient Pelusium on the Sinai Peninsula, 23 miles (37 km) east of the Suez Canal. This victory by the 52nd (Lowland) Division and the Anzac Mounted Division of the Egyptian Expeditionary Force (EEF) over a joint Ottoman and German force, which had marched across the Sinai, marked the end of the Defence of the Suez Canal campaign, also known as the Offensive zur Eroberung des Suezkanals and the İkinci Kanal Harekâtı, which had begun on 26 January 1915.

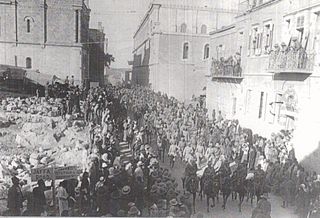
The Battle of Magdhaba took place on 23 December 1916 during the Defence of Egypt section of the Sinai and Palestine Campaign in the First World War. The attack by the Anzac Mounted Division took place against an entrenched Ottoman Army garrison to the south and east of Bir Lahfan in the Sinai desert, some 18–25 miles (29–40 km) inland from the Mediterranean coast. This Egyptian Expeditionary Force (EEF) victory against the Ottoman Empire garrison also secured the town of El Arish after the Ottoman garrison withdrew.

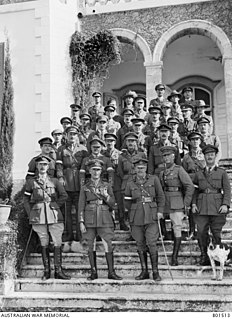
General Sir Henry George Chauvel, was a senior officer of the Australian Imperial Force who fought at Gallipoli and during the Sinai and Palestine Campaign in the Middle Eastern theatre of the First World War. He was the first Australian to attain the rank of lieutenant general and later general, and the first to lead a corps. As commander of the Desert Mounted Corps, he was responsible for one of the most decisive victories and fastest pursuits in military history.

The Australian and New Zealand Mounted Division was a mounted infantry division of the British Empire during the First World War. The division was raised in March 1916 and was assigned to the I ANZAC Corps. On establishment, it consisted of four brigades comprising three Australian Light Horse and one New Zealand mounted rifles, supported by British horse artillery. In 1917, one of the Australian brigades was replaced by a British yeomanry brigade. After April 1917, the standard order of battle was reduced to two Australian brigades and one New Zealand brigade, although the Imperial Camel Corps Brigade and other British mounted brigades were temporarily attached several times during operations.
The Australian Mounted Division originally formed as the Imperial Mounted Division in January 1917, was a mounted infantry, light horse and yeomanry division. The division was formed in Egypt, and along with the Anzac Mounted Division formed part of Desert Column, Egyptian Expeditionary Force in World War I. The division was originally made up of the Australian 3rd Light Horse Brigade, the reconstituted 4th Light Horse Brigade, and two British yeomanry brigades; the 5th Mounted Brigade and 6th Mounted Brigade.
The Desert Mounted Corps was an army corps of the British Army during the First World War, of three mounted divisions renamed in August 1917 by General Edmund Allenby, from Desert Column. These divisions which served in the Sinai and Palestine Campaign had been formed by Australian light horse, British yeomanry, and New Zealand mounted rifles brigades, supported by horse artillery, infantry and support troops. They were later joined by Indian cavalry and a small French cavalry detachment.

The Battle of Rafa, also known as the Action of Rafah, fought on 9 January 1917, was the third and final battle to complete the recapture of the Sinai Peninsula by British forces during the Sinai and Palestine campaign of the First World War. The Desert Column of the Egyptian Expeditionary Force (EEF) attacked an entrenched Ottoman Army garrison at El Magruntein to the south of Rafah, close to the frontier between the Sultanate of Egypt and the Ottoman Empire, to the north and east of Sheikh Zowaiid. The attack marked the beginning of fighting in the Ottoman territory of Palestine.

The First Battle of Gaza was fought on 26 March 1917 during the first attempt by the Egyptian Expeditionary Force (EEF), which was a British Empire military formation, formed on 10 March 1916 under the command of General Archibald Murray from the Mediterranean Expeditionary Force and the Force in Egypt (1914–15), at the beginning of the Sinai and Palestine Campaign of the First World War. Fighting took place in and around the town of Gaza on the Mediterranean coast when infantry and mounted infantry from the Desert Column, a component of the Eastern Force, attacked the town. Late in the afternoon, on the verge of capturing Gaza, the Desert Column was withdrawn due to concerns about the approaching darkness and large Ottoman reinforcements. This British defeat was followed a few weeks later by the even more emphatic defeat of the Eastern Force at the Second Battle of Gaza in April 1917.

The Battle of Beersheba was fought on 31 October 1917, when the British Empire's Egyptian Expeditionary Force (EEF) attacked and captured the Yildirim Army Group garrison at Beersheba, beginning the Southern Palestine Offensive of the Sinai and Palestine campaign of World War I. Infantry from the 60th (London) and the 74th (Yeomanry) Divisions of the XX Corps from the southwest conducted limited attacks in the morning, then the Anzac Mounted Division launched a series of attacks against the strong defences which dominated the eastern side of Beersheba, resulting in their capture during the late afternoon. Shortly afterwards, the Australian Mounted Division's 4th and 12th Light Horse Regiments conducted a mounted infantry charge with bayonets in their hands, their only weapon for mounted attack, as their rifles were slung across their backs. Part of the two regiments dismounted to attack entrenchments on Tel es Saba defending Beersheba while the remainder of the light horsemen continued their charge into the town, capturing the place and part of the garrison as it was withdrawing.
The Yeomanry Mounted Division was a Territorial Force cavalry division formed at Khan Yunis in Palestine in June 1917 from three yeomanry mounted brigades. It served in the Sinai and Palestine Campaign of the First World War, mostly as part of the Desert Mounted Corps. In April 1918 six of the regiments were withdrawn from the division and sent to France, being converted from Yeomanry to battalions of the Machine Gun Corps. These were replaced by Indian Army cavalry regiments withdrawn from France, and the division was renamed 1st Mounted Division, the third such division to bear that title. In July the combined division was renamed as the 4th Cavalry Division.

The Second Battle of Gaza was fought on 17-19 April 1917, following the defeat of the Egyptian Expeditionary Force (EEF) at the First Battle of Gaza in March, during the Sinai and Palestine Campaign of the First World War. Gaza was defended by the strongly entrenched Ottoman Army garrison, which had been reinforced after the first battle by substantial forces. They manned the town's defences and a line of strong redoubts which extended eastwards along the road from Gaza to Beersheba. The defenders were attacked by the Eastern Force's three infantry divisions, supported by two mounted divisions, but the strength of the defenders, their entrenchments & supporting artillery decimated the attackers.
The Second Transjordan attack on Shunet Nimrin and Es Salt, officially known by the British as the Second action of Es Salt and by others as the Second Battle of the Jordan, was fought east of the Jordan River between 30 April and 4 May 1918, during the Sinai and Palestine Campaign of the First World War. The battle followed the failure of the First Transjordan attack on Amman fought at the beginning April. During this second attack across the Jordan River, fighting occurred in three main areas. The first area in the Jordan Valley between Jisr ed Damieh and Umm esh Shert the Egyptian Expeditionary Force (EEF) defended their advanced position against an attack by units of the Seventh Army based in the Nablus region of the Judean Hills. The second area on the eastern edge of the Jordan Valley where the Ottoman Army garrisons at Shunet Nimrin and El Haud, on the main road from Ghoraniyeh to Amman were attacked by the 60th (London) Division many of whom had participated in the First Transjordan attack. The third area of fighting occurred after Es Salt was captured by the light horse brigades to the east of the valley in the hills of Moab, when they were strongly counterattacked by Ottoman forces converging on the town from both Amman and Nablus. The strength of these Ottoman counterattacks forced the EEF mounted and infantry forces to withdraw back to the Jordan Valley where they continued the Occupation of the Jordan Valley during the summer until mid September when the Battle of Megiddo began.
The Capture of Jericho occurred between 19 and 21 February 1918 to the east of Jerusalem beginning the Occupation of the Jordan Valley during the Sinai and Palestine Campaign of the First World War. Fighting took place in an area bordered by the Bethlehem–Nablus road in the west, the Jordan River in the east, and north of a line from Jerusalem to the Dead Sea. Here a British Empire force attacked Ottoman positions, forcing them back to Jericho and eventually across the Jordan River.

This is the order of battle for the Battle of Megiddo (1918), the concluding engagement of the Sinai and Palestine Campaign of the First World War. The Entente's Egyptian Expeditionary Force, commanded by General Edmund Allenby and composed mainly of British, Indian, Australian and New Zealand troops, with a small French and Armenian contingent, cooperated with the Arab Northern Army, which was part of the Arab Revolt and was under the overall command of the Emir Feisal, in an all-out offensive against the Yıldırım Army Group, part of the army of the Ottoman Empire.

The Stalemate in Southern Palestine was a six month standoff between the British Egyptian Expeditionary Force (EEF) and the Ottoman Army in World War I. The two hostile forces faced each other along the Gaza to Beersheba line during the Sinai and Palestine Campaign, with neither side able to force its opponent to withdraw. The stalemate began in April 1917 with the defeat of the EEF by the Ottoman Army at the Second Battle of Gaza and lasted until the EEF offensive began with the Battle of Beersheba on 31 October 1917.
The Southern Palestine offensive, employing manoeuvre warfare, began on 31 October 1917, with the Battle of Beersheba, during the Sinai and Palestine Campaign, of World War I. After the capture of Beersheba, by the Egyptian Expeditionary Force (EEF), the Gaza to Beersheba line became increasingly weakened and, seven days later, the EEF successfully forced the Ottoman Turkish Empire's Seventh and Eighth Armies to withdraw. During the following seven days of pursuit, the Turkish forces were pushed back to Jaffa. There followed three weeks of hard fighting in the Judean Hills before Jerusalem was captured on 9 December 1917. During five and a half weeks of almost continuous offensive operations, the EEF captured 47.5 miles (76.4 km) of territory.
The Battle of Tel el Khuweilfe, part of the Southern Palestine Offensive, began on 1 November 1917, the day after the Egyptian Expeditionary Force (EEF) victory at the Battle of Beersheba during the Sinai and Palestine Campaign of World War I. After the Stalemate in Southern Palestine a series of coordinated attacks were launched by British Empire units on the Ottoman Empire's German commanded Yildirim Army Group's front line, which stretched from Gaza inland to Beersheba. During fighting for the town, the road from Beersheba to Jerusalem via Hebron, was cut just north of the town in the southern spur of the Judean Hills. Here Ottoman units strongly defended the road and the Seventh Army headquarters at Hebron.
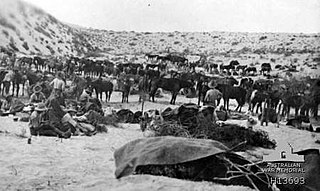
The Battle of Bir el Abd or the Abd well was fought between the forces of the British Empire and the Ottoman Empire, during the Sinai and Palestine Campaign of the First World War.
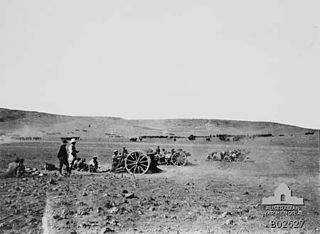
XVIII Brigade, Royal Horse Artillery was a Royal Horse Artillery brigade of the Territorial Force that was formed by the Egyptian Expeditionary Force in Palestine in July 1917 for the ANZAC Mounted Division. It served with the division thereafter in the Sinai and Palestine Campaign and was broken up after the end of World War I.
The Structure of the Egyptian Expeditionary Force over the course of the First World War is shown below.
