Ductility refers to the ability of a material to sustain significant plastic deformation before fracture. Plastic deformation is the permanent distortion of a material under applied stress, as opposed to elastic deformation, which is reversible upon removing the stress. Ductility is a critical mechanical performance indicator, particularly in applications that require materials to bend, stretch, or deform in other ways without breaking. The extent of ductility can be quantitatively assessed using the percent elongation at break, given by the equation:

Young's modulus is a mechanical property of solid materials that measures the tensile or compressive stiffness when the force is applied lengthwise. It is the modulus of elasticity for tension or axial compression. Young's modulus is defined as the ratio of the stress applied to the object and the resulting axial strain in the linear elastic region of the material.
The field of strength of materials typically refers to various methods of calculating the stresses and strains in structural members, such as beams, columns, and shafts. The methods employed to predict the response of a structure under loading and its susceptibility to various failure modes takes into account the properties of the materials such as its yield strength, ultimate strength, Young's modulus, and Poisson's ratio. In addition, the mechanical element's macroscopic properties such as its length, width, thickness, boundary constraints and abrupt changes in geometry such as holes are considered.

In materials science, fatigue is the initiation and propagation of cracks in a material due to cyclic loading. Once a fatigue crack has initiated, it grows a small amount with each loading cycle, typically producing striations on some parts of the fracture surface. The crack will continue to grow until it reaches a critical size, which occurs when the stress intensity factor of the crack exceeds the fracture toughness of the material, producing rapid propagation and typically complete fracture of the structure.
Whitening, Whitener or Whiten may refer to:

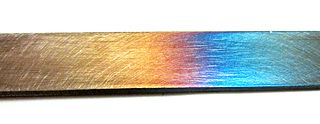
Tempering is a process of heat treating, which is used to increase the toughness of iron-based alloys. Tempering is usually performed after hardening, to reduce some of the excess hardness, and is done by heating the metal to some temperature below the critical point for a certain period of time, then allowing it to cool in still air. The exact temperature determines the amount of hardness removed, and depends on both the specific composition of the alloy and on the desired properties in the finished product. For instance, very hard tools are often tempered at low temperatures, while springs are tempered at much higher temperatures.

Leukonychia is a medical term for white discoloration appearing on nails. It is derived from the Greek words leuko 'white' and onyx 'nail'. The most common cause is injury to the base of the nail where the nail is formed.

Delamination is a mode of failure where a material fractures into layers. A variety of materials, including laminate composites and concrete, can fail by delamination. Processing can create layers in materials, such as steel formed by rolling and plastics and metals from 3D printing which can fail from layer separation. Also, surface coatings, such as paints and films, can delaminate from the coated substrate.

Stress corrosion cracking (SCC) is the growth of crack formation in a corrosive environment. It can lead to unexpected and sudden failure of normally ductile metal alloys subjected to a tensile stress, especially at elevated temperature. SCC is highly chemically specific in that certain alloys are likely to undergo SCC only when exposed to a small number of chemical environments. The chemical environment that causes SCC for a given alloy is often one which is only mildly corrosive to the metal. Hence, metal parts with severe SCC can appear bright and shiny, while being filled with microscopic cracks. This factor makes it common for SCC to go undetected prior to failure. SCC often progresses rapidly, and is more common among alloys than pure metals. The specific environment is of crucial importance, and only very small concentrations of certain highly active chemicals are needed to produce catastrophic cracking, often leading to devastating and unexpected failure.

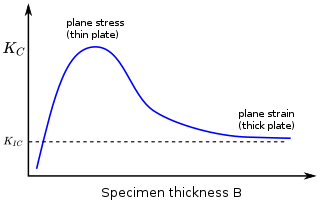
In materials science, fracture toughness is the critical stress intensity factor of a sharp crack where propagation of the crack suddenly becomes rapid and unlimited. A component's thickness affects the constraint conditions at the tip of a crack with thin components having plane stress conditions and thick components having plane strain conditions. Plane strain conditions give the lowest fracture toughness value which is a material property. The critical value of stress intensity factor in mode I loading measured under plane strain conditions is known as the plane strain fracture toughness, denoted . When a test fails to meet the thickness and other test requirements that are in place to ensure plane strain conditions, the fracture toughness value produced is given the designation . Fracture toughness is a quantitative way of expressing a material's resistance to crack propagation and standard values for a given material are generally available.
ASM International, formerly known as the American Society for Metals, is an association of materials-centric engineers and scientists.
Cyclic stress is the distribution of forces that change over time in a repetitive fashion. As an example, consider one of the large wheels used to drive an aerial lift such as a ski lift. The wire cable wrapped around the wheel exerts a downward force on the wheel and the drive shaft supporting the wheel. Although the shaft, wheel, and cable move, the force remains nearly vertical relative to the ground. Thus a point on the surface of the drive shaft will undergo tension when it is pointing towards the ground and compression when it is pointing to the sky.

Plastic bending is a nonlinear behavior particular to members made of ductile materials that frequently achieve much greater ultimate bending strength than indicated by a linear elastic bending analysis. In both the plastic and elastic bending analyses of a straight beam, it is assumed that the strain distribution is linear about the neutral axis. In an elastic analysis this assumption leads to a linear stress distribution but in a plastic analysis the resulting stress distribution is nonlinear and is dependent on the beam's material.

Flexural strength, also known as modulus of rupture, or bend strength, or transverse rupture strength is a material property, defined as the stress in a material just before it yields in a flexure test. The transverse bending test is most frequently employed, in which a specimen having either a circular or rectangular cross-section is bent until fracture or yielding using a three-point flexural test technique. The flexural strength represents the highest stress experienced within the material at its moment of yield. It is measured in terms of stress, here given the symbol .

An aluminium alloy (UK/IUPAC) or aluminum alloy is an alloy in which aluminium (Al) is the predominant metal. The typical alloying elements are copper, magnesium, manganese, silicon, tin, nickel and zinc. There are two principal classifications, namely casting alloys and wrought alloys, both of which are further subdivided into the categories heat-treatable and non-heat-treatable. About 85% of aluminium is used for wrought products, for example rolled plate, foils and extrusions. Cast aluminium alloys yield cost-effective products due to the low melting point, although they generally have lower tensile strengths than wrought alloys. The most important cast aluminium alloy system is Al–Si, where the high levels of silicon (4–13%) contribute to give good casting characteristics. Aluminium alloys are widely used in engineering structures and components where light weight or corrosion resistance is required.
7075 aluminium alloy (AA7075) is an aluminium alloy with zinc as the primary alloying element. It has excellent mechanical properties and exhibits good ductility, high strength, toughness, and good resistance to fatigue. It is more susceptible to embrittlement than many other aluminium alloys because of microsegregation, but has significantly better corrosion resistance than the alloys from the 2000 series. It is one of the most commonly used aluminium alloys for highly stressed structural applications and has been extensively used in aircraft structural parts.

Electronic components have a wide range of failure modes. These can be classified in various ways, such as by time or cause. Failures can be caused by excess temperature, excess current or voltage, ionizing radiation, mechanical shock, stress or impact, and many other causes. In semiconductor devices, problems in the device package may cause failures due to contamination, mechanical stress of the device, or open or short circuits.
Metallurgical failure analysis is the process to determine the mechanism that has caused a metal component to fail. It can identify the cause of failure, providing insight into the root cause and potential solutions to prevent similar failures in the future, as well as culpability, which is important in legal cases. Resolving the source of metallurgical failures can be of financial interest to companies. The annual cost of corrosion in the United States was estimated by NACE International in 2012 to be $450 billion a year, a 67% increase compared to estimates for 2001. These failures can be analyzed to determine their root cause, which if corrected, would save reduce the cost of failures to companies.

Tensile testing, also known as tension testing, is a fundamental materials science and engineering test in which a sample is subjected to a controlled tension until failure. Properties that are directly measured via a tensile test are ultimate tensile strength, breaking strength, maximum elongation and reduction in area. From these measurements the following properties can also be determined: Young's modulus, Poisson's ratio, yield strength, and strain-hardening characteristics. Uniaxial tensile testing is the most commonly used for obtaining the mechanical characteristics of isotropic materials. Some materials use biaxial tensile testing. The main difference between these testing machines being how load is applied on the materials.
The four-point flexural test provides values for the modulus of elasticity in bending , flexural stress , flexural strain and the flexural stress-strain response of the material. This test is very similar to the three-point bending flexural test. The major difference being that with the addition of a fourth bearing the portion of the beam between the two loading points is put under maximum stress, as opposed to only the material right under the central bearing in the case of three-point bending.


