The 1st Armoured Division was an armoured formation of the Australian Army, raised in 1941 as part of the Second Australian Imperial Force (AIF) during World War II. While the Division was originally to be deployed to North Africa in late 1941, it was retained in Australia following the outbreak of the Pacific War. The 1st Armoured Division formed a key element of Australia's defences against a feared Japanese invasion and was disbanded in Western Australia in September 1943.

The Royal Australian Armoured Corps (RAAC) is an administrative corps of the Australian Army. It provides the Australian Defence Force's Armour capability, which performs the function of mounted combat. Armour combines firepower, mobility, protection and networked situational awareness to generate shock action and overmatch in close combat. Armour is an essential element of the combined arms approach that is employed by the Australian Army.

The 2nd Armoured Division was an armoured formation of the Australian Army during World War II. Originally raised in 1921 as the 2nd Cavalry Division, based in Victoria and South Australia, the formation had been converted into a motor division in early 1942, before adopting the armoured designation later in the year. A Militia formation, the division undertook garrison duties in Australia and did not see combat before being disbanded in mid-1943.
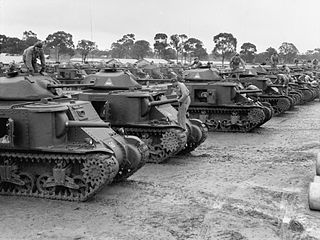
Armoured units made a relatively small, but important, contribution to Australia’s war effort during World War II. While Australia formed three armoured divisions and two independent armoured brigades during the war, Australian armoured units only saw action as independent regiments and companies supporting larger infantry formations. Early actions were fought in the Middle East by the divisional carrier regiments that supported the 6th, 7th and 9th Divisions, fighting in Libya, Egypt and Syria in 1941–42, before the Australian divisions returned to Australia in 1942–43. During the early fighting in the Pacific, there was a limited role for armoured formations, although one armoured regiment – the 2/6th – took part in the fighting around Buna–Gona in late 1942. Later in the war, though, during the Huon Peninsula, Bougainville and Borneo campaigns of 1943–45, several armoured units were used by Australian forces in the infantry support role.
The 3rd Army Tank Brigade was an armoured brigade of the Australian Army during the Second World War. The brigade was formed in May 1942 and disbanded in September 1943 without seeing combat.

The 10th Armoured Division was an armoured formation of division-size of the British Army, raised during the Second World War and was active from 1941–1944 and after the war from 1956–1957. It was formed from the 1st Cavalry Division, a 1st Line Yeomanry unit of the Territorial Army (TA) which had previously been serving in Palestine. The division was converted from cavalry to armour and redesignated from 1 August 1941.

The 2/6th Armoured Regiment was an armoured regiment of the Australian Army that served during World War II. Raised in 1941 the Regiment took part in the Battle of Buna–Gona in 1942–43, however, it did not see further action during the war and was disbanded in September 1945.

The 1st Royal New South Wales Lancers was an Australian Army light cavalry (reconnaissance) regiment. Its complicated lineage includes the New South Wales Lancers which was first formed as a colonial unit in 1885 as the New South Wales Cavalry, and subsequently saw action in the Second Boer War, and later during First World War at Gallipoli and Palestine as the 1st Light Horse Regiment. The unit subsequently served during the Second World War as the 1st Armoured Regiment equipped with Matilda tanks, fighting the Japanese in New Guinea and Borneo.

The 12th/16th Hunter River Lancers is an Australian Army Reserve cavalry regiment. It was formed on 1 May 1948, although it draws its lineage from units that were originally formed in the 1880s. It is currently a Heavy Cavalry unit equipped with Bushmaster Protected Mobility Vehicles. The regiment forms part of the 11th Brigade, attached to the 2nd Division and draws its members from regional centres in northern New South Wales, hence the reference to the Hunter River. Since 2000 the regiment has provided individuals as reinforcements to round-out Regular Army units deploying overseas on peacekeeping operations and in the conflicts in Iraq and Afghanistan.

The 1st Armoured Brigade was a formation of the Australian Army during World War II. The brigade was formed in July 1941, at Greta, New South Wales from volunteers for the Second Australian Imperial Force and was assigned to the 1st Armoured Division. Raised initially for service in the Middle East, following Japan's entry into the war, the brigade was assigned to the defence of Australia in case of an invasion. After garrison duties in New South Wales and Western Australia, it was disbanded in November 1944 without seeing active service, although some of its former units saw action later with other formations.

The 2nd Armoured Brigade was a formation of the Australian Army during World War II. The brigade was formed in July 1941, at Puckapunyal, Victoria, from Second Australian Imperial Force volunteers. It was assigned to the 1st Armoured Division in July 1941, with the intention of deploying it to the Middle East. However, it was reassigned to home defence following Japan's entry into the war, and was then transferred to the 3rd Armoured Division in October 1942. The brigade remained in Australia, undertaking defensive duties in Victoria and Queensland before being disbanded in January 1944. While it did not see any active service as a formation, some of its constituent units eventually took part in the campaigns on Tarakan, Labuan, Bougainville and around Aitape–Wewak in 1944–1945 after transferring to other brigades.
The 6th Australian Armoured Brigade was a formation of the Australian Army during World War II. The brigade was formed in May 1942, by the conversion of the 6th Motor Brigade and was assigned to the 2nd Motor Division. The brigade also absorbed units of the 5th Motor Brigade in June 1942. The brigade remained in Australia and did not see any active service before it was converted into the 4th Armoured Brigade in March 1943.
The 1st Motor Brigade was a formation of the Australian Army during the interwar years and the early part of World War II. Initially raised in 1921 as the 1st Cavalry Brigade in Queensland, it was a part time formation of the Militia. It consisted of three light horse regiments spread across several depots in the southeast part of the state. During World War II, the brigade was mobilized for defensive duties in December 1941, and assumed positions north of Brisbane to defend against a possible invasion. In early 1942, the brigade was converted into a motorized formation, and was redesignated as the 1st Motor Brigade. In July 1943, when the threat of invasion had passed, it was disbanded and its manpower reallocated to operational formations.
The 2nd Motor Brigade was a formation of the Australian Army during the interwar years and World War II. Initially raised in 1921 as the 2nd Cavalry Brigade in New South Wales, it was a part-time formation of the Militia. It consisted of three light horse regiments spread across several depots across the Hunter Valley and northern part of the state. During World War II, the brigade was mobilised for defensive duties in December 1941, and assumed positions along the northern coast to defend against a possible invasion. In early 1942, the brigade was converted into a motorised formation, and was redesignated as the 2nd Motor Brigade. In April 1943, when the threat of invasion had passed, it was disbanded and its manpower reallocated.
The 3rd Motor Brigade was a formation of the Australian Army during the interwar years and early part of World War II. Initially raised in 1921 as the 3rd Cavalry Brigade in Victoria, it was a formation of the part-time Militia. It consisted of three light horse regiments, which were spread across several depots in regional Victoria. During World War II, the brigade was mobilised for defensive duties in December 1941 to defend against a possible invasion. In early 1942, it was converted into a motorised formation and was redesignated as the 3rd Motor Brigade. The brigade moved to Western Australia in late 1942 and remained there until August 1944 when it was disbanded without having seen combat.

The 4th Motor Brigade was a formation of the Australian Army during the interwar years and the early part of the World War II. A formation of the part-time Militia, the brigade was formed in 1921 as the 4th Cavalry Brigade. At this time, it consisted of three light horse regiments based in southern and western New South Wales. During World War II, the brigade was mobilised for defensive duties in December 1941, and assumed positions along the southern New South Wales coast to defend against a possible invasion. It was converted into the 4th Motor Brigade in March 1942 when it was motorised. As a motor brigade, the 4th undertook defensive duties on the south coast of New South Wales before it was converted into an armoured formation, designated the 3rd Army Tank Brigade in May 1942.

The structure of the Australian Army changed considerably during World War II. At the outbreak of war the Army comprised a small regular component and a large, but ill-trained and equipped, militia force. In September 1939 the government authorised the establishment of the Second Australian Imperial Force for overseas service; this force eventually reached a strength of four infantry divisions, an armoured division and various headquarters and support units. The militia force, which remained in Australia, was neglected until the outbreak of the Pacific War.
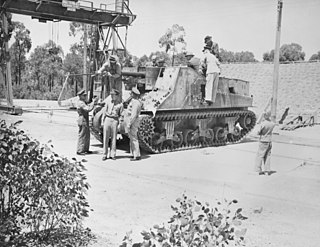
The Australian Army has used tanks from after the First World War, through the interwar period, the Second World War, the Cold War and to the present day. Throughout this period the Army has primarily been a light infantry force, with its tanks mainly being used in the direct support role. The Australian Army's tanks have seen combat during the Second World War and the Vietnam War, where they proved successful despite some of the designs employed being considered obsolete. The first Australian tanks were a small number of British medium and light tanks which were operated mainly for training purposes during the 1920s and 1930s.

The 14th Armoured Regiment was a unit of the Australian Army, which served during World War II. The regiment was formed in May 1942 as part of the 6th Australian Armoured Brigade. It was originally a Militia unit which originated from the 17th Light Horse Regiment. It was disbanded in early 1943 without seeing combat.
The 22nd Field Regiment, Royal Australian Artillery was an artillery regiment of the Australian Army. Formed in 1916 as a howitzer brigade assigned to the 2nd Division, the unit served on the Western Front during World War I until it was disbanded in early 1917. In 1921, it was raised as a part-time unit in Victoria. It undertook defensive duties in Australia during World War II and in the late 1940s and into the mid-1950s the regiment served as a self propelled artillery unit assigned to the 2nd Armoured Brigade. It was disbanded in 1957.


