The Battle of Dogger Bank was a naval engagement during the First World War that took place on 24 January 1915 near the Dogger Bank in the North Sea, between squadrons of the British Grand Fleet and the Kaiserliche Marine (High Seas Fleet). The British had intercepted and decoded German wireless transmissions, gaining advance knowledge that a German raiding squadron was heading for the Dogger Bank and ships of the Grand Fleet sailed to intercept the raiders.
The British surprised the smaller and slower German squadron, which fled for home. During a stern chase lasting several hours, the British caught up with the Germans and engaged them with long-range gunfire. The British disabled Blücher, the rearmost German ship and the Germans put the British flagship HMSLion out of action. Due to inadequate signalling, the remaining British ships stopped the pursuit to sink Blücher; by the time the ship had been sunk, the rest of the German squadron had escaped.
The German squadron returned to harbour with some ships in need of extensive repairs. Lion made it back to port but was out of action for several months. The British had lost no ships and suffered few casualties; the Germans had lost Blücher and most of her crew. After the British victory, both navies replaced officers who were thought to have shown poor judgement and made changes to equipment and procedures because of failings observed during the battle.
Before 1914, international communication was conducted via undersea cables laid along shipping lanes, most of which were under British control. Hours after the British ultimatum to Germany in August 1914, they cut the German cables. German messages could be passed only by wireless, using cyphers to disguise their content. The Signalbuch der Kaiserlichen Marine (SKM) was captured from the German light cruiser SMSMagdeburg after she ran aground in the Baltic Sea on 26 August 1914.[3] The German-Australian steamer Hobart was seized near Melbourne, Australia on 11 August and the Handelsverkehrsbuch (HVB) codebook, used by the German navy to communicate with merchant ships and within the High Seas Fleet, was captured. A copy of the book was sent to England by the fastest steamer, arriving at the end of October.[4] During the Battle off Texel (17 October), the commander of the German destroyer SMSS119 threw overboard his secret papers in a lead lined chest as the ship sank but on 30 November, a British trawler dragged up the chest. Room 40 gained a copy of the Verkehrsbuch (VB) codebook, normally used by Flag officers of the Kaiserliche Marine.[5]
The Director of the Intelligence Division of the Admiralty, Rear-Admiral Henry Oliver, established a code breaking organisation to decipher German signals, using cryptographers from academic backgrounds and making use of the windfalls taken from the German ships. At first, the inexperience of the cryptanalysts in naval matters led to errors in the understanding of the material. This lack of naval experience caused Oliver to make personal decisions about the information to be passed to other departments, many of which, particularly the Operations Department, had reservations about the value of Room 40. The transfer of an experienced naval officer, Commander W. W. Hope, remedied most of the deficiencies of the civilians' understanding. On 14 October, Oliver became Chief of the Naval War Staff, but continued to treat Room 40 more as a fiefdom and a source for the informal group of officers around the First Lord of the Admiralty, Winston Churchill, which received decoded messages but had insufficient authority to use them to best advantage.[6]
German ships had to report their position every night by wireless and British listening posts along the east coast took cross-bearings to find the positions of the ships when they transmitted. This signals intelligence meant that the British did not need wasteful defensive standing patrols and sweeps of the North Sea but could economise on fuel and use the time for training and maintenance. The Admiralty also uncovered the German order of battle and tracked the deployment of ships, which gave them an offensive advantage. The lack of a proper war staff at the Admiralty and poor liaison between Room 40, Oliver and the operations staff meant that the advantage was poorly exploited in 1915; it was not until 1917 that this was remedied. When German ships sailed, information from Room 40 needed to be passed on quickly but Oliver found it hard to delegate and would not routinely supply all decrypts; commanders at sea were supplied only with what the Admiralty thought they needed. Information could reach the Grand Fleet late, incomplete or mistakenly interpreted. When Jellicoe asked for a decryption section to take to sea, he was refused on security grounds.[7]
With the German High Seas Fleet (HSF) confined to port after the British success at the Battle of Heligoland Bight in 1914, Admiral Friedrich von Ingenohl, the Commander-in-Chief of the HSF planned a raid on Scarborough, Hartlepool and Whitby on the east coast of England, with the I Scouting Group (Admiral Franz von Hipper), a battlecruiser squadron of three battlecruisers and a large armoured cruiser, supported by light cruisers and destroyers. Hipper opened fire at 08:00 on 16 December 1914, eventually killing 108 and wounding 525 civilians. British public and political opinion was outraged that German warships could sail so close to the British coast, shelling coastal towns with impunity; British naval forces had failed to prevent the attacks and also failed to intercept the raiding squadron. The British fleet had sailed but the German ships escaped in stormy seas and low visibility, assisted by British communication failures.[8][9] The Germans had made the first successful attack on Britain since the 17th century and suffered no losses but Ingenohl was unjustly blamed for missing an opportunity to inflict a defeat on the Royal Navy, despite creating the chance by his offensive-mindedness.[10]
British counter-action
The British had let the raid occur and appeared to the public to have been surprised (having been forewarned by decoded wireless messages) and then to have failed to sink the German raiding force on its way back to Germany. In 1921, the official historian Julian Corbett wrote,
Two of the most efficient and powerful British squadrons...knowing approximately what to expect...had failed to bring to action an enemy who was acting in close conformity with our appreciation and with whose advanced screen contact had been established.[10]
The British had escaped a potential disaster, because the British 1st Battlecruiser Squadron (Vice-Admiral Sir David Beatty) was unsupported by the 2nd Battle Squadron (Vice-Admiral Sir George Warrender), when it failed to make contact with the raiding force. The worst British failure was in the exploitation of the intelligence provided by the code breakers at Room 40 (Sir Alfred Ewing), that had given the British notice of the raid. Some intercepts decoded during the action had taken two hours to reach British commanders at sea, by when they were out of date or misleading. News of the sailing of the HSF was delivered so late that the British commanders thought that the Germans were on the way, when they were returning. At sea, Beatty had sent ambiguous signals and some commanders had not used their initiative. On 30 December, the commander of the Home Fleet, Admiral Sir John Jellicoe, gave orders that when in contact with German ships, officers were to treat orders from those ignorant of local conditions as instructions only but he refused Admiralty suggestions to loosen ship formations, for fear of decentralising tactical command too far.[11]
Plan
German plan
Hipper suspected that the British had received advanced warning about earlier operations of the HSF from spy ships mingling with British and Dutch fishing boats, operating near the German Bight and the Dogger Bank, to observe German fleet movements. Hipper considered that with the Dogger Bank mid-way on the short route to the English coast, a signal from a trawler could reach the British in time for the British battlecruisers to intercept a German sortie, certainly on the return journey. Hipper ordered German ships vigorously to enforce search and seizure rules, fishing boats being brought into Cuxhaven to be searched. Buoyed by the success of the raid on the English coast, Admiral Hipper planned an attack on the British fishing fleet on the Dogger Bank. The German fleet had increased in size since the outbreak of war, with the arrival in service of the König-classdreadnought battleships SMSKönig, Grosser Kurfürst, Markgraf and Kronprinz of the 3rd Battle Squadron and the Derfflinger-class battlecruiserDerfflinger.[12]
Hipper intended to clear the bank of British fishing vessels and dubious neutrals and to attack any small British warships in the area, with the HSF covering the withdrawal of the battlecruisers.[13] The limited nature of the operation conformed to the ban by the Kaiser on operations by the High Seas Fleet, that had been reiterated on 10 January. A slightly more aggressive strategy was permitted, within the policy of keeping the HSF in being, in which the fleet could sortie to attempt to isolate and destroy advanced British forces or to attack the Grand Fleet if in greater strength. On 19 January, Beatty had reconnoitred the area west of the German Bight and been seen by a German aircraft. The reconnaissance and British activity at the Dogger Bank led Ingenohl to order Hipper and the I Scouting Group to survey the area and surprise and destroy any light forces found there. The I Scouting Group contained the battlecruisers Seydlitz (flagship), Moltke, Derfflinger and armoured cruiser Blucher, four light cruisers and eighteen destroyers.[14]
British plan
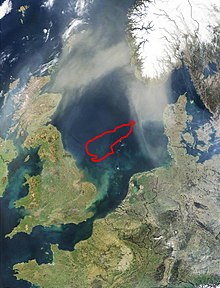
Area of the Dogger Bank
Wireless transmissions from German ships in the Jade River on 23 January 1915, intercepted and decoded by Room 40, alerted the British to a German sortie in force as far as the Dogger Bank. At the Admiralty, Wilson, Oliver and Churchill arranged a plan to confront the Germans with a superior opponent. A rendezvous was set for 24 January at 07:00, 30nmi (35mi; 56km) north of the Dogger Bank and about 180nmi (210mi; 330km) west of Heligoland.[15] The battlecruisers comprised the 1st Battlecruiser Squadron (Beatty) with Lion (flagship), Tiger and Princess Royal. The new 2nd Battlecruiser Squadron (Rear-Admiral Gordon Moore deputy to Beatty) had New Zealand as flagship and Indomitable. Harwich Force (Commodore Reginald Tyrwhitt) sailed from Harwich with three light cruisers and 35 destroyers, to rendezvous with the battlecruisers at 07:00 on 24 January.[15]
To cover the East Coast and act as distant support, the 3rd Cruiser Squadron and the seven pre-dreadnoughts of the 3rd Battle Squadron (Admiral Edward Eden Bradford) sailed from Rosyth for an area in the North Sea, from which they could cut off the German force if it moved north. The Grand Fleet left Scapa at 21:00 on 23 January, to sweep the southern North Sea but could not be expected to arrive on the scene until the afternoon of 24 January.[15] Soon after the German force sailed, the 1st Light Cruiser Squadron (Commodore William Goodenough) and the battlecruisers departed Rosyth, heading south; at 07:05 on 24 January, a clear day with good visibility, they encountered German screening vessels at the Dogger Bank.[1]
Sighting the smoke from a large approaching force, Hipper headed south-east by 07:35 to escape but the battlecruisers were faster than the German squadron, which was held back by the slower armoured cruiser Blücher and the coal-fuelled torpedo boats. By 08:00, the German battlecruisers had been sighted from Lion but the older battlecruisers of the British 2nd Battlecruiser Squadron were lagging behind the 1st Battlecruiser Squadron. Chasing the Germans from a position astern and to starboard, the British ships gradually caught up—some reaching a speed of 27kn (31mph; 50km/h)—and closed to gun range.[1] Beatty chose to approach from this direction so that the prevailing wind blew the British ships' smoke clear, allowing them a good view of the German ships, while German gunners were partially blinded by their funnel and gun smoke blowing towards the British ships. Lion opened fire at 08:52, at a range of 20,000yd (11mi; 18km) and the other British ships commenced firing as they came within range, while the Germans were unable to reply until 09:11, because of the shorter range of their guns.[16] No warships had engaged at such long ranges or at such high speeds before, and accurate gunnery for both sides was an unprecedented challenge but after a few salvos, British shells straddled Blücher.[17]
The British fire was concentrated on the battlecruiser Seydlitz at the head of the line and Blücher at the rear. With five British ships against four German, Beatty intended that his two rear ships, New Zealand and Indomitable, should engage Blücher, while his leading three engaged their opposite numbers. Captain Henry Pelly of the new battlecruiser Tiger assumed that two ships should concentrate on the leading German ship and engaged Seydlitz, leaving Moltke free to fire at Lion. Tiger's fire was ineffective, as she mistook the shell splashes from Lion for her own, when the fall of shot was 3,000yd (1.7mi; 2.7km) beyond Seydlitz.[18] At 09:43, Seydlitz was hit by a 13.5in (340mm) shell from Lion, which penetrated her after turret barbette and caused an ammunition fire in the working chamber. This fire spread rapidly through other compartments, igniting ready propellant charges all the way to the magazines and knocked out both rear turrets with the loss of 165men.[19][20] Only the prompt action of the executive officer, Wilhelm Heidkamp, in flooding the magazines saved Seydlitz from a magazine explosion that would have destroyed the ship.[21][lower-alpha 1]
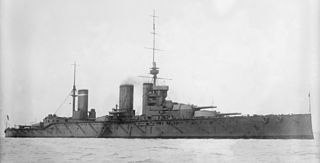
German battlecruisers (L–R) Derfflinger, Moltke and Seydlitz en route to Dogger Bank.
The British ships were relatively unscathed until 10:18, when Derfflinger hit Lion with several 30.5cm (12.0in) shells, damaging her engines and causing flooding; Lion lost speed and began to fall behind. At 10:41, Lion narrowly escaped a disaster similar to that on Seydlitz, when a German shell hit the forward turret and ignited a small ammunition fire but it was extinguished before causing a magazine explosion.[23] A few minutes later, taking on water and listing to port, Lion had to stop her port engine and reduce speed to 15kn (17mph; 28km/h) and was soon out of action, having been hit 14 times.[24] At 10:30, Blücher was hit by a shell from Princess Royal, which caused an ammunition fire and boiler room damage. Blücher had to reduce speed to 17kn (20mph; 31km/h) and lagged behind the rest of the German force.[16] Beatty ordered Indomitable—his slowest ship—to intercept Blücher.[25]
Painting of SMS V5 engaging HMSLion, by Willy Stöwer
With his ships running short of ammunition, Hipper chose to steam for home, leaving the disabled Blücher behind, to save his remaining ships.[26] The annihilation of the German squadron appeared likely to the British until 10:54, when Beatty—believing he saw a submarine periscope on Lion′s starboard bow—ordered a 90° turn to port, to avoid a submarine ambush (The "periscope" may have been a surfacing, run-out torpedo which had been launched 15 minutes earlier by the German destroyer V5). At 11:02, realising that so sharp a turn would open the range too much, Beatty ordered "Course NE" to limit the turn to 45° and then added "Engage the enemy's rear", to clarify his intent that the other ships, which had now left Lion far behind, should pursue the main German force. With Lion′s electric generators out of action, Beatty could only signal using flag hoists and both signals were flown at the same time.[27]
The combination of the signal "Course NE"—which happened to be the direction of Blücher—and the signal to engage the rear was misunderstood by Beatty's second-in-command, Rear-Admiral Moore on New Zealand, as an order for all the battlecruisers to finish off Blücher. The British battlecruisers broke off the pursuit of the German squadron and attacked Blücher, with most of the British light cruisers and destroyers joining in. Beatty tried to correct this obvious misunderstanding by using the order from Horatio Nelson at the Battle of Trafalgar "Engage the enemy more closely" but this order was not in the signal book and Beatty chose "Keep nearer to the enemy" as the closest equivalent. By the time this signal was hoisted, Moore's ships were too far away to read Beatty's flags and the correction was not received.[28]
Despite the overwhelming odds, Blücher put the British destroyer HMSMeteor out of action and scored two hits on the British battlecruisers with her 21cm (8.3in) guns. Blücher was hit by about 70 shells and wrecked. When struck by two torpedoes from the light cruiser Arethusa, Blücher capsized at 54 25' N. Lat., 5 25' E. Long and sank at 13:13, with the loss of 792 crew.[29][2] British ships began to rescue survivors, but they were hindered by the arrival of the Zeppelin L-5 (LZ-28) and a German seaplane which attacked with small bombs. No damage was done but the British ships put on speed and withdrew to avoid further aerial attack, leaving some of the survivors behind.[30] By this time, the rest of the German ships were too far away for the British to catch up.[31]
Lion made 10kn (12mph; 19km/h) at the beginning of the 300nmi (350mi; 560km) return voyage, escorted by Indomitable. Beatty contemplated leaving a flotilla of destroyers to guard Lion and sending the rest to the German Bight, to make a night attack on the German ships, but the damage to Lion caused more problems. As she crept home, the ship suffered further engine-trouble from saltwater contamination in the boiler-feed-water system and her speed dropped to 8kn (9.2mph; 15km/h). Lion was taken in tow by Indomitable, an operation which took two hours, in which the battlecruisers were exceedingly vulnerable to submarine attacks. At 17:00, the voyage resumed, the ships eventually managing 10kn (12mph; 19km/h) and when the Grand Fleet arrived, Jellicoe increased the screen to thirteen light cruisers and 67 destroyers. A message from the Admiralty arrived that the Germans were planning a night destroyer attack but that the destroyers with the two scouting groups were low on fuel and those with the HSF were too far away.[32]
25 January
Lion and Indomitable slowed to 7kn (8.1mph; 13km/h) overnight when Lion had more engine-trouble and at dawn were still 100nmi (120mi; 190km) short of the Firth of Forth. The destroyers reformed into an anti-submarine screen and the ships reached the firth at midnight; the destroyer Meteor was towed into the Humber Estuary.[33]Lion was out of action for four months, Fisher having decreed that the damage be repaired at Armstrong's on the Tyne, without her going into dry dock, making for an extremely difficult and time-consuming job.[34] The surviving German ships reached port; Derfflinger was repaired by 17 February but Seydlitz needed a drydock and was not ready for sea until 1 April.[35][36]
Aftermath
Analysis
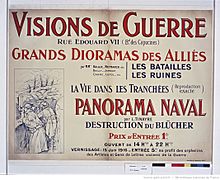
1916 advertisement for a film of the Blücher sinking. Proceeds from the premiere showing of the film went to orphans of artists and writers lost to the war.
At first the Germans thought that Tiger had been sunk, because of a large fire that had been seen on her decks, but it was soon clear that the battle was a serious German reverse. Kaiser Wilhelm II issued an order that all risks to surface vessels were to be avoided. Ingenohl was sacked and replaced by Admiral Hugo von Pohl. The damage to Seydlitz revealed flaws in the protection of her magazines and dangerous ammunition-handling procedures. Some of these failings were remedied in the HSF before the Battle of Jutland(31 May – 1 June 1916).[37] The Germans thought that the appearance of the British squadron at dawn was too remarkable to be a coincidence and concluded that a spy near their base in Jade Bay was responsible, not that the British were reading their encrypted wireless communications.[38] (In 1920, Scheer wrote that the number of British ships present suggested that they had known about the operation in advance, but that this was put down to circumstances, although "other reasons" could not be excluded.)[39]
Beatty had lost control of the battle and he judged that the opportunity of an overwhelming victory had been lost. The Admiralty—erroneously believing that Derfflinger had been badly damaged—later reached the same conclusion.[40] Jutland later showed that the British battlecruisers were still vulnerable to ammunition fires and magazine explosions, if hit by plunging fire. Had Moore's three fast battlecruisers pursued Hipper's remaining three (leaving the slower Indomitable behind as Beatty intended), the British might have been at a disadvantage and been defeated. Blücher demonstrated the ability of the German ships to absorb great punishment; all of Hipper's remaining ships were larger, faster, newer, more heavily armed, and far better armoured than Blücher; only Seydlitz had suffered serious damage. Apart from the sinking of Blücher, the Germans out-hit the British by over three to one, with 22 heavy-calibre hits—16 on Lion and six on Tiger—against seven British hits.[40]
The battle, although inconclusive, boosted British morale. Rear-Admiral Moore was quietly replaced and sent to the Canary Islands and Captain Henry Pelly of Tiger was blamed for not taking over when Lion was damaged. Ralph Seymour remained Beatty's flag lieutenant, although he was responsible for hoisting Beatty's two commands on one flag hoist, allowing them to be read as one. The use of wireless allowed centralised control of ships from the Admiralty, which cramped the initiative of the men on the spot. Signals between ships continued to be by flag but there was no revision of the signal book or the assumptions of its authors.[41] Signalling aboard Lion was again poor in the first hours of Jutland, with serious consequences for the British. The battlecruisers failed to improve fire distribution and similar targeting errors were made at Jutland.[42]
Casualties
Royal Scots Territorials firing a salute over the grave of Captain Erdmann, Commander of SMS Blücher
In 1929, Julian Corbett, the official naval historian, recorded 792 men killed and 45 wounded out of the 1,026 crew on Blücher, 189 of the men being rescued by the British. Seydlitz lost 159 men killed and 33 wounded and Kolberg lost three men killed and two wounded.[36] In 1965, Marder wrote that over 1,000 German sailors had been killed or captured, for British casualties of fewer than 50 men killed or wounded.[43] In 2003, Massie wrote that German casualties were an estimated 951 men killed and 78 wounded, most in Blücher; 153 men were killed and 33 were wounded in the fire in the two after turrets of Seydlitz. The British rescued 189 unwounded prisoners and 45 wounded from Blücher. British casualties were 15 killed and 80 men wounded. On Lion, two men had been killed and eleven wounded, most by a shell hit in the A turret lobby. Ten men were killed on Tiger with nine men wounded and on Meteor, four men were killed and two were wounded.[44]
↑ Supposedly, a sailor named Wilhelm Heidkamp saved the ship, when he flooded the magazine by opening the red hot valves, burning his hands and lungs, injuries from which he never recovered, leading to his early death in 1931. The Kriegsmarine named the destroyer Z21 in his honour.[22]
Beesly, Patrick (1982). Epkenhans, M. (ed.). Room 40: British Naval Intelligence, 1914–1918. London: Hamish Hamilton. ISBN978-0-241-10864-2.
Campbell, N. J. M. (1998). Jutland: An Analysis of the Fighting. New York: Lyons Press. ISBN978-1-55821-759-1.
Corbett, J. S. (2009) [1929]. Naval Operations. History of the Great War based on Official Documents. Vol.II (2nd, Naval & Military Press repr.ed.). London: Longmans, Green. OCLC220474040. Retrieved 25 January 2016.
Hillman, J.; Nägler, F. (2011). Epkenhans, M. (ed.). Skagerrakschlacht: Vorgeschichte – Ereignis – Verarbeitung[Battle of Jutland: Prelude, Event, Analysis]. Beiträge zur Militärgeschichte (in German). Berlin: Oldenburg. ISBN978-3-48670-270-5.
Groos, O.; Lorey, H.; Mantey, E. von (1920). Der Krieg in der Nordsee[The War in the North Sea]. Der Krieg zur See, 1914–1918, herausgegeben vom Marine-Archiv [The War at Sea, Published by the Marine Archive] (in German). Vol.III. Berlin: Mittler & Sohn. OCLC715186632.
The Battle of Jutland was a naval battle fought between Britain's Royal Navy Grand Fleet, under Admiral Sir John Jellicoe, and the Imperial German Navy's High Seas Fleet, under Vice-Admiral Reinhard Scheer, during the First World War. The battle unfolded in extensive manoeuvring and three main engagements, from 31 May to 1 June 1916, off the North Sea coast of Denmark's Jutland Peninsula. It was the largest naval battle and the only full-scale clash of battleships of the war. Jutland was the third fleet action between steel battleships, following the Battle of the Yellow Sea in 1904 and the Battle of Tsushima in 1905, during the Russo-Japanese War. Jutland was the last major battle in history fought primarily by battleships.
The Battle of Heligoland Bight was the first Anglo-German naval battle of the First World War, fought on 28 August 1914, between ships of the United Kingdom and Germany. The battle took place in the south-eastern North Sea, when the British attacked German patrols off the north-west German coast. The German High Seas Fleet was in harbour on the north German coast while the British Grand Fleet was out in the northern North Sea. Both sides engaged in long-distance sorties with cruisers and battlecruisers, with close reconnaissance of the area of sea near the German coast—the Heligoland Bight—by destroyer.
HMS Queen Mary was the last battlecruiser built by the Royal Navy before the First World War. The sole member of her class, Queen Mary shared many features with the Lion-class battlecruisers, including her eight 13.5-inch (343 mm) guns. She was completed in 1913 and participated in the Battle of Heligoland Bight as part of the Grand Fleet in 1914. Like most of the modern British battlecruisers, the ship never left the North Sea during the war. As part of the 1st Battlecruiser Squadron, Queen Mary attempted to intercept a German force that bombarded the North Sea coast of England in December 1914, but was unsuccessful. The ship was refitting in early 1915 and missed the Battle of Dogger Bank in January, but participated in the largest fleet action of the war, the Battle of Jutland in mid-1916. She was hit twice by the German battlecruiser Derfflinger during the early part of the battle and her magazines exploded shortly afterwards, sinking the ship.
HMS Inflexible was one of three Invincible-class battlecruisers built for the Royal Navy before World War I and had an active career during the war. She tried to hunt down the German battlecruiser SMS Goeben and the light cruiser SMS Breslau in the Mediterranean Sea when war broke out and she and her sister ship Invincible sank the German armoured cruisers SMS Scharnhorst and SMS Gneisenau during the Battle of the Falkland Islands. Inflexible bombarded Turkish forts in the Dardanelles in 1915, but was damaged by return fire and struck a mine while maneuvering. She had to be beached to prevent her from sinking, but she was patched up and sent to Malta, and then Gibraltar for more permanent repairs. Transferred to the Grand Fleet afterwards, she damaged the German battlecruiser Lützow during the Battle of Jutland in 1916 and watched Invincible explode. She was deemed obsolete after the war and was sold for scrap in 1921.
HMS Indomitable was one of three Invincible-class battlecruisers built for the Royal Navy before World War I and had an active career during the war. She tried to hunt down the German ships Goeben and Breslau in the Mediterranean when war broke out and bombarded Turkish fortifications protecting the Dardanelles even before the British declared war on Turkey. She helped to sink the German armoured cruiser Blücher during the Battle of Dogger Bank in 1915 and towed the damaged British battlecruiser HMS Lion to safety after the battle. She damaged the German battlecruisers Seydlitz and Derfflinger during the Battle of Jutland in mid-1916 and watched her sister ship HMS Invincible explode. Deemed obsolete after the war, she was sold for scrap in 1921.
The Lion class were a pair of battlecruisers built for the Royal Navy before World War I. Nicknamed the "Splendid Cats", the ships were a significant improvement over their predecessors of the Indefatigable class in speed, armament and armour. These improvements were in response to the German battlecruisers of the Moltke class, which were in turn larger and more powerful than the first British battlecruisers of the Invincible class.
HMS Invincible was the lead ship of her class of three battlecruisers built for the Royal Navy during the first decade of the twentieth century and the first battlecruiser to be built by any country in the world. During the First World War, she participated in the Battle of Heligoland Bight in a minor role, as she was the oldest and slowest of the British battlecruisers present. During the Battle of the Falkland Islands, Invincible and her sister ship Inflexible sank the armoured cruisers Scharnhorst and Gneisenau almost without loss to themselves, despite numerous hits by the German ships.
The three Invincible-class battlecruisers were built for the Royal Navy and entered service in 1908 as the world's first battlecruisers. They were the brainchild of Admiral Sir John ("Jacky") Fisher, the man who had sponsored the construction of the world's first "all-big-gun" warship, HMS Dreadnought. He visualised a new breed of warship, somewhere between the armoured cruiser and battleship; it would have the armament of the latter, but the high speed of the former. This combination would allow it to chase down most ships, while allowing it to run from more powerful designs.
HMS Princess Royal was the second of two Lion-class battlecruisers built for the Royal Navy before the First World War. Designed in response to the Moltke-class battlecruisers of the Imperial German Navy, the ships significantly improved on the speed, armament, and armour of the preceding Indefatigable class. The ship was named after Louise, The Princess Royal, a title occasionally granted to the Monarch's eldest daughter.
HMS Lion was a battlecruiser built for the Royal Navy in the 1910s. She was the lead ship of her class, which were nicknamed the "Splendid Cats". They were significant improvements over their predecessors of the Indefatigable class in terms of speed, armament and armour. This was in response to the first German battlecruisers, the Moltke class, which were very much larger and more powerful than the first British battlecruisers, the Invincible class.
SMS Seydlitz was a battlecruiser of the German Kaiserliche Marine, built in Hamburg. She was ordered in 1910 and commissioned in May 1913, the fourth battlecruiser built for the High Seas Fleet. She was named after Friedrich Wilhelm von Seydlitz, a Prussian general during the reign of King Frederick the Great and the Seven Years' War. Seydlitz represented the culmination of the first generation of German battlecruisers, which had started with the Von der Tann in 1906 and continued with the pair of Moltke-class battlecruisers ordered in 1907 and 1908. Seydlitz featured several incremental improvements over the preceding designs, including a redesigned propulsion system and an improved armor layout. The ship was also significantly larger than her predecessors—at 24,988 metric tons, she was approximately 3,000 metric tons heavier than the Moltke-class ships.
The Indefatigable class were the second class built of British battlecruisers which served in the Royal Navy and the Royal Australian Navy during World War I. The design represented a modest reworking of the preceding Invincible class, featuring increased endurance and an improved cross-deck arc of fire for their midships wing turrets achieved by a lengthening of the hull. Like its predecessor, the design resembled the contemporary dreadnought of the Royal Navy, but sacrificed armour protection and one turret from the main battery for a 4-knot speed advantage.
HMS Tiger was a battlecruiser built for the Royal Navy during the 1910s. The ship was the most heavily armoured British battlecruiser at the start of the First World War in 1914, but was not yet ready for service. The ship was assigned to the 1st Battlecruiser Squadron for the duration of the war and participated in the Battle of Dogger Bank in early 1915, though she was still shaking down and did not perform well. Tiger next participated in the Battle of Jutland in 1916, where she was only lightly damaged despite suffering many hits by German shells. Apart from providing distant cover during the Second Battle of Heligoland Bight in 1917, she spent the rest of the war on uneventful patrols in the North Sea.
SMS Derfflinger was a battlecruiser of the German Kaiserliche Marine built in the early 1910s during the Anglo-German naval arms race. She was the lead ship of her class of three ships; her sister ships were Lützow and Hindenburg. The Derfflinger-class battlecruisers were larger and featured significant improvements over the previous German battlecruisers, carrying larger guns in a more efficient superfiring arrangement. Derfflinger was armed with a main battery of eight 30.5 cm (12 in) guns, compared to the 28 cm (11 in) guns of earlier battlecruisers. She had a top speed of 26.5 knots and carried heavy protection, including a 30-centimeter (11.8 in) thick armored belt.
SMS Blücher was the last armored cruiser built by the German Empire. She was designed to match what German intelligence incorrectly believed to be the specifications of the British Invincible-class battlecruisers. Blücher was larger than preceding armored cruisers and carried more heavy guns, but was unable to match the size and armament of the battlecruisers which replaced armored cruisers in the British Royal Navy and German Imperial Navy. The ship was named after the Prussian Field Marshal Gebhard von Blücher, the commander of Prussian forces at the Battle of Waterloo in 1815.
SMS Moltke was the lead ship of the Moltke-class battlecruisers of the German Imperial Navy, named after the 19th-century German Field Marshal Helmuth von Moltke. Commissioned on 30 September 1911, the ship was the second battlecruiser of the Imperial Navy. Moltke, along with her sister ship Goeben, was an enlarged version of the previous German battlecruiser design, Von der Tann, with increased armor protection and two more main guns in an additional turret. Compared to her British rivals—the Indefatigable class—Moltke and her sister Goeben were significantly larger and better armored.
SMS Von der Tann was the first battlecruiser built for the German Kaiserliche Marine, as well as Germany's first major turbine-powered warship. At the time of her construction, Von der Tann was the fastest dreadnought-type warship afloat, capable of reaching speeds in excess of 27 knots. She was designed in response to the British Invincible class. While the German design had slightly lighter guns—28 cm (11 in), compared to the 30.5 cm (12 in) Mark X mounted on the British ships—Von der Tann was faster and significantly better-armored. She set the precedent of German battlecruisers carrying much heavier armor than their British equivalents, albeit at the cost of smaller guns.
The Raid on Scarborough, Hartlepool and Whitby on 16 December 1914 was an attack by the Imperial German Navy on the British ports of Scarborough, Hartlepool, West Hartlepool and Whitby. The bombardments caused hundreds of civilian casualties and resulted in public outrage in Britain against the German Navy for the raid and the Royal Navy for failing to prevent it.
The Raid on Yarmouth, on 3 November 1914, was an attack by the Imperial German Navy on the British North Sea port and town of Great Yarmouth. German shells only landed on the beach causing little damage to the town, after German ships laying mines offshore were interrupted by British destroyers. The British submarine HMS D5 was sunk by a German mine as it was leaving harbour to attack the German ships. A German armoured cruiser was sunk after striking two German mines outside its home port.
Franz Ritter von Hipper was an admiral in the German Imperial Navy. Franz von Hipper joined the German Navy in 1881 as an officer cadet. He commanded several torpedo boat units and served as watch officer aboard several warships, as well as Kaiser Wilhelm II's yacht SMY Hohenzollern. Hipper commanded several cruisers in the reconnaissance forces before being appointed commander of the I Scouting Group in October 1913.
This page is based on this Wikipedia article Text is available under the CC BY-SA 4.0 license; additional terms may apply. Images, videos and audio are available under their respective licenses.