The First Battle of Passchendaele took place on 12 October 1917 during the First World War, in the Ypres Salient in Belgium on the Western Front. The attack was part of the Third Battle of Ypres and was fought west of Passchendaele village. The British had planned to capture the ridges south and east of the city of Ypres as part of a strategy decided by the Allies at conferences in November 1916 and May 1917. Passchendaele lay on the last ridge east of Ypres, 5mi (8.0km) from the railway junction at Roulers, which was an important part of the supply system of the German 4th Army.
After a dry spell in September, rains began on 3 October and by the Battle of Poelcappelle on 9 October much of the British field artillery opposite Passchendaele was out of action due to rain, mud and German artillery-fire. The remaining guns were either left in old positions and fired at the limit of their range or were operated from any flat ground near wooden roadways or from platforms, many of which were unstable, where it was found impossible to move them forward. General Herbert Plumer and Field Marshal Douglas Haig were left under the impression that a big advance had been made towards Passchendaele ridge but most of the ground had been lost to German counter-attacks in the afternoon.
The British attack on 12 October began 2,000–2,500yd (1.1–1.4mi; 1.8–2.3km) from the village instead of the 1,500yd (1,400m) originally thought by the British commanders. Air reconnaissance revealed the true position too late to make substantial changes to the plan. The main attack of the Second Army was by the two Anzac Corps, supported by the Fifth Army to the north. On Passchendaele Ridge, opposite the I Anzac and II Anzac Corps, the attack was repulsed or captured ground was recovered by German counter-attacks. The attack on the right flank of the Fifth Army was a costly failure but on the left, the fringe of Houthoulst Forest was gained. British attacks were postponed until the weather improved and communications behind the front were restored.
The battle was a German defensive success but was mutually costly and two German divisions were diverted to Flanders to replace "extraordinarily high" losses. In the worst weather conditions of the campaign, in the five weeks after the Battle of Broodseinde, the number of troops engaged by the British amounted to no more than those involved in the Battle of Pilckem Ridge on 31 July. British casualties in October 1917 were the third highest of the war, after July 1916 and April 1917.
In July 1917, Field MarshalDouglas Haig began the Third Battle of Ypres campaign to advance from the Ypres Salient. At the Battle of Messines, the far (east) side of the Messines Ridge had been captured down to the Oosttaverne Line and a substantial success gained in the subsequent Battle of Pilckem Ridge.[2] At the Battle of Langemarck there was only an advance of 1,500yd (1,400m) around Langemarck village by XIV Corps and the French First Army on the northern flank. The failure of the Fifth Army to advance on the Gheluvelt Plateau in August, led Haig to send artillery reinforcements to the south-east, along the higher ground of the Gheluvelt plateau, Broodseinde Ridge and the southern half of Passchendaele Ridge.[3] The Gheluvelt Plateau was taken over by the Second Army ( General Herbert Plumer), which continued the evolution of bite-and-hold tactics that had been used in July and August.[4]
The Second Army planned to attack with a succession of bodies of infantry on narrower fronts, to the first objective about 800yd (730m) forward; the second objective was 500yd (460m) beyond and the final objective was 300yd (270m) further on.[4] Pauses on the objectives would become longer and attacks would be protected by a bigger, deeper, multi-layered creeping barrage. Standing barrages beyond the objectives were to be fired during pauses to obstruct German counter-attacks, to confront them with defensive areas based on the British objectives. The British infantry would be in communication with its artillery and have much more local support from the Royal Flying Corps (RFC).[5] Beyond the "creeper", four heavy artillery counter-battery double groups, with 222 guns and howitzers, covered a 7,000yd (4.0mi; 6.4km) front, ready to engage German guns with gas and high-explosive shell.[6] At the Battle of the Menin Road Ridge (20 September), Battle of Polygon Wood (26 September) and Battle of Broodseinde (4 October), these methods produced a 4,000yd (2.3mi; 3.7km) advance in two weeks, inflicted many German casualties. The Germans changed tactics several times against the refined British methods but all failed.[7]
In the lower ground west of the Passchendaele Ridge, three months of shelling had blocked the watercourses that normally provided drainage. On the night of 4 October, it began to rain intermittently for the next three days. Much of the battlefield again became a quagmire, making movement extremely difficult.[8] Had the German defence collapsed during the Battle of Poelcappelle on 9 October, the reserve brigades of II Anzac Corps were to have passed through later in the day, to advance to far side of Passchendaele village and the Goudberg spur to the north.[9] On 7 October, the afternoon attack had been cancelled by Haig because of the rain and the final details of the plan for the renewed attack of 12 October, were decided on the evening of 9 October.[10] Plumer had received misleading information about the progress of the attack that day and believed that "a sufficiently good jumping-off line" had been achieved, passing the erroneous information back to Haig.[11][a] The decision was made to continue the offensive to gain higher ground for the winter, to assist the French with their attack due on 23 October (the Battle of La Malmaison) and to hold German troops in Flanders for the Battle of Cambrai due in November.[8]
Prelude
British preparations
Field gun being moved two days before the battle
Encouraged by the unusually high German losses during the Battle of Broodseinde and reports of lowered German morale, Haig sought quickly to renew the Allied offensive and secure Passchendaele Ridge.[13] The Battle of Poelcappelle began on 9 October and was costly to both sides; most of the ground captured opposite Passchendaele was lost later in the day to German counter-attacks.[14] News of this German defensive success was slow in reaching the higher British commanders, because the usual collapse of communications during an attack was exacerbated by the rain and mud. Late on 9 October, Plumer erroneously informed Haig that II Anzac Corps had reached the first objective, which made a good jumping-off position for the attack due on 12 October.[15][b] Many British guns had sunk in the mud, bogged down while being moved forward or run short of ammunition. German artillery fire had become much heavier as British heavy artillery counter-battery fire almost ceased from 9 to 12 October, as attempts were made to move the guns forward, although the defenders were still caused considerable difficulty by British bombardments.[17][18]
The 3rd Australian Division and the New Zealand Division relieved the 66th (2nd East Lancashire) Division and the 49th (West Riding) Division on the night of 10/11 October. Patrols discovered that the 49th (West Riding) Division had reached the Wallemolen spur east of the Ravebeek creek but the advance beyond had been stopped by new barbed wire entanglements around the Flandern I Stellung. The 66th (2nd East Lancashire) Division, on the right flank, was found to be back near its start line of 9 October.[19] The New Zealand Division made hurried preparations to restore communications and reconnoitre the ground, because information from the 49th (West Riding) Division headquarters was insufficient; some wounded were still stranded in no-man's-land when the attack began on 12 October.[20] Many field guns needed for the attack remained bogged in the mud and other field guns were placed on improvised platforms, when their new sites had proved impossible to reach, from which they fired slowly and inaccurately or sank into the mud.[21] A German bombardment took place on the morning of 11 October and later in the day the British shelled the German defences on Wallemolen spur, to little effect. Some progress was made in the building of plank roads since the attack on 9 October and a few more guns had reached their new positions by 12 October.[14] The Commander, Royal Artillery (CRA) of the New Zealand Division reported that adequate artillery support for his division could not be guaranteed.[22]
Plumer discovered that the line near Passchendaele had hardly changed and that the main reason for the failure on 9 October was uncut barbed wire30yd (27m) deep, in front of the pillboxes at the hamlet of Bellevue on the Wallemolen spur.[23] The New Zealand Division commander, Major-GeneralAndrew Russell, later wrote that accurate information had arrived 24 hours too late to ask for a postponement or radically to alter the barrage plan and unit orders.[24][c] The true position of the front line meant that the advance of 1,500yd (1,400m) to the final objective would actually have to cover 2,000–2,500yd (1.1–1.4mi; 1.8–2.3km).[26] The opening barrage line planned for the 3rd Australian Division was moved back 350yd (320m) but this still required the infantry to advance for 500yd (460m) to reach it.[27] Duckboard tracks had been extended to the line held on 9 October, which allowed infantry to move up on the night of 11 October in time for the attack, despite rain and a German gas bombardment on Gravenstafel spur. High winds and heavy rain began about zero hour (5:25 a.m.) and lasted all day.[28]
British plan
Allied artillery barrage map
The II Anzac Corps and the Second Army headquarters were misinformed as to the extent of the advance achieved on 9 October. The objectives set for 12 October required an advance of 2,000–2,500yd (1.1–1.4mi; 1.8–2.3km) to the final objective, rather than the intended 1,000–1,500yd (910–1,370m).[29] The I Anzac Corps with the 4th and 5th Australian divisions, in place of the exhausted 1st and 2nd Australian divisions, was to provide a flank guard to the south.[30] The I Anzac Corps was to advance across the Keiberg Spur and dig in on the flank of the main assault, at the first and second objective lines only, 1,200yd (1,100m) and 880yd (800m) forward.[31]
The main attack was to be undertaken by the Second Army, with the 3rd Australian Division and the New Zealand Division of the II Anzac Corps, on a front of 3,000yd (1.7mi; 2.7km). The 3rd Australian Division would attack Passchendaele ridge and the village and the New Zealand Division was to capture the Bellevue Spur.[32] The first objective (Red Line) was practically the same as the second objective of the attack on 9 October, 1,200yd (1,100m) forward, beyond the Bellevue pillboxes. The second objective (Blue Line) was 880yd (800m) beyond, at the junction of the Wallemolen Spur and was the jumping-off line for the attack on the village of Passchendaele. The final objective (Green Line) lay 400yd (370m) beyond the village.[33]
Although short of fresh troops, the Fifth Army was to establish the northern flank of the main attack. In the XVIII Corps area, the 26th Brigade of the 9th Division was to advance 2,000yd (1,800m) to the ridge north of the Goudberg re-entrant and the 55th Brigade of the 18th (Eastern) Division was to attack for a similar distance north of the Lekkerboterbeek creek. In the XIV Corps area, the 12th Brigade of the 4th Division, the 51st Brigade of the 17th Division and the 3rd Guards Brigade of the Guards Division, were to advance beyond Poelcappelle and close up to Houthoulst Forest, on the boundary with the French First Army.[34]
In the New Zealand Division sector, the two attacking brigades each had a machine-gun company and three other machine-gun companies were to fire a machine-gun barrage. The division had the nominal support of a hundred and forty-four 18-pounderfield guns and forty-eight 4.5-inch howitzers The artillery was expected to move forward after the final objective was gained, to bombard German-held ground from positions 1,000–2,000yd (910–1,830m) beyond Passchendaele village.[35] On the southern flank, the I Anzac Corps was to capture ground south of the Ypres–Roulers railway, the X Corps and IX Corps attacking on the right.[21]
The British front line and the German defences in the area east of Ypres, mid-1917
From mid-1917, the area east of Ypres was defended by six German defensive positions the front position, Albrecht Stellung (second position), Wilhelm Stellung (third position), Flandern I Stellung (fourth position), Flandern II Stellung (fifth position) and Flandern III Stellung (under construction). In between the German positions lay the Belgian villages of Zonnebeke and Passchendaele.[36] After their defensive success on 9 October, the Germans brought fresh divisions into the line but the tempo of British operations caused considerable anxiety among German commanders.[37] The 18th Division took over in the Poelcappelle area; on a 1,000m (3,300ft) front, the division had 17 heavy machine-guns and large numbers of MG 08/15 machine-guns distributed among its infantry companies.[38]
Ludendorff's defensive changes had been implemented in some parts of the front, despite a certain reluctance by some of the local commanders. Outposts beyond the German advanced defensive zone (Vorfeld) were to hold the front line in enough strength to stop the British from sapping forward. The garrisons were to withdraw to the main line at the rear of the Vorfeld when attacked, signalling to the artillery with rockets and Very lights for barrage fire. The German artillery would place the barrage in front of the main line of resistance, before the British infantry reached it and if possible, the troops in the front position were to attempt to defeat the attack without calling on the supporting Eingreif Division, to limit casualties.[39]
In his diary, Rupprecht wrote that he was doubtful about the changes of tactics required by Ludendorff, especially his instructions for more counter-battery fire, since in previous battles the German artillery had engaged British infantry. An anticipated French attack on the Chemin des Dames, meant that fewer reinforcements could be expected by the 4th Army, making a fighting withdrawal the only possible response to the British attacks. Rupprecht wrote that the fighting power of German troops in Flanders was declining and that all attempts to counter the British artillery had failed, requiring a greater retreat, far enough back to force the British into a laborious artillery redeployment.[40] After being postponed from 2 October, due to delays in the transport of ammunition, Unternehmen Mondnacht (Operation Moonlight) took place at midnight on 11/12 October. A strip of ground from Messines to Dixmude was bombarded with gas, which high winds dispersed with little effect on Allied troops.[14]
The two Anzac Corps of the Second Army conducted the main attack. Rain fell all night on the night of 11/12 October, with only one dry interval during the day. The Germans opposite the New Zealanders had been alert all night, sending up many flares and bombarded the New Zealand front line at 5:00 a.m., which hit the New Zealand trench mortar personnel and destroyed their ammunition.[41][d] The 12th Brigade of the 4th Australian Division, advanced on time at 5:25 a.m. but saw no infantry from the 3rd Australian Division beyond the railway. The brigade captured the Keiberg cutting and consolidated, along with the rest of the first objective, although with many casualties.[43]
The 9th Brigade of the 3rd Australian Division, managed to reach the first objective and the battalion due to advance to the second objective went straight on. As soon as those troops began to descend from a slight rise, they were engaged by German field and heavy artillery. The brigade kept going to the second objective, although part of the advance remained bogged down short of the first objective. The 10th Brigade (3rd Australian Division) suffered many casualties from machine-guns in pillboxes but found some cover at a fold near the first objective, despite increasing machine-gun fire from the Bellevue pillboxes.[44]
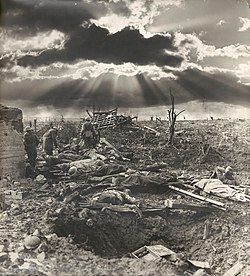
New Zealand artillery in action and firing from shell-holes during the battle
The New Zealand advance was obstructed by uncut barbed wire on the Wallemolen spur; the creeping barrage was very thin, as some guns were bogged and others had been knocked out by German artillery. The creeping barrage diminished as it moved forward and howitzer shells, plunging into wet ground around the Bellevue pillboxes exploded harmlessly.[44] The German artillery fired all the way to the rear of the New Zealand divisional area and machine-gun barrages from the German pillboxes raked the advance.[44] The division captured the cemetery at Wallemolen and reached Wolf Copse, the right of the advance stopping on the rise astride the Ravebeek creek.[45]
North of the Gravenstafel–Metcheele road, the division gained some ground but was stopped by belts of barbed wire 25–50yd (23–46m) deep and were swept by machine-gun fire.[45] The infantry tried to cut their way through the wire of the German Flandern I Stellung on the Wallemolen spur and small numbers of troops got through both belts but were killed after being stopped by more wire around the German pillboxes. Further south, the New Zealand Division captured two pillboxes, with help from 3rd Australian Division troops in the area. An advance began up the northern slope of the Ravebeek creek but broke down quickly around Laamkeek. At 8:00 a.m. the surviving New Zealand infantry were ordered to dig-in.[41]
New Zealand signaller on a German blockhouse during the battle
The advance of the Australians towards the second objective began at 8:25 a.m. but the 10th Brigade had suffered too many casualties to advance and dug-in to wait for reinforcements.[46] A party from the 10th Brigade kept going and arrived at the pillbox near Crest Farm, whose occupants promptly surrendered. The party then advanced into Passchendaele village before German troops rallied and re-occupied the pillbox.[46] Small groups from the 12th Brigade got across the Keiberg spur but suffered many casualties and the brigade repulsed two German counter-attacks between 3:00 p.m. and 4.00 p.m.[43] An attempt was made to use the reserve battalion of the 9th Brigade to outflank the Bellevue pillboxes, combined with a new attack by the New Zealand Division around 3:00 p.m.[47]
The attack was eventually cancelled, as the 9th (Scottish) Division to the north and the 3rd Australian Division to the south were forced back by the fire of the Bellevue machine-guns. The artillery bombardment went ahead, dropping on some New Zealand positions but also dispersing two German parties massing for a counter-attack.[47] By 3:30 p.m. the 10th Brigade had filtered back to its start-line, due to fire from the Bellevue Spur.[43] The 9th Brigade was exposed by this retirement and fell back from the second objective in the face of artillery, machine-gun and sniper fire, with many casualties.[43] When the Anzac advance broke into the front between Passchendaele and the Keiberg Spur, I Battalion, Reserve Infantry Regiment 55 of the 220th Division was attached to the 195th Division and II Battalion, Reserve Infantry Regiment 55 to the 233rd Division. With the divisions in the front line, the German reinforcements reoccupied the areas vacated by the Australians and New Zealanders, capturing 56 unwounded and many wounded Australians.[48] In the evening, most of the New Zealand Division withdrew to a line on the lower slopes of the Wallemolen spur.[47]
Fifth Army
Protection of the northern flank of the main attack by the Second Army was provided by the Fifth Army, with a brigade each of the 9th (Scottish) and 18th (Eastern) divisions of XVIII Corps. The brigades attacked from north of Goudberg to north of the Lekkerboterbeek stream, adjacent to the northern boundary of the Second Army. The 26th Brigade of the 9th (Scottish) Division was to advance 2,000yd (1,800m) on a 1,500yd (1,400m) front, with its left flank on the Lekkerboterbeek, into an area dotted with fortified farm buildings. The 55th Brigade of the 18th (Eastern) Division attacked north of the Lekkerboterbeek, over ground soaked after rain all day on 11 October. A low-flying German aircraft had reconnoitred the area near the 55th Brigade so the position of the jumping-off line was altered, to avoid a possible German counter-barrage as the brigade formed up for the advance.[49]
XVIII Corps
9th (Scottish) Division insignia
The 9th (Scottish) Division was hampered by the effect of rain and mud on supply routes, which stranded guns and caused shortages of ammunition, particularly in smoke shells. At midnight on 11 October, torrential rain fell and a German gas and high explosive bombardment fell on the divisional forming-up areas. The wide front left numerous gaps in the line, as the 26th Brigade advanced behind a barrage moving at 100yd (91m) in eight minutes, assisted by a machine-gun barrage from 16 Vickers machine-guns. The creeping barrage began at 5:35 a.m. and was described as "thin and ragged". The advancing troops lost direction and communication broke down, as carrier pigeons were hindered by the high wind and messenger dog handlers became casualties. The infantry continued their advance and on the right of the captured Adler Farm and reached the green line at Source Trench.[50]
In the centre, the attackers had to dig in after a 100yd (91m) advance. Small parties reached Source Trench and some may have advanced as far as Vat Cottages. On the left of the brigade the ground was even worse, the infantry were unable to keep up with the barrage and lost direction but managed to capture a pillbox and move forward. Some of the troops on the left flank inadvertently crossed the Lekkerboterbeek, advanced 80yd (73m) and then formed a flank with troops from the 18th (Eastern) Division. Except on the right flank, the attack was stopped by the Germans only 100yd (91m) from the start line, despite the 27th Brigade being sent to reinforce the attack, in which some of the British infantry drowned in shell-holes. The new front line ran from the junction with the New Zealand Division at the cemetery near Wallemolen, to Oxford Houses then back to the old front line.[50]
Formation sign of the 18th (Eastern) Division
The barrage began at 5:20 a.m. and the 55th Brigade of the 18th (Eastern) Division, infantry advanced in "snake formation". The divisional field artillery suffered the same fate as those of the divisions to the south, many guns sinking into the soft ground. A German counter-barrage began within a minute of the advance and as British troops took cover, German machine-gunners fired at the crater lips of shell-holes, through which bullets penetrated and hit the soldiers sheltering inside. The effect of the German barrage was worst on the right flank and added to German machine-gun fire from the Brewery and Helles House strong points; the situation at Requette Farm was not known as all runners sent from the area were killed. Mud clogged weapons of all types and at 11:00 a.m., a British trench-mortar battery and some supporting machine-guns had to cease fire, because of wet and dirty ammunition. At noon, German counter-attacks towards the west end of Poelcappelle began and lasted all afternoon, the Germans trying to exploit a gap between the British 4th and 18th divisions. Defensive positions in shell-holes were held by the survivors of the British attack.[49]
XIV Corps
The northern flank of the Fifth Army, on the boundary with the French First Army, was held by XIV Corps, which also attacked with a brigade of each division to close up to Houthoulst Forest.[51] After dark on 11 October, tape was laid beyond the front line in the corps area, for the troops to form up on, beyond a possible German counter-barrage. To avoid detection, scouts patrolled further forward, to ambush German patrols.[52] The 3rd Guards Brigade of the Guards Division moved up on the night of 11 October, through heavy rain and a German gas barrage (Operation Mondnacht), which caused many casualties in this part of the front.[53] The artillery barrage began on schedule at 5:25 a.m. and the German counter-barrage was slow to begin, falling mostly behind the attacking waves. The XIV Corps divisions had much better artillery and machine-gun barrages than the divisions further south and the creeping barrage moved at a very slow rate of 100yd (91m) in ten minutes, in two 300yd (270m) bounds.[51]
The 12th Brigade headquarters (4th Division) next to the XVIII Corps area, was to attack with a composite force of two battalions of the 10th Brigade and two from the 12th Brigade. Two battalions were to lead, with a battalion each in support and reserve, following on to a first objective about 200yd (180m) forward, then pivoting on the right to the final objective another 300yd (270m) forward at Water House. The ground had been soaked again by overnight rain and the advance by the right-hand battalion was stopped at Requette Farm by determined German resistance and massed machine-gun fire, during which contact with the neighbouring battalion of the 18th (Eastern) Division was lost. The left-hand battalion advance faced less opposition and by 6:20 a.m. had crossed the Poelcappelle–le Cinq Chemins road, captured Memling and Senegal farms and then made contact with the 17th (Northern) Division. After the capture of Requette Farm by the right-hand battalion, more German machine-gun fire was received from the Brewery and Helles House, which stopped the attack on the right flank. Requette Farm was lost to a German counter-attack around noon and attempts by reinforcements to re-take the farm were abandoned as dark fell.[54] The brigade extended a defensive flank on the right to maintain contact with the 18th (Eastern) Division. The new front line curved back through Besace Farm to west of Helles House, south-west of Requette Farm, north of Poelcappelle.[55]
The 51st Brigade of the 17th (Northern) Division was to advance for 1,600yd (1,500m) astride the Ypres–Staden railway, to meet the left flank of the 4th Division north of Poelcappelle and the right flank of the Guards Division, 400yd (370m) north of the railway. Beyond the railway, the advance of the 51st Brigade veered slightly south, away from a German strongpoint which caused many casualties and lost touch with the Guards Division. South of the embankment, astride the Broombeek and Watervlietbeek streams, several German farm strongpoints, pillboxes and shell-hole positions were overrun by the infantry, who were able to keep well up to the very-slow-moving barrage. The brigade reached its first objective by 8:00 a.m., despite a number of German reinforcements arriving through the British artillery barrages. The final objective was reached at 11:00 a.m. and on the right a defensive flank was thrown back from Memling Farm at the final objective, to link with the 4th Division. By noon the advance was complete, 218 German prisoners had been taken and no German counter-attack followed, resistance being limited to a small amount of rifle fire.[56]
In cold, wet weather, the 3rd Guards Brigade made a short advance behind a ragged barrage, took the higher ground on the edge of Houthoulst Forest and cut off the rest of the spur running north-east from Veldhoek. Contact with the 17th (Northern) Division on the right flank was lost, after the left flank formation of the 17th (Northern) Division veered south and the crew of a contact patrol aircraft failed to see the loss of direction. Two platoons due to meet the attacking brigade of the 17th (Northern) Division had to dig in near the Angle Point pillbox under machine-gun fire. After dark, the Guards and the 17th (Northern) Division closed the gap, by capturing the blockhouses at Angle Point and Aden House. Next day, conditions were so bad that the attacking brigade was relieved by the 1st Guards Brigade. The fresh troops patrolled vigorously to the southern edge of Houthoulst Forest against little organised German resistance, except for extensive sniping around the Colbert cross-roads and Colombo House.[57]
Air operations
During the battle, forty-one British pilots made low-altitude strafing and bomb attacks. The British flew an additional 27 contact and counter-attack patrols and 124 zone-calls were made to the artillery, to engage German machine-gun nests, troops, artillery and transport. British aircraft observers made 26 calls to destroy German artillery batteries and an additional 37 calls for artillery battery neutralisation. The British flew four bombing raids on German encampments and railway stations, eight reconnaissance flights beyond the battlefront and engaged in twelve dogfights with German aircraft. The British squadrons lost fourteen aircraft; five crew members returned wounded.[58][e]
Aftermath
Analysis
Map showing wet areas near Passchendaele village, blue shading marks wet and waterlogged areas near Passchendaele
The defence of the 4th Army on 12 October was more effective than expected by the British. The German 18th Division held the line opposite Poelcappelle and retained most of its area after committing all of its reserves. The German command considered the Allied advance in the north to be less dangerous than that towards the Flandern II Stellung defensive position between Passchendaele and Drogenbroodhoek. One division was moved to Morslede and another to the area between Westrozebeke and Stadenberg, either side of Passchendaele.[60] The 195th Division at Passchendaele had so many casualties (3,325) from 9 to 12 October that it had to be relieved by the 238th Division.[61]
Ludendorff changed his mind about the prospect of retaining Passchendaele Ridge, believing that the British had only fourteen days before the weather made attacks impossible and ordered Rupprecht to stand fast.[62] At a conference on 18 October, Hermann von Kuhl advocated a retreat as far to the east as possible; Friedrich Sixt von Armin the 4th Army commander and his chief of staff, Colonel Fritz von Loßberg preferred to fight to hold their remaining defences in the Flandern I and Flandern II Stellungen, because the ground beyond the Passchendaele watershed was untenable, even in winter.[63] The British attack was costly for both sides but captured more ground opposite Passchendaele than on 9 October; the British took prisoner more than 1,000 men.[64]
British artillery support was inadequate, due to the amount of field artillery out of action and the vast increase in mud, which smothered high-explosive shell-detonations. The weather from 4 to 12 October also prevented counter-battery fire and little was achieved by the heavier guns.[9] On 13 October, the British decided to stop the offensive until better weather returned and roads and tracks had been repaired, to ensure that deliberate attacks with a greater quantity of artillery support could be resumed. Operations were to continue to reach a suitable line for the winter and to keep German attention on Flanders, to help the French attack due on 23 October and the Third Army operation south of Arras set for mid-November (the Battle of Cambrai).[65] The Canadian Corps relieved the II Anzac Corps on 18 October, in the depression between Gravenstafel Ridge and the heights at Passchendaele. The captured ground made a slightly better starting line for the Second Battle of Passchendaele, which began on 26 October.[66]
Casualties and commemoration
The funeral of Lieutenant-Colonel George Augustus King, who was killed in action on 12 October 1917
Ludendorff divided the Third Battle of Ypres into five periods. In the Fourth Battle of Flanders, from 2 to 21 October, he described German casualties as "extraordinarily high".[67] Hindenburg wrote later that he waited with great anxiety for the wet season.[68] In Der Weltkrieg (1956 [1942]), the German official historians recorded 12,000 casualties, including 2,000 missing for the accounting period 11–20 October but did not give a separate figure for 12 October.[69] The 4th Australian Division suffered c.1,000 casualties and the 3rd Australian Division c.3,199 casualties.[48] From 9 to 12 October, the German 195th Division suffered 3,395 casualties.[70] Calculations of German losses by James Edmonds, the British official historian, have been severely criticised, for adding 30 per cent to German casualty figures to account for different methods of calculation.[71]
There were 2,735 New Zealand casualties, of whom 845 were killed or mortally wounded and stranded in no man's land.[44] In 2007, Harper wrote that 846 New Zealanders were killed, 2,000 were wounded and 138 men died of their wounds in the following week.[72] The 4th Division suffered 3,569 casualties from 4 to 12 October.[73] In 2014, Perry recorded more than 6,250 casualties in the II Anzac Corps, 1,000 losses in the I Anzac Corps and 9,950 casualties in the Fifth Army.[74] The New Zealand memorial at Tyne Cot, commemorates New Zealanders killed during the Battle of Broodseinde and the First Battle of Passchendaele, who have no known grave and the Buttes New Zealand Memorial contains the remains of New Zealand troops killed from September 1917 until February 1918. In 1997, Christopher Pugsley wrote that the casualties made 12 October 1917 New Zealand's blackest day and in 2007, Glyn Harper wrote that ".... more New Zealanders were killed or maimed in these few short hours than on any other day in the nation's history".[75]
On 22 October the 18th (Eastern) Division of XVIII Corps attacked the east end of Polecappelle as XIV Corps to the north attacked with the 34th Division between the Watervlietbeek and Broenbeek streams and the 35th Division attacked northwards into Houthoulst Forest. (The 35th Division was supported by a regiment of the French 1st Division on the left flank.) The attack was intended to push forward the left flank of the Fifth Army, to guard against a German counter-attack on the flank of the Canadian Corps, when it attacked Passchendaele. The artillery of the Second and Fifth armies conducted a bombardment to simulate a general attack as a deception. Poelcappelle was captured but the attack at the junction between the 34th and 35th divisions was repulsed. German counter-attacks pushed back the 35th Division in the centre but the French captured all their objectives. Attacking on ground cut up by bombardments and soaked by rain, the British had struggled to advance in places and lost the ability to move quickly to outflank pillboxes. The infantry of the 35th Division reached the fringes of Houthoulst Forest; after being outflanked it was pushed back in places. German counter-attacks after 22 October were equally disadvantaged and costly failures. The German 4th Army was prevented from transferring troops away from the Fifth Army and from concentrating its artillery-fire on the Canadians as they prepared for the Second Battle of Passchendaele (26 October – 10 November 1917).[76]
↑According to James Edmonds, the British official historian, on 7 October, Gough and Plumer told Haig that they favoured ending the campaign because of the return of poor weather and general state of the battlefield. Prior and Wilson wrote that this meeting did not appear in contemporary records and doubted that it took place.[12]
↑Charles Bean, the Australian official historian, held Alexander Godley, the II Anzac Corps commander and his staff responsible for failing to find out the true state of events, despite there being time to do this before the coming attack.[16]
↑In 1941 the Australian official historian Charles Bean, attributed the delay to inefficiency by Lieutenant-General Alexander Godley, the II Anzac Corps commander and his staff, as did Christopher Pugsley in 1997.[25]
↑British Expeditionary Force time went back one hour to Greenwich Mean Time on 8 October, the attack beginning at 6.25 a.m.British Summer Time. The progression of the season can be seen in the changes of zero hour relative to British Summer Time. Messines, 7 June 3:10 a.m., Pilckem Ridge, 31 July 3:50 a.m., Gheluvelt Plateau, 10 August 4:35 a.m., Langemarck, 16 August 4:45 a.m., Menin Road, 20 September 5:40 a.m., Polygon Wood, 26 September 5:50 a.m., Broodseinde, 4 October 6:00 a.m., Poelcappelle, 9 October 6:20 a.m. and First Passchendaele, 12 October 6:25 a.m.[42]
↑Zones were based on lettered squares of the army 1:40,000 map; each map square was divided into four sections 3,000sqyd (0.00097sqmi; 0.0025km2). The observer used a call-sign of the map square letter then the zone letter to signal to the artillery. All guns and howitzers up to 6in (150mm) able to bear on the target, opened rapid fire using corrections of aim from the air observer.[59]
Boraston, J. H. (1920) [1919]. Sir Douglas Haig's Despatches (2nded.). London: Dent. OCLC633614212.
Dennis, P.; Grey, G., eds. (2007). 1917: Tactics, Training and Technology. Loftus, NSW: Australian History Military Publications. ISBN978-0-9803-7967-9.
Harper, G. "Masterpiece or Massacre: the New Zealand Division and two Battles of 1917". In Dennis & Grey (2007).
Edmonds, J. E. (1991) [1948]. France and Belgium 1917: 7th June – 10th November. Messines and Third Ypres (Passchendaele). History of the Great War Based on Official Documents by Direction of the Historical Section of the Committee of Imperial Defence. Vol.II (Imperial War Museum and Battery Pressed.). London: HMSO. ISBN978-0-89839-166-4.
Headlam, C. (2010) [1924]. History of the Guards Division in the Great War 1915–1918. Vol.I (Naval & Military Pressed.). London: J. Murray. ISBN978-1-84342-124-5.
Hilliard Atteridge, A. (2003) [1929]. History of the 17th (Northern) Division (Naval & Military Pressed.). London: R. Maclehose & Co. ISBN978-1-84342-581-6.
Hindenburg, P. von (2006) [1920]. Paul von Hindenburg: aus meinem leben[The Great War] (in German) (abbr. trans. Casselled.). Leipzig: Herzel. ISBN978-1-85367-704-5.
Terraine, J. (1977). The Road to Passchendaele: The Flanders Offensive 1917, A Study in Inevitability. London: Leo Cooper. ISBN978-0-436-51732-7.
Wynne, G. C. (1976) [1939]. If Germany Attacks: The Battle in Depth in the West (Greenwood Press, Westport, CTed.). Cambridge: Clarendon Press. ISBN978-0-8371-5029-1.
Journals
McRandle, J. H.; Quirk, J. (2006). "The Blood Test Revisited: A New Look at German Casualty Counts in World War I". The Journal of Military History. 70 (3 July 2006). Lexington, VA: 667–701. doi:10.1353/jmh.2006.0180. ISSN0899-3718. S2CID159930725.
This page is based on this Wikipedia article Text is available under the CC BY-SA 4.0 license; additional terms may apply. Images, videos and audio are available under their respective licenses.