This article needs additional citations for verification .(June 2009) |
Autofrettage is a work-hardening process in which a pressure vessel (thick walled) is subjected to enormous pressure, causing internal portions of the part to yield plastically, resulting in internal compressive residual stresses once the pressure is released. The goal of autofrettage is to increase the pressure-carrying capacity of the final product. Inducing residual compressive stresses into materials can also increase their resistance to stress corrosion cracking; that is, non-mechanically assisted cracking that occurs when a material is placed in a corrosive environment in the presence of tensile stress. The technique is commonly used in manufacture of high-pressure pump cylinders, warship and gun barrels, and fuel injection systems for diesel engines. Due to work-hardening process it also enhances wear life of the barrel marginally. While autofrettage will induce some work hardening, that is not the primary mechanism of strengthening.
The start point is a single steel tube of internal diameter slightly less than the desired calibre. The tube is subjected to internal pressure of sufficient magnitude to enlarge the bore and in the process the inner layers of the metal are stretched in tension beyond their elastic limit. This means that the inner layers have been stretched to a point where the steel is no longer able to return to its original shape once the internal pressure has been removed. Although the outer layers of the tube are also stretched, the degree of internal pressure applied during the process is such that they are not stretched beyond their elastic limit. The reason why this is possible is that the stress distribution through the walls of the tube is non-uniform. Its maximum value occurs in the metal adjacent to the source of pressure, decreasing markedly towards the outer layers of the tube. The strain is proportional to the stress applied within the elastic limit; therefore the expansion at the outer layers is less than at the bore. Because the outer layers remain elastic they attempt to return to their original shape; however, they are prevented from doing so completely by the new permanently stretched inner layers. The effect is that the inner layers of the metal are put under compression by the outer layers in much the same way as though an outer layer of metal had been shrunk on as with a built-up gun. This can be better understood by assuming thick walled tube as multilayer tube. The next step is to subject the compressively strained inner layers to a low-temperature treatment (LTT) which results in the elastic limit being raised to at least the autofrettage pressure employed in the first stage of the process. Finally, the elasticity of the barrel can be tested by applying internal pressure once more, but this time care is taken to ensure that the inner layers are not stretched beyond their new elastic limit. The end result is an inner surface of the gun barrel with a residual compressive stress able to counterbalance the tensile stress that would be induced when the gun is discharged. In addition the material has a higher tensile strength due to work hardening. [1]
Early in the history of artillery, people observed that, after firing a small number of rounds, the bore of a new gun slightly enlarges and hardens. [2] Historically, the first type of autofrettage avant la lettre was mandrelling bronze gun barrels, invented and patented in 1869 by Samuel B. Dean of the South Boston Iron Company. [3] But it found no use on the American continent and was copied [4] without a license [5] by Franz von Uchatius in mid-1870s. It found some use in several European countries lacking steel industry, but was quickly displaced by cast steel everywhere except Austro-Hungary, which stuck to the obsolete technology until WWI [6] and therefore had their artillery handicapped. [7]
The problem of strengthening steel gun barrels using the same principle was tackled by French colonial artillery colonel Louis Frédéric Gustave Jacob, who suggested in 1907 to pressurize them hydraulically and coined the term "autofrettage". In 1913, Schneider-Creusot made a 14 cm L/50 naval gun by such a method [8] and applied for a patent. [9] However, implementing such a technique on an industrial scale required numerical methods to approximate the solutions of transcedental equations of plastic deformation, which were developed in France during WWI by math professor Maurice d'Ocagne and Schneider engineer Louis Potin. [10]
In modern practice, a slightly oversized die is pushed slowly through the barrel by a hydraulically driven ram. The amount of initial underbore and oversize of the die are calculated to strain the material around the bore past its elastic limit into plastic deformation. A residual compressive stress remains on the barrel's inner surface, even after final honing and rifling.
The technique has been applied to the expansion of tubular components down hole in oil and gas wells. The method has been patented by the Norwegian oil service company, Meta, which uses it to connect concentric tubular components with sealing and strength properties outlined above.
The term autofrettage is also used to describe a step in manufacturing of composite overwrapped pressure vessel (COPV) where the liner is expanded (by plastic deformation), inside the composite overwrap. [11]
Fiberglass or fibreglass is a common type of fiber-reinforced plastic using glass fiber. The fibers may be randomly arranged, flattened into a sheet called a chopped strand mat, or woven into glass cloth. The plastic matrix may be a thermoset polymer matrix—most often based on thermosetting polymers such as epoxy, polyester resin, or vinyl ester resin—or a thermoplastic.
In continuum mechanics, stress is a physical quantity that describes forces present during deformation. For example, an object being pulled apart, such as a stretched elastic band, is subject to tensile stress and may undergo elongation. An object being pushed together, such as a crumpled sponge, is subject to compressive stress and may undergo shortening. The greater the force and the smaller the cross-sectional area of the body on which it acts, the greater the stress. Stress has dimension of force per area, with SI units of newtons per square meter (N/m2) or pascal (Pa).
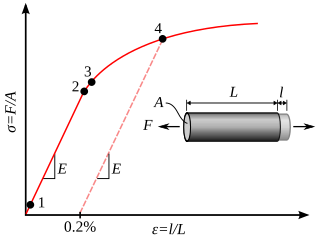
In engineering, deformation refers to the change in size or shape of an object. Displacements are the absolute change in position of a point on the object. Deflection is the relative change in external displacements on an object. Strain is the relative internal change in shape of an infinitesimal cube of material and can be expressed as a non-dimensional change in length or angle of distortion of the cube. Strains are related to the forces acting on the cube, which are known as stress, by a stress-strain curve. The relationship between stress and strain is generally linear and reversible up until the yield point and the deformation is elastic. Elasticity in materials occurs when applied stress does not surpass the energy required to break molecular bonds, allowing the material to deform reversibly and return to its original shape once the stress is removed. The linear relationship for a material is known as Young's modulus. Above the yield point, some degree of permanent distortion remains after unloading and is termed plastic deformation. The determination of the stress and strain throughout a solid object is given by the field of strength of materials and for a structure by structural analysis.
In physics and materials science, plasticity is the ability of a solid material to undergo permanent deformation, a non-reversible change of shape in response to applied forces. For example, a solid piece of metal being bent or pounded into a new shape displays plasticity as permanent changes occur within the material itself. In engineering, the transition from elastic behavior to plastic behavior is known as yielding.
In engineering and materials science, a stress–strain curve for a material gives the relationship between stress and strain. It is obtained by gradually applying load to a test coupon and measuring the deformation, from which the stress and strain can be determined. These curves reveal many of the properties of a material, such as the Young's modulus, the yield strength and the ultimate tensile strength.
The field of strength of materials typically refers to various methods of calculating the stresses and strains in structural members, such as beams, columns, and shafts. The methods employed to predict the response of a structure under loading and its susceptibility to various failure modes takes into account the properties of the materials such as its yield strength, ultimate strength, Young's modulus, and Poisson's ratio. In addition, the mechanical element's macroscopic properties such as its length, width, thickness, boundary constraints and abrupt changes in geometry such as holes are considered.
An elastic modulus is the unit of measurement of an object's or substance's resistance to being deformed elastically when a stress is applied to it.
A pressure vessel is a container designed to hold gases or liquids at a pressure substantially different from the ambient pressure.
In continuum mechanics, elastic shakedown behavior is one in which plastic deformation takes place during running in, while due to residual stresses or strain hardening the steady state is perfectly elastic.
In materials science, work hardening, also known as strain hardening, is the strengthening of a metal or polymer by plastic deformation. Work hardening may be desirable, undesirable, or inconsequential, depending on the context.
Shot peening is a cold working process used to produce a compressive residual stress layer and modify the mechanical properties of metals and composites. It entails striking a surface with shot with force sufficient to create plastic deformation.
In materials science and solid mechanics, residual stresses are stresses that remain in a solid material after the original cause of the stresses has been removed. Residual stress may be desirable or undesirable. For example, laser peening imparts deep beneficial compressive residual stresses into metal components such as turbine engine fan blades, and it is used in toughened glass to allow for large, thin, crack- and scratch-resistant glass displays on smartphones. However, unintended residual stress in a designed structure may cause it to fail prematurely.
The Bauschinger effect refers to a property of materials where the material's stress/strain characteristics change as a result of the microscopic stress distribution of the material. For example, an increase in tensile yield strength occurs at the expense of compressive yield strength. The effect is named after German engineer Johann Bauschinger.
In materials science and engineering, the yield point is the point on a stress-strain curve that indicates the limit of elastic behavior and the beginning of plastic behavior. Below the yield point, a material will deform elastically and will return to its original shape when the applied stress is removed. Once the yield point is passed, some fraction of the deformation will be permanent and non-reversible and is known as plastic deformation.
In materials science, hardness is a measure of the resistance to localized plastic deformation, such as an indentation or a scratch (linear), induced mechanically either by pressing or abrasion. In general, different materials differ in their hardness; for example hard metals such as titanium and beryllium are harder than soft metals such as sodium and metallic tin, or wood and common plastics. Macroscopic hardness is generally characterized by strong intermolecular bonds, but the behavior of solid materials under force is complex; therefore, hardness can be measured in different ways, such as scratch hardness, indentation hardness, and rebound hardness. Hardness is dependent on ductility, elastic stiffness, plasticity, strain, strength, toughness, viscoelasticity, and viscosity. Common examples of hard matter are ceramics, concrete, certain metals, and superhard materials, which can be contrasted with soft matter.
Laser peening (LP), or laser shock peening (LSP), is a surface engineering process used to impart beneficial residual stresses in materials. The deep, high-magnitude compressive residual stresses induced by laser peening increase the resistance of materials to surface-related failures, such as fatigue, fretting fatigue, and stress corrosion cracking. Laser shock peening can also be used to strengthen thin sections, harden surfaces, shape or straighten parts, break up hard materials, compact powdered metals and for other applications where high-pressure, short duration shock waves offer desirable processing results.
The mechanical properties of carbon nanotubes reveal them as one of the strongest materials in nature. Carbon nanotubes (CNTs) are long hollow cylinders of graphene. Although graphene sheets have 2D symmetry, carbon nanotubes by geometry have different properties in axial and radial directions. It has been shown that CNTs are very strong in the axial direction. Young's modulus on the order of 270 - 950 GPa and tensile strength of 11 - 63 GPa were obtained.
A composite overwrapped pressure vessel (COPV) is a vessel consisting of a thin, non-structural liner wrapped with a structural fiber composite, designed to hold a fluid under pressure. The liner provides a barrier between the fluid and the composite, preventing leaks and chemical degradation of the structure. In general, a protective shell is applied for protective shielding against impact damage. The most commonly used composites are fiber reinforced polymers (FRP), using carbon and kevlar fibers. The primary advantage of a COPV as compared to a similar sized metallic pressure vessel is lower weight; COPVs, however, carry an increased cost of manufacturing and certification.
A built-up gun is artillery with a specially reinforced barrel. An inner tube of metal stretches within its elastic limit under the pressure of confined powder gases to transmit stress to outer cylinders that are under tension. Concentric metal cylinders or wire windings are assembled to minimize the weight required to resist the pressure of powder gases pushing a projectile out of the barrel. Built-up construction was the norm for guns mounted aboard 20th century dreadnoughts and contemporary railway guns, coastal artillery, and siege guns through World War II.
In metallurgy, peening is the process of working a metal's surface to improve its material properties, usually by mechanical means, such as hammer blows, by blasting with shot, focusing light, or in recent years, with water column impacts and cavitation jets. With the notable exception of laser peening, peening is normally a cold work process tending to expand the surface of the cold metal, thus inducing compressive stresses or relieving tensile stresses already present. It can also encourage strain hardening of the surface metal.