Battle of Bergendal

Last updated
Battle of Bergendal
Part of the Second Boer War
Map of the battle of Bergendal - final attack (Battles of the nineteenth century, 1901).jpg
Map of the battle of Bergendal: The final attack (Battles of the nineteenth century, 1901)
Date21–27 August 1900
Location 25°44′4″S30°5′36″E / 25.73444°S 30.09333°E / -25.73444; 30.09333 (Battle of Bergendal)
Result British victory
Belligerents

Flag of the United Kingdom.svg  United Kingdom

Flag of Transvaal.svg  South African Republic
Commanders and leaders
Lord Roberts
Redvers Buller
Louis Botha
Strength
19,000 men, 82 guns [1] 7,000 men, 20 guns [2]
Casualties and losses
385 78

The Battle of Berg-en-dal (also known as the Battle of Belfast [3] or Battle of Dalmanutha) took place in South Africa during the Second Anglo-Boer War.

Contents

The battle was the last set-piece battle of the war, although the war was still to last another two years. It was also the last time that the Boers' four 155 mm Creusot Long Tom guns were used in the same battle.

Before

Hostilities commenced in October 1899. On the Cape front the British forces broke through in February 1900 and the next month they were in Bloemfontein, the capital of the Orange Free State. Pretoria, the capital of the Zuid-Afrikaansche Republiek (ZAR) was captured in June 1900. The government of the ZAR and a few Boer commandos fled eastwards along the railway line to Lourenço Marques (now Maputo). They were pursued by General Pole-Carew and his 11th Infantry Division (7,500 officers and men) and a cavalry division commanded by Lieutenant-General French.

Major Jackson map showing the farms on which the Boers were deployed Bergendal01.tif
Major Jackson map showing the farms on which the Boers were deployed

Prior to the Battle of Diamond Hill on 11 June 1900, General Botha sent a few officers ahead to Belfast to select and prepare ramparts and emplacements for the next battle. [4] The terrain at Belfast was such that it was the only place where the Boers could present a wide enough front to resist the enemy's superior force. [5] The Boer forces were deployed as follows: North of the railway line, in a semi-circle around the town of Belfast, the Lydenburg commando was to be found on the farms Spitskop, Zuikerboschkop and Langkloof. [6] A Long Tom was placed on the farm Spitskop. [7] These burghers' task was to prevent the English from taking the back road to Dullstroom. The commandos from Middelburg and Johannesburg were on the farm Steynsplaats, just east of the main road to Dullstroom. Their task was to enfilade the enemy with cross-fire, should they decide to take the main road to Dullstroom and Lydenburg. [8] Another Long Tom was placed behind these commandos on the farm Waterval. Still on the northern side of the railway line, but close to it, was the Krugersdorp commando. [9] Next to them, but on the southern side of the railway line was a detachment of the Zuid-Afrikaansche Rijdende Politie (ZARPs), who were to bear the brunt of the British attack. The burghers from Germiston were next to them. South of the railway line the upper reaches of the Komati River flow from north to south giving rise to a number of hills and dales. One such hill formed a large plateau and was called Gelukplato, because it was on the farm Geluk. The rest of Botha's force was ensconced on this plateau. The Heidelberg commando was on the farm Geluk, while the Bethal commando built their sconces on the farm Frischgewaagd, [10] They were supported by the third Long Tom on Driekop. [11] The fourth Long Tom was initially mounted on a railway truck. After 6 August, when Sir Redvers Buller started to advance towards Belfast, this gun was moved to position close to Elandskop. [12] From there they could bomb Groblers Bridge, should Buller decide to advance via there to Machadodorp. [13]

Colonel French in full dress uniform, 1892 Major-General Sir J.D.P. French.jpg
Colonel French in full dress uniform, 1892

Pole-Carew reached Middelburg in July 1900 and started assembling the XIth Infantry Division. French and his cavalry advanced to Wonderfontein. On the Natal front General Sir Redvers Buller broke through in February 1900, but was then stopped. It was only on 6 August 1900 that he could start his advance towards Belfast. His task force consisted of the 4th Infantry Division commanded by Lieutenant-General N.G. Lyttelton, with Brigadier-General F.W. Kitchener of the 7th Brigade and Major-General Howard of the 8th Brigade. Buller's mounted troops consisted of the 2nd Cavalry Brigade, commanded by Major-General J.F. Brocklehurst and 3 Mounted Infantry Brigade under Earl Dundonald. Buller's force consisted of 9,000 officers and men with 42 guns. [14] Buller reached the farm Twyfelaar on the Komati River on 15 August. There he got in touch with French's right flank. This enabled Buller to be supplied from Wonderfontein. [15]

Battle

21 August

General Buller advanced to the farm Van Wyk's Vley, about eight miles (13 km) north of Twyfelaar. General French remained on his left flank. While advancing the last three miles, Buller's right flank came under fire from the Bethal commando on Frischgewaagd. [16] A fight ensued and it lasted until early evening. British casualties were 36 (including 7 dead and 3 missing) and 3 Boers were wounded. [17]

22 August

Buller was peeved. He sent Major-general Walter Kitchener to teach the Bethal commando a lesson. Two battalions foot soldiers, four squadrons mounted troops and eight guns accompanied Kitchener. The Brits did not know that during the night the Carolina commando joined the burghers from Bethal. They fought all day. British casualties were two dead and five wounded. No casualties were reported on the other side. [18]

23 August

Gravestone of Liverpools on Geluk Gelukfallen.JPG
Gravestone of Liverpools on Geluk

During Buller's advance, at a time when it was unclear to the Boers whether he was going to Machadodorp or Belfast, they removed the Long Tom from the railway truck and placed it near Elandskop. [19] The remains of the emplacements was found at 25°46.214'S, 30°12.829'E (WGS84). When Buller advanced from Twyfelaar to Van Wyk's Vley, it was clear that he was aiming at Belfast. The Boers then moved the gun to Captain von Dalwig's camp on the farm Waaikraal. [20] The remains of the emplacement can be found at 25°46.225'S, 30°09.079'E(WGS84).

Pole-Carew and his infantry division left Middelburg and advanced to Wonderfontein. Buller, with French still on his left flank, advanced to the farm Geluk and established his headquarters in the valley near the farm house. On his eastern side was the Geluk Plateau on which the Heidelberg commando had built their sconces. He ordered the 8th Infantry Brigade, assisted by Dundonald's mounted troops and the South African Light Horse, to ascend the plateau and make it safe. On the plateau they had to face the commandos from Heidelberg and Bethal, as well as Von Dalwig's guns, including two Long Toms. Despite heavy losses, they managed to hold the edge of the plateau. [21] British casualties were 12 dead, 61 wounded and 33 missing. The Boers had 12 wounded, including Captain von Dalwig. [22]

24 August

4.7 QF gun on howitzer carriage 4,7 QF.jpg
4.7 QF gun on howitzer carriage
Long Tom in action The Boer War, 1899 - 1902 Q82962.jpg
Long Tom in action

During the night of 23 August Buller's men on the western edge of the Geluk plateau dug in and made emplacements for four naval guns (two 5" and two 4.7"). The next day they exchanged fire with the Boers' two Long Toms (on Driekop and Von Dalwig's camp). The Long Toms caused six casualties in the Natal Field Force. [23]

Pole-Carew's left Wonderfontein and occupied Belfast. British casualties were 18. [24] During the night of 24/5 August his men placed two 5" guns just south of the railway line and two 4.7" pieces near the Belfast station. [25]

25 August

French's left swipe Frenchveeg.jpeg
French's left swipe

On 25 August Lord Roberts arrived in Belfast to take charge of operations. He had a conference with his generals, Pole-Carew, Buller and French. French was ordered to get rid of the Boers on their right flank on Zuikerboschkop and then swerve right to Machadodorp. Buller was ordered to turn right and advance over Dalmanutha to Machadodorp. Pole-Carew had to extend his force northwards along the main road to Dullstroom to join French at Lakenvley. [26]

Fighting on this day was limited to the exchange of fire of the heavy guns. Maurice and Grant record: "Moreover, the enemy had by no means the better of the exchanges with the heavy guns of both divisions, one of the 6-inch Creusots near Bergendal being reduced to silence by a 5-inch shell from Pole-Carew's position". [27]

26 August

General French and his cavalry left Geluk very early and first called at Belfast. They left there at 09:00 and first proceeded west along the railway line, possibly to mislead Boer spies. When they were out of sight they swung right and unexpectedly appeared on the farm Boschpoort. The Boers and their Long Tom beat a hasty retreat, while French cleared the rest of the burghers from Zuikerboschkop and Langkloof. By 14:00 he could send a message to Pole-Carew that they could commence their march northwards. The Infantry Division experienced some cross-fire from the east and the Long Tom on Waterval fired a few shots as well. [28] The result of the march was that Pole-Carew was in command of all the high-lying ground between the railway line and Lakenvley. [29] Most of the Middelburg commando had simply fled. [30]

Buller advanced northwards as well. His plan was to swing right on the farm Vogelstruispoort and then proceed over Waaikraal to Dalmanutha. [31] But that afternoon his scouts reported (a bit erroneously) that the Boers' right flank ended at the railway line. He therefore decided to make his breakthrough on the farm Bergendal the next day. [32]

27 August

Map of Maurice & Grant showing protuberance Bergendalfarm.jpg
Map of Maurice & Grant showing protuberance

Buller himself went scouting early that morning. The Boers' right flank did not actually end at the railway line, but it did swing sharply clockwise. It thus formed a salient angle. [33] The result was that their position on the farm Bergendal (occupied by the ZARPs) stuck out like the tip of one's nose or a protuberance. On both sides of this position the Boers' sangars were facing away from the tip, with the result that those occupying them could not assist those on the tip in the case of a frontal attack. Then there was some high ground some 3,000 yards south-west of the salient angle and that was an ideal place for the artillery he wanted to use. [34]

About 36 guns were placed on the high ground and the bombardment of the ZARPs position started at 11:00. [35] After three hours the Rifle Brigade and the Inniskilling Fusiliers charged and burst right through the Boer lines. When the fighting stopped they found that the position had been defended by the Zuid-Afrikaanse Republiek Politie (a police force). The British found 14 dead bodies and captured nineteen prisoners. The rest of the wounded were taken away by the Boers and some even survived. British casualties for the day were: officers, 3 dead and 7 wounded; men, 100 wounded or missing and 12 dead. [36]

The Battle of Bergendal was over. British casualties were 385 and the Boers' were 78. [37]

Aftermath

As a result of this defeat, the Boer line of defence was breached and on 28 August Buller's troops marched into Machadodorp. The ZAR government, meanwhile, had decamped to Nelspruit. A few days later, on 1 September, Lord Roberts proclaimed the entire South African Republic British territory.

However, the capture of Machadodorp and Roberts' proclamation did not end the war. Although the British had won the battle, Botha's main force had managed to stay intact. The Boer commandos subsequently dispersed to Lydenburg and Barberton and the next phase of the war—guerrilla warfare—started. This second phase would last even longer than the first, conventional, phase and peace would eventually only be declared at the end of May 1902.

War Memorial

Two memorials, large pylon for Boers, small stone pyramid for British, on Berg-en-dal BergEnDalMemorial.JPG
Two memorials, large pylon for Boers, small stone pyramid for British, on Berg-en-dal

A memorial was erected in 1935 in memory of the twelve Zarps who died in the Battle of Berg-en-dal on 27 Augustus 1900. A much larger second memorial, in honour of all Boers, including the Zarps, who had died in the Eastern Transvaal, was unveiled on 29 Augustus 1970 and a small stone cairn was erected in memory of the 25 officers and men of the 2nd Battalion the Rifle Brigade who died in the battle.

Footnotes

  1. Pakenham, Thomas(2)The Boer War, Weidenfeld & Nicolson, London, 1979, p.455
  2. Pakenham(2), supra, p.454.
  3. "Jacson: Chapter III - Events Following The Siege Of Ladysmith, And The Advance North Under Sir Redvers Buller 1900". AngloBoerWar.com. Retrieved 9 September 2014.
  4. Viljoen, Ben J.,My Reminiscences of the Anglo Boer War, Kindle edition, loc. 1294.
  5. Reichman, C & Slocum, S.L'H, Boer War Operations in South Africa 1899–1902, Washington 1901 & Scripta Africana, 1987, p. 226.
  6. Amery, L.S. (editor), The Times History of the War in South Africa, volume IV, p. 440 and map. Breytenbach J.H., Die Geskiedenis van die Tweede Vryheidsoorlog in Suid-Afrika, volume VI, p. 318
  7. Goldman C.S., With General French and the Cavalry in South Africa, MacMillan & Co. Ltd, 1902, p. 343.
  8. Amery, supra, p. 440
  9. Amery, supra, p. 441.
  10. Amery, supra, p.441.
  11. 25°48.187'S, 30°10.366'E [WGS84]
  12. 25°46.214'S, 30°12.829'E (WGS84)
  13. Reichmann et al., supra, p. 231.
  14. Amery, supra, p. 437; Breytenbach, supra, p. 304
  15. Amery, supra, p. 443.
  16. Amery, supra, p. 444.
  17. Breytenbach, supra, p. 320.
  18. Breytenbach, supra, p. 321; Amery, supra, p. 445.
  19. Amery, supra, p. 441.
  20. Amery, supra, p. 456; Preller, G.S. 'Die Vier Long Toms', Die Huisgenoot, 28/5/1937, pp. 14-5, 21.
  21. Breytenbach, supra, 321-4; Amery, supra, p. 445-6
  22. Breytenbach, supra, p. 324.
  23. Maurice & Grant, History of the War in South Africa, 1899–1902, Hurst & Blackett Ltd, 1908, London, volume III, p. 391
  24. Amery, supra, p. 447
  25. Schultz, B.G. Die Slag van Bergendal (Dalmanutha), MA thesis, University of Pretoria, 1974, p. 84
  26. Amery, supra, p. 448; Breytenbach, supra, p. 327.
  27. Maurice & Grant, supra, p. 393
  28. Goldman, supra, p. 344.
  29. Breytenbach, supra, p327-329, Amery, supra, p. 449
  30. Breytenbach, supra, p. 331.
  31. Breytenbach, supra, p. 329
  32. Amery, supra, p. 450.
  33. Maurice & Grant, supra, p. 396.
  34. Pakenham(2), supra, p. 455.
  35. Breytenbach, supra, p. 333
  36. Pakenham(2), supra, p. 456.
  37. Breytenbach, supra, p. 343.

Related Research Articles

<span class="mw-page-title-main">Belfast, Mpumalanga</span> Place in Mpumalanga, South Africa

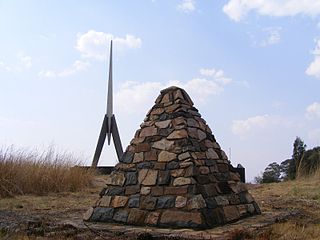
Belfast is a small town in Mpumalanga Province, South Africa. It is situated in the eMakhazeni Local Municipality in the Nkangala District Municipality.

The following lists events that happened during 1900 in South Africa.

<span class="mw-page-title-main">Battle of Modder River</span> 1899 battle of the Second Boer War

The Battle of Modder River was an engagement in the Boer War, fought at Modder River, on 28 November 1899. A British column under Lord Methuen, that was attempting to relieve the besieged town of Kimberley, forced Boers under General Piet Cronjé to retreat to Magersfontein, but suffered heavy casualties altogether.

<span class="mw-page-title-main">Battle of Colenso</span> 1899 battle of the Second Boer War

The Battle of Colenso was the third and final battle fought during the Black Week of the Second Boer War. It was fought between British and Boer forces from the independent South African Republic and Orange Free State in and around Colenso, Natal, South Africa on 15 December 1899.

<span class="mw-page-title-main">Battle of Paardeberg</span> 1900 battle of the Second Boer War

The Battle of Paardeberg or Perdeberg was a major battle during the Second Anglo-Boer War. It was fought near Paardeberg Drift on the banks of the Modder River in the Orange Free State near Kimberley.

<span class="mw-page-title-main">Battle of Magersfontein</span> 1899 battle of the Second Boer War

The Battle of Magersfontein was fought on 11 December 1899, at Magersfontein, near Kimberley, South Africa, on the borders of the Cape Colony and the independent republic of the Orange Free State. British forces under Lieutenant General Lord Methuen were advancing north along the railway line from the Cape to relieve the siege of Kimberley, but their path was blocked at Magersfontein by a Boer force that was entrenched in the surrounding hills. The British had already fought a series of battles with the Boers, most recently at Modder River, where the advance was temporarily halted.

<span class="mw-page-title-main">155 mm Creusot Long Tom</span> Siege gun

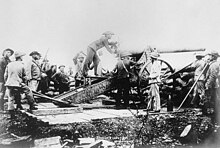
The 155 mm CreusotLong Tom was a French siege gun manufactured by Schneider et Cie in Le Creusot, France and used by the Boers in the Second Boer War as field guns.

The Battle of Rooiwal was an engagement of the Second Boer War. It took place on 11 April 1902 and resulted in a victory by a British force commanded by Colonel Robert Kekewich over a Boer commando led by Generals Ferdinandus Jacobus Potgieter and Jan Kemp.

<span class="mw-page-title-main">Battle of the Tugela Heights</span> 1900 battle of the Second Boer War

The Battle of Tugela Heights, consisted of a series of military actions lasting from 14 February through to 27 February 1900 in which General Sir Redvers Buller's British army forced Louis Botha's Boer army to lift the Siege of Ladysmith during the Second Boer War.

<span class="mw-page-title-main">Christoffel Cornelis Froneman</span>

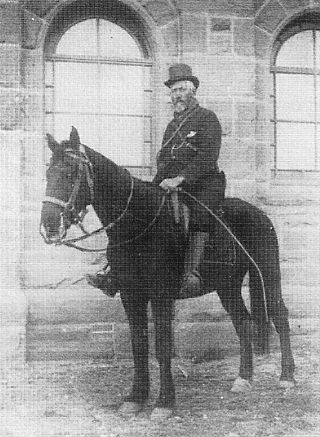
Christoffel Cornelis Froneman, commonly known as Stoffel Froneman, was veldkornet, general and Vice-Commander-in-Chief of the Orange Free State Boer forces during the Anglo-Boer War of 1899-1902.

<span class="mw-page-title-main">South Australian Mounted Rifles</span> Military unit

The South Australian Mounted Rifles (SAMR) was a mounted infantry unit of the Colony of South Australia that served in the Second Boer War. The first contingent of South Australian Mounted Rifles was raised in 1899, followed by a second contingent in 1900.

<span class="mw-page-title-main">Jan Hendrik Olivier</span> Boer general

Jan Hendrik Olivier was a Boer general during the Second Boer War who was notable for being the main Boer commander at the Battle of Stormberg.

<span class="mw-page-title-main">Marthinus Prinsloo</span> Boer general (1838 - 1903)

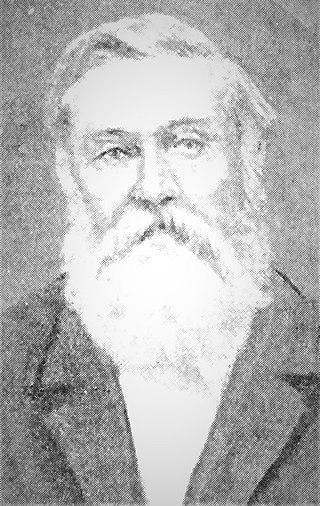
Marthinus Prinsloo was an Orange Free State Boer farmer, politician and general in the Second Boer War (1899-1902). He was born of Nicolaas Frans Prinsloo (1813-1890) and Isabella Johanna Petronella Rautenbach in the district of Graaff-Reinet, South Africa who migrated to the Orange Free State where they lived in Bloemfontein, Waterval and Bethlehem.

<span class="mw-page-title-main">Piet de Wet</span> Boer general (1861–1929)

Pieter Daniël de Wet was a Boer general in the Anglo-Boer War (1899–1902) and a younger brother of Boer general and politician Christiaan de Wet. Piet de Wet participated in the Battle of Poplar Grove, the Battle of Sanna's Post for the waterworks there, and defeated the 13th Battalion Imperial Yeomanry at Lindley. In July 1900, he surrendered to the British at Kroonstad, Orange Free State. He became a prominent member of the National Scouts helping the British in the last years of the Boer War.

<span class="mw-page-title-main">Chris Botha</span>

Christiaan Botha was a younger brother of Louis Botha (1862–1919) and Philip Botha (1851-1901), but an older brother of Theunis Jacobus Botha (1867-1930), and likewise a Boer general in the Second Boer War (1899–1902) who then both fought the British to the end.

<span class="mw-page-title-main">Petrus Johannes Liebenberg</span> Boer war general (1857–1950)

Petrus Johannes Liebenberg was a Boer general in the Anglo-Boer War (1899–1902).

<span class="mw-page-title-main">Sarel Oosthuizen</span>

Sarel Francois Oosthuizen, 22 March 1862 – 14 August 1900) was a Boer War general. In 1920 he was posthumously awarded the Dekoratie Voor Trouwe Dienst, Anglo-Boeroorlog, 1899-1902.

<span class="mw-page-title-main">Joachim Christoffel Fourie</span> Anglo-Boer War general (1845–1900)

Joachim Christoffel Fourie was an Anglo-Boer War Combat General and Assistant Commander-in-Chief for the South African Republic.

<span class="mw-page-title-main">Sarel du Toit</span>

Sarel Petrus du Toit was a Second Boer War Boer general for the South African Republic. In 1896 he was elected representative to the Eerste Volksraad in Pretoria for the district of Wolmaransstad.

<span class="mw-page-title-main">Daniel Jacobus Elardus Erasmus</span> Boer general (1845 - 1914)

Daniel Jacobus Elardus Erasmus was a Boer general during the Anglo Boer War (1899–1902).

References