Hammer and anvil

Last updated

The hammer and anvil is a military tactic involving the use of two primary forces, one to pin down an enemy, and the other to smash or defeat the opponent with an encirclement maneuver. It may involve a frontal assault by one part of the force, playing a slower-moving or more static role. The second phase involves a more mobile force that maneuvers around the enemy and attacks from behind or the flank to deliver a decisive blow. [1]

Contents

The "hammer and anvil" tactic is fundamentally a single envelopment, and is to be distinguished from a simple encirclement where one group simply keeps an enemy occupied, while a flanking force delivers the coup de grace. The strongest expression of the concept is where both echelons are sufficient in themselves to strike a decisive blow. The "anvil" echelon here is not a mere diversionary gambit, but a substantial body that hits the enemy hard to pin him down and grind away his strength. The "hammer" or maneuver element succeeds because the anvil force materially or substantially weakens the enemy, preventing him from adjusting to the threat in his flank or rear. [2] Other variants of the concept allow for an enemy to be held fast by a substantial blocking or holding force, while a strong echelon, or hammer, delivers the decisive blow. In all scenarios, both the hammer and anvil elements are substantial entities that can cause significant material damage to opponents, as opposed to light diversionary, or small scale holding units. [3]

Antiquity

The Battle of Issus Battle issus decisive.png
The Battle of Issus

Battle of Issus

The tactic was used in Antiquity, as the maneuver's origins used light cavalry, ubiquitous in the ancient world. The tactic also worked with the heavy cataphracts of the Eastern world. It appeared in a number of battles fought by the ancient Greeks and Romans. In addition to being used in many of Alexander the Great's battles, it was also used during the Second Punic War during the Battle of Cannae and the Battle of Zama. [4]

Battle of Pharsalus

Pompey attempted to use his right flank cavalry as a hammer stroke while his heavy infantry held Caesar's legions fast in the center BattlePharsalus-LIX.png
Pompey attempted to use his right flank cavalry as a hammer stroke while his heavy infantry held Caesar's legions fast in the center

In 48 BC, Pompey the Great attempted to use it against Julius Caesar at the Battle of Pharsalus, in what was to be the decisive battle of the Great Roman Civil War. Caesar countered this by ambushing Pompey's "hammer" element with a hidden fourth line of infantry; [5] Pompey's infantry was to be the anvil while his cavalry 'hammer' encircled Caesar's left flank. There was significant distance between the two armies, according to Caesar. [6]

As the infantry of Caesar advanced, Pompey ordered his men not to charge, but to wait until Caesar's legions came into close quarters; Pompey's adviser Gaius Triarius believed that Caesar's infantry would be fatigued and fall into disorder if they were forced to cover twice the expected distance of a battle march. Also, stationary troops were expected to be able to defend better against pila throws. [7] Seeing that Pompey's army was not advancing, Caesar's infantry under Mark Antony and Gnaeus Domitius Calvinus started the advance. As Caesar's men neared throwing distance, without orders, they stopped to rest and regroup before continuing the charge; [8] Pompey's right and centre line held as the two armies collided. Caesar countered this by positioning the reserves of his 4th line to intercept the attacking cavalry.

As Pompey's infantry fought, Labienus ordered the Pompeian cavalry on his left flank to attack Caesar's cavalry; as expected they successfully pushed back Caesar's cavalry. Caesar then revealed his hidden fourth line of infantry and surprised Pompey's cavalry charge; Caesar's men were ordered to leap up and use their pila to thrust at Pompey's cavalry instead of throwing them. Pompey's cavalry panicked and suffered hundreds of casualties, as Caesar's cavalry came about [9] and charged after them. After failing to reform, the rest of the Pompey's cavalry retreated to the hills, leaving the left wing of Pompey's legions exposed to the hidden troops as Caesar's cavalry wheeled around their flank. Caesar then ordered in his third line, containing his most battle-hardened veterans, to attack. This broke Pompey's left wing troops, who fled the battlefield. [10]

After routing Pompey's cavalry, Caesar threw in his last line of reserves. [11] Pompey lost the will to fight as he watched both cavalry and legions under his command break formation and flee from battle, and he retreated to his camp, leaving the rest of his troops at the centre and right flank to their own devices. He ordered the garrisoned auxiliaries to defend the camp as he escaped. As the rest of Pompey's army were left confused, Caesar urged his men to end the day by routing the rest of Pompey's troops and capturing the Pompeian camp. They complied with his wishes; after finishing off the remains of Pompey's men, they furiously attacked the camp walls. The Thracians and the other auxiliaries who were left in the Pompeian camp, in total seven cohorts, defended bravely, but were not able to fend off the assault. [10]

Early modern era to World War I

The Ashanti versus the British – 1874

Scene from Third Anglo-Ashanti War 1874 Battle of Amoaful.jpg
Scene from Third Anglo-Ashanti War 1874

The colonial wars of the 1800s saw some African armies deploy hammer and anvil tactics. In 1874, a strong British force under Sir Garnet Wolseley, armed with modern rifles and artillery, invaded the territory of the Ashanti Empire. The Ashanti military did not confront the British immediately, and made no major effort to interdict their long, vulnerable lines of communication through the jungle terrain. Their plan appeared to be to draw the British deep into their territory, against a strong defensive anvil centred at the town of Amoaful. Here the British would be tied down, while manoeuvring wing elements circled to the rear, trapping and cutting them off. Some historians, such as Byron Farwell, note that this was approach was a traditional Ashanti battle strategy, and was common in some African armies as well. [12] At the village of Amoaful, the Ashantis succeeded in luring their opponents forward, but could not make any headway against the modern firepower of the British forces, which laid down a barrage of fire to accompany an advance of infantry in squares. This artillery fire took a heavy toll on the Ashanti, but they left a central blocking force in place around the village, while unleashing a large flanking attack on the left, that almost enveloped the British line and successfully broke into some of the infantry squares. Ashanti weaponry however, was poor compared to the modern weapons deployed by the British, and such superior arms served the British well in repulsing the dangerous Ashanti encirclements. [13] As one participant noted:

The Ashantees stood admirably, and kept up one of the heaviest fires I ever was under. While opposing our attack with immediately superior numbers, they kept enveloping our left with a constant series of well-directed flank attacks. [14]

Wolesey had studied and anticipated the Ashanti "horseshoe" formations, and had strengthened the British flanks with the best units and reinforced firepower. He was able to shift this firepower to threatened sectors to stymie enemy maneuvers, defeating their hammer and anvil elements and forcing his opponents to retreat. [15] One British combat post-mortem pays tribute to the slain Ashanti commander for his tactical leadership and use of terrain:

The great Chief Amanquatia was among the killed. Admirable skill was shown in the position selected by Amanquatia, and the determination and generalship he displayed in the defence fully bore out his great reputation as an able tactician and gallant soldier. [16]

World War II

Battle of Caen

The British anvil in the east held the bulk of the German armor fast and worked it over, until the American hammer was able to break through in the west, destroying the German front. Caen hammer anvil tactics usarmymap.jpg
The British anvil in the east held the bulk of the German armor fast and worked it over, until the American hammer was able to break through in the west, destroying the German front.

When the Allies landed at Normandy, the strategy used by the commander of the D-Day land forces, General Bernard Montgomery, was to confront the feared German panzers with constantly attacking British armies on the eastern flank of the beachhead. The role of the British forces would be to act as a great shield for the Allied landing, constantly sucking the German armour on to a great "anvil" on the left (east), and constantly grinding it down with punishing blows from artillery, tanks and Allied aircraft. [17] As the anvil held the bulk of the German armor fast, this would open the way for the Americans to wield a great "hammer" in the west, on the right of the Allied line, breaking through the German defenses, where the Americans led by such commanders as "Lightning" Joe Collins, could run free. The British role would thus not be a glamorous one, but a tough battle in a punishing cauldron of attrition, in and around the key city of Caen. [18]

The Germans had initially counterattacked the Normandy beachhead with powerful panzer and mobile forces hoping to drive to the sea by creating a wedge between the US and British armies. Failing this, they were then faced with a large, menacing British advance towards the strategic city of Caen, that threatened to collapse a great portion of their front, presenting a credible and very dangerous breakthrough threat. The British and Canadian divisions were not a secondary, defensively-oriented holding or diversionary force, but aggressively sought to penetrate and destroy the German front. The Germans were thus forced to commit their strongest echelons in the theatre, the mobile panzer and SS units to avoid this peril. These were pulled deeper and deeper against the attritional anvil on the eastern flank, slowly corroding German strength and capability. The bitter confrontation tied down and weakened the Wehrmacht, thus eventually paving the way for a crushing American breakthrough in the west.

As General Montgomery signaled on June 25, 1944:

When the American attack went in west of St Lo at 1100 hours on 25 July, the main enemy armoured strength of six panzer and SS divisions was deployed on the eastern flank facing the British Army. This is a good dividend. The Americans are going well and I think things will now begin to move towards the plan outlined in M512. [19]

Supreme Allied Commander Dwight Eisenhower affirmed Montgomery's overall strategy in a message of 10 July, urging stronger efforts:

I am familiar with your plan for generally holding firmly with your left, attracting thereto all of the enemy armour, while your right pushes down the Peninsula and threatens the rear and flank of the forces facing the Second British Army.. It appears to me that we must use all possible energy in a determined effort to prevent a stalemate or facing the necessity of fighting a major defensive battle with the slight depth we now have in the bridgehead... please be assured that I will produce everything that is humanly possible to assist you in any plan that promises to get us the elbow room we need. The air and everything else will be available." [20]

Montgomery's overall "hammer and anvil" conception of the battle eventually resulted in success, but it took two months of bitter fighting in and around the city of Caen. [21]

Post World War II

Communist Insurgency in South Korea

In early 1950, prior to the North Korean People's Army's southward advance across the 38th parallel, the North frequently launched small offensives at the border and inserted thousands of guerillas infiltrators into the South as far as Jeju Island in hopes of achieving the overthrow of President Syngman Rhee and the imposition of a communist government. [22] After a number of Republic of Korea Army (ROKA) counterinsurgency successes, the North Koreans waged a final attempt at inciting revolution by sending two battalion-sized units of guerillas under the commands of Kim Sang-ho and Ki Moo-hyon. The first unit was, over the course of several engagements with the ROKA 6th Division, destroyed with only one survivor. The second was also annihilated by a two-battalion hammer-and-anvil maneuver by units of the ROKA 6th Division. The KPA guerillas lost 584 (480 killed, 104 captured) and the ROKA troops reported 69 killed and 184 wounded. It would prove to be the last major effort of the communist north to annex the south until the invasion on 25 June 1950. [23]

Soviet sweep operations in Afghanistan

See also

Related Research Articles

<span class="mw-page-title-main">Battle of Pharsalus</span> Decisive battle of Caesars Civil War (48 BC)

The Battle of Pharsalus was the decisive battle of Caesar's Civil War fought on 9 August 48 BC near Pharsalus in Central Greece. Julius Caesar and his allies formed up opposite the army of the Roman Republic under the command of Pompey. Pompey had the backing of a majority of Roman senators and his army significantly outnumbered the veteran Caesarian legions.

<span class="mw-page-title-main">Pompey</span> Roman general and statesman (106–48 BC)

Gnaeus Pompeius Magnus, known in English as Pompey or Pompey the Great, was a general and statesman of the Roman Republic. He played a significant role in the transformation of Rome from republic to empire. Early in his career, he was a partisan and protégé of the Roman general and dictator Sulla; later, he became the political ally, and finally the enemy, of Julius Caesar.

<span class="mw-page-title-main">Pincer movement</span> Military tactic: simultaneously attacking both sides of an enemy formation

The pincer movement, or double envelopment, is a military maneuver in which forces simultaneously attack both flanks (sides) of an enemy formation. This classic maneuver has been important throughout the history of warfare.

Titus Labienus was a high-ranking military officer in the late Roman Republic. He served as tribune of the Plebs in 63 BC. Although mostly remembered as one of Julius Caesar's best lieutenants in Gaul and mentioned frequently in the accounts of his military campaigns, Labienus chose to oppose him during the Civil War and was killed at Munda. He was the father of Quintus Labienus.

<span class="mw-page-title-main">Battle of Dyrrhachium (48 BC)</span> Siege battle, part of Caesars civil war

The Battle of Dyrrachium took place from April to late July 48 BC near the city of Dyrrachium, modern day Durrës in what is now Albania. It was fought between Gaius Julius Caesar and an army led by Gnaeus Pompey during Caesar's civil war.

<span class="mw-page-title-main">Battle of Munda</span> Final battle of Caesars Civil War in present-day southern Spain, 45 BC

The Battle of Munda, in southern Hispania Ulterior, was the final battle of Caesar's civil war against the leaders of the Optimates. With the military victory at Munda and the deaths of Titus Labienus and Gnaeus Pompeius, Caesar was politically able to return in triumph to Rome, and then govern as the elected Roman dictator. Subsequently, the assassination of Julius Caesar began the Republican decline that led to the Roman Empire, initiated with the reign of the emperor Augustus.

<span class="mw-page-title-main">Battle of Thapsus</span> Battle of Caesars Civil War (46 BCE)

The Battle of Thapsus was a military engagement that took place on April 6, 46 BC near Thapsus. The forces of the Optimates, led by Quintus Caecilius Metellus Scipio, were defeated by the forces of Julius Caesar. It was followed shortly by the suicides of Scipio and his ally, Cato the Younger, the Numidian King Juba, and his Roman peer Marcus Petreius.

Publius Attius Varus was the Roman governor of Africa during the civil war between Julius Caesar and Pompey. He declared against Caesar, and initially fought Gaius Scribonius Curio, who was sent against him in 49 BC.

<span class="mw-page-title-main">Caesar's civil war</span> War in the Roman Republic (49 to 45 BC)

Caesar's civil war was a civil war during the late Roman Republic between two factions led by Gaius Julius Caesar and Gnaeus Pompeius Magnus (Pompey), respectively. The main cause of the war was political tensions relating to Caesar's place in the republic on his expected return to Rome on the expiration of his governorship in Gaul.

<span class="mw-page-title-main">Oblique order</span> Military tactic

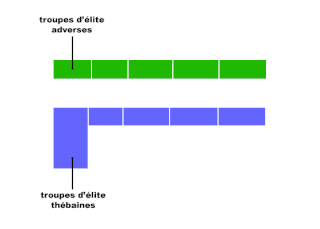
The oblique order is a military tactic whereby an attacking army focuses its forces to attack a single enemy flank. The force commander concentrates the majority of their strength on one flank and uses the remainder to fix the enemy line. This allows a commander with weaker or equal forces to achieve a local superiority in numbers. The commander can then try to defeat the enemy in detail. It has been used by numerous successful generals. Oblique order required disciplined troops able to execute complex maneuvers in varied circumstances.

<span class="mw-page-title-main">Battle of Ilerda</span> 49 BC battle in modern-day Catalonia

The Battle of Ilerda took place in June 49 BC between the forces of Julius Caesar and the Spanish army of Pompey Magnus, led by his legates Lucius Afranius and Marcus Petreius. Unlike many of the other battles of the civil war, this was more a campaign of manoeuvre than actual fighting. It allowed Caesar to eliminate the threat of Pompey's forces in Hispania and face Pompey himself in Greece at the Battle of Pharsalus.

<span class="mw-page-title-main">Flanking maneuver</span> Military tactic

In military tactics, a flanking maneuver is a movement of an armed force around an enemy force's side, or flank, to achieve an advantageous position over it. Flanking is useful because a force's fighting strength is typically concentrated in its front, therefore, to circumvent an opposing force's front and attack its flank is to concentrate one's own offense in the area where the enemy is least able to concentrate defense.

The Battle of Nicopolis was fought in December 48 BC between the army of Pharnaces II of Pontus, the son of Mithdridates VI Eupator, and a Roman army led by Gnaeus Domitius Calvinus.

In military tactics, a flanking maneuver, or flanking manoeuvre, is an attack on the sides of an opposing force. If a flanking maneuver succeeds, the opposing force would be surrounded from two or more directions, which significantly reduces the maneuverability of the outflanked force and its ability to defend itself.

<span class="mw-page-title-main">Battle of the Abas</span>

The Battle of the Abas was fought in 65 BC between the forces of the Roman Republic under Pompey Magnus and those of the Caucasian Albanian King Oroeses during the course of the Third Mithridatic War. The battle took place on a flat plain by the River Abas, after the Roman forces had only recently crossed over it from the other bank, and with much dense forest nearby. Pompey's victory neutralised the threat of the Albanians rejoining with their old ally Mithridates in his attempts to rekindle his lost war with Rome.

The Battle of Lauron was fought in 76 BC by a rebel force under the command of the renegade Roman general Quintus Sertorius and an army of Roman Republic under the command of the Roman general Gnaeus Pompeius Magnus. The battle was part of the Sertorian War and ended in victory for Sertorius and his rebels. The battle was recorded in detail by Frontinus in his Stratagems and by Plutarch in his Lives of Sertorius and Pompey.

<span class="mw-page-title-main">Military of the Ashanti Empire</span> Armed forces of the Ashanti Empire

The Ashanti Empire was an Akan empire and kingdom from 1701 to 1957, in modern-day Ghana. The military of the Ashanti Empire first came into formation around the 17th century AD in response to subjugation by the Denkyira Kingdom. It served as the main armed forces of the empire until it was dissolved when the Ashanti became a British crown colony in 1901. In 1701, King Osei Kofi Tutu I won Ashanti independence from Denkyira at the Battle of Feyiase and carried out an expansionist policy.

The Battle of Ascurum took place in 46 BC during Caesar’s Civil War and saw the defeat of a force under Pompey the Younger in battle against the Mauretanians.

Caesar's invasion of Macedonia occurred as part of Caesar's civil war, starting with his landing near Paeleste on the coast of Epirus, and continuing until he forced Pompey to flight after the Battle of Pharsalus.

The military tactics of Alexander the Great have been widely regarded as evidence that he was one of the greatest generals in history. During the Battle of Chaeronea, won against the Athenian and Theban armies, and the battles of Granicius and of Issus, won against the Achaemenid Persian army of Darius III, Alexander employed the so-called "hammer and anvil" tactic. However, in the Battle of Gaugamela, the Persians possessed an army vastly superior in numbers to the Macedonian army. This tactic of encirclement by rapid shock units was not very feasible. Alexander had to compose and decide on an innovative combat formation for the time; he arranged his units in levels; he pretended to want to encircle the enemy in order to better divide it and thus opened a breach in its defensive lines.

References

  1. Gat, Azar. War In Human Civilisation. Oxford: Oxford University Press, 2006. 340.
  2. Allan Millet and Williamson Murray, ed. 2010. Military Effectiveness, vol 3. p 302
  3. Millet and Williamson, Military Effectiveness, vol 3
  4. Gat, Azar. War In Human Civilization. Oxford: Oxford University Press, 2006. 340.
  5. Battle of Pharsalus
  6. Caesar, BC III 92,1.
  7. Caesar, BC III, 92,2.
  8. Caesar, BC III, 93,1.
  9. "Roman Armageddon at Pharsalus". 14 December 2016.
  10. 1 2 James, Steven. "(PDF) 48 BC: The Battle of Pharsalus | Steven James - Academia.edu".
  11. Caesar, BC III, 93,4
  12. Byron Farwell. 2001. The encyclopedia of nineteenth-century land warfare. WW Norton. p 56.
  13. The Victorians at war, 1815–1914: an encyclopedia of British military history. By Harold E. Raugh. ACL-CLIO: pp. 21–37
  14. Charles Rathbone Low, A Memoir of Lieutenant-General Sir Garnet J. Wolseley, R. Bentley: 1878, pp. 57–176
  15. The Victorians at war, 1815–1914: pp. 21–37
  16. Charles Rathbone Low. A Memoir of Lieutenant-General Sir Garnet J. Wolseley. 1878, pg 174
  17. Nigel Hamilton, 1983. Master of the Battlefield pg 628-769
  18. Hamilton, 1983. Master of the Battlefield pg 628-769
  19. Hamilton, Master of the Battlefield, p757
  20. Rick Atkinson. 2014. The Guns at Last Light: The War in Western Europe, 1944-1945 p 124
  21. Alexander McKee's Caen: Anvil of Victory, 2012.
  22. Appleman, Roy (1992). South to the Naktong, North to the Yalu. Washington, D.C.: Center of Military History, United States Army. p. 5. ISBN   0-16-035958-9.
  23. Gibby, Bryan (2012). Will to Win: American Military Advisors in Korea, 1946–1953. University Alabama Press. pp. 80–82. ISBN   978-0817317645.