
The 6th Division was an infantry division of the Australian Army. It was raised briefly in 1917 during World War I, but was broken up to provide reinforcements before seeing action. It was not re-raised until the outbreak of World War II, when it was formed as a unit of the Second Australian Imperial Force. Throughout 1940–41 it served in the North African Campaign, the Greek campaign, on Crete and in Syria, fighting against the Germans, Italians and Vichy French. In 1942, the division left the Middle East and returned to Australia to meet the threat of Japan's entry into the war. Part of the division garrisoned Ceylon for a short period of time, before the division was committed to the New Guinea campaign. In New Guinea, its component brigades had a major role in the successful counter-offensive along the Kokoda Track, at Buna–Gona and around Salamaua–Lae in 1942–43. Throughout late 1943–44, the division was re-organised in Australia before being committed as a complete formation to one of the last Australian operations of the war around Aitape–Wewak in 1944–45.

The 2/6th Battalion was an infantry battalion of the Australian Army that served during the Second World War. Raised in October 1939 as part of the all-volunteer Second Australian Imperial Force, the battalion formed part of the 6th Division and was among the first troops raised by Australia during the war. Departing Australia in early 1940, the 2/6th were deployed to the Middle East where in January 1941, it took part in the first action of the war by Australian ground forces, the Battle of Bardia, which was followed by further actions around Tobruk. Later, the 2/6th were dispatched to take part in the Battle of Greece, although they were evacuated after only a short involvement in the campaign. Some members of the battalion subsequently fought on Crete with a composite 17th Brigade battalion, and the battalion had to be re-formed in Palestine before being sent to Syria in 1941–42, where they formed part of the Allied occupation force that was established there in the aftermath of the Syria–Lebanon campaign.

The 2/5th Battalion was an infantry battalion of the Australian Army that operated during World War II. It was raised at Melbourne, Victoria, on 18 October 1939 as part of the Second Australian Imperial Force, attached to the 17th Brigade of the 6th Division. The 2/5th was one of only two Australian infantry battalions to fight against all of the major Axis powers during the war, seeing action against the Germans and Italians in Egypt, Libya, Greece and Crete, and the Vichy French in Syria, before returning to Australia in 1942 to fight the Japanese following a period of garrison duties in Ceylon, where it formed part of an Australian force established to defend against a possible Japanese invasion.

The 29th Brigade was an infantry brigade of the Australian Army that was raised for service during World War II. Formed in late 1941 as part of the Militia, the brigade was initially formed for home defence in response to Japan's entry into the war. Composed of three Queensland-based infantry battalions and various supporting elements, the brigade initially undertook defensive duties around Townsville in 1941–1942 before deploying to New Guinea in 1943. There, the brigade undertook garrison duties before taking part in the Salamaua–Lae campaign. After a period of almost 18 months overseas, the brigade's elements were returned to Australia for a period of rest and reorganisation before later being assigned to the Bougainville campaign in 1944–1945. After the war, the brigade was disbanded in December 1945, along with its component units.

The Battle of Wau, 29 January – 4 February 1943, was a battle in the New Guinea campaign of World War II. Forces of the Empire of Japan sailed from Rabaul and crossed the Solomon Sea and, despite Allied air attacks, successfully reached Lae, where they disembarked. Japanese troops then advanced overland on Wau, an Australian base that potentially threatened the Japanese positions at Salamaua and Lae. A race developed between the Japanese moving overland, hampered by the terrain, and the Australians, moving by air, hampered by the weather. By the time the Japanese reached the Wau area after a trek over the mountains, the Australian defenders had been greatly reinforced by air. In the battle that followed, despite achieving tactical surprise by approaching from an unexpected direction, the Japanese attackers were unable to capture Wau.

The Salamaua–Lae campaign was a series of actions in the New Guinea campaign of World War II. Australian and United States forces sought to capture two major Japanese bases, one in the town of Lae, and another one at Salamaua. The campaign to take the Salamaua and Lae area began after the successful defence of Wau in late January, which was followed up by an Australian advance towards Mubo as the Japanese troops that had attacked Wau withdrew to positions around Mubo. A series of actions followed over the course of several months as the Australian 3rd Division advanced north-east towards Salamaua. After an amphibious landing at Nassau Bay, the Australians were reinforced by a US regimental combat team, which subsequently advanced north up the coast.

The 2/5th Commando Squadron was one of twelve independent companies and or commando squadrons of the Australian Army formed for service during World War II. Initially formed in 1942 as the "2/5th Independent Company", the 2/5th served in New Guinea, taking part in a major commando raid on Salamaua in June 1942. It was later withdrawn from New Guinea and reformed as the "2/5th Cavalry (Commando) Squadron", as part of the 2/7th Cavalry (Commando) Regiment which saw service in Borneo in 1945. It was disbanded in early 1946.
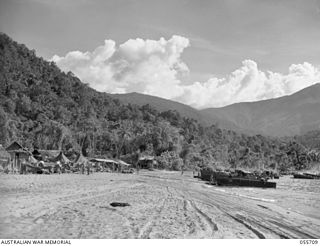
The Landing at Nassau Bay was an amphibious landing by Allied forces at Nassau Bay during the New Guinea campaign of World War II that took place between 30 June and 6 July 1943. The operation was undertaken so that Allies could secure a beachhead to establish a supply point to shorten their supply lines for the proposed attack on Salamaua as part of the Salamaua–Lae campaign and resulted in a battalion-sized force of US infantry and supporting elements being landed largely unopposed on the south-eastern flank of the battle zone.

New Guinea Force was a military command unit for Australian, United States and native troops from the Territories of Papua and New Guinea serving in the New Guinea campaign during World War II. Formed in April 1942, when the Australian First Army was formed from the Australian I Corps after it returned from the Middle East, it was responsible for planning and directing all operations within the territory up until October 1944. General Headquarters Southwest Pacific Area Operational Instruction No.7 of 25 May 1942, issued by Commander-Allied-Forces, General Douglas MacArthur, placed all Australian and US Army, Air Force and Navy Forces in the Port Moresby Area under the control of New Guinea Force. Over the course of its existence, New Guinea Force was commanded by some of the Australian Army's most notable commanders, including Sydney Rowell, Sir Edmund Herring and Sir Leslie Morshead.
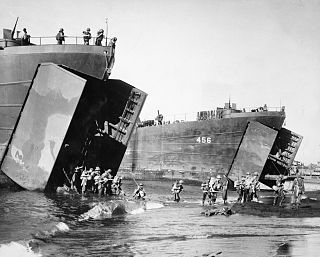
The Landing at Lae was an amphibious landing to the east of Lae and then the subsequent advance on the town during the Salamaua–Lae campaign of World War II. Part of Operation Postern, which was undertaken to capture the Japanese base at Lae, the landing was undertaken between 4 and 6 September 1943 by Australian troops from the 9th Division, supported by US naval forces from the VII Amphibious Force. The first major amphibious operation undertaken by the Australian Army since the failed Gallipoli Campaign, the Australians invested a significant amount of effort into planning the operation.
The 2/3rd Commando Squadron was one of twelve independent or commando companies and squadrons formed by the Australian Army for service during World War II. Raised in October 1941 as the 2/3rd Independent Company, it served in New Caledonia and New Guinea before being amalgamated into the 2/7th Cavalry Commando Regiment and adopting the name 2/3rd Commando Squadron in 1943. After this, the squadron did not see action again until 1945, when it participated in the Borneo campaign. Throughout the course of the war, the 2/3rd lost 69 members killed in action. No battle honours were awarded to the unit, although it participated in a number of notable engagements in these campaigns and its members received numerous decorations for their service. Following the end of hostilities in the Pacific, the unit was disbanded in early 1946, upon their return to Australia.

The 58th/59th Battalion was an infantry battalion of the Australian Army which served during the Second World War. Raised in 1942 as part of the Militia through the amalgamation of the 58th and 59th Battalions, it formed part of the 15th Brigade, assigned to the 3rd Division. Initially the battalion undertook defensive duties in Australia before being deployed to New Guinea where it took part in the fighting around Salamaua and Lae and then the Finisterre Range campaign. In 1945 they were sent to Bougainville where they took part in the fighting in the southern sector of the island. Following the end of the war, the battalion was disbanded in 1946.

The Battle of Sattelberg took place between 17 and 25 November 1943, during the Huon Peninsula campaign of the Second World War. Involving forces from Australia, the United States and Japan, the fighting centred on the Sattelberg mission station which was situated atop a hill about 900 metres (3,000 ft) above sea level, approximately 8 kilometres (5.0 mi) inland from Finschhafen, New Guinea. Following the Australian landing at Scarlet Beach a large force of Japanese had retreated inland towards Sattelberg. The Japanese, holding the high ground, subsequently threatened the Australian lines of communication as they advanced south towards Finschhafen. The Australian 26th Brigade was tasked with capturing the mission to neutralise this threat. Over the course of 10 days they advanced west from Jivevaneng up the southern approaches to the mission, reducing the Japanese position with armour, artillery, and air support. The Japanese finally abandoned Sattelberg and withdrew north to Wareo, having suffered heavy casualties and running low on supplies.

Brigadier Murray John Moten, was a senior officer in the Australian Army during World War II who commanded the 2/27th Battalion during the Syria-Lebanon campaign in 1941, and the 17th Brigade during the Salamaua–Lae campaign in 1943 and the Aitape–Wewak campaign in 1944–1945.

The Battle of the Pimple was part of the Markham and Ramu Valley – Finisterre Range campaign, which consisted of a number of battles fought by Australian and Japanese troops in Papua New Guinea in World War II. Fought on 27 and 28 December 1943, the battle took place as the Australians advanced towards the Japanese strong hold around Shaggy Ridge, and was a preliminary phase in their eventual capture of that position in January 1944. Supported by artillery, mortars, machine guns and fighter-bomber aircraft, the assault was made across a narrow frontage, which was usually not much wider than a single section. Two companies of Australian infantry were committed to the attack, with one securing the initial crest, while the other exploited the position and secured several other smaller features throughout the two days of fighting. In the aftermath, Japanese artillery harassed the Australians holding the position, and subjected them to several counter-attacks, which were eventually defeated.
The Battle of Lababia Ridge was fought from 20–23 June 1943 in the Territory of New Guinea during World War II. Part of the Salamaua–Lae campaign, the battle involved Australian and Japanese troops who clashed on the ridge, which was about 20 kilometres (12 mi) south of Salamaua, near Mubo, over the course of several days. The battle was fought in conjunction with several other actions in the region as the Allies attempted to draw Japanese attention away from Lae, where they launched seaborne landings in mid-September 1943, in conjunction with airborne landings around Nadzab. The fighting around Lababia Ridge took place at the same time as the Battle of Mubo, after two battalions of Japanese infantry launched a counter-attack on a depleted Australian company. The Australians, supported by Royal Australian Air Force fighter-bombers, managed to hold off the initial Japanese attacks before being reinforced by another depleted company. Fighting continued over the course of three days before the Japanese withdrew.

The Battle of Mubo was a series of actions in the Mubo area of the Territory of New Guinea between Australian and Japanese forces which took place between 22 April and 14 July 1943, during World War II. The battle formed part of the wider Salamaua–Lae campaign, and was fought in the early stages of the campaign. The battle followed the successful defence of the airfield around Wau by the Australians in late January 1943, after the Japanese had attempted to infiltrate the Australian positions with two infantry battalions.

The Battle of Roosevelt Ridge was fought between 21 July and 14 August 1943 between US and Japanese forces in the Salamaua area of the Territory of New Guinea during World War II. The battle was fought in conjunction with several other actions of the Salamaua–Lae campaign. Throughout the first half of 1943, Australian forces had clashed with the Japanese around Wau and then Mubo as they had pushed the Japanese back towards Salamaua. As the campaign had developed, the Japanese had brought in reinforcements from elsewhere in New Guinea, effectively reducing their garrison, particularly around Lae. Following fighting on Lababia Ridge, the Australians had begun securing positions around Bobdubi, with a view to extending towards Mount Tambu.

The Battle of Mount Tambu was a series of actions fought in the Salamaua area of the Territory of New Guinea between Allied and Japanese forces, which took place between 16 July and 18 August 1943, during World War II. The battle formed part of the wider Salamaua–Lae campaign and was fought in the final stages of the campaign, which had seen a combined Australian and US force advance from Wau towards Salamaua following the repulse of the Japanese attack on Wau in late January and early February 1943. After several frontal assaults on the position by Australian and US infantrymen were rebuffed by determined Japanese defenders, an indirect approach was sought and flanking moves were undertaken to cut off the Japanese supply route along the Komiatum Track. This succeeded in eventually forcing the Japanese off the position as they withdrew to avoid encirclement.
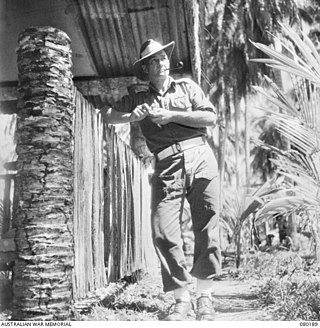
Colonel George Radford Warfe, was an Australian Army officer who commanded several Australian commando and infantry units during the Second World War. He later served in staff and training roles in the post war period, which included service during the Malayan Emergency and then as a civilian advisor during the Vietnam War following his military retirement. He was active in the civil defence organisation in Victoria and in the business community before his death at the age of 63 in November 1975 from cancer.


