Markham, Ramu and Finisterre campaigns

Last updated
Markham Valley, Ramu Valley and
Finisterre Range campaigns
Part of the New Guinea Campaign of the Pacific Theater (World War II)
Battle for Shaggy Ridge 2.jpg
Members of 'C' Company, Australian 2/9th Infantry Battalion, digging in at a newly occupied part of Shaggy Ridge on 23 January 1944
Date19 September 1943 – 24 April 1944
Location
Result Allied victory
Belligerents
Flag of Australia (converted).svg  Australia
Flag of the United States (1912-1959).svg  United States
Merchant flag of Japan (1870).svg  Japan
Commanders and leaders
Flag of Australia (converted).svg George Vasey Merchant flag of Japan (1870).svg Masutaro Nakai
Units involved

7th Division

11th Division

18th Army

  • Nakai Detachment
Strength
~ 17,000 ~ 12,000
Casualties and losses
204 killed
464 wounded
800 killed
400 wounded

The Markham Valley, Ramu Valley and Finisterre Range campaigns were a series of battles within the broader New Guinea campaign of World War II. The campaigns began with an Allied offensive in the Ramu Valley, from 19 September 1943, and concluded when Allied troops entered Madang on 24 April 1944. During the campaign, Australian forces supported by Australian and US aircraft advanced through the Markham Valley and Ramu Valleys during which there were minor clashes with Japanese forces, which withdrew towards their main defensive line in the Finisterre Range.

Contents

A central geographical and strategic feature of these campaigns was the imposing Shaggy Ridge, running north–south in the Finisterres; this was the scene of a climactic battle during which the Australians assaulted the Japanese positions in December 1943 and January 1944. Following the fighting around Shaggy Ridge, the Japanese withdrew towards the northern coast of New Guinea, where they were pursued by Australian and US forces advancing through the Finisterres and along the coast from Saidor. Following the capture of Madang, the Japanese eventually withdrew to Wewak where further fighting took place in 1944 and 1945.

Background

Strategic situation

During September 1943, Australian forces from Major General George Vasey's 7th Division, advancing from Nadzab, had captured Lae, as part of a pincer undertaken in conjunction with Major General George Wootten's 9th Division, which had advanced along the coast from the east of Lae. Heavy rain had held up the Australian advance and much of the garrison had managed to withdraw inland, prior to the capture of the town. To follow these forces up, the 9th Division's focus then shifted to the Huon Peninsula, while the 7th Division – following the capture of Kaiapit – advanced from there to Dumpu and Marawasa, to prepare for the Australian advance through the Ramu Valley and into the Finisterre Range, towards Bogadjim near Madang on the northern coast. [1] [2]

Opposing forces

The Japanese formation in the campaign was the Nakai Detachment, a brigade-sized formation detached from the Japanese 20th Division under Major General Masutaro Nakai. [3] The area was defended by several battalions of the 78th Infantry Regiment, supported by the 26th Artillery Regiment and the 27th Independent Engineer Regiment. The II/78th and two companies of the III/78th were deployed forward around Kankiryo and Shaggy Ridge, with the I/78th spread out around Saipa and Yokopi and the remaining two companies of the III/78th at Yaula, the 239th Infantry Regiment held the rear around Madang, Erima and Bogadjim, along with 2,000 unassigned reinforcements; this was a force of about 12,000 men. [1] It faced the Australian 7th Division, consisting of approximately 17,000 men, [4] under Vasey, and made up of the 18th, 21st and 25th Brigades, along with the 2/6th Commando Squadron. [5]

Campaign

Advance into the Markham and Ramu Valleys

Markham and Ramu Valley Operations, September-November 1943 Markham Valley.jpg
Markham and Ramu Valley Operations, September–November 1943

The campaign began in September 1943 following the 7th Division's drive on Lae, as part of the wider New Guinea campaign, which saw the 9th Division carrying out operations along the Huon Peninsula on the coast to the east, while the 7th moved towards the west. [6] Carrying out a number of smaller-scale operations, the units of the 21st and 25th Brigades advanced up the Markham and Ramu Valleys. Apart from a significant engagement around Kaiapit, where the 2/6th Commando Squadron captured the village and killed over 200 Japanese. The Australians were barely resisted as they advanced and they arrived in Dumpu in early October. During the entire advance, the Australian and American forces in the Ramu Valley were supplied by air. The capture of the Ramu Valley, allowed a forward airbase to be developed at Gusap. [5] [7] [8]

Following this, the 7th Division provided security for a number of airfields that were constructed in the territory they had captured in the valleys. [9] To assist with this, the 6th Machine Gun Battalion was brought up from Port Moresby to defend Gusap. [10] However, the Japanese remained in strong possession of the Finisterre Range, and their positions at Kankiryo Saddle north of the Ramu river and the 1,500 m (4,900 ft) high razorback ridge named Shaggy Ridge, continued to threaten the airfields. [7] This threat manifested itself in the road that the Japanese were attempting to build from Madang on the coast inland to Nadzab, via Bogadjim, along which they were hoping to advance through to Dumpu. [5] [7]

Thus, the Kankiryo Saddle and Shaggy Ridge were of vital strategic importance for both the Japanese and the Australians. For the Japanese, it provided a strong obstacle to the Australian advance north towards the coast, while also offering them the ground along which they could launch their own offensive in order to recapture the territory they had lost earlier in the campaign. For the Australians, the Japanese positions on the high ground signalled threat and their commander, Vasey, came to the decision that he would have to launch an offensive in order to capture this ground. [7]

Into the Finnisterres and the attack on Shaggy Ridge

Troops of the 2/16th Infantry Battalion, watch aircraft bombarding The Pimple prior to their attack on Japanese positions there, 27 December 1943. AWM 062320 2-16 Shaggy.jpg
Troops of the 2/16th Infantry Battalion, watch aircraft bombarding The Pimple prior to their attack on Japanese positions there, 27 December 1943.

This led to a number of battles in the steep mountains of the Finnisterres. In October, battles took place at Palliser's Hill, [11] and then later at Johns' Knoll where the Australians first managed to capture the knoll and then held it against a determined Japanese counterattack. [5] In November, the 25th Brigade relieved the 21st as the offensive was maintained, [7] and later in December and into January heavy fighting took place around Shaggy Ridge, [5] a 6.5-kilometre (4.0 mi) long spur dotted by several rocky outcrops. The Japanese had established numerous strong posts and positions along the ridge, blocking the Australian advance towards the coast, where they were aiming to secure Bogadjim and Madang. [12] The initial attacks on Shaggy Ridge began on 27 December with a heavy artillery and air preparation of the Japanese positions around The Pimple, a steep rocky outcrop, which commanded the southern half of the position and had prevented the Australians advancing over the previous two months. These preparatory fires were followed by an assault up the steep slopes of The Pimple by the 2/16th Infantry Battalion, which employed ladders made out of bamboo to help scale the face of the slope. Held up overnight by a Japanese pillbox, the 2/16th resorted to explosives to destroy it. [12] [13]

Early in the new year, the 15th and 18th Brigades relieved the 21st and 25th Brigades around Shaggy Ridge, and planning for a new offensive began. [12] The major Australian attack on Shaggy Ridge – codenamed Operation Cutthroat – was launched by the 18th Brigade on 19–20 January. [14] The 2/4th Field Regiment, which established its guns around the Lake area to the west of the Mosia River, and south of Guy's Post, while stores were brought up to that position by jeep. [15] The brigade's three battalions were to converge on the Kankiryo Saddle from three different directions: the 2/12th Infantry Battalion was to advance from Canning's Saddle, east of Shaggy Ridge, and attack two well-defended knolls on the northern end of Shaggy Ridge, known as Prothero I and II; the 2/9th Infantry Battalion would attack northwards along Shaggy Ridge itself, to take McCaughey's Knoll, by way of Green Sniper's Pimple; and the 2/10th Infantry Battalion would advance along Faria Ridge, which lay to the east of Shaggy Ridge and joined it at Kankiryo Saddle. [16]

After the Kankiryo Saddle was secured on 26 January 1944, the Japanese withdrew to Crater Hill. From there, they had good observation of the saddle to the south-west, and they established a strong position. The Australians surrounded the position and over the course of a week reduced the position with patrolling and air attacks, forcing the Japanese defenders to abandon the position on 31 January 1944, and fall back to Paipa. Casualties during the fighting to secure Shaggy Ridge amounted to up to 500 Japanese killed, and 46 killed and 147 wounded for the Australians. [17]

Pursuit towards Madang

Shortly after Shaggy Ridge was captured, the 18th Brigade was replaced by the 15th Brigade, a Militia formation. [18] As the Australians began consolidating their position, the 7th Division was ordered to limit its exploitation, while supplies were pushed forward of Kankiryo. Meanwhile, in an effort to harass the Japanese rearguard, the 57th/60th Infantry Battalion undertook a program of long range patrols to the north. A landing by two US battalions around the Yalau Plantation pushed the Japanese further back, but nevertheless, their rearguards continued to provide determined resistance and the Australians advanced towards Bogadjim, pursuing the Japanese forces as they withdrew. [19]

Members of "B" Company, Australian 2/12th Battalion, who helped silence a Japanese mountain gun on one of the hills known as Prothero I & II, 22 January 22, 1944. Awm 064220 shaggy.jpg
Members of "B" Company, Australian 2/12th Battalion, who helped silence a Japanese mountain gun on one of the hills known as Prothero I & II, 22 January 22, 1944.

Yaula was captured on 4 April linking up with elements of the 2/2nd Commando Squadron. A few days later, the 11th Division, under the command of Major General Allan Boase took over from the 7th, and they subsequently linked up with US forces on the coast around Rimba as they pushed forward along an axis bounded by the Kabenau and Nuru Rivers. Bogadjim was reached on 13 April and on 23 April troops from the 8th Brigade came ashore there, effecting a link up between the 5th Division, [12] which had been advancing along the coast from Saidor, which had been secured by US and Australian forces in January – February 1944. Madang was subsequently taken on 24–25 April by troops from the 8th and 15th Brigades, while the 30th Infantry Battalion secured Alexishafen the following day. [20] A follow-up landing was made by the 37th/52nd Infantry Battalion on Karkar Island, while the 35th Infantry Battalion secured a large quantity of abandoned Japanese stores at Hansa Bay, and pushed patrols towards the Sepik River. [12]

Aftermath

For the Australians, the advance through the Markham, Ramu and Faria Valleys proved to be a hard slog. Casualties for the 7th Division between 18 September 1943 and 8 April 1944 amounted to 204 killed and 464 wounded. Disease took an even greater toll with 13,576 personnel being evacuated. Japanese estimates of their own casualties indicate losses of 800 killed, 400 wounded and 800 dead from disease. [21]

With the capture of Madang, the Allies finally effectively secured the Huon Peninsula; [5] [20] nevertheless, the Allies were unable to prevent the Japanese defenders from withdrawing and, as a result, they were unsuccessful in completely destroying them. Following the fall of Madang, the remnants of the Japanese 18th Army eventually withdrew to the Wewak area with the intention of falling back to Hollandia. That base fell before they could arrive after the Allies launched Operations Reckless and Persecution, and consequently they remained in the Wewak area. [22] US forces from the 41st Infantry Division subsequently landed at Aitape and in mid- to late 1944, US and Japanese forces clashed during the Battle of Driniumor River. [18] In late 1944, the Australian 6th Division arrived to relieve the US garrison, and the Australian forces subsequently launched the Aitape–Wewak campaign, fighting a campaign to secure the airfield and then clear the Japanese from the inland areas patrolling through the Torricelli and Prince Alexander mountain ranges. [23] [24]

Fighting during the campaign was featured in the Australian documentary Jungle Patrol (1944). [25] After the war, the Australian Army awarded the units that participated in the campaign several battle honours. These were: Ramu Valley, Shaggy Ridge, Finisterres, Barum, Bogadjim, and Madang. [26] [27]

Notes

  1. 1 2 Keogh 1965, p. 346.
  2. Coulthard-Clark 1998, pp. 241–245.
  3. Dexter 1961, p. 424.
  4. Dickens 2005, p. xiii.
  5. 1 2 3 4 5 6 Johnston 2007, p. 29.
  6. Johnston 2007, pp. 8–9.
  7. 1 2 3 4 5 Dickens 2005, p. 264.
  8. Casey 1951, pp. 171–174.
  9. Bradley 2004a, p. 43.
  10. Dexter 1961, pp. 594 & 684.
  11. Bradley 2004a, p. 72.
  12. 1 2 3 4 5 "New Guinea" (PDF). Campaign Publications. Veterans Review Board. Archived from the original (PDF) on 4 March 2016. Retrieved 19 October 2014.
  13. Bradley 2004b, pp. 22–27.
  14. Coulthard-Clark 1998, pp. 245–246.
  15. Keogh 1965, pp. 352–354.
  16. Keogh 1965, pp. 354–359.
  17. Coulthard-Clark 1998, p. 246.
  18. 1 2 Bradley 2004a, p. 241.
  19. Keogh 1965, pp. 359–360.
  20. 1 2 Keogh 1965, p. 360.
  21. Grant 2014, p. 251.
  22. Dexter 1961, p. 789.
  23. Long 1963, pp. 271–281.
  24. Keogh 1965, pp. 370–374, 400–408.
  25. "Jungle Patrol". National Film and Sound Archive of Australia. Retrieved 26 January 2016.
  26. "Battle Honours of the Australian Army: World War Two: South West Pacific" (PDF). Australian Army. Archived from the original (PDF) on 29 March 2013. Retrieved 30 December 2012.
  27. Rodger 2003, pp. 358–368.

Related Research Articles

<span class="mw-page-title-main">7th Division (Australia)</span> WW2 Australian Army formation

The 7th Division was an infantry division of the Australian Army. It was formed in February 1940 to serve in World War II, as part of the Second Australian Imperial Force. The division was raised on the British establishment of nine infantry battalions per division and consisted of two new brigades and three of the original 12 battalions of the 6th Division forming the third brigade. The division is sometimes known by the nickname "The Silent Seventh", due to a perception that its achievements were unrecognised, in comparison to the other Australian divisions. The origin of this belief appears to be censorship of the part played by the 7th Division in the fierce fighting in the 1941 Syria-Lebanon campaign. The 7th Division along with the 6th and 9th Australian Divisions were the only divisions to serve in both the Middle East and the South West Pacific Area. It was disbanded in 1946, following the end of the war.

<span class="mw-page-title-main">Huon Peninsula campaign</span> Part of the New Guinea Campaign of the Pacific Theater (World War II)

The Huon Peninsula campaign was a series of battles fought in north-eastern Papua New Guinea in 1943–1944 during the Second World War. The campaign formed the initial part of an offensive that the Allies launched in the Pacific in late 1943 and resulted in the Japanese being pushed north from Lae to Sio on the northern coast of New Guinea over the course of a four-month period. For the Australians, a significant advantage was gained through the technological edge that Allied industry had achieved over the Japanese by this phase of the war, while the Japanese were hampered by a lack of supplies and reinforcements due to Allied interdiction efforts at sea and in the air.

<span class="mw-page-title-main">Shaggy Ridge</span>

Shaggy Ridge is a 6.5 kilometres (4.0 mi) long razorback (stratigraphic) ridge in the Finisterre Range, in north eastern Papua New Guinea. Its highest point is 1,497 metres (4,911 ft) above sea level. The ridge is located between the valleys of the Mene and Faria Rivers and culminates at one end in Kankiryo Saddle, which links it to Faria Ridge and divides Faria Valley and Mindjim River Valley. From the Ramu Valley, the ridge runs NNW, and the highest point is located at 145°44.23'E:5°46.36'S.

<span class="mw-page-title-main">Battle of Shaggy Ridge</span>

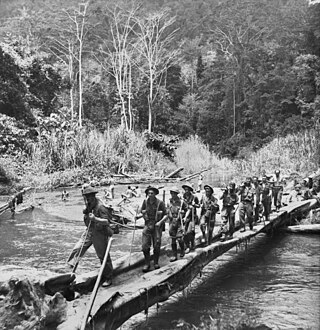
The Battle of the Shaggy Ridge was part of the Finisterre Range campaign, consisting of a number of actions fought by Australian and Japanese troops in Papua New Guinea in World War II. Following the Allied capture of Lae and Nadzab, the Australian 9th Division had been committed to a quick follow up action on the Huon Peninsula in an effort to cut off the withdrawing Japanese. Once the situation on the Huon Peninsula stabilised in late 1943, the 7th Division had pushed into the Markham and Ramu Valleys towards the Finisterre Range with a view to pushing north towards the coast around Bogadjim, where they would meet up with Allied forces advancing around the coast from the Huon Peninsula, before advancing towards Madang.

<span class="mw-page-title-main">2/10th Battalion (Australia)</span> Former infantry battalion of the Australian Army

The 2/10th Battalion was an infantry battalion of the Australian Army that was raised for overseas service as part of the all-volunteer Second Australian Imperial Force during World War II. Formed in October 1939, it was the first 2nd AIF unit raised from the state of South Australia during the war; after completing a period of training in Australia, the battalion embarked for overseas service. Initially, it had been intended that the 2/10th and its parent brigade – the 18th Brigade – would be sent to the Middle East to join the other brigades of the 6th Division, but instead the 18th Brigade was sent to strengthen the garrison in the United Kingdom after France capitulated in mid-1940. Re-assigned to the 9th Division, the 2/10th remained in the United Kingdom undertaking defensive duties until late 1940 when it finally arrived in the Middle East, where the 18th Brigade became part of the 7th Division.

<span class="mw-page-title-main">18th Brigade (Australia)</span> Infantry brigade of the Australian Army during WWII

The 18th Brigade was an infantry brigade of the Australian Army. The brigade briefly existed as a Militia formation prior to the First World War, but this was short-lived. During the Second World War, the brigade was raised on 13 October 1939 and was one of the first three infantry brigades of the Second Australian Imperial Force to be formed. Initially commanded by Brigadier Leslie Morshead, it served in the United Kingdom in 1940–1941, where it helped bolster the British garrison in anticipation of a possible German invasion following the Fall of France. In early 1941, the brigade was transferred to the Middle East where it later took part in fighting against the Italians in Libya and then helped to defend the besieged port of Tobruk before fighting against the Vichy French in the Syria–Lebanon campaign. The 18th Brigade was withdrawn to Australia in early 1942, and it later took part in the fighting against the Japanese in Pacific fighting several campaigns in New Guinea between late 1942 and early 1944. Its final involvement of the war came in mid-1945 when it took part in re-taking Balikpapan. Following the end of hostilities, the 18th Brigade was disbanded on 3 January 1946.

<span class="mw-page-title-main">2/16th Battalion (Australia)</span> Military unit

The 2/16th Battalion was an infantry battalion of the Australian Army, serving during World War II. Attached to the 21st Brigade that was assigned to the 7th Division, the 2/16th was raised in 1940 as part of the Second Australian Imperial Force from volunteers drawn mainly from the state of Western Australia. After training in Australia, the battalion was deployed to the Middle East where it undertook defensive duties along the Egyptian–Libyan border in early 1941 before taking part in the Syria–Lebanon campaign, fighting against Vichy French forces in June and July. At the conclusion of the campaign, the 2/16th remained in Lebanon, contributing to the Allied occupation force there, before returning to Australia in early 1942 following Japan's entry into the war. In August 1942, they were committed to the fighting along the Kokoda Track and then later fought around Buna and Gona. After a period of rest and reorganisation in Australia, the battalion fought around Lae and then took part in the Finisterre Range campaign in 1943–44. Its final campaign of the war came in Borneo in July 1945. At the end of the war, the 2/16th were disbanded in January 1946.

<span class="mw-page-title-main">Landing at Lae</span> Amphibious landing of World War II

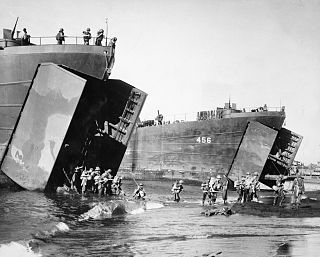
The Landing at Lae was an amphibious landing to the east of Lae and then the subsequent advance on the town during the Salamaua–Lae campaign of World War II. Part of Operation Postern, which was undertaken to capture the Japanese base at Lae, the landing was undertaken between 4 and 6 September 1943 by Australian troops from the 9th Division, supported by US naval forces from the VII Amphibious Force. The first major amphibious operation undertaken by the Australian Army since the failed Gallipoli Campaign, the Australians invested a significant amount of effort into planning the operation.

<span class="mw-page-title-main">2/9th Battalion (Australia)</span> Former infantry battalion of the Australian Army

The 2/9th Battalion was an infantry battalion of the Australian Army during World War II. Raised in Queensland as part of the Second Australian Imperial Force shortly after the outbreak of the war, it formed part of the 18th Brigade and over the course of the war it was attached to the 6th, 9th and 7th Divisions due to several re-organisations. It served in the United Kingdom in 1940, forming part of a small Australian garrison sent there to help defend against a possible German invasion, before being transferred to North Africa where it took part in the Siege of Tobruk and then undertook garrison duties in Syria following the Syria–Lebanon campaign in 1941.

<span class="mw-page-title-main">25th Brigade (Australia)</span> Infantry brigade of the Australian Army during World War II

The 25th Brigade was a brigade-sized infantry unit of the Australian Army that served during the Second World War. Raised in July 1940 and consisting of three infantry battalions, the 25th Brigade initially served in the United Kingdom, where it formed part of the garrison tasked with defending against a possible German invasion. In 1941, the brigade was redeployed to the Middle East where it took part in the Syria–Lebanon campaign fighting several actions around Merdjayoun and Jezzine.

<span class="mw-page-title-main">15th Brigade (Australia)</span> 1916-1945 Australian Army infantry brigade

The 15th Brigade was an infantry brigade of the Australian Army. Originally raised in 1912 as a Militia formation, the brigade was later re-raised in 1916 as part of the First Australian Imperial Force during World War I. The brigade took part in the fighting on the Western Front in France and Belgium during 1916–1918 before being disbanded in 1919. After this it was re-raised as a part-time unit of the Citizens Force in 1921 in Victoria. During World War II the brigade undertook defensive duties and training in Victoria and Queensland, before being deployed to New Guinea in 1943. Over the course of 1943 and 1944, it took part in the Salamaua–Lae, Markham–Ramu campaigns before returning to Australia in late 1944. In mid-1945, the brigade was committed to the Bougainville campaign, before being disbanded following the end of hostilities.

<span class="mw-page-title-main">57th/60th Battalion (Australia)</span> Infantry battalion of the Australian Army

The 57th/60th Battalion was an infantry battalion of the Australian Army which served during the Second World War. It was formed in 1930 as part of the Militia by the amalgamation of the 57th Battalion and the 60th Battalion.

<span class="mw-page-title-main">21st Brigade (Australia)</span> Infantry brigade of the Australian Army during World War II

The 21st Brigade was a brigade-sized infantry unit of the Australian Army. It was briefly raised in 1912 as a Militia formation providing training as part of the compulsory training scheme. Later, it was re-formed in April 1940 as part of the Second Australian Imperial Force, the unit was raised for service during World War II. As part of the 7th Division the brigade's constituent units were raised from volunteers from several Australian states. After rudimentary training in Australia, the brigade deployed for the Middle East in October 1940. Defensive duties were mounted along the Libyan border in early 1941, before the brigade was committed to the Syria-Lebanon campaign, fighting against Vichy French forces. In early 1942, following Japan's entry into the war, the brigade returned to Australia. After a period of defensive duties in Australia, it was deployed to New Guinea and subsequently played a key role in the Kokoda Track campaign, delaying the Japanese advance towards Port Moresby and then joining the pursuit as the Japanese withdrew towards Buna–Gona. In 1943–1944, the brigade took part in the capture of Lae and the Ramu Valley–Finisterre Range campaign. Its final campaign of the war, came in the final months when it took part in the Balikpapan landings. It was disbanded in 1946.

<span class="mw-page-title-main">58th/59th Battalion (Australia)</span> Australian Army infantry battalion

The 58th/59th Battalion was an infantry battalion of the Australian Army which served during the Second World War. Raised in 1942 as part of the Militia through the amalgamation of the 58th and 59th Battalions, it formed part of the 15th Brigade, assigned to the 3rd Division. Initially the battalion undertook defensive duties in Australia before being deployed to New Guinea where it took part in the fighting around Salamaua and Lae and then the Finisterre Range campaign. In 1945 they were sent to Bougainville where they took part in the fighting in the southern sector of the island. Following the end of the war, the battalion was disbanded in 1946.

<span class="mw-page-title-main">2/14th Battalion (Australia)</span> Military unit

The 2/14th Battalion was an infantry battalion of the Australian Army that served during World War II. Part of the 21st Brigade, 7th Division, the battalion was raised from Second Australian Imperial Force volunteers drawn mainly from the state of Victoria. After completing training in Australia in 1940, the battalion deployed to the Middle East where it was stationed in Egypt and Palestine before it saw action against the Vichy French in Syria in June and July 1941, in a short lived campaign. Garrison duties in Lebanon followed before the battalion was withdrawn to Australia in early 1942 as Australian forces were concentrated in the Pacific to respond to the threat posed by Japan's entry into the war.

<span class="mw-page-title-main">2/27th Battalion (Australia)</span> Military unit

The 2/27th Battalion was an infantry battalion of the Australian Army during World War II. Raised in May 1940 as part of the 7th Division from volunteers from the state of South Australia, the battalion was assigned to the 21st Brigade. After completing training in Australia, the 2/27th deployed to the Middle East in November 1940, and in early 1941 undertook defensive duties in the Western Desert. The battalion's first combat experience came against the Vichy French during the short Syria–Lebanon campaign during which it fought major engagements around Sidon and Damour. At the conclusion of the fighting in Syria, the battalion remained in the area as part of the Allied occupation force until early 1942 when it was returned to Australia to fight against the Japanese.

<span class="mw-page-title-main">Battle of Finschhafen</span> 1943 battle in the Huon Peninsula campaign of WWII

The Battle of Finschhafen was part of the Huon Peninsula campaign in New Guinea during World War II and was fought between Australian and Japanese forces. The fighting took place between 22 September and 24 October 1943 following the landing at Scarlet Beach, which was followed by a two-pronged advance on Finschhafen as the Australian 20th Infantry Brigade advanced on the town from the north, while the 22nd Infantry Battalion drove from the south, having advanced from the landing beaches east of Lae. After the capture of Finschhafen, the Japanese forces in the area withdrew towards Sattelberg where they sought to hold the Australians before launching a counteroffensive, which subsequently threatened the landing beach. This attack was repelled by Australian and American forces, with heavy casualties being inflicted on the Japanese. In the aftermath, the Australians went on the offensive, capturing Sattelberg, and then advancing towards the Wareo plateau.

<span class="mw-page-title-main">Battle of The Pimple</span>

The Battle of the Pimple was part of the Markham and Ramu Valley – Finisterre Range campaign, which consisted of a number of battles fought by Australian and Japanese troops in Papua New Guinea in World War II. Fought on 27 and 28 December 1943, the battle took place as the Australians advanced towards the Japanese strong hold around Shaggy Ridge, and was a preliminary phase in their eventual capture of that position in January 1944. Supported by artillery, mortars, machine guns and fighter-bomber aircraft, the assault was made across a narrow frontage, which was usually not much wider than a single section. Two companies of Australian infantry were committed to the attack, with one securing the initial crest, while the other exploited the position and secured several other smaller features throughout the two days of fighting. In the aftermath, Japanese artillery harassed the Australians holding the position, and subjected them to several counter-attacks, which were eventually defeated.

<span class="mw-page-title-main">Battle of John's Knoll–Trevor's Ridge</span>

The Battle of John's Knoll–Trevor's Ridge was fought from 12–13 October 1943 during World War II. The battle was part of the Markham and Ramu Valley – Finisterre Range campaign, which consisted of series of actions fought by Australian and Japanese troops in the Territory of New Guinea as the Australian 7th Division advanced through the foothills of the Finisterre Range from Dumpu towards Bogadjim, near Madang on the northern coast, following the capture of Lae in mid-September 1943.

<span class="mw-page-title-main">Battle of Madang</span> Part of New Guinea campaign of World War II

The Battle of Madang, fought between early February and late April 1944, was the break-out and pursuit phase of the Markham and Ramu Valley – Finisterre Range and Huon Peninsula campaigns, which were part of the wider New Guinea campaign of World War II. After overcoming the Japanese defences around Shaggy Ridge, the Australian forces descended the steep slopes of the Finisterre Range and pursued the withdrawing Japanese towards Bogadjim and then Madang on the north coast of New Guinea. There they linked up with US and Australian forces that had advanced along the coast from the Huon Peninsula, while the remnants of three Japanese divisions withdrew towards Wewak, where further fighting would take place throughout late 1944 and into 1945.

References