Zeebrugge Raid

Last updated

Zeebrugge Raid
Part of the First World War
Zeebrugge raid (en).png
Diagram of Zeebrugge harbour after the raid
Date23 April 1918
Location 51°21′27″N03°11′51″E / 51.35750°N 3.19750°E / 51.35750; 3.19750
Result German victory
Belligerents
Flag of the United Kingdom.svg  United Kingdom Flag of the German Empire.svg  Germany
Commanders and leaders
Naval Ensign of the United Kingdom.svg John Jellicoe
Naval Ensign of the United Kingdom.svg Roger Keyes
Naval Ensign of the United Kingdom.svg Reginald Bacon
War Ensign of Germany 1903-1918.svg Ludwig von Schröder
Strength
1,700 Royal Marines
1 destroyer
Casualties and losses
227 killed
356 wounded
1 destroyer sunk
8 killed
16 wounded

The Zeebrugge Raid (Dutch : Aanval op de haven van Zeebrugge; French : Raid sur Zeebruges) on 23 April 1918, was an attempt by the Royal Navy to block the Belgian port of Bruges-Zeebrugge. The British intended to sink obsolete ships in the canal entrance, to prevent German vessels from leaving port. The port was used by the Imperial German Navy as a base for U-boats and light shipping, which were a threat to Allied control of the English Channel and southern North Sea. Several attempts to close the Flanders ports by bombardment failed and Operation Hush, a 1917 plan to advance up the coast, proved abortive. As ship losses to U-boats increased, finding a way to close the ports became urgent and the Admiralty became more willing to consider a raid.

Contents

An attempt to raid Zeebrugge was made on 2 April 1918 but was cancelled at the last moment, after the wind direction changed and made it impossible to lay a smokescreen to cover the ships. Another attempt was made on 23 April, with a concurrent attack on Ostend. Two of three blockships were scuttled in the narrowest part of the Bruges–Ostend Canal and one of two submarines rammed the viaduct linking the shore and the mole, to trap the German garrison. The blockships were sunk in the wrong place and after a few days the Germans had opened the canal to submarines at high tide. Lessons were learned during the operation that would be put to use in the Second World War.

Background

Strategic developments

At the end of 1916 a combined operation against Borkum, Ostend and Zeebrugge had been considered by Admiral Sir Lewis Bayly, commander of the Coast of Ireland Station. The plan was rejected due to the difficulty of supplying a landing force and the vulnerability of such a force to a land counter-attack; subsequent proposals were rejected for the same reasons. A bombardment of the Zeebrugge lock gates under cover of a smoke screen was studied by Vice-Admiral Sir Reginald Bacon, commander of the Dover Patrol and the Admiralty in late 1915 but was also rejected as too risky. In 1916, Commodore Reginald Tyrwhitt proposed an attack to block Zeebrugge, which was rejected. Tyrwhitt suggested a more ambitious operation to capture the mole and the town as a prelude to advancing on Antwerp. Bacon was asked to give his opinion and rejected the plan, as did the Admiralty. [1]

Rear-Admiral Roger Keyes was appointed director of the Plans Division at the Admiralty in October 1917 and on 3 December submitted another plan for the blocking of Zeebrugge and Ostend using old cruisers in a night attack in the period from 14 to 19 March. Bacon also proposed an operation on 18 December, which combined Tyrwhitt's landing on the mole with a blocking operation. A monitor, HMS Sir John Moore, was to land 1,000 troops on the mole, the monitor HMS General Craufurd was to bombard the lock gates and fortifications from short range; the blockships were to enter the harbour in the confusion. The raid was proposed in 1917 by Admiral Sir John Jellicoe but was not authorised until Keyes adapted Bacon's plan for a blocking operation, to make it difficult for German ships and submarines to leave the port. The raid was approved in January 1918 and volunteer crews were obtained from the Grand Fleet "to perform a hazardous service". [2]

Tactical developments

Graphic depiction of the raid from Popular Science magazine, July 1918 Zeebrugge Raid graphic.JPG
Graphic depiction of the raid from Popular Science magazine, July 1918

The possibility of a landing on the Belgian coast was not abandoned, despite the number of rejected plans and early in 1917, Bacon assisted in the planning of Operation Hush, landings by the three brigades of the 1st Division around Middelkerke at the northern extremity of the Western Front. The operation was dependent on the advance of the British armies in the Third Battle of Ypres and had no influence on events at Zeebrugge and Ostend. If landings at the ports were successful, the forces involved would be doomed unless they were relieved by the advance of the armies in Flanders. [3] Bacon devised a plan to destroy the lock gates at Zeebrugge by bombardment with the 15-inch guns of the monitors HMS Erebus, HMS Terror and HMS Marshal Soult. [4]

The bombardment would have to be undertaken at long range, because of the danger of return fire from the Kaiser Wilhelm battery at Knokke and meant aiming at a target 90 by 30 sq ft (8.4 by 2.8 m2) in area at a range of 13  nmi (15  mi ; 24  km ), using directions from an artillery-observation aircraft. Bacon calculated that 252 shells would be necessary and that it would take at least 84 minutes to fire them. If the attempt began with surprise and the bombardment ships were obscured by a smoke screen, the German guns at Knokke might not have enough time accurately to return fire before the bombardment ended. Bacon thought that the destruction of the lock gates was worth the sacrifice of a monitor but that risking all three for no result was impossible to avoid. [4]

The plan needed a rare combination of wind, tide and weather; to obtain surprise the monitors would need to be in position before dawn. Mist and low cloud would make artillery observation from an aircraft impossible and the wind would have to be blowing from a narrow range of bearings or the smoke screen would be carried over the ships and out to sea, exposing them to view from the shore. Such conditions were unlikely to recur for several days, making a bombardment on the following day most unlikely. The bombardment force sailed for Zeebrugge three times but changes in the weather forced a return to England each time. [5] [lower-alpha 1] On 11 May, Bacon ordered another attempt for the next day; a buoy was laid 15 nmi (17 mi; 28 km) to the north-west of the mole as a guide and a second buoy was placed in the bombardment position. A bearing was taken from the buoy to the base of the mole at Zeebrugge by a ship sailing from the buoy to the mole, despite a mist which reduced visibility to a mile and the ship advancing perilously close to German shore batteries. The ship returned to the buoy by 4:45 a.m., with the bearing and distance. The bombardment ships had taken position, the Motor Launches had formed a line, ready to generate the smokescreen and the escorts formed a square around the monitors. Five destroyers zigzagged around the flotilla as a screen against U-boats, the minesweepers began operating around the monitors and the covering force cruised in the distance, ready to intercept a German destroyer sortie. [6]

Zeebrugge bombardment, 12 May 1917

The bombardment opened late because of the need to tow Marshal Soult, slowing the armada and also by a haze off the harbour. Two Royal Naval Air Service (RNAS) artillery-observation aircraft from Dunkirk, which had taken off at 2:00 a.m., had to wait from 3:00 a.m. over Zeebrugge for almost two hours. The aircraft were met by seven Sopwith Pups from 4 (Naval) Squadron RNAS, which patrolled the coast from 5:45 a.m. as six Sopwith Triplanes of 10 (Naval) Squadron RNAS flew over the fleet. One of the artillery-observation aircraft had engine trouble and force-landed in the Netherlands; the other ran short of petrol. Firing from the monitors was opened just after 5:00 a.m. and at first fell short; many of the shells failed to explode, which left the aircraft unable to signal the fall of shot. The accuracy of the bombardment improved soon after; Marshal Soult hit the target with its twelfth shell and Erebus with its twenty-sixth. Terror was most hampered by the loss of one of the aircraft and by dud shells; only forty-five of the 250 shells fired were reported and the observation aircraft had to return because of fuel shortage at 5:30 a.m., leaving the last half-hour of the bombardment reliant on estimated corrections of aim. [7] Two relieving aircraft also had engine trouble and failed to arrive. [8]

In the first hour of the bombardment, German retaliation was limited to anti-aircraft fire and attempts to jam the wireless of the artillery-observation aircraft. When the Pups from 4 (Naval) Squadron arrived, twice their number of German Albatros fighters engaged them and some of the aircraft from over the fleet, which joined in the dogfight. The British claimed five German aircraft shot down and the fleet was able to complete the bombardment. A third patrol later shot down a German seaplane into Ostend harbour and lost one fighter. [8] At 6:00 a.m. the ships weighed anchor, just as the Kaiser Wilhelm battery opened fire. Two seaplanes which attempted to approach the fleet were driven off by British fighter seaplanes, which escorted the fleet home. [8] Bacon returned with the impression that the bombardment had succeeded but aerial photographs taken the following week revealed that about fifteen shells had landed within a few yards of the lock gates on the western side and four shells had fallen just as close on the eastern side. The basin north of the locks had been hit and some damage caused to the docks but Zeebrugge remained open to German destroyers and U-boats. [9] The Admiralty concluded that had the monitors been ready to fire as soon as the observer in the artillery-observation aircraft signalled or if the shoot had been reported throughout, the lock gates would have been hit. Bacon made preparations to bombard Ostend harbour. [8]

Ostend bombardment, 5 June 1917

Bruges docks and the approaches from Ostend and Zeebrugge Bruges docks and the approaches from Ostend and Zeebrugge.jpg
Bruges docks and the approaches from Ostend and Zeebrugge

Attempts to bombard Ostend on 26 and 27 May were abandoned because of poor weather but on 4 June, the bombardment ships sailed for the Ratel Bank off Ostend; the bombardment force was smaller and the covering force larger than for the Zeebrugge operation, since surprise was less likely. [10] [lower-alpha 2] The Harwich Force provided four light cruisers, a flotilla leader and eight destroyers as a covering force off the Thornton Bank and a second wave of four light cruisers and eight destroyers to guard against an attack from the Schouwen Bank. The firing buoy and its bearing and range from the target were established using the Zeebrugge method and the escorting ships formed a square around the bombardment ships. [10]

Sint-Petrus-en-Pauluskerk, Ostend PPkerk(01).jpg
Sint-Petrus-en-Pauluskerk, Ostend

German destroyers were sighted east of the Ratel Bank at 1:42 a.m. by HMS Lance and Lochinvar which were steering towards Ostend to establish the range and bearing of the target from the sighting buoy. The German destroyers frustrated two attempts to enter the harbour, which left the fleet without sighting data and reliant on dead reckoning. At about 2:30 a.m., gunfire was heard from the direction of the covering force to the north and at about 3:00 a.m. the bombardment force Motor Launches began to lay a smokescreen. At dawn the coast became visible and Bacon corrected the position by taking a bearing on Sint-Petrus-en-Pauluskerk. The bombardment commenced at 3:20 a.m., German coastal guns replied within minutes and fired accurately at Erebus and Terror but with no effect. [12]

The British bombardment ceased at 4:00 a.m.; the fleet weighed anchor at 4:20 a.m. and withdrew northwards. The covering force guarded the ships from a point 5 nmi (5.8 mi; 9.3 km) distant, having engaged two German destroyers as they tried to reach Zeebrugge, sinking S20. [12] Ostend was a larger target than Zeebrugge and could be seen from the sea, which made accurate shooting easier. The dockyard was hit by twenty out of 115 shells and intelligence reports noted the sinking of a lighter, a UC-boat, damage to three destroyers and that the German command had been made anxious about the security of the coast. Had Bacon been able to repeat the shore bombardments at short intervals, naval operations from the Flanders coast by the Germans would have been much more difficult to organise. More bombardments were planned but these were all postponed because essential conditions of tide and weather were not met. After several months, the bombardments resumed but the Germans had been able to repair the damage. [13] As the long methodical bombardments of Ostend and Zeebrugge had proved impractical, Bacon attached a large monitor to the forces which patrolled coastal barrages, ready to exploit opportunities of favourable wind and weather to bombard Zeebrugge and Ostend, which occurred several times but had no effect on the working of the ports. [14]

Prelude

German defences

By 1917 the German defences on the Flanders coast included Kaiser Wilhelm II, a heavy artillery battery at Knokke, east of the Bruges Canal, of four 12 in (300 mm) guns, with a range of 41,000 yd (23 mi; 37 km) and the Tirpitz battery of four 11 in (280 mm) guns, with a range of 35,000 yd (20 mi; 32 km), 1.5 mi (2.4 km) west of Ostend. Two more batteries were being built in early 1917 and between the main defences were many mobile guns, entrenchments and machine-gun nests. The only vulnerable part of the German defensive system was the lock gates at Zeebrugge, the destruction of which would make the canal to Bruges tidal and drastically reduce the number of ships and submarines that could pass along it. [15]

British preparations

An appeal was made to the Grand Fleet for volunteers for special service on 23 February 1918. [lower-alpha 3] Very few of the participants were aware of the objective. [18] [19] [lower-alpha 4] The cruisers involved in the blockade, including HMS Vindictive, were equipped in Chatham by over 2,000 workers for the special fitting out or (in the case of the ships to be sunk) stripping out of unnecessary equipment, including their masts. Iris, Daffodil and the submarines were converted in Portsmouth. The fleet made its rendezvous at Swin Deep, about 8 nmi (9.2 mi; 15 km) south of Clacton. The first opportunity for the raid was early April 1918 and on 2 April the fleet sailed and Zeebrugge was bombed by 65 Squadron from Dunkirk. The success of the raid depended upon smokescreens to protect the British ships from the fire of German coastal artillery but the wind direction was unfavourable and the attack was called off. Zeebrugge was visible to the fleet and the fleet to the Germans in Zeebrugge; seventy-seven ships of all sizes, some with their lights already switched off, had to make a sharp turn to the west to return to their bases. [21]

Raid

The blocking of Zeebrugge (true order is Intrepid, Iphigenia and Thetis south to north) The blocking of Zeebrugge.jpg
The blocking of Zeebrugge (true order is Intrepid, Iphigenia and Thetis south to north)

A second attempt was made on 23 April, in conjunction with a raid on the neighbouring harbour of Ostend. The raid began with a diversion against the mile-long Zeebrugge mole, led by the old cruiser, Vindictive, with two Mersey ferries, Daffodil and Iris II. The three ships were accompanied by two old submarines, which were filled with explosives to blow up the viaduct connecting the mole to the shore. Vindictive was to land a force of 200 sailors and a battalion of Royal Marines, at the entrance to the Bruges–Ostend Canal, to destroy German gun positions. During the landing the wind changed and the smokescreen to cover the ship was blown offshore. The marines immediately came under massed fire and suffered many casualties. Vindictive was spotted by German gunners and forced to land in the wrong place, resulting in the loss of the marines' heavy gun support. Eventually the submarine HMS C3 commanded by Lieutenant Richard Sandford, destroyed the viaduct when its demolition charge exploded. [23]

The attempt to sink three old cruisers to block the flow of traffic in and out of the Port of Bruges-Zeebrugge failed. The failure of the attack on the Zeebrugge mole resulted in the Germans concentrating their fire on the three blocking ships, HMS Thetis, Intrepid and Iphigenia, which were filled with concrete. Thetis, which had been ordered to ram the lock gates at the end of the channel, was severely damaged by German fire and collided with a submerged wire net, which disabled both of its engines. Starting to sink before reaching the main channel, the crew of Thetis coaxed enough power from the engines to bring it over a dredged part of the outer channel and scuttled the ship. [24] The two other ships were sunk at the narrowest point of the canal. [25] The submarines C1 (Lieutenant A. C. Newbold) and C3 were old, manned by volunteer crews of one other officer and four ratings. They had five tons of amatol packed into their fore-ends and were to be driven into the viaduct and then blown up, to prevent reinforcement of the German garrison on the mole. [26] The crews were to abandon their submarines shortly before the collision with the viaduct, leaving the submarines to steer themselves automatically. During the passage from Dover, C1 parted with its tow and arrived too late to take part in the operation. [27] [lower-alpha 5] Sandford elected to steer C3 into the viaduct manually instead of depending on the automatic system. [29]

Aftermath

Analysis

Zeebrugge

Channel obstructed after the raid; (Left to right) HMS Intrepid, HMS Iphigenia and HMS Thetis. The obstructions are not enough to prevent U-boats from sailing out at high tide. Aerial photograph after Zeebrugge Raid IWM Q 20648B.jpg
Channel obstructed after the raid; (Left to right) HMS Intrepid, HMS Iphigenia and HMS Thetis. The obstructions are not enough to prevent U-boats from sailing out at high tide.

In 1931, the official historian, Sir Henry Newbolt, wrote that before the raid, two submarines entered or left the Flanders bases each day and continued at that rate during the week after the raid. The block ships were sunk in the wrong position and the canal was only obstructed for a few days. The Germans removed two piers in the western bank of the canal near the block ships and dredged a channel through the silt near their sterns. At high tide, U-boats could move along the new channel past the block ships. [30]

The average number of passages was maintained until June, when the rate fell to about one submarine per day, to an extent due to a bombardment of Zeebrugge on 9 June. After the damage was repaired, the rate of U-boat traffic did not return to the pre-raid level. [31] Newbolt considered that the reduced traffic was caused by the recall of some U-boats to Germany in June, after reports that operations in the Dover Straits had become too dangerous. The usual remedy, of increasing the number of destroyer raids, was not possible because of the difficulty in using Zeebrugge as a harbour. [31]

Newbolt wrote that the raid on Zeebrugge was part of an anti-submarine campaign which had lasted for five months, using patrols and minefields to close the Straits and which continued despite the most destructive sortie achieved by the Germans during the war. The British anti-submarine measures inflicted a steady attrition of the Flanders U-boats and the attack on Zeebrugge came when the German blockade of Britain was supposed to have reduced drastically the resources and endurance of the British Empire. [32] News of the raid was skilfully exploited to raise Allied morale and to foreshadow victory Possunt quia posse videntur ("They can because they think they can"). [32] Bacon wrote in 1931 that he was a seagoing commander with intimate knowledge of the tidal and navigational conditions in the Ostend and Zeebrugge areas; operational failures were due in part to the appointment of Keyes (an Admiralty man) and his changes to plans Bacon had laid. [33]

Ostend

Ostend had been attacked at the same time as the attempt on Zeebrugge but this effort was a failure. Believing the Zeebrugge raid to have been effective, the British undertook the Second Ostend Raid on 9 May, in which Vindictive and another cruiser HMS Sappho were sunk as a blockships. The plan took guidance from the experience gained at Zeebrugge. [34]

Casualties

Of the 1,700 men involved in the operation, S. F. Wise recorded in 1981 that 300 were wounded and more than 200 killed. [35] Kendall gave figures of 227 dead and 356 wounded. [36] The destroyer HMS North Star was sunk. [37] Among the dead was Wing Commander Frank Brock, the man who devised and commanded the smoke screen. [38] [lower-alpha 6] [lower-alpha 7] [lower-alpha 8] Most of the casualties were buried in England either because they died of their wounds en route or because the survivors recovered their bodies. The Zeebrugge plot of St James's Cemetery, Dover has nine unidentified men and fifty named men who died on 23 April 1918 but most fatalities were returned to their families for local burial. [41] [42] [lower-alpha 9] The Germans suffered casualties of eight dead and sixteen wounded. [43]

Victoria Cross

The Zeebrugge Raid was promoted by Allied propaganda as a British victory and eight Victoria Crosses were awarded. The 4th Battalion Royal Marines was awarded the Victoria Cross for the action. Under Rule 13 of the Victoria Cross warrant, a ballot was stipulated to select the recipients. Victoria Cross rules specify that four Victoria Crosses should be awarded this way (one to an officer, one to an NCO and two to other ranks) but they were not observed and only two Victoria Crosses were awarded. This was the last time that Victoria Crosses were awarded by ballot, although the rule remained within the Victoria Cross warrant. In a mark of respect to those involved in the raid, the Royal Marines have never raised another 4th Battalion. [44]

A ballot was similarly held for the crews of the assault vessels for the Zeebrugge Mole (Vindictive, Royal Daffodil and Iris II) and the raiding parties. Victoria Crosses were awarded to Able Seaman Albert Edward McKenzie (Vindictive) and Captain Alfred Carpenter (commander of Vindictive). Lieutenant-Commander Arthur Harrison and Lieutenant-Commander George Bradford who led raiding parties from Vindictive and Iris II received posthumous VCs. Sergeant Norman Finch, Royal Marine Artillery, was selected by the 4th Battalion. Richard Sandford, commander of the submarine C.3 and Captain Edward Bamford who led the 4th Battalion were also awarded. [44]

Gallery

Order of battle

Royal Navy order of battle for the Zeebrugge and Ostend Raids: 22 April 1918 [46]

See also

Notes

  1. Three 15-inch monitors, a 12-inch monitor, "M" monitors 24 and 26, two destroyer flotilla leaders, Botha and Faulknor, eight destroyers from the 6th Flotilla, Lochinvar, Landrail, Lydiard, Mentor, Moorsom, Morris, Mermaid and Racehorse, six paddle minesweepers and 19, motor-launches. Tyrwhitt, with two cruisers and twelve destroyers of the Harwich Force, covered the operation. [5]
  2. Erebus and Terror, two flotilla leaders, six destroyers, two P-boats and twelve Motor Launches. [11]
  3. Leading Stoker Norbert McCrory recalled that "On 23rd Feb 1918.... We... received a wireless [communication] asking for volunteers to the numbers of eleven men, for special service. On receiving the message, Seamen and Stokers were asked to volunteer. Soon it was seen all who wished to go could not be accepted, much to their disappointment. Only eleven were chosen". [16] Lieutenant Commander Ronald Boddie recalled, "It was the 1st March when I joined the Hindustan [at Chatham] with 40 other officers, 200 seamen and 250 stokers, all from the Grand Fleet. The Hindustan was an elderly battleship and was to be our home until the expedition was ready to sail". [17]
  4. Able Seaman William O'Hara recalled the moment when he reported at Chatham Barracks, "There was great speculations as to what we were there for but no one could satisfy our curiosity. We were eventually detailed off into four sections, men belonging to ships of the same squadron being detailed to the same section". [20]
  5. Submarine C3: Lieutenant Richard Sandford, R.N. wounded, Lieutenant J. Howell Price, D.S.C., R.N.R., Coxswain, Petty-Officer W. Harner, O.N. 228795 wounded, E.R.A. A. G. Roxburgh, O.N. 272242, Leading Seaman W.G. Mayer, On.N. 22196, Stoker 1., H. C. Bindall, O.N. K5343 wounded. Submarine C1: Lieutenant A.C. Newbold, R.N., Lieutenant S.A. Bayford, D.S.C., R.N.R., Petty-Officer H. G. Jones, L.T.O., O.N. 17 994, Petty Officer G. T. Newman, O.N. 213236 Coxswain, E.R.A. W. H. R. Coward, O.N. 1495, Stoker Petty-Officer F. J. Smith, O.N. 299134. [28]
  6. A. M. Low said "...the preparation of bombs, which although successful, only just operated in time for Commander Brock to see them in the last hours of his life at Zeebrugge". [38]
  7. Archibald Low, The First Guided Missile "....rocket experiments were conducted under my own patents with the help of Cdr. Brock, a truly great man who lost his life at Zeebrugge. For that Mole attack I had prepared a radio-fired bomb device by which any one of a number of floating buoys could be selected and exploded by radio." [39]
  8. IWM - Royal Flying Corps Feltham Transmitter for the selective firing of floating mines for use in the Zeebrugge raid. [40]
  9. Kendall lists the names of the fatalities and the locations of their graves, which are predominantly in the United Kingdom. [42]

Footnotes

  1. Newbolt 2009, pp. 241–242.
  2. Newbolt 2009, pp. 241–243.
  3. Newbolt 2009, p. 36.
  4. 1 2 Newbolt 2009, pp. 37–38.
  5. 1 2 Newbolt 2009, p. 38.
  6. Newbolt 2009, pp. 39–40.
  7. Newbolt 2009, p. 40.
  8. 1 2 3 4 Jones 2002, p. 84.
  9. Newbolt 2009, p. 41.
  10. 1 2 Newbolt 2009, p. 46.
  11. Newbolt 2009, p. 45.
  12. 1 2 Newbolt 2009, pp. 46–47.
  13. Newbolt 2009, pp. 47–48.
  14. Newbolt 2009, pp. 118–119.
  15. Newbolt 2009, pp. 36–37.
  16. Kendall 2016, p. 11.
  17. Kendall 2016, p. 29.
  18. Newbolt 2009, pp. 244–249.
  19. Kendall 2016, pp. 11, 29, 31.
  20. Kendall 2016, p. 30.
  21. Newbolt 2009, pp. 251–252.
  22. Coleman 2014, p. 180.
  23. Newbolt 2009, pp. 252–261.
  24. Warner 2008, Part One, c. 3, para. 2.
  25. Newbolt 2009, pp. 261–262.
  26. Newbolt 2009, p. 245.
  27. Newbolt 2009, p. 260.
  28. The Times 1919, p. 342.
  29. Coleman 2014, pp. 151–152.
  30. Newbolt 2009, p. 265.
  31. 1 2 Newbolt 2009, p. 276.
  32. 1 2 Newbolt 2009, pp. 276–277.
  33. Bacon 1932, pp. 161–166, 223–227.
  34. Coleman 2014, pp. 130–136, 209–225.
  35. Wise 1981, p. 205.
  36. Kendall 2009, p. 11.
  37. Coleman 2014, p. 239.
  38. 1 2 Bloom 1958, p. 82.
  39. Low 1952, p. 436.
  40. "Transmitter, for remote radio control mines". Archived from the original on 19 July 2021. Retrieved 19 July 2021.
  41. CWGC 2010.
  42. 1 2 Kendall 2009, pp. 308–310.
  43. Karau 2003, p. 210.
  44. 1 2 Coleman 2014, pp. 230–233.
  45. Kendall 2009, p. 256.
  46. Keyes 2013.

Related Research Articles

HMS <i>Zubian</i> 1917 destroyer from Britain

HMS Zubian was a First World War Royal Navy Tribal-class destroyer constructed from the forward end of HMS Zulu and the rear and mid sections of HMS Nubian. These two destroyers had been badly damaged in late 1916, and rather than scrapping both hulls at the height of World War I, the Admiralty ordered that they be rebuilt as the composite Zubian and put back into service. She was commissioned into the fleet in June 1917. The name Zubian is a portmanteau of the names of the original ships.

<span class="mw-page-title-main">First Ostend Raid</span> 1918 British military attack on German-held port in Belgium

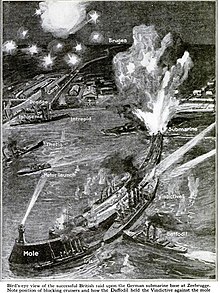
The First Ostend Raid was the first of two attacks by the Royal Navy on the German-held port of Ostend during the late spring of 1918 during the First World War. Ostend was attacked in conjunction with the neighbouring harbour of Zeebrugge on 23 April in order to block the vital strategic port of Bruges, situated 6 mi inland and ideally sited to conduct raiding operations on the British coastline and shipping lanes. Bruges and its satellite ports were a vital part of the German plans in their war on Allied commerce (Handelskrieg) because Bruges was close to the troopship lanes across the English Channel and allowed much quicker access to the Western Approaches for the U-boat fleet than their bases in Germany.

<span class="mw-page-title-main">Second Ostend Raid</span> 1918 Royal Navy operation to block Ostend Harbour

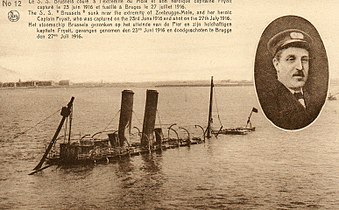
The Second Ostend Raid was the later of two failed attempts made during the spring of 1918 by the United Kingdom's Royal Navy to block the channels leading to the Belgian port of Ostend as a part of its conflict with the German Empire during World War I. Due to the significant strategic advantages conferred by the Belgian ports, the Imperial German Navy had used Ostend as a base for the U-boat campaign during the Battle of the Atlantic since 1915.

HMS <i>Warwick</i> (D25) Destroyer of the Royal Navy

HMS Warwick (D25) was an Admiralty W-class destroyer built in 1917. She saw service in both the First and Second World Wars, before being torpedoed and sunk in February 1944.

HMS Faulknor was a British destroyer of the First World War. She was purchased by the Royal Navy whilst still under construction in Britain for the Chilean Navy who had ordered her in 1912 as part of the Almirante Lynch class. She was renamed after the Faulknor family of British nineteenth century naval officers.

HMS <i>Vindictive</i> (1897) Arrogant-class cruiser

HMS Vindictive was a British Arrogant-class cruiser built at Chatham Dockyard. She was launched on 9 December 1897 and completed in 1899. The vessel participated in the Zeebrugge Raid.

<i>Arrogant</i>-class cruiser Ship class

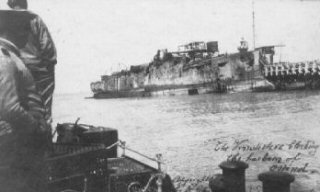
The Arrogant-class cruiser was a class of four protected cruisers built for the British Royal Navy at the end of the 1890s. One ship, HMS Gladiator, was lost following a collision with a merchant ship in 1908, while HMS Vindictive saw active service in the First World War, taking part in the Zeebrugge Raid in April 1918 before being sunk as a blockship during the Second Ostend Raid in May 1918.

HMS Starfish was an R-class destroyer which served with the Royal Navy. She was launched on 27 September 1916 and sold to be broken up on 21 April 1928. She was built by Hawthorn Leslie of Hebburn Tyne.

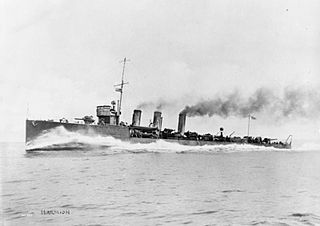
HMS Murray was a Royal Navy Admiralty M-class destroyer. Ordered before the outbreak of war, she was therefore the first of her class to enter operation during the early months of the First World War. She was also the first vessel of the Royal Navy to carry the name HMS Murray.

HMS Lightfoot was a Marksman-class flotilla leader of the British Royal Navy. Construction by J. Samuel White began in June 1914, shortly before the outbreak of the First World War, and the ship was launched and completed in 1915. She survived the war and was sold for scrap in 1921.

HMS <i>Retriever</i> (1917) British R-class destroyer

HMS Retriever was a Thornycroft-built R-class destroyer which served with the Royal Navy during the First World War. Launched in 1917, the vessel formed part of the Harwich Force and took part in operations off the coast of Ostend in support of the bombardment of the town in June that year. During August the following year, the vessel attempted to deploy a seaplane from a towed lighter, but a lack of wind meant the operation was unsuccessful. The vessel was also jointly credited with the destruction of the submarine SM UB-54 that year, although this has been disputed. After the war, the ship was placed in reserve and was sold to be broken up in 1927.

HMS <i>Manly</i> (1914) Destroyer of the Royal Navy

HMS Manly was a Yarrow M-class destroyer of the British Royal Navy. Built by the Scottish shipbuilder Yarrow between 1913 and 1914, Manly served during the First World War. She formed part of the Harwich Force in the early years of the war, and then later in the English Channel as part of the Dover Patrol taking part in the Zeebrugge Raid in 1918. She survived the war, and was sold for scrap in 1920.

HMS Mentor was a Hawthorn Leslie M-class destroyer of the British Royal Navy. Built by the Tyneside shipbuilder Hawthorn Leslie between 1913 and 1915, Mentor served during the First World War. She formed part of the Harwich Force in the early years of the war, taking part in the Battle of Dogger Bank and then later in the English Channel as part of the Dover Patrol. She survived the war, and was sold for scrap in 1921.

HMS <i>Matchless</i> (1914) Destroyer of the Royal Navy

HMS Matchless was a Royal Navy Admiralty M-class destroyer. Matchless was built by Swan Hunter from 1913 to 1914 and was completed in December that year. She served through the remainder of the First World War, operating in the North Sea as part of the Harwich Force in the early part of the war and later in the English Channel as part of the Dover Patrol, where she took part in both the First and Second Ostend Raids. Despite being badly damaged by a German mine in 1915 and being involved in several collisions, she survived the war, and was sold for scrap in 1921.

HMS Milne was a Royal Navy Admiralty M-class destroyer. Milne was built by John Brown & Company from 1913 to 1914 and was completed in December that year. She served through the remainder of the First World War, at first with the Harwich Force with which she took part in the Battle of Dogger Bank in January 1915, and later with the Dover Patrol, sinking the German submarine UC-26 in May 1917. Milne was sold for scrap in 1921.

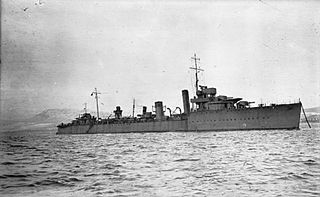
HMS Melpomene was a Medea-class destroyer of the British Royal Navy. She was one of four destroyers, of similar design to the British M-class ordered by Greece in June 1914, which the British purchased during construction owing to the outbreak of the First World War.

HMS <i>Moorsom</i> (1914) British M-Class destroyer, WW1

HMS Moorsom was an Admiralty M-class destroyer which served in the Royal Navy during the First World War. The M class was an improvement on the preceding L class, capable of higher speed. Moorsom, the first ship to enter navy service to be named after Admiral Sir Robert Moorsom, was launched in December 1914, initially serving as part of the Grand Fleet before being transferred to the Harwich Force the following year. Briefly rejoining the Grand Fleet, the destroyer saw service in the Battle of Jutland in 1916 supporting the British battlecruisers and received hits from a battleship of the German High Seas Fleet. Moorsom also undertook other duties, including escorting the troop ship Mauretania in June 1915 and the minelayer Princess Margaret in August 1915 and November 1916. Placed within the Dover Patrol, the destroyer formed part of the cover for monitors including Erebus and Terror on attacks on Ostend and Zeebrugge in May and June 1917, and April and May 1918. After the Armistice, the destroyer was placed in reserve and subsequently sold to be broken up in November 1921.

HMS <i>Morris</i> British M-Class destroyer

HMS Morris was an Admiralty M-class destroyer which served with the Royal Navy during the First World War. The M class were an improvement on the preceding L class, capable of higher speed. The ship, the only vessel to be named Morris to serve with the Royal Navy, was launched on 19 November 1914. Joining the Grand Fleet as part of a new flotilla, the destroyer was soon in action, serving as part of a destroyer screen during the Battle of Dogger Bank in January 1915 and an escort to the minelayer Princess Margaret during a skirmish with German torpedo boats eight months later. At the Battle of Jutland in 1916, the destroyer was a crucial part of the flotilla that drove the German torpedo boats away from the British battlecruisers. Morris received no hits during these confrontations. The destroyer assisted in the rescue of survivors from the R-class destroyer Simoom and the recovery of the damaged flotilla leader Botha in 1917. The ship also undertook general duties including escorting merchant ships, minelayers, monitors, and the seaplane carrier Vindex. After the armistice that ended the war, the destroyer was considered superfluous to requirements, Initially placed in reserve, Morris was decommissioned and, on 8 November 1921, sold to be broken up.

HMS <i>Nugent</i>

HMS Nugent was an Admiralty M-class destroyer which served in the Royal Navy during the First World War. The vessel had a largely uneventful career. Nugent was one of 85 M class, an improvement on those of the preceding L class, capable of higher speed. The destroyer was launched in 1917 and joined the Sixth Destroyer Flotilla of the Dover Patrol, operating in the Strait of Dover. The vessel was involved in attacks by German destroyers on Dover and the Dover Barrage in 1917 and 1918, but did not have contact with the enemy vessels, inflicted no damage and received no hits. The ship then provided part of the escort to the blockship Vindictive in the Second Ostend Raid but again saw no action. After the Armistice, Nugent was placed in reserve before being sold to be broken up in 1921.

HMS <i>Mansfield</i> (1914) British M-Class destroyer

HMS Mansfield was a Hawthorn Leslie M-class destroyer that served in the Royal Navy during the First World War. The M class was an improvement on those of the preceding L class, capable of higher speed. Built by the Tyneside shipbuilder Hawthorn Leslie, the destroyer was launched in 1915 and joined the Harwich Force as an anti-submarine escort for merchant ships in the Southwest Approaches and English Channel. In between that service, in 1916, Mansfield accompanied the seaplane carrier Vindex on a seaplane raid on German Zeppelin sheds during which the destroyer assisted in the sinking of two German patrol boats. In 1918, the vessel supported attacks by British monitors and submarines against Zeebrugge and escorted Vindictive to Ostend where the retired protected cruiser was sunk as a blockship. After the Armistice, Mansfield was placed in reserve before being sold to be broken up in 1921.

References

Books

Magazines

Websites

Further reading