Computer vision tasks include methods for acquiring, processing, analyzing and understanding digital images, and extraction of high-dimensional data from the real world in order to produce numerical or symbolic information, e.g. in the forms of decisions. Understanding in this context means the transformation of visual images into descriptions of the world that make sense to thought processes and can elicit appropriate action. This image understanding can be seen as the disentangling of symbolic information from image data using models constructed with the aid of geometry, physics, statistics, and learning theory.

Machine vision is the technology and methods used to provide imaging-based automatic inspection and analysis for such applications as automatic inspection, process control, and robot guidance, usually in industry. Machine vision refers to many technologies, software and hardware products, integrated systems, actions, methods and expertise. Machine vision as a systems engineering discipline can be considered distinct from computer vision, a form of computer science. It attempts to integrate existing technologies in new ways and apply them to solve real world problems. The term is the prevalent one for these functions in industrial automation environments but is also used for these functions in other environment vehicle guidance.

Automatix Inc., founded in January 1980, was the first company to market industrial robots with built-in machine vision. Its founders were Victor Scheinman, inventor of the Stanford arm; Phillippe Villers, Michael Cronin, and Arnold Reinhold of Computervision; Jake Dias and Dan Nigro of Data General; Gordon VanderBrug, of NBS, Donald L. Pieper of General Electric and Norman Wittels of Clark University.
Cognex Corporation is an American manufacturer of machine vision systems, software and sensors used in automated manufacturing to inspect and identify parts, detect defects, verify product assembly, and guide assembly robots. Cognex is headquartered in Natick, Massachusetts, USA and has offices in more than 20 countries.

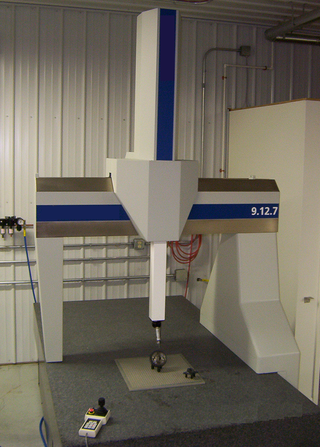
A coordinate-measuring machine (CMM) is a device that measures the geometry of physical objects by sensing discrete points on the surface of the object with a probe. Various types of probes are used in CMMs, the most common being mechanical and laser sensors, though optical and white light sensors do exist. Depending on the machine, the probe position may be manually controlled by an operator, or it may be computer controlled. CMMs typically specify a probe's position in terms of its displacement from a reference position in a three-dimensional Cartesian coordinate system. In addition to moving the probe along the X, Y, and Z axes, many machines also allow the probe angle to be controlled to allow measurement of surfaces that would otherwise be unreachable.

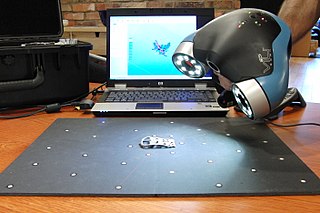
3D scanning is the process of analyzing a real-world object or environment to collect three dimensional data of its shape and possibly its appearance. The collected data can then be used to construct digital 3D models.
KLA Corporation is an American capital equipment company based in Milpitas, California. It supplies process control and yield management systems for the semiconductor industry and other related nanoelectronics industries. The company's products and services are intended for all phases of wafer, reticle, integrated circuit (IC) and packaging production, from research and development to final volume manufacturing.
The following are common definitions related to the machine vision field.

InspecVision Ltd., established in 2003, is a UK engineering company based in Mallusk, Northern Ireland. It is a manufacturing company that produces computer vision inspection systems. The company is one of several local companies created as spinoffs or inspired by research conducted at the Queen's University of Belfast.

Automated optical inspection (AOI) is an automated visual inspection of printed circuit board (PCB) manufacture where a camera autonomously scans the device under test for both catastrophic failure and quality defects. It is commonly used in the manufacturing process because it is a non-contact test method. It is implemented at many stages through the manufacturing process including bare board inspection, solder paste inspection (SPI), pre-reflow and post-re-flow as well as other stages.
Dimensional metrology, also known as industrial metrology, is the application of metrology for quantifying the physical size, form (shape), characteristics, and relational distance from any given feature.
Orbotech Ltd. a subsidiary of KLA Corporation and a technology company used in the manufacturing of consumer and industrial products throughout the electronics and adjacent industries. The company providing electronics reading, writing, and connecting solutions used by manufacturers of printed circuit boards, flat panel displays, advanced packaging, micro-electro-mechanical systems and other electronic components. The company is headquartered in Yavne, Israel and operates in North America, Europe, Japan and Asia-Pacific.
A structured-light 3D scanner is a device that measures the three-dimensional shape of an object by projecting light patterns—such as grids or stripes—onto it and capturing their deformation with cameras. This technique allows for precise surface reconstruction by analyzing the displacement of the projected patterns, which are processed into detailed 3D models using specialized algorithms.
Computer-aided inspection (CAI) is the use of software tools to assess manufactured objects. It is closely related to computer-aided design (CAD) and computer-aided manufacturing (CAM). Its primary purpose is to allow engineers to more quickly and precisely assess the physical properties of manufactured objects. These properties can include dimensions, material consistency, roughness and roundness.

Industrial computed tomography (CT) scanning is any computer-aided tomographic process, usually X-ray computed tomography, that uses irradiation to produce three-dimensional internal and external representations of a scanned object. Industrial CT scanning has been used in many areas of industry for internal inspection of components. Some of the key uses for industrial CT scanning have been flaw detection, failure analysis, metrology, assembly analysis and reverse engineering applications. Just as in medical imaging, industrial imaging includes both nontomographic radiography and computed tomographic radiography.
Novacam Technologies Inc. specializes in designing and manufacturing advanced metrology and imaging systems for industrial and bio-medical applications. Novacam's fiber-based optical profilometers and Optical Coherence Tomography (OCT) systems are based on low coherence interferometry. The fiber-based nature of Novacam's detector probes is unique in the optical metrology industry.

Mountains is an image analysis and surface metrology software platform published by the company Digital Surf. Its core is micro-topography, the science of studying surface texture and form in 3D at the microscopic scale. The software is dedicated to profilometers, 3D light microscopes ("MountainsMap"), scanning electron microscopes ("MountainsSEM") and scanning probe microscopes ("MountainsSPIP").
Digital Surf is a French software company formed in 1989 mainly known for its Mountains software, that is offered as embedded or optional OEM surface analysis software by the majority of profilometer and microscope manufacturers.
Geomagic is the professional engineering software brand of 3D Systems. The brand began when Geomagic Inc., a software company based in Morrisville, North Carolina, was acquired by 3D Systems in February 2013 and combined with that company's other software businesses. Geomagic was founded in 1997 by Ping Fu and Herbert Edelsbrunner.

Air-Cobot (Aircraft Inspection enhanced by smaRt & Collaborative rOBOT) is a French research and development project of a wheeled collaborative mobile robot able to inspect aircraft during maintenance operations. This multi-partner project involves research laboratories and industry. Research around this prototype was developed in three domains: autonomous navigation, human-robot collaboration and nondestructive testing.


