
The Second Boer War, also known as the Boer War, the Anglo-Boer War, or the South African War, was fought between the British Empire and two independent Boer states, the South African Republic and the Orange Free State, over the Empire's influence in South Africa. The trigger of the war was the discovery of diamonds and gold in the Boer states. Initial Boer attacks were successful, and although British reinforcements later reversed these, the war continued for years with Boer guerrilla warfare, until harsh British counter-measures including a scorched earth policy brought the Boers to terms.

James Rogers, VC was an Australian recipient of the Victoria Cross, the highest award for gallantry in the face of the enemy that can be awarded to British and Commonwealth forces. Rogers received his award for his actions at Thaba 'Nchu in Orange Free State on 15 June 1901 while serving in the South African Constabulary during the Second Boer War.
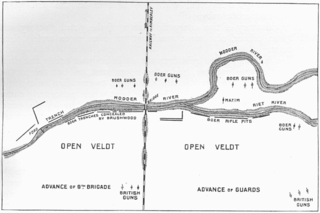
The Battle of Modder River was an engagement in the Boer War, fought at Modder River, on 28 November 1899. A British column under Lord Methuen, that was attempting to relieve the besieged town of Kimberley, forced Boers under General Piet Cronjé to retreat to Magersfontein, but suffered heavy casualties altogether.

The Battle of Stormberg was the first British defeat of Black Week, in which three successive British forces were defeated by Boer irregulars in the Second Boer War.
Sanna's Post was an engagement fought during the Second Boer War (1899-1902) between the British Empire and the Boers of the two independent republics of the Orange Free State and the South African Republic.
The Cape Mounted Riflemen were South African military units.

The Battle of Diamond Hill (Donkerhoek) was an engagement of the Second Boer War that took place on 11 and 12 June 1900 in central Transvaal.

Until Australia became a Federation in 1901, each of the six colonies were responsible for their own defence. From 1788 until 1870 this was done with British regular forces. In all, 24 British infantry regiments served in the Australian colonies. Each of the Australian colonies gained responsible government between 1855 and 1890, and while the Colonial Office in London retained control of some affairs, and the colonies were still firmly within the British Empire, the Governors of the Australian colonies were required to raise their own colonial militia. To do this, the colonial Governors had the authority from the British crown to raise military and naval forces. Initially these were militias in support of British regulars, but British military support for the colonies ended in 1870, and the colonies assumed their own defence. The separate colonies maintained control over their respective militia forces and navies until 1 March 1901, when the colonial forces were all amalgamated into the Commonwealth Forces following the creation of the Commonwealth of Australia. Colonial forces, including home raised units, saw action in many of the conflicts of the British Empire during the 19th century. Members from British regiments stationed in Australia saw action in India, Afghanistan, the New Zealand Wars, the Sudan conflict, and the Boer War in South Africa.
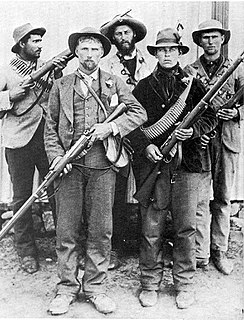
The Boer commandos or "Kommandos" were volunteer military units of guerilla militia organized by the Boer people of South Africa. The term came into English usage during the Second Boer War of 1899-1902.
Major General Sir John Charles Hoad was an Australian military leader, best known as the Australian Army's second Chief of the General Staff.
The Victorian Mounted Rifles (VMR) was a regiment composed of Australian forces that served in the Second Boer War. It was first raised by Colonel Tom Price in the mid-1880s, composed of voluntary forces. It was composed of several contingents, the most notable being the 5th Victorian Mounted Rifles.

The military history of Australia during the Boer War is complex, and includes a period of history in which the six formerly autonomous British Australian colonies federated to become the Commonwealth of Australia. At the outbreak of the Second Boer War, each of these separate colonies maintained their own, independent military forces, but by the cessation of hostilities, these six armies had come under a centralised command to form the Australian Army.

The New South Wales Imperial Bushmen was a mounted regiment, consisting of six rifle squadrons, raised in the New South Wales colony for service during the Second Boer War.
The New South Wales Mounted Rifles was a mounted infantry regiment of the Colony of New South Wales.
The Queensland Imperial Bushmen was an Australian mounted Imperial Bushmen regiment raised in the Queensland colony for service during the Second Boer War.
The New South Wales Citizens Bushmen was a mounted infantry regiment of the Colony of New South Wales which was raised in 1900 and served in the Second Boer War.
The 1st Australian Horse was a mounted infantry regiment of the Colony of New South Wales that was formed in 1897. The 1st Australian Horse wore distinctive myrtle green uniforms with black embroidery.
The Queensland Citizen Bushmen, also known as the 3rd Queensland Mounted Infantry, was a mounted infantry regiment raised in Queensland for service during the Second Boer War. Formed as part of the third Queensland contingent with an original strength of 316 men, it departed for South Africa on 2 March 1900 aboard the Duke of Portland. Under the command of Major Walter Tunbridge, it initially served in Rhodesia, and later in west Transvaal, where it took part in the Relief of Mafeking, and actions at Koster River and Elands River. It then served in northern Transvaal, including actions at Rhenoster Kop and Wolwekuil, and the advance on Pietersburg. Fatal casualties included three men killed or died of wounds, and five dead from disease. The unit returned to Australia in June 1901 on the Morayshire.
The South Australian Mounted Rifles (SAMR) was a mounted infantry unit of the Colony of South Australia that served in the Second Boer War. The first contingent of South Australian Mounted Rifles was raised in 1899, followed by a second contingent in 1900.
The South Australian Bushmen was a mounted infantry squadron of the Colony of South Australia that served in the Second Boer War, the third contingent contributed by the colony.