South Australian Mounted Rifles

Last updated

South Australian Mounted Rifles
AWM P00220 South Australian Mounted Rifles 1900.jpg
2nd South Australian Mounted Rifles training in Adelaide, prior to deployment to South Africa, early 1900. Trooper Harry Morant is third from left.
Active1899–1901
CountryFlag of South Australia.svg  South Australia
Allegiance British Empire
Type Mounted infantry
Size
Initial:
  • 6 officers and 121 men (1st SAMR)
  • 7 officers and 112 men (2nd SAMR)
Engagements Second Boer War

The South Australian Mounted Rifles (SAMR) was a mounted infantry unit of the Colony of South Australia that served in the Second Boer War. The first contingent of South Australian Mounted Rifles was raised in 1899, followed by a second contingent in 1900.

Contents

The first contingent, an infantry company, arrived in South Africa in late November 1899, and served with the Australian Regiment guarding a railway line. After being mounted, the unit fought in operations around Colesberg, and in the march to Bloemfontein, where it joined the second contingent to form the South Australian Mounted Rifles. The second contingent, a mounted squadron, had arrived in South Africa in late February 1900, participating in the suppression of a Boer uprising before joining the march to Bloemfontein. The SAMR, as part of the 1st Mounted Infantry Brigade, participated in the capture of Johannesburg and Pretoria, the Battle of Diamond Hill, and the Battle of Belfast, the last set-piece battle of the war. After advancing to the eastern border of Transvaal, the first contingent and a small portion of the second contingent returned to Australia in November, while the remainder served in Transvaal until March 1901, when they too returned to Australia.

History

An unrelated militia unit with the same name was formed by the merger of the South Australian Adelaide Lancer and mounted rifle militia units in 1895. [1]

1st contingent

Group portrait of the 1st contingent, taken before departure from Adelaide 1st contingent South Australian Mounted Rifles 1899 group portrait.jpg
Group portrait of the 1st contingent, taken before departure from Adelaide

The 1st South Australian Mounted Rifles (SAMR) were raised as the South Australian Infantry Company in late 1899, under the command of Captain Frederick Henry Howland. The company was mostly composed of men with prior military experience, and numbered six officers and 121 men; it had no relation to the militia unit of the same name. It embarked at Port Adelaide aboard the troopship Medic on 2 November, disembarking at Cape Town on 25 November, where they camped at Maitland until 1 December. On that day, the company moved to De Aar by train, after which they marched to Belmont, joining the Australian Regiment there. [2] With the regiment, it marched to Enslin on 10 December to relieve the Gordon Highlanders under the orders of Lieutenant-General Lord Methuen, after which it was held in reserve at the Battle of Magersfontein, in which it did not participate. [3] During these operations, the company helped to guard the railway line from De Aar to the Modder River. [4]

The company returned to Naauwpoort around the end of January, then to Rensburg and lastly Maeder's Farm, where it received horses and became a mounted rifle squadron, along with the other companies of the Australian Regiment; the South Australians were now designated the South Australian Mounted Rifles. With the regiment, the 1st SAMR became part of the British force commanded by Major-General Ralph Arthur Penrhyn Clements, holding positions in front of Colesberg. [4] It lost an officer killed at Pink Hill on 12 February, when Clements' force was attacked by a superior Boer force. Following the engagement the British retreated towards Rensburg and to Arundel on the night of 13–14 February, where the regiment suffered multiple casualties while serving as the rearguard of the column. After reaching Arundel, Acting Adjutant Captain G.R. Lascelles of the Royal Fusiliers went back to the battlefield with a mainly 1st SAMR mixed volunteer group to "help infantrymen who had been left behind." [3] [5]

Howland giving the 'Prepare to mount' order to soldiers leaving camp at Rensburg, February 1900 Captain Howland of the 1st SAMR gives order Rensburg.jpg
Howland giving the 'Prepare to mount' order to soldiers leaving camp at Rensburg, February 1900

The 1st SAMR joined the 2nd Battalion of the Berkshire Regiment after the retreat to Arundel, and participated in the repulse of a Boer attack on 20 February, followed by sustained engagements through the next eight days, during which it lost a trooper killed on 21 February. [5] During the advance of Clements' Column from Arundel beginning on 28 February, the squadron was again in the rearguard. It was sent to the front on 8 March when preparations for crossing the Orange River at Norval’s Pont began, and engaged Boer troops until the column crossed on 15 March. The squadron participated in the subsequent march to Bloemfontein as part of the column of the Inniskilling Dragoons under Major Dauncey, on the right of Clements' force. [6] The first and second contingents united at Bloemfontein to form the SAMR. [3] [2]

2nd contingent and unified SAMR

The 2nd SAMR was raised as a mounted infantry squadron from the same types of men as the 1st contingent. It numbered seven officers and 112 men, under the command of Captain Charles James Reade. Among its men was Lance Corporal Harry Morant, executed for killing civilians during his subsequent service with the Bushveldt Carbineers. [7] It left Adelaide aboard the troopship Surrey on 26 January 1900, disembarking at Cape Town on 25 February. The squadron encamped at Maitland before departing for De Aar by train on 2 March, arriving at the latter four days later. It marched to Britstown and joined the column of Colonel John Adye after arriving at De Aar, participating in the relief of Prieska during a Boer uprising in that area. According to one trooper, they returned 'with "whips" of loot'. [8] After returning to De Aar, it moved to Norval's Pont by train, then marched to Bloemfontein under Major Euthoven of J Battery Royal Horse Artillery. [6] [9] During its independent operations the squadron was under the overall command of Generals William Forbes Gatacre and Reginald Pole-Carew. [10]

Soldiers of the 2nd SAMR watching a sheep being cut up for army rations Soldiers of the 2nd SAMR army rations sheep.jpg
Soldiers of the 2nd SAMR watching a sheep being cut up for army rations

At Bloemfontein, the unified South Australian Mounted Rifles joined the Fourth Corps of the 1st Mounted Infantry Brigade, along with the Victorian Mounted Rifles, Tasmanian Mounted Infantry, 4th Battalion Imperial Mounted Infantry, J Battery Royal Horse Artillery, and two QF 1-pounder pom-pom guns, providing reconnaissance for the army of Field Marshal Frederick Roberts. The SAMR fought in the Karee-Brandfort action, under the command of General Charles Tucker, losing at least one wounded and one captured. It served as the advance guard of Pole-Carew's 11th Division in the march to Johannesburg, [10] [11] capturing seven engines while cutting the Pretoria railway under fire at Elandsfontein on 29 May. [12]

On the morning of 30 May fifty men of the SAMR under Lieutenant Frank Milton Rowell and fifty Imperial Mounted Infantry under a captain were tasked with capturing the Doornfontein kopjes reservoir to the north of Johannesburg, leaving camp at 08:00. They fought their way into the city, unaware of the location of the reservoir, thus becoming the first to enter it. The SAMR were guided to the reservoir by remaining British residents and held it for the rest of the day, capturing ten prisoners. Returning to camp at 16:00 they retreated under fire, having lost two horses and expended most of their ammunition. Johannesburg was surrendered on the next day, and the SAMR entered the city behind corps commander Colonel St. George C. Henry and his staff. Lieutenants George Lynch and Rowell were handed the keys to the fort, over which the Union Jack was raised; 85 Boers surrendered to them that day. [12] After participating in the capture of Pretoria and the Battle of Diamond Hill, it camped at Donkerhoek and Rhenoster Fontein between 13 June and 28 July. They marched through Bronkhorstspruit to Middelburg and fought in the Battle of Belfast on 7 September, the last pitched battle of the war, in which they suffered multiple casualties. [10] [11]

After Belfast, the SAMR marched along the Pretoria–Delagoa Bay Line to Komatipoort on the border with Portuguese East Africa via Helvetia, Machadodorp, Nooitgedacht, Kaapsehoop, Barberton, and Hectorspruit. The unit found abandoned Boer guns near Komatipoort, where they participated in a review in honour of the birthday of Carlos I, King of Portugal at Komatipoort, then returned by train to Pretoria on 9 October, where it camped at Sunnyside. The first contingent and 25 men of the second contingent departed from Cape Town aboard the troopship SS Harlech Castle on 3 November, arriving at Adelaide on 30 November. There, these soldiers were given a bonus of 30 days' pay by the South Australian Government and were disbanded. The remainder of the second contingent was attached to Brigadier-General Edwin Alderson's Mounted Infantry Brigade, serving in east and northeast Transvaal until March 1901. On 29 March the remaining men departed Cape Town [11] aboard the transport Tongariro, arriving at Sydney on 1 May. Moving overland to Melbourne, the remaining portion of the 2nd SAMR participated in the Commonwealth inaugural celebrations before reaching Adelaide on 12 May, [2] where it was given a bonus of 30 days' pay by the South Australian government, being disbanded three days later. [10]

Casualties, decorations, and battle honours

Grave of a 2nd SAMR trooper who died of disease, marked with wreath AWM P03797.002 2nd SAMR Trooper George Lawrence Hardy grave.jpg
Grave of a 2nd SAMR trooper who died of disease, marked with wreath

The first contingent suffered casualties of two killed or died of wounds, one captured, [13] and three died of disease, while the only casualties of the second contingent were four died of disease. Captain John Henry Stapleton of the first contingent received the Distinguished Service Order, along with Captain Joseph Francis Humphris of the second contingent. Four men of the second contingent received the Distinguished Conduct Medal. In addition, Reade was appointed a Companion of the Order of the Bath. [2]

In 1903, the militia unit known as the South Australian Mounted Rifles was expanded into the 16th and 17th Australian Light Horse Regiments. Both regiments received an honorary banner for South African service in 1904 and the honorary distinction South Africa 1899–1902 for the service of the SAMR in the Boer War in 1908; both were awarded to units who had more than twenty members serve in the war. [14] The battle honour South Africa 1899–1902 is carried by the 3rd/9th Light Horse (South Australian Mounted Rifles), which perpetuates the unit. [15]

Notes

  1. Bou 2010, pp. 21, 33.
  2. 1 2 3 4 Wilcox 2002, pp. 401–402.
  3. 1 2 3 Murray 1911, pp. 343–344.
  4. 1 2 Stirling 1907, p. 451.
  5. 1 2 Stirling 1907, p. 452.
  6. 1 2 Stirling 1907, p. 453.
  7. Plowman 2014, p. 23.
  8. Wilcox 2002, p. 73.
  9. Wallace 1976, pp. 342–343.
  10. 1 2 3 4 Murray 1911, pp. 347–348.
  11. 1 2 3 Stirling 1907, pp. 453–454.
  12. 1 2 Wallace 1976, pp. 194–197.
  13. Murray 1911, p. 346.
  14. Festberg 1972, pp. 40–41, 45.
  15. Festberg 1972, pp. 15, 40–41.

Related Research Articles

Australian Light Horse

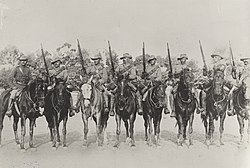
Australian Light Horse were mounted troops with characteristics of both cavalry and mounted infantry, who served in the Second Boer War and World War I. During the inter-war years, a number of regiments were raised as part of Australia's part-time military force. These units were gradually mechanised either before or during World War II, although only a small number undertook operational service during the war. A number of Australian light horse units are still in existence today.

2nd/14th Light Horse Regiment Regiment of the Australian Army

The 2nd/14th Light Horse Regiment is a regiment of the Australian Army and forms part of the Royal Australian Armoured Corps. The regiment is an Australian Light Horse unit, and has been widely romanticised and popularised in literature and poetry throughout the 20th Century. The unit sentimentally traces its lineage to 1860 and is the oldest Australian Regular Army unit through antecedent units the 2nd Moreton Light Horse (QMI) and the 14th West Moreton Light Horse (QMI). The regiment is assigned to 7th Brigade based in Brisbane and is equipped with the M1A1 Abrams tank and the ASLAV reconnaissance vehicle.

Royal New South Wales Regiment Military unit

The Royal New South Wales Regiment (RNSWR) is a reserve infantry regiment of the Australian Army based in the state of New South Wales.

Queen Nandi Mounted Rifles Military unit

The Queen Nandi Mounted Rifles is an reserve armoured regiment of the South African Army.

Battle of Diamond Hill

The Battle of Diamond Hill (Donkerhoek) was an engagement of the Second Boer War that took place on 11 and 12 June 1900 in central Transvaal.

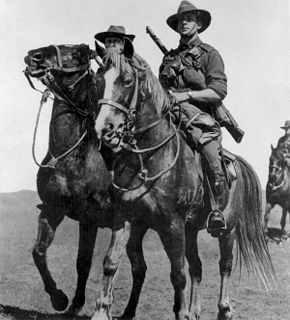
Marshall's Horse was a South African cavalry unit formed in 1899 at the start of the Second Boer War to provide military support for the British campaign. The unit was created from the Uitenhage Rifles and 1st City (Grahamstown) Volunteers. They formed in Grahamstown, initially comprising 244 members before rising to 500 in late 1899. The unit's first commanding officer was Major George Marshall CMG.

1st Royal New South Wales Lancers Military unit

The 1st Royal New South Wales Lancers was an Australian Army light cavalry (reconnaissance) regiment. Its complicated lineage includes the New South Wales Lancers which was first formed as a colonial unit in 1885 as the New South Wales Cavalry, and subsequently saw action in the Second Boer War, and later during First World War at Gallipoli and Palestine as the 1st Light Horse Regiment. The unit subsequently served during the Second World War as the 1st Armoured Regiment equipped with Matilda tanks, fighting the Japanese in New Guinea and Borneo.

Military history of Australia during the Second Boer War

The military history of Australia during the Boer War is complex, and includes a period of history in which the six formerly autonomous British Australian colonies federated to become the Commonwealth of Australia. At the outbreak of the Second Boer War, each of these separate colonies maintained their own, independent military forces, but by the cessation of hostilities, these six armies had come under a centralised command to form the Australian Army.

3rd/9th Light Horse (South Australian Mounted Rifles) Military unit

The 3rd/9th Light Horse is a Reserve light cavalry regiment of the Australian Army based in Smithfield, South Australia. Part of the Royal Australian Armoured Corps (RAAC), the regiment is attached to the 9th Brigade, 2nd Division and currently operates G-Wagon SRV 6x6 and Bushmaster Protected Mobility Vehicles.

10th Light Horse Regiment (Australia) Regiment of the Australian Army

The 10th Light Horse Regiment is a "mounted infantry" regiment of the Australian Army Reserve, raised in Western Australia (WA).

3rd Light Horse Regiment (Australia) Military unit

The 3rd Light Horse Regiment was a mounted infantry regiment of the Australian Army during the First World War. The regiment was raised in September 1914, and by December as part of the 1st Light Horse Brigade had moved overseas. The regiment only fought against the forces of the Ottoman Empire, in Egypt, at Gallipoli, on the Sinai Peninsula, and in Palestine and Jordan. After the armistice the regiment eventually returned to Australia in March 1919. For its role in the war the regiment was awarded nineteen battle honours.

6th Light Horse Regiment (Australia) Australian Army mounted regiment

The 6th Light Horse Regiment was a mounted infantry regiment of the Australian Army during the First World War. The regiment was raised in September 1914, and assigned to the 2nd Light Horse Brigade. The regiment fought against the forces of the German Empire and the Ottoman Empire, in Egypt, at Gallipoli, on the Sinai Peninsula, and in Palestine and Jordan. After the armistice the regiment eventually returned to Australia in March 1919. For its role in the war the regiment was awarded sixteen battle honours. During the inter-war years, the regiment was re-raised as a part-time unit based in New South Wales, adopting the designation of the "New South Wales Mounted Rifles". It was later converted to a motor regiment during the early years of the Second World War before being redesignated as an armoured car regiment. Nevertheless, it was disbanded in early 1943 without having been deployed overseas. During the post war years, the regiment was re-raised as part of the Citizens Military Force, and in 1956 was converted into an infantry unit, and in 1960 was subsumed into the Royal New South Wales Regiment.

The Natal Field Force (NFF) was a multi-battalion field force originally formed by Major-General Sir George Pomeroy Colley in Natal for the First Boer War. It was later re-established for the Second Boer War (1899–1902) and commanded by Major-General Sir Redvers Buller VC GCB GCMG.

The New South Wales Mounted Rifles was a mounted infantry regiment of the Colony of New South Wales.

The 1st Australian Horse was a mounted infantry regiment of the Colony of New South Wales that was formed in 1897. The 1st Australian Horse wore distinctive myrtle green uniforms with black embroidery.

The South Australian Bushmen was a mounted infantry squadron of the Colony of South Australia that served in the Second Boer War, the third contingent contributed by the colony.

The Australian Regiment was a regiment of troops from the Australian colonies that served in the Second Boer War. It began its existence as infantry but was soon mounted due to the conditions of the war.

Royal Artillery Mounted Rifles Military unit

The Royal Artillery Mounted Rifles are detachments of the British Army's Royal Artillery when deployed as mounted infantry. The unit was first developed towards the end of the Second Boer War which was characterised by guerrilla warfare. There was little call for traditional units of field or horse artillery but high demand for mounted infantrymen to counter the highly mobile Boer commandos. By the end of the war around 2,000 artillerymen were acting in the mounted infantry role. A similar force was deployed to Ireland in the early 1920s to counter guerrilla tactics used by Irish republicans.

20th Pioneer Battalion (Australia) Former Australian Army unit

The 20th Pioneer Battalion was an Australian Army pioneer unit that served in New Guinea during World War II. A Militia unit, the battalion was originally formed as a light horse regiment in 1918. Through the 20th Light Horse Regiment, the unit drew lineage back to early Victorian colonial forces, raised in 1885. During the early part of World War II, the unit was converted from a light horse regiment to a motorised unit – the 20th Motor Regiment – and undertook defensive duties in Victoria and then Queensland. In 1944, it deployed in a dismounted role to Merauke in Dutch New Guinea, to defend the Allied airfield that had been constructed there. The unit was later converted into a pioneer battalion in early 1945, deploying to New Guinea in the final stages of the war. It was disbanded in November 1945.

References

Further reading