Testing of advanced thermoplastic composite welds

Last updated

Welding of advanced thermoplastic composites is a beneficial method of joining these materials compared to mechanical fastening and adhesive bonding. Mechanical fastening requires intense labor, and creates stress concentrations, while adhesive bonding requires extensive surface preparation, and long curing cycles. Welding these materials is a cost-effective method of joining concerning preparation and execution, and these materials retain their properties upon cooling, so no post processing is necessary. These materials are widely used in the aerospace industry to reduce weight of a part while keeping strength. [1]

Contents

For many industries there are codes and standards that need to be followed when being implemented into service. The quality of the welds made on these materials are important in ensuring people receive safe products. [2] There are not codes made specifically for the welding of advanced thermoplastic composite welds, so the codes for adhesive bonding of plastics and metals [1] [3] are slightly altered, and used in order to properly test these materials. Even though the joining method is different these materials have mechanical requirements they need to meet.

Weld testing and analysis

There are several mechanical properties that need to be tested to ensure the quality of welds. The testing methods talked about in this article will be referenced from the ASTM adhesive bonding standards. The properties needed to be tested are shear strength, fracture toughness, and fatigue properties. Optical microscopy is also often done to look for weld defects.

Testing for shear strength

According to ASTM D1002 The specimens tested will be configured as lap joints. They will need to be sectioned in a way that they can fit in the grips used for the tensile testing. The length of the overlap for the lap joint is determined by the thickness of the material, the yield point of the metal, and the value that is 50% of the estimated average shear strength in an adhesive bond, but for the purpose of this article it will be specified for a welded joint. The code also specifies the required capabilities of the machine used to test the shear strength. The breaking load of the specimens must fall between 15 and 85 percent of the full scale capabilities of the apparatus. For thermoplastic composites these machines need to be able to maintain a loading rate of 80–100 kg/cm2. The jaws of the machine must align with test specimen so as soon as the test gets started the long axis of the test specimen will be aligned with the direction of the applied tension. The machines grip on the test specimen must be 63 mm (2.5 in). The code specifies what needs to be recorded from the test such as material used, material thickness and other necessary sample measurements, and material properties. ASTM also governs on precision of testing, and avoiding bias in the results. [4]

Fatigue strength

ASTM D3166 specifies fatigue testing methods for metal to metal adhesive joints. It references ASTM D1002 for creating test specimens. The testing machine must be capable of applying a sinusoidal cyclic axial load. The cycle rate and type of equipment can influence the results of the tests being run. 1800 cycles/minute are recommended unless otherwise specified. Tests are generally run at ambient temperature and humidity which is specified at 50% relative humidity ±4%, and 23 °C ±1.1 °C. At least 5 S-N curves need to be generated for a welded joint to give a usable range of cyclical loads on the material. The loads need to be varied from a minimal value that is ideally above 2000 cycles, to a load with 10% of the materials max strength.[ non-primary source needed ]

Fracture toughness

Impact testing is done to test the fracture toughness of the joints welded. ASTM D5041 is used for reference when doing impact tests on advanced thermoplastic composites. Impact tests can get data for figuring out how much energy is needed to break the material, and it can also shed light on modes of failure for a certain joint. The testing machine needs to be something that moves at a constant speed before impact, it needs to be able to give a force readout on impact, generally a wedge is used as the impact tool, along other requirements specified by the code. The code calls for the tests to be done at ambient lab conditions, but depending on the application of the material this may change. Standard speed of testing for impacts is 127 mm/min, where the standard chart speed is 250 mm/min.[ non-primary source needed ]

Optical microscopy

Optical microscopy is a necessary testing method in order to observe the quality of the weld joint. There are defects that can occur during welded that can weaken the joint or cause stress concentrations. [1] [3] Voids can occur during processes such as induction, ultrasonic, and resistance welding, so visual inspection is important to ensuring a quality joint, while developing weld procedures, and for using parts for service. Inspection can be done with the naked eye, an optical microscope, and more high-powered devices such as a scanning electron microscope (SEM). [1] Taking a cross section of the welded joint will allow the joint to be inspected for defects.

Non-destructive Testing of Thermoplastic Composite Welds

Many of the nondestructive testing (NDT) methods available for testing of thermoplastic composite base materials can be used for welds in thermoplastic composites as well. In some cases, modifications are necessary. [5] International standards like EN 13100-1, 13100-2, 13100-3 & 13100-4 govern inspection of the base materials.[ non-primary source needed ] While these standards were not necessarily developed specifically for the welds in said materials, the physical principles are often still applicable.[ citation needed ]

The methods include:

Visual Inspection (VT) is typically the first option for any attempt at NDT, being the least expensive, as it requires the least specialized training and usually few if any special tools. Defects on the surfaces of thermoplastic composite welds can be detected visually if they are of sufficient size. Weld defects such as misalignment, porosity, lack of fusion and degradation of the matrix and/or fibers may be visually apparent. Subsurface defects may not be visible, unless the composite matrix was nearly transparent and the embedded fibers did not obscure them. [6]
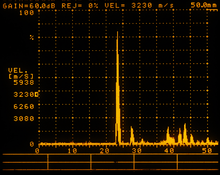
Ultrasonic A-scan display showing a reflector in the part being tested. UT flaw detection - crack.png
Ultrasonic A-scan display showing a reflector in the part being tested.

Ultrasonic testing (UT) can offer detailed NDT information for welded thermoplastic composites. [7] Tests can be done with shear wave or transverse waves, though the composite materials often attenuate the signals significantly and care must be taken to account for this. Contact methods using either manual or automated transducers coupled to the part being inspected or non-contact methods using water immersion or a bubbler (i.e. a continuous stream of water through which the ultrasound passes) can be effective if designed and calibrated properly. Amplitude of reflection data may be used to generate B-scan [8] or C-scan images, which can show the materials being welded at various, discrete depths or cross sections, a capability not available with traditional radiographic methods. Ultrasound can detect delaminations, lack of fusion, porosity, voids, inclusions and other defects mostly regardless of their orientation. Deterring factors include that the method is time consuming and the data are open to some interpretation, requiring skilled technician to perform and interpret the test.

Radiographic testing (RT) can be performed in several ways. Typically low energies are required [9] for testing of composites in order to see any detail, which restricts the radiation sources to be used to x-ray types rather than gamma sources like Ir-192 or Cobalt-60, which tend to have higher energy levels. Data may be recorded either on film or digitally, using specially developed screens for detecting and saving an image than can be manipulated later with the proper software and hardware. Because radiographic testing relies on differences in material density to provide an image, resolution of fibers like carbon from the thermoplastic matrix is not always very high, since the density of the plastic does not differ much from that of the carbon or glass filaments. For digital imaging, the lack of contrast may be partially addressed after the radiographic images are taken, using digital imaging software. Radiography can detect porosity, voids and possibly differences in fiber density or orientation in the composite matrix due to the welding process. Lack of fusion may not be visible by RT unless it is perpendicular to the direction of the source of radiation.
Computed Tomography (CT), a subset of radiographic testing, is proving useful for the inspection of thermoplastic composite welds. CT involves the computerized building of a 3-D image using X-rays taken from numerous, incremental angles. It is particularly useful for the determination of fiber orientation in welds of glass reinforced composites. [10]

Thermography [11] involves testing the part for discontinuities that can be seen by an infrared camera when the part is heated or cooled. It offers a significant improvement on some of the more traditional NDT methods in that it can be used on large areas of, for example, airplane parts or storage tanks.

Eddy Current testing (ET) has been found to be useful for characterizing the nature of fibers and their orientation in certain composite materials, particularly those with conductive reinforcing fibers. It would not be useful for composites reinforced with glass or aramid fibers, for example, as no currents can be induced in these insulating materials. Much higher magnetic field frequencies are used to generate the eddy currents used for testing plastic composites than are typically used for metals. [12] Though delaminations in the material were either undetectable or nearly so, more recent research has found that by induction heating the part in addition to exciting an alternating magnetic field, some delaminations could also be detected in CFRP.

Shearography output image of CFRP/honeycomb part with artificial defects Steinbichler Shearography Honeycomb with CFRP Top Layer Artificial failures that simulate layer-core delaminations Gradient-view Result.jpg
Shearography output image of CFRP/honeycomb part with artificial defects

Laser Shearography involves accurately measuring perturbations in the surfaces of a (usually thin) part under load or strain with the aid of lasers scanning across the surface being evaluated. [13] Voids, pores, delaminations and other defects in composite welds can be detected by this method.

Acoustic Emission testing provides qualitative information on the presence and potential growth of defects such as cracks and delaminations in welded composite materials. [14] Typically this method is used to help narrow down the locations(s) of defects in large structures before using a more precise NDT method such as radiography or ultrasonic testing to help localize and characterize the nature of the defect.

Related Research Articles

<span class="mw-page-title-main">Nondestructive testing</span> Evaluating the properties of a material, component, or system without causing damage

Nondestructive testing (NDT) is any of a wide group of analysis techniques used in science and technology industry to evaluate the properties of a material, component or system without causing damage. The terms nondestructive examination (NDE), nondestructive inspection (NDI), and nondestructive evaluation (NDE) are also commonly used to describe this technology. Because NDT does not permanently alter the article being inspected, it is a highly valuable technique that can save both money and time in product evaluation, troubleshooting, and research. The six most frequently used NDT methods are eddy-current, magnetic-particle, liquid penetrant, radiographic, ultrasonic, and visual testing. NDT is commonly used in forensic engineering, mechanical engineering, petroleum engineering, electrical engineering, civil engineering, systems engineering, aeronautical engineering, medicine, and art. Innovations in the field of nondestructive testing have had a profound impact on medical imaging, including on echocardiography, medical ultrasonography, and digital radiography.

<span class="mw-page-title-main">Thermosetting polymer</span> Polymer obtained by irreversibly hardening (curing) a resin

In materials science, a thermosetting polymer, often called a thermoset, is a polymer that is obtained by irreversibly hardening ("curing") a soft solid or viscous liquid prepolymer (resin). Curing is induced by heat or suitable radiation and may be promoted by high pressure or mixing with a catalyst. Heat is not necessarily applied externally, and is often generated by the reaction of the resin with a curing agent. Curing results in chemical reactions that create extensive cross-linking between polymer chains to produce an infusible and insoluble polymer network.

<span class="mw-page-title-main">Ultrasonic welding</span> Welding process

Ultrasonic welding is an industrial process whereby high-frequency ultrasonic acoustic vibrations are locally applied to work pieces being held together under pressure to create a solid-state weld. It is commonly used for plastics and metals, and especially for joining dissimilar materials. In ultrasonic welding, there are no connective bolts, nails, soldering materials, or adhesives necessary to bind the materials together. When used to join metals, the temperature stays well below the melting point of the involved materials, preventing any unwanted properties which may arise from high temperature exposure of the metal.

<span class="mw-page-title-main">Plastic welding</span> Welding of semi-finished plastic materials

Plastic welding is welding for semi-finished plastic materials, and is described in ISO 472 as a process of uniting softened surfaces of materials, generally with the aid of heat. Welding of thermoplastics is accomplished in three sequential stages, namely surface preparation, application of heat and pressure, and cooling. Numerous welding methods have been developed for the joining of semi-finished plastic materials. Based on the mechanism of heat generation at the welding interface, welding methods for thermoplastics can be classified as external and internal heating methods, as shown in Fig 1.

<span class="mw-page-title-main">Heat sealer</span> Machine for joining thermoplastic materials using heat

A heat sealer is a machine used to seal products, packaging, and other thermoplastic materials using heat. This can be with uniform thermoplastic monolayers or with materials having several layers, at least one being thermoplastic. Heat sealing can join two similar materials together or can join dissimilar materials, one of which has a thermoplastic layer.

<span class="mw-page-title-main">Delamination</span> Mode of failure for which a material fractures into layers

Delamination is a mode of failure where a material fractures into layers. A variety of materials including laminate composites and concrete can fail by delamination. Processing can create layers in materials such as steel formed by rolling and plastics and metals from 3D printing which can fail from layer separation. Also, surface coatings such as paints and films can delaminate from the coated substrate.

<span class="mw-page-title-main">Acoustic emission</span>

Acoustic emission (AE) is the phenomenon of radiation of acoustic (elastic) waves in solids that occurs when a material undergoes irreversible changes in its internal structure, for example as a result of crack formation or plastic deformation due to aging, temperature gradients, or external mechanical forces.

<span class="mw-page-title-main">Industrial radiography</span> Type of non-destructive testing

Industrial radiography is a modality of non-destructive testing that uses ionizing radiation to inspect materials and components with the objective of locating and quantifying defects and degradation in material properties that would lead to the failure of engineering structures. It plays an important role in the science and technology needed to ensure product quality and reliability. In Australia, industrial radiographic non-destructive testing is colloquially referred to as "bombing" a component with a "bomb".

<span class="mw-page-title-main">Electromagnetic acoustic transducer</span>

Electromagnetic acoustic transducer (EMAT) is a transducer for non-contact acoustic wave generation and reception in conducting materials. Its effect is based on electromagnetic mechanisms, which do not need direct coupling with the surface of the material. Due to this couplant-free feature, EMATs are particularly useful in harsh, i.e., hot, cold, clean, or dry environments. EMATs are suitable to generate all kinds of waves in metallic and/or magnetostrictive materials. Depending on the design and orientation of coils and magnets, shear horizontal (SH) bulk wave mode, surface wave, plate waves such as SH and Lamb waves, and all sorts of other bulk and guided-wave modes can be excited. After decades of research and development, EMAT has found its applications in many industries such as primary metal manufacturing and processing, automotive, railroad, pipeline, boiler and pressure vessel industries, in which they are typically used for nondestructive testing (NDT) of metallic structures.

Weld quality assurance is the use of technological methods and actions to test or assure the quality of welds, and secondarily to confirm the presence, location and coverage of welds. In manufacturing, welds are used to join two or more metal surfaces. Because these connections may encounter loads and fatigue during product lifetime, there is a chance they may fail if not created to proper specification.

Hot plate welding, also called heated tool welding, is a thermal welding technique for joining thermoplastics. A heated tool is placed against or near the two surfaces to be joined in order to melt them. Then, the heat source is removed, and the surfaces are brought together under pressure. Hot plate welding has relatively long cycle times, ranging from 10 seconds to minutes, compared to vibration or ultrasonic welding. However, its simplicity and ability to produce strong joints in almost all thermoplastics make it widely used in mass production and for large structures, like large-diameter plastic pipes. Different inspection techniques are implemented in order to identify various discontinuities or cracks.

<span class="mw-page-title-main">James H. Williams Jr.</span>

James Henry Williams Jr. is a mechanical engineer, consultant, civic commentator, and teacher of engineering. He is currently Professor of Applied Mechanics in the Mechanical Engineering Department at the Massachusetts Institute of Technology (MIT). He is regarded as one of the world's leading experts in the mechanics, design, fabrication, and nondestructive evaluation (NDE) of nonmetallic fiber reinforced composite materials and structures. He is also Professor of Writing and Humanistic Studies at MIT.

Carbon fiber testing is a set of various different tests that researchers use to characterize the properties of carbon fiber. The results for the testing are used to aid the manufacturer and developers decisions selecting and designing material composites, manufacturing processes and for ensured safety and integrity. Safety-critical carbon fiber components, such as structural parts in machines, vehicles, aircraft or architectural elements are subject to testing.

Active thermography is an advanced nondestructive testing procedure, which uses a thermography measurement of a tested material thermal response after its external excitation. This principle can be used also for non-contact infrared non-destructive testing (IRNDT) of materials.

Green strength, or handling strength, can be defined as the strength of a material as it is processed to form its final ultimate tensile strength. This strength is usually considerably lower than the final ultimate strength of a material. The term green strength is usually referenced when discussing non-metallic materials such as adhesives and elastomers. Recently, it has also been referenced in metallurgy applications such as powdered metallurgy.

Adhesive bonding is a process by which two members of equal or dissimilar composition are joined. It is used in place of, or to complement other joining methods such mechanical fasting by the use nails, rivets, screws or bolts and many welding processes. The use of adhesives provides many advantages over welding and mechanical fastening in steel construction; however, many challenges still exist that have made the use of adhesives in structural steel components very limited.

Advanced thermoplastic composites (ACM) have a high strength fibres held together by a thermoplastic matrix. Advanced thermoplastic composites are becoming more widely used in the aerospace, marine, automotive and energy industry. This is due to the decreasing cost and superior strength to weight ratios, over metallic parts. Advance thermoplastic composite have excellent damage tolerance, corrosion resistant, high fracture toughness, high impact resistance, good fatigue resistance, low storage cost, and infinite shelf life. Thermoplastic composites also have the ability to be formed and reformed, repaired and fusion welded.

Implant resistance welding is a method used in welding to join thermoplastics and thermoplastic composites.

Solvent bonding is one of several methods of adhesive bonding for joining plastics. Application of a solvent to a thermoplastic material softens the polymer, and with applied pressure this results in polymer chain interdiffusion at the bonding junction. When the solvent evaporates, this leaves a fully consolidated bond-line. An advantage to solvent bonding versus other polymer joining methods is that bonding generally occurs below the glass transition temperature of the polymer.

A variety of non-destructive examination (NDE) techniques are available for inspecting plastic welds. Many of these techniques are similar to the ones used for inspecting metal welds. Traditional techniques include visual testing, radiography, and various ultrasonic techniques. Advanced ultrasonic techniques such as time of flight diffraction (TOFD) and phased-array ultrasonics (PAUT) are being increasingly studied and used for inspecting plastic pipeline welds. Research in the use of optical coherence tomography (OCT) and microwave reflectrometry has also been conducted.

References

  1. 1 2 3 4 Villegas, Irene Fernandez; Moser, Lars; Yousefpour, Ali; Mitschang, Peter; Bersee, Harald EN (30 August 2012). "Process and performance evaluation of ultrasonic, induction and resistance welding of advanced thermoplastic composites". Journal of Thermoplastic Composite Materials. 26 (8): 1007–1024. doi:10.1177/0892705712456031. S2CID   34033898.
  2. "Detailed Overview | www.astm.org". www.astm.org. Retrieved 2018-03-26.
  3. 1 2 Shi, H. (2014). Resistance Welding of Thermoplastic Composites: Process and Performance (PhD Thesis). Delft University of Technology. doi:10.4233/uuid:58f16f99-afc1-4713-842e-562412583340. ISBN   9789461863812.[ page needed ]
  4. Committee, D14. "Test Method for Apparent Shear Strength of Single-Lap-Joint Adhesively Bonded Metal Specimens by Tension Loading (Metal-to-Metal)". doi:10.1520/d1002-10.{{cite journal}}: Cite journal requires |journal= (help)CS1 maint: numeric names: authors list (link)
  5. Edwards, G.R. (1987). "The Non-Destructive Testing of Welds in Continuous Fibre Reinforced Thermoplastics". Composites Evaluation. pp. 3–10. doi:10.1016/B978-0-408-02569-0.50004-0. ISBN   978-0-408-02569-0.
  6. Grewell, David A; Benatar, Avraham; Park, Joon Bu; Bonten, C (2003). Plastics and composites welding handbook. Munich: Hanser. ISBN   9781569903131. OCLC   318407015.[ page needed ]
  7. Ibrahim, M.E.; Smith, R.A.; Wang, C.H. (December 2017). "Ultrasonic detection and sizing of compressed cracks in glass- and carbon-fibre reinforced plastic composites". NDT & E International. 92: 111–121. doi:10.1016/j.ndteint.2017.08.004. hdl: 1983/78d650d4-24d0-4c5f-8787-ae8a4bbe7403 .
  8. Maio, L.; Memmolo, V.; Boccardi, S.; Meola, C.; Ricci, F.; Boffa, N.D.; Monaco, E. (2016). "Ultrasonic and IR Thermographic Detection of a Defect in a Multilayered Composite Plate". Procedia Engineering. 167: 71–79. doi: 10.1016/j.proeng.2016.11.671 .
  9. Hassen, Ahmed Arabi; Taheri, Hossein; Vaidya, Uday K. (July 2016). "Non-destructive investigation of thermoplastic reinforced composites". Composites Part B: Engineering. 97: 244–254. doi:10.1016/j.compositesb.2016.05.006. OSTI   1254791.
  10. Fiebig, Isabel; Schoeppner, Volker (2016). "Influence of the Initial Fiber Orientation on the Weld Strength in Welding of Glass Fiber Reinforced Thermoplastics". International Journal of Polymer Science. 2016: 1–16. doi: 10.1155/2016/7651345 .
  11. Nino, G.F.; Ahmed, T.J.; Bersee, H.E.N.; Beukers, A. (April 2009). "Thermal NDI of resistance welded composite structures". Composites Part B: Engineering. 40 (3): 237–248. doi:10.1016/j.compositesb.2008.10.003.
  12. De Goeje, M.P.; Wapenaar, K.E.D. (May 1992). "Non-destructive inspection of carbon fibre-reinforced plastics using eddy current methods". Composites. 23 (3): 147–157. doi:10.1016/0010-4361(92)90435-W.
  13. Georgeson, Gary E.; Bossi, Richard H. (2018-08-01). "Nondestructive Testing of Composites". Materials Evaluation. 76 (8): 1048–1060. ISSN   0025-5327.
  14. Tushar, Chhugani; Ralish, Routray; Rajesh, M.; Manikandan, M.; Rajapandi, R.; Kar, V.R.; Jayakrishna, Kandasamy (2019). "Maintenance and monitoring of composites". Structural Health Monitoring of Biocomposites, Fibre-Reinforced Composites and Hybrid Composites. pp. 129–151. doi:10.1016/B978-0-08-102291-7.00008-3. ISBN   978-0-08-102291-7. S2CID   139419304.