An order of battle is a list of the elements of a military formation that are organised within a hierarchical command structure. It can provide information on the strength of that formation and the equipment used.[1] An order of battle is not necessarily a set structure and it can change depending on tactical or strategic developments or the evolution of military doctrine. For example, a division could be radically altered from one campaign to another through the adding or removing of sub-units but retain its identity and history. The size of a division can dramatically vary as a result of the forces assigned and the doctrine employed at that time.
The 1st Armoured Division of the British Army was formed in 1937 as the Mobile Division and renamed the 1st Armoured Division in April 1939. The division was dispatched with 257 tanks to fight in the Battle of France. After several costly engagements and the collapse of the Allied effort, it was forced to retreat back to the UK with only 13 remaining tanks. In late 1941, the division was sent to reinforce the British effort in North Africa with 184 tanks. It then fought in all the major engagements of the Western Desert campaign during 1942 from defeat in the Battle of Gazala to victory in the Second Battle of El Alamein. It assisted in the chase of the Axis Powers across North Africa into Tunisia, culminating with the Axis' overall defeat on the continent. In the aftermath of the Tunisian campaign, the division remained in Africa until 1944, when it was transferred to Italy. Its final battles were against the German Gothic Line during the Italian campaign. The division was broken up in October 1944 to provide reinforcements for other active formations due to a personnel shortage in the British Army, and officially disbanded in early 1945.
Background
The Mobile Division was formed in November 1937, and renamed the 1st Armoured Division in April 1939.[2][3] Prior to the outbreak of the Second World War, doctrine called for such a division to be composed of two armoured brigades—each with three armoured regiments—and a support group. The support group included all required supporting arms the division would need: infantry, engineers, artillery, and anti-tank and anti-aircraft guns. At full strength, the support group would have sixteen 25-pounder field gun-howitzers, twenty-four 2-pounder anti-tank gun, and twenty-four Bofors 40mm (1.6in) anti-aircraft guns. On paper, the division would contain 108 light tanks, 159 light cruisers, 58 heavy cruisers, and 24 close-support tanks, and have 9,442 personnel. This basic organisation changed on numerous occasions during the war, although the actual implementation could be delayed due to several factors.[4]
British forces defined light tanks as reconnaissance vehicles, which were armed with machine guns. Cruiser tanks were swiftly moving, more heavily armoured, and equipped with machine guns and an anti-tank gun. The cruiser tank's role was to engage and destroy enemy armoured forces. Its main weapon, a 2-pounder anti-tank gun, was supplied only with armour-piercing rounds, meaning cruiser tanks were ineffective against entrenched infantry or suppressing hostile artillery.[5][6] The A9 is an example of a light cruiser while the A10 provides an example of a heavy cruiser. The light and heavy definitions arose in 1938, to differentiate between cruisers that were thinly armoured and their better armoured variants (for example, the A9 frontal armour was only 14mm (0.55in) thick compared to the 30mm (1.2in) thickness of the A10).[7][8] Rather than being fitted with an anti-tank gun, close-support cruiser tanks were equipped with a howitzer for firing smoke and high-explosive rounds, and were not intended to fight other tanks.[9]
From formation through to the outbreak of the Second World War
It was intended for the division to have 620 armoured fighting vehicles, although did not reach this strength during the early years of its existence. As best they could be, the cavalry regiments were outfitted with the Light Tank Mk VI while the tank brigade contained Vickers Medium Mark IIs. Due to the lack of tanks, trucks were used to simulate their existence for training purposes. It was not until December 1938 that the first delivery of A13 cruiser tanks were made, followed by A9s in January 1939.[11] In April 1939, several nomenclature changes took place. The Mobile Division was renamed the 1st Armoured Division, the cavalry brigades were retitled as light armoured brigades, and the tank brigade became the heavy armoured brigade. Likewise, on 4 April 1939, the Royal Armoured Corps was formed to command all mechanised cavalry and the battalions of the Royal Tank Corps. The latter was renamed the Royal Tank Regiment and its nomenclature colloquially changed; each unit dropped the word battalion from its title, although this was not officially adopted until September 1945.[12][13]
4th (until end of 1938), 10th, 11th (joined January 1939), 23rd (until end of 1938), 27th, 36th (until end of 1938), 55th (joined January 1939), and 62nd Companies
Mobile Divisional Signals, Royal Corps of Signals
12th Lancers
2nd Battalion, King's Royal Rifle Corps
1st Battalion, Rifle Brigade
April-September 1939
A MK II medium tank loading onto a Scammell Pioneer tank transporter
1st Light Armoured Brigade (until 4 November 1939)
King's Dragoon Guards
3rd Hussars
4th Queen's Own Hussars
2nd Light Armoured Brigade (renamed 2nd Armoured Brigade on 14 April 1940)
2nd Dragoon Guards (Queen's Bays)
9th Queen's Royal Lancers
10th Hussars
1st Heavy Armoured Brigade (renamed 3rd Armoured Brigade on 14 April 1940)
2nd Battalion, Royal Tank Regiment
3rd Battalion, Royal Tank Regiment
5th Battalion, Royal Tank Regiment
1st Support Group
1st Royal Horse Artillery (until 20 October 1939)
2nd Royal Horse Artillery (until 20 October 1939)
60th Anti-Tank Regiment (joined 22 December 1939, left 14 February 1940)
101st Light Anti-Aircraft/Anti-tank Regiment (joined 15 February 1940)
1st Field Squadron, Royal Engineers (until 31 January 1940)
1st Field Park Troop, Royal Engineers (until 31 January 1940)
1st Battalion, Rifle Brigade (until 24 April 1940)
2nd Battalion, King's Royal Rifle Corps (until 24 April 1940)
Battle of France
A cruiser tank of the division (turret facing to the rear) moves through a French village, May 1940
From the beginning of the Second World War in September 1939, the 1st Armoured Division had been used to provide troops and material for other formations. In October, two regiments of artillery were withdrawn from the support group and dispatched to France. The following month, an armoured brigade was withdrawn to form the 2nd Armoured Division. In January 1940, engineers were removed to serve elsewhere and they were followed by an armoured regiment and the division's infantry in April and May, just prior to the division being deployed to France.[16]
These changes left the 1st Armoured Division short of its required subordinate units, although it did contain 114 light and 143 cruiser tanks. It, however, lacked replacement tanks, spare parts, bridging and wireless equipment, and anti-tank and anti-aircraft guns. The advance elements of the division landed in France on 15 May 1940, and the first major components arrived four days later. It took another week until the entire division had been deployed.[17][18][19] It fought in a number of engagements, most notably the Battle of Abbeville, and suffered heavy tank losses in its encounters with German forces. By 18 June, with 13 tanks remaining, it completed its evacuation to the UK.[20]
An example of Crusader tanks, with crews asleep on the ground
During 1941, an armoured division was to consist of 340 tanks. Due to ongoing fighting in Egypt and Italian Libya, armoured reinforcements were requested from the UK and the 1st Armoured Division was used to provide these. With 60 M3 Stuart light tanks and 124 Crusader tanks, the division left the UK in August—just before organisational changes to the layout of UK-based armoured divisions were made. The changes, however, were not forced upon divisions serving in Africa. The division arrived in Egypt in mid-November and moved into Italian Libya the following month.[23][24][25]
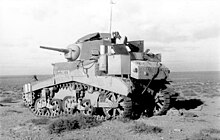
In January 1942, after clashes with Axis armoured forces, the division was attacked and forced to retreat to Gazala.[26] On 27 February, a new organisation for North African-based armoured divisions was announced. Each was to include one armoured brigade group consisting of three armoured regiments, one motorised infantry battalion, engineers, anti-tank and anti-aircraft guns, and artillery; as well as one motor brigade group composed of three motorised infantry battalions with the same selection of supporting arms as the armoured brigade. This reorganisation called for the support group to be abolished, which resulted in its units being dispersed to other formations located nearby. Due to the mixture of British and American tanks in use, different organisations for the armoured regiments equipped with both were drawn up. Those with M3 Grants and Stuarts were intended to have 24 of the former and 20 of the latter. Those equipped with a mix of Crusaders and Grants were intended to have 36 of the former and 12 of the latter.[27] These changes had not been implemented by the start of the Battle of Gazala, a few months later. Between the 1st and the 7th Armoured Divisions, there were 167 Grants, 257 Crusaders, and 149 Stuart tanks available for the battle. A breakdown of what each formation had, is not provided by the official history for this period, and the various armoured regiments fought under the banner of each division at various points of the battle.[28][29] On 12 June, for example, all tanks were placed under the command of the 1st Armoured Division, which then consisted of 206 tanks (83 Grants, 59 Crusaders, and 64 Stuarts). After battling with two German armoured divisions, it ended the day with 50 serviceable tanks; the rest had been either destroyed or sent to workshops to be repaired.[30][31]
After further fighting, the division retreated from Gazala. It then fought in the Battle of Mersa Matruh, before a further retreat took place to El Alamein.[32][33][34] This was followed by the First Battle of El Alamein and heavy tank losses resulted in some regiments being temporarily amalgamated; for example, the 3rd Royal Tank Regiment and the 5th Royal Tank Regiment became the 3rd/5th Royal Tank Regiment until they were eventually rebuilt as separate entities. Tank strength fluctuated due to losses, reinforcements, and other changes. For example, on 15 July, the division had 77 Grants, 82 Crusaders, and 32 Stuarts; on 21 July, 61 Grants, 81 Crusaders, and 31 Stuarts.[35][36] At the end of the battle, the division was allowed a period of rest. Additional war office guidelines for divisional structure were released on 24 August and maintained most of the ideas laid out in February, although it did abolish brigade groups and changed how supporting arms were used. The change resulted in the armoured brigade containing three armoured regiments and one battalion of infantry, and the motor brigade controlling just infantry. The supporting arms, such as artillery and engineers, became divisional troops rather than assigned to a specific brigade as they had been under the briade group concept. The 1st Armoured Division was reorganised to conform to these new guidelines and on paper would have 172 tanks. When the division mustered for the Second Battle of El Alamein, it contained slightly fewer: 1 Grant, 92 Shermans, and 68 Crusaders.[37][38] After the battle concluded in an Allied victory, the division pursued Axis forces across North Africa. It then fought in the Tunisia campaign until May 1943, when Axis forces surrendered in Africa.[39] With the conclusion of the campaign, the division remained in North Africa until 1944.[40]
200th Guards Brigade Group (from 12 February 1942. Renamed 200th Guards Motor Brigade Group on 6 April, then 201st Guards Motor Brigade Group on 21 May.)
2nd Battalion, King's Royal Rifle Corps (until 18 December 1942)
2nd Battalion, Rifle Brigade
7th Battalion, Rifle Brigade
1st Battalion, King's Royal Rifle Corps (from 15 January 1943)
Divisional artillery
Royal Horse Artillery
2nd Regiment
4th Regiment
11th (Honourable Artillery Company) Regiment
Royal Artillery
76th Anti-Tank Regiment
42nd Light Anti-Aircraft Regiment
Divisional engineers, Royal Engineers
1st Field Squadron
7th Field Squadron
1st Field Park Squadron
1st Armoured Divisional Signals, Royal Corps of Signals
12th Royal Lancers
Italian campaign
A Sherman tank of the 2nd Armoured Brigade in Italy (after it became an independent formation).
On 27 May 1944, the 1st Armoured division started to move from North Africa to Italy, at which point its main formation was the 2nd Armoured Brigade. Landings in Italy were completed by 14 June and over the next two months, the division was brought up to strength. By this point, a full-strength armoured division was to have 14,964 personnel, 4,267 vehicles including 366 tanks, 48 pieces of artillery, 54 anti-tank guns, and 24 tank destroyers. The division was allocated two infantry brigades due to the need for additional infantry support considering the fighting conditions in Italy. Initially, the 66th Infantry Brigade was assigned but was switched with the 18th Infantry Brigade before the division went into combat. This brigade had earlier fought together with the division, when it was named the 7th Motor Brigade. The second infantry formation was the 43rd Gurkha Lorried Infantry Brigade. By the start of combat operations, the division had around 140 tanks.[48][49] Between late August and the end of September, the several engagements were fought as part of the Allied assault on the German Gothic Line and nearly 2,000 casualties was suffered by the division.[50]
By mid-1944, the British Army was in the midst of a personnel crisis; it did not have enough men to replace casualties suffered by front line infantry. In the Italian theatre, the army needed to find at least 21,000 reinforcements. To address this, the War Office started to transfer men from the Royal Artillery and the Royal Air Force to infantry training depots. This did not solve the shortage, so the decision was made to disband divisions and transfer personnel in order to keep a fewer number of combat formations as close to full strength as possible.[51][52][53] The 1st Armoured Division was chosen to be disbanded as part of this effort. The 43rd Gurkha Lorried Infantry Brigade was transferred to the 56th (London) Infantry Division to strengthen it. The divisional troops and the 18th Infantry Brigade were broken-up and their personnel reassigned to other formations as reinforcements. The 2nd Armoured Brigade was kept intact and became an independent armoured formation.[53] The divisional headquarters was also maintained and by October, it commanded two ad hoc units in addition to a vastly different 18th Infantry Brigade.[54] The headquarters relinquished command of its final troops on 28 October 1944 and the 1st Armoured Division ceased to be an operational formation thereafter. It was officially disbanded on 11 January 1945.[55]
May–September 1944
An example of the M10 Wolverine tank destroyer, used by anti-tank regiments.
Operation Compass was the first large British military operation of the Western Desert Campaign (1940–1943) during the Second World War. British, Empire and Commonwealth forces attacked Italian forces of the 10th Army in western Egypt and Cyrenaica, the eastern province of Libya, from December 1940 to February 1941.
This is the Operation Telic order of battle, which lists the British forces that took part in Operation Telic, including
The 11th Armoured Division was an armoured division of the British Army which was created in March 1941 during the Second World War. The division was formed in response to the unanticipated success of the German panzer divisions. The 11th Armoured was responsible for several major victories in the Battle of Normandy from in the summer of 1944, shortly after the Normandy landings, and it participated in the Allied advance from Paris to the Rhine, the Rhine crossing in March 1945. It was disbanded in January 1946 and reformed towards the end of 1950. In 1956, it was converted into the 4th Infantry Division.
The 2nd Armoured Division was a division of the British Army that was active during the early stages of the Second World War. The division's creation had been discussed since the beginning of 1939, with the intent to form it by splitting the 1st Armoured Division. A lack of tanks delayed this until December 1939. For a short period after its creation, the division had no assigned units until the 1st Light Armoured Brigade was assigned to it from the 1st Armoured Division, and the 22nd Heavy Armoured Brigade from Southern Command.
The 6th Armoured Division was an armoured division of the British Army, created in September 1940 during the Second World War and re-formed in May 1951 in the UK.
The 8th Armoured Division was an armoured division of the British Army during the Second World War. It was deployed to Egypt in June 1942 but never operated as a complete formation and was disbanded in January the following year.
The 9th Armoured Division was an armoured division of the British Army, raised during the Second World War. It never saw active service during the war as a complete division.
The 22nd Armoured Brigade was an armoured brigade of the British Army that saw service during and after the Second World War. The brigade was formed on the outbreak of war on 3 September 1939 from Territorial Army (TA) armoured regiments. It saw a considerable amount of action during the war, beginning with the Western Desert Campaign where it was engaged in Operation Crusader and at the Battles of Gazala, Mersa Matruh, First Alamein and Alam el Halfa. It then joined the 7th Armoured Division for the Second Battle of El Alamein. It remained part of 7th Armoured for the rest of the war, including the campaigns in Tunisia, Italy and North West Europe. It continued in the postwar TA until 1956. The brigade's identity was re-established in the Regular Army between 1981 and 1993.
The 1st Cavalry Division was a regular Division of the British Army during the First World War where it fought on the Western Front. During the Second World War it was a first line formation, formed from Yeomanry Regiments. It fought in the Middle East before being converted to the 10th Armoured Division.
The 10th Armoured Division was an armoured formation of division-size of the British Army, raised during the Second World War and was active from 1941–1944 and after the war from 1956–1957. It was formed from the 1st Cavalry Division, a 1st Line Yeomanry unit of the Territorial Army (TA) which had previously been serving in Palestine. The division was converted from cavalry to armour and redesignated from 1 August 1941.
The 1st Armoured Brigade, raised as the 1st Light Armoured, on 14 April 1940 its designation changed to 1st Armoured Brigade Group, an armoured formation of the British Army.
The 4th Cavalry Brigade was a cavalry brigade of the British Army. It served in the Napoleonic Wars, in the First World War on the Western Front where it was initially assigned to The Cavalry Division before spending most of the war with the 2nd Cavalry Division, and with the 1st Cavalry Division during the Second World War.
This is the order of battle for the ground forces involved in Operation Crusader, a World War II battle between the British Commonwealth and the European Axis Powers of Germany and Italy in North Africa between 18 November – 30 December 1941.
During the Second World War the British Army deployed armoured divisions and independent armoured and tank brigades.
In September 1939, the British Army was in process of expanding their anti-aircraft and mobile assets. Among these new changes was the formation of Anti-Aircraft Command which was formed on 1 April 1939, and the 1st Armoured Division formed in 1937. The list below will include the British Army units, colonial units, and those units which were in the process of formation.
Aldershot Command was a formation of the British Army at the start of the Second World War in September 1939. It had been re-formed in 1905, when the army established a series of geographical military districts, known as "commands", to replace six army corps that had existed for a short period. The purpose of the commands was to administer all units and formations located within their geographical borders, and if needed could be further subdivided into "areas". In 1939, it was one of the army's six regional commands, which existed within the British Isles, on the outbreak of the Second World War. Its geographical area encompassed parts of the following four counties: Berkshire, Hampshire, Surrey, and Sussex.
References
Allport, Alan (2015). Browned Off and Bloody-minded: The British Soldier Goes to War 1939–1945. New Haven: Yale University Press. ISBN978-0-300-17075-7.
Barr, Niall (2004). Pendulum of War: The Three Battles of El Alamein. London: Jonathan Cape. ISBN978-0-22406-195-7.
Chadwick, Kenneth (1970). The Royal Tank Regiment. London: Leo Cooper. OCLC102888.
French, David (2001) [2000]. Raising Churchill's Army: The British Army and the War Against Germany 1919–1945. Oxford: Oxford University Press. ISBN978-0-199-24630-4.
Fletcher, David (1993) [1989]. The Great Tank Scandal: British Armour in the Second World War Part 1. London: Her Majesty's Stationery Office. ISBN978-0-11290-460-1.
Jackson, William; etal. (2004) [1988]. Victory in the Mediterranean, Part II – June to October 1944. History of the Second World War United Kingdom Military Series. Vol.VI. London: Naval & Military Press. ISBN978-1-84574-071-9.
Joslen, H. F. (2003) [1960]. Orders of Battle: Second World War, 1939–1945. Uckfield, East Sussex: Naval and Military Press. ISBN978-1-84342-474-1.
Playfair, I. S. O.; etal. (2004a) [1954]. Butler, J. R. M. (ed.). The Mediterranean and Middle East: The Early Successes Against Italy (to May 1941). History of the Second World War United Kingdom Military Series. Vol.I. London: Naval & Military Press. ISBN978-1-84574-065-8.
Playfair, I. S. O.; etal. (2004b) [1956]. Butler, J. R. M. (ed.). The Mediterranean and Middle East: The Germans Come to the Help of their Ally (1941). History of the Second World War United Kingdom Military Series. Vol.II. London: Naval & Military Press. ISBN978-1-84574-066-5.
Playfair, I. S. O.; etal. (2004) [1960]. Butler, J. R. M. (ed.). The Mediterranean and Middle East: British Fortunes Reach their Lowest Ebb (September 1941 to September 1942). History of the Second World War United Kingdom Military Series. Vol.III. London: Naval & Military Press. ISBN978-1-84574-067-2.
Playfair, I. S. O.; etal. (2004) [1966]. Butler, J. R. M. (ed.). The Mediterranean and Middle East: The Destruction of Axis Forces in Africa. History of the Second World War United Kingdom Military Series. Vol.IV. London: Naval & Military Press. ISBN978-184574-068-9.
McDonald, Janet (2020). Supplying the British Army in the Second World War. Barnsley: Pen & Sword Military. ISBN978-1-52672-533-2.
Messenger, Charles (1994). For Love of Regiment 1915–1994. A History of British Infantry. Vol.II. London: Pen & Sword Books. ISBN978-0-850-52422-2.
Stevens, George Richard (1946). The Tiger Triumphs, The Story of Three Great Divisions in Italy. London: Her Majesty's Stationery Office. OCLC2708151.
Winton, Harold R. (1988). To Change an Army: General Sir John Burnett-Stuart and British Armoured Doctrine, 1927–1938. Lawrence, Kansas: University Press of Kansas. ISBN978-0-70060-356-5.
Zaloga, Steven (2015). Armored Champion: The Top Tanks of World War II. Mechanicsburg, Pennsylvania: Stackpole Books. ISBN978-0-81171-437-2.
This page is based on this Wikipedia article Text is available under the CC BY-SA 4.0 license; additional terms may apply. Images, videos and audio are available under their respective licenses.