The Battle of Biak was part of the Western New Guinea campaign of World War II, fought between the United States Army and the Japanese Army from 27 May to 17 August 1944. Taking place on the island of Biak, in Geelvink Bay, in present-day Indonesia, it was part of General Douglas MacArthur's South West Pacific Area's offensive drive to clear New Guinea in preparation for an invasion of the Philippines. It was the first major effort by the Japanese to allow uncontested landings for the purpose of creating a kill zone inland. The main Allied objective was to capture the island so that they could construct airfields there. The battle resulted in the capture of the island by Allied forces, which were then used to support operations elsewhere in the Pacific.
Background
The island of Biak forms part of the Schouten Islands, and dominates the entrance to Geelvink Bay, near the western end of New Guinea; its terrain and location about 325 miles (523km) from Hollandia and 180 miles (290km) from Sarmi (where the Japanese had begun concentrating supply bases and airfields), made it well suited to airfield construction, particularly in the flatter southeastern area. As a result, as the Allies began their advance towards the Philippines in 1944, General Douglas MacArthur's Southwest Pacific command began planning its capture.[1] In conceptualizing the operation, Allied planners envisaged a week-long operation;[2] estimating that there were up to 2,000 Japanese troops defending the area.[3] Four landing beaches were chosen near Bosnek, designated Green 1, 2, 3 and 4. Allied planners considered these beaches to be poorer for landing operations, compared to those further away from the airfields, but they were chosen due to their proximity to the main Allied objectives and because aerial reconnaissance indicated that the beaches were not backed by cliffs or swamps, and that there were two jetties nearby that might facilitate deep-water port access.[4]
A map showing the location of Biak in the Schouten Islands
Allied intelligence greatly under-estimated the number of troops holding the island.[3] The island was held by 11,400 Japanese troops under the command of ColonelKuzume Naoyuki. Initially, the majority of the combat troops (about 4,000 personnel), were drawn from the veteran 222nd Infantry Regiment which had previously served in China,[3] along with tanks from the IJA 36th Division, supported by artillery, anti-aircraft, construction and naval guard and base troops under Rear Admiral Sadatoshi Senda.[10] These troops were reinforced by elements of the 35th Division's 219th and 221st Infantry Regiments.[11]
Due to the size of the coastline he had to defend, and based on an appreciation of the Allied objectives, Kuzume focused his defensive plans away from the water's edge. Instead, he decided to carry out a feint, allowing the Americans to come ashore unopposed so that they would advance into the trap he had prepared for them utilizing a series of caves that were located west of Mokmer and to the east of Bosnek. This defensive complex was intended to turn the area around the vital airfield into a honeycomb of defended caves and pillboxes filled with riflemen, automatic weapons, artillery, batteries of mortars, and a single company of Type 95 Ha-Go light tanks. The western caves were connected by a series of underground tunnels and were largely constructed for fighting purposes. Kuzume also stockpiled these positions with ammunition and other supplies, with several dumps located around the eastern cave area, along with living quarters for the defenders.[12] Water was limited on Biak and had to be strictly rationed by the US troops, and heat and humidity would take a heavy toll during the fighting.[2][13]
The Allies knew from an intercepted message dated 5 May 1944 that the IJA 2nd Area intelligence thought the next Allied landing would probably be on Biak, and a preliminary landing was made on 17 May at Wakde on the way to Biak. There a smaller airfield was available, which could be used as an advanced base until the Biak strips were ready. While initial Allied G2 estimates of Japanese troops were approximately 5,000, an intercepted message at the end of April gave the ration strength as 10,800. However, this figure was thought to be projected strength, rather than current strength.[14]
Battle
The invasion force assembled largely in the Humboldt Bay area near Hollandia, and after only limited rehearsals departed late on 25 May.[15] After a 45-minute pre-landing naval bombardment,[16] the 41st Infantry Division of the United States Army landed on Biak on 27 May 1944, initially with the 162nd Infantry Regiment, and soon followed by the remainder of the division, including the 163rd and 186th Infantry Regiments. By 5:15 in the afternoon 12,000 troops had landed, with 12 M4 Sherman tanks, 29 field guns, 500 vehicles, and 3,000 tons of supplies, including 600 tons aboard vehicles.[17] Several minor Japanese air attacks took place against the US lodgment on the first day; initially these were not pressed too heavily, but in the afternoon two waves of aircraft attacked the LSTs around the western jetty. Several bombs were dropped but failed to explode. Three aircraft were destroyed, and one was badly damaged by anti-aircraft fire from the US ships and guns that had been brought ashore.[18]
Map depicting the US landings and seizure of Mokmer Drome
After a brief attack on the beachhead by a group of Japanese light tanks, which was defeated by a group of M4 Shermans in the first tank against tank engagement of the Pacific War,[19] the US regiment moved inland quietly confident and expecting little opposition. This perception changed completely when they reached the airfield. From low-lying terrain and surrounding ridges came a storm of heavy weapons fire that pinned the US troops down. It was not until dark that amphibious tractors could be brought up to extricate them from the trap. The next day they reached the end of Mokmer airstrip. (Sorido airstrip was the objective.) The Japanese held firm, delaying its capture.[20] With the slow progress the US command pulled their forces back, relieved Major General Horace Fuller of command of the 41st Division and reinforced the division with the 34th Regimental Combat Team (34th RCT) of the 24th Infantry Division.[21]
On 5 June the 186th Infantry, with the 2nd Battalion of the 162nd Infantry attached, moved to the eastern bases of the ridges dominating Mokmer strip. A coordinated attack was launched on 7 June which resulted in the capture of Mokmer strip and the establishment of a beachhead south of the strip; however, Japanese resistance continued in the area, particularly in the caves overlooking the area, and prevented engineers from improving the airfield. The engineers recommenced their efforts on 13 June but were once again disrupted by the Japanese.[22] General Robert L. Eichelberger assumed command of the Hurricane Task Force on 15 June, tasked with renewing the attack. The new attack plan was to drive the Japanese from all terrain upon which they could fire on Mokmer Drome. First the West Caves, the Japanese encampment area, was cleared by the 186th Infantry Regiment, who then moved up on the ridges. The 34th RCT, supported by the 167th Field Artillery Battalion, occupied Borokoe and Sorido Dromes almost without opposition.[23]
The US forces had been delayed 10 days. With the delay, the Fifth Air Force Command looked for alternative sites from which they could operate. They arranged the capture of the nearby island of Owi on 2 June and built Owi Airfield comprising two 7,000-ft airstrips there. An advanced echelon was stationed there composed of a bombardment group, two fighter groups, a P-61 Black Widow night fighter group, and a garrison of 15,000 troops.[24]
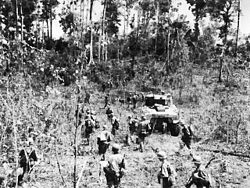
The assault on Biak, infantrymen moving up, May 1944
Control of Biak nearly became a critical turning point battle in the campaign for the Pacific. The Japanese had been seeking to engage the Americans in a decisive battle, the Kantai Kessen, that would enable them to win the war. Biak was not far from major Japanese fleet units and there were a number of land airfields nearby that could support the land-based aircraft the Japanese were hoping to concentrate to defeat the US fleet. The Imperial Navy's Chief of Staff, Admiral Ryūnosuke Kusaka, believed Biak represented the Allies' main effort, and a counterattack at Biak could provoke the US Navy into engaging in a major action.[25] In response to the landing at Biak by US forces, the Japanese launched an operation to reinforce the area. Initially, for air support, the Japanese 23rd Air Flotilla initially only had 18 aircraft but was later reinforced with up to 166 aircraft, which were moved to Sorong, in Dutch New Guinea, arriving from Japan and the Marianas.[26]
The Imperial Japanese Navy also began planning to reinforce the island under Operation KON (渾作戦) . Planning for this operation began on 29 May. A total of 2,500 troops from the 2nd Amphibious Brigade were assigned for transport from Mindanao; they were to be escorted by a force under Rear Admiral Naomasa Sakonju, consisting of the battleship Fuso, the heavy cruisers Aoba, Myoko and Haguro, the light cruiser Kinu, and eight destroyers (five as part of the screen and three as part of the transport element). They were scheduled to reach Biak on 3 June; other forces were to be transported from Manokwari by barge.[27]
Admiral Soemu Toyoda, commander of the Japanese Combined Fleet, initially attempted to reinforce Biak to hold the airstrips, but his first reinforcement sent 1 June was turned back when a Japanese scout plane mistakenly reported a US aircraft carrier in the vicinity. A second relief effort on 8 June was intercepted and driven off by American and Australian naval forces. A third attempt, with the support of the super-battleships Yamato and Musashi, was scheduled for 13 June, but the American invasion of the Marianas forced the Imperial Navy to redirect their forces to the Marianas for a major confrontation in the Philippine Sea.[28]
US infantry on Biak
These efforts were coupled with heavy air attacks. On 2 June, a heavy Japanese air attack was undertaken against LSTs around Biak in support of the reinforcement efforts; a total of 12 out of 54 attacking aircraft were lost, while one Allied LST suffered a near miss.[29] The following day, another large scale air attack was undertaken by Japanese aircraft against Allied vessels around Biak, resulting in minor damage and the loss of 11 aircraft out of 41.[30] In total, three reinforcement efforts were undertaken as part of Operation KON, as well as further barge operations; several large vessels and a number of aircraft were lost by the Japanese during these efforts, although about 1,200 personnel from the 219th, 221st and 222nd Infantry Regiments were landed throughout June.[31]
No. 1 Wireless Unit RAAF, an Australian radio transmission intercept and monitoring unit, learned that, at the time of the invasion, Lieutenant General Takuzo Numata, the Chief of Staff of the 2nd Area Army, was on the island for an inspection tour. He sent messages to command requesting to be evacuated. A float plane was sent in from Korim Bay on the night of 20 June to bring him off. After two more days of intense fighting, Kuzume burned the regimental colors, indicating to his men that the regiment would make the defense of Biak their final battle. He then committed hara kiri, showing his men he did not fear death.[32]
Allied engineers resumed their work on Mokmer airfield on 20 June.[33] The Americans broke through the Japanese defenses on 22 June, with the coastal strip from Bosnek to Sorido being captured, including the three airfields at Sorido (4500ft), Borokoe (4500ft) and Mokmer (8,000ft). There were about 3,000 Japanese remnants trying to organize a final counterattack up to 17 August.[34]
Aftermath
The capture of Biak Island cost the Allied ground forces 438 killed and 2,361 wounded or injured in action, while casualties amongst naval forces amounted to 22 killed, 14 missing and 68 wounded. In addition, US forces suffered 7,234 non battle casualties. The majority of these non-battle casualties were caused by scrub typhus. About 600 British Indian and Javanese forced laborers were released from Japanese custody after the battle.[35][33] From their good service on Biak and other Pacific islands, the 41st received another nickname: the Jungleers.[2] The Japanese fought to annihilation, with 4,700 killed and 200 captured; the remainder faced death from disease and starvation in the following months.[35] Biak was a grinding, shot-for-shot battle. The Japanese tactics of allowing the landing and delaying their firing until there were a great many targets were repeated at other battles including the Battle of Peleliu and the Battle of Okinawa.[2]
A disabled Japanese tank at Biak
The Allies subsequently developed Biak into a logistics base and constructed several airfields in the area. Several runways were constructed by US engineers on nearby Owi, while Mokmer Drome was operational by 22 June, and was further improved and expanded with hardstandings for over 100 aircraft throughout July and into August. Other fields were constructed at Borokoe and Sorido, although the latter field was not completed due to limited manpower and unsuitable terrain. These fields were not completed in time for use during operations to capture the Marianas in June, but they were utilized during follow on actions against the Palau Islands in September; Biak was also used to strike targets in Mindanao and in the Netherlands East Indies. The port facilities around Biak were also improved, with eight berths constructed for LSTs along the southern coast, while two floating docks were constructed to facilitate use by Liberty Ships at Biak and Owi. Several other docks and jetties were constructed or improved, while several roads – 12 miles (19km) on Owi and 30 miles (48km) on Biak – were constructed around the island to improve internal lines of communication; another 22 miles (35km) of existing roads on Biak were also improved. A 400-bed hospital was also constructed, while another was planned but ultimately not completed.[36]
The Battle of Biak triggered the Japanese to initiate Operation KON which not only planned to use battleships to transport more troops and to fight against the Allied forces at Biak but also entailed the transferring of hundreds of precious naval airplanes from the Marianas and other islands to western New Guinea to prepare for a counteroffensive because Biak was considered a crucial island of defense in the Southwest Pacific theater by the Japanese military. About half of the land-based airplanes of the 1st Air Fleet ended up far out of position for the Battle of the Philippine Sea and were not able to contribute to the Japanese plans of using land-based airplanes to support the carrier-based airplanes like what Operation A-Go demanded during the Mariana Islands campaign. The Battle of Saipan which happened at the same time coincidentally also permanently canceled Operation KON and the battleships that were planning to attack MacArthur's small naval forces consisting of no aircraft carriers or battleships and only a few cruisers and destroyers were ordered north to screen aircraft carriers.[37][38]
This page is based on this Wikipedia article Text is available under the CC BY-SA 4.0 license; additional terms may apply. Images, videos and audio are available under their respective licenses.