
The 3rd Light Horse Brigade was a mounted infantry brigade of the Australian Imperial Force (AIF), which served in the Middle Eastern theatre of World War I. The brigade was initially formed as a part-time militia formation in the early 1900s in Victoria. In 1914, the brigade was re-constituted as part of the AIF. The brigade first saw action while serving with the Australian and New Zealand Army Corps during the Gallipoli campaign where they were noted for their attack during the Battle of the Nek. After being withdrawn to Egypt in February 1916 they were involved in the Sinai and Palestine Campaign until the end of the war. They were attached to a number of different formations being part of the Anzac Mounted Division in March 1916 and the Australian Mounted Division in June 1917, who they remained with until the end of the war. After the war, the AIF light horse regiments were demobilised and disbanded; however, the brigade briefly existed as a part-time militia formation in New South Wales until 1921 when its regiments were reorganised into cavalry brigades.

The 5th Light Horse Brigade was a mounted infantry brigade of the First Australian Imperial Force (AIF) that served during World War I. The brigade was initially formed as a part-time militia formation in the early 1900s in Queensland. During World War I, the brigade was formed in Palestine in July 1918 following the disbandment of the Imperial Camel Corps. At this time, the brigade consisted of two Australian Light Horse regiments and a French cavalry regiment, and was supported by British and New Zealand artillery and machine gun troops. It served in the Middle Eastern theatre of World War I in the Sinai and Palestine Campaign as part of the Australian Mounted Division, but only saw limited operations before the war ended, taking part in the capture of Damascus in September and October 1918. After the war, the AIF light horse regiments were demobilised and disbanded; however, the brigade briefly existed as a part-time militia formation in Victoria until 1921 when its regiments were reorganised into cavalry brigades.
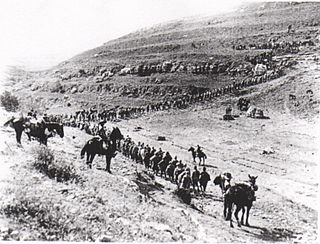
The First Transjordan attack on Amman and to their enemy as the First Battle of the Jordan took place between 21 March and 2 April 1918, as a consequence of the successful Battle of Tell 'Asur which occurred after the Capture of Jericho in February and the Occupation of the Jordan Valley began, during the Sinai and Palestine Campaign of World War I. During the First Transjordan attack large incursions into Ottoman territory occurred. Firstly the Passage of the Jordan River, was successfully captured between 21 and 23 March, followed by the first occupation of Es Salt in the hills of Moab between 24 and 25 March. The First Battle of Amman took place between 27 and 31 March when the Anzac Mounted Division and the Imperial Camel Corps Brigade were reinforced by two battalions of 181st Brigade followed by a second two battalions from the 180th Brigade and artillery. The Fourth Army headquarters located in Amman was strongly garrisoned and during the battle received reinforcements on the Hejaz railway, the strength of which eventually forced the attacking force to retire back to the Jordan Valley between 31 March and 2 April. The Jordan Valley would continue to be occupied by the Egyptian Expeditionary Force (EEF) through the summer until the middle of September 1918 when the Battle of Megiddo began.
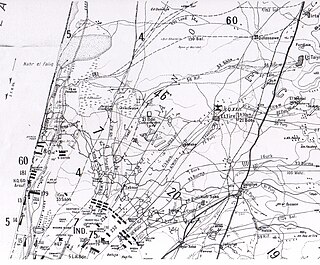
The Battle of Sharon fought between 19 and 25 September 1918, began the set piece Battle of Megiddo half a day before the Battle of Nablus, in which large formations engaged and responded to movements by the opposition, according to pre-existing plans, in the last months of the Sinai and Palestine Campaign of World War I. The fighting took place over a wide area from the Mediterranean Sea east to the Rafat salient in the Judean Hills. Here the Egyptian Expeditionary Force (EEF) XXI Corps with the French brigade sized Détachement Français de Palestine et de Syrie attacked the Yildirim Army Group Eighth Army's XXII Corps and German Asia Corps. The Battle of Sharon extended well behind the Ottoman front lines when the Desert Mounted Corps rode through a gap in the front line across the Plain of Sharon to occupy the Esdraelon Plain. Meanwhile, during the Battle of Nablus the XX Corps attacked Nablus while Chaytor's Force held the right flank in the Jordan Valley before advancing to secure bridges and fords across the Jordan River, to continue the encirclement the defenders in the Judean Hills. Subsequently, Chaytor's Force advanced against the Fourth Army to capture Es Salt and Amman after the Second Battle of Amman.

The Battle of Samakh was fought on 25 September 1918, during the Battle of Sharon which together with the Battle of Nablus formed the set piece Battle of Megiddo fought from 19 to 25 September 1918, in the last months of the Sinai and Palestine Campaign of the First World War. During the cavalry phase of the Battle of Sharon the Desert Mounted Corps commanded by the Australian Lieutenant General Harry Chauvel, captured the Esdraelon Plain 40–50 miles (64–80 km) behind the front line in the Judean Hills on 20 September, when the 3rd Light Horse Brigade captured Jenin. The 4th Light Horse Brigade, Australian Mounted Division was deployed guarding supply columns, and prisoners, before being ordered to attack and capture Samakh on the shore of the Sea of Gallilee. Here the Ottoman and German garrison had been ordered by the commander of the Yildirim Army Group to fight to the last man.

The Battle of Nazareth began on 20 September 1918, during the Battle of Sharon, which together with the Battle of Nablus formed the set piece Battle of Megiddo fought during the last months of the Sinai and Palestine Campaign of the First World War. During the cavalry phase of the Battle of Sharon the Desert Mounted Corps rode to the Esdraelon Plain 40 and 50 miles behind the front line in the Judean Hills. At Nazareth on the plain, the 13th Cavalry Brigade of the 5th Cavalry Division attempted to capture the town and the headquarters of the Yildirim Army Group which was eventually captured the following day after the garrison had withdrawn.
The Capture of Afula and Beisan occurred on 20 September 1918, during the Battle of Sharon which together with the Nablus, formed the set piece Battle of Megiddo fought during the last months of the Sinai and Palestine Campaign of the First World War. During the cavalry phase of the Battle of Sharon, the 4th Cavalry Division of the Desert Mounted Corps attacked and captured the main communications hub at Afula, located in the centre of the Esdraelon Plain, and Beisan on the plain's eastern edge near the Jordan River, some 40–50 miles (64–80 km) behind the front line in the Judean Hills.

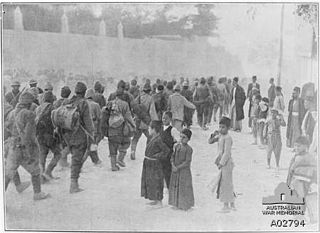
The Capture of Jenin occurred on 20 September 1918, during the Battle of Sharon which together with the Battle of Nablus formed the set piece Battle of Megiddo fought between 19 and 25 September during the last months of the Sinai and Palestine Campaign of the First World War. During the cavalry phase of the Battle of Sharon carried out by the Desert Mounted Corps, the 3rd Light Horse Brigade, Australian Mounted Division attacked and captured the town of Jenin located on the southern edge of the Esdraelon Plain 40–50 miles (64–80 km) behind the front line in the Judean Hills. The Australian light horse captured about 2,000 prisoners, the main supply base and the ordnance depot of the Seventh and the Eighth Armies in and near the town. They also cut the main road from Nablus and a further 6,000 Ottoman Empire and German Empire prisoners, were subsequently captured as they attempted to retreat away from the Judean Hills.
The Battle of Nablus took place, together with the Battle of Sharon during the set piece Battle of Megiddo between 19 and 25 September 1918 in the last months of the Sinai and Palestine Campaign of the First World War. Fighting took place in the Judean Hills where the British Empire's XX Corps attacked the Ottoman Empire's Yildirim Army Group's Seventh Army defending their line in front of Nablus. This battle was also fought on the right flank in the Jordan Valley, where Chaytor's Force attacked and captured the Jordan River crossings, before attacking the Fourth Army at Es Salt and Amman capturing many thousands of prisoners and extensive territory. The Battle of Nablus began half a day after the main Battle of Sharon, which was fought on the Mediterranean section of the front line where the XXI Corps attacked the Eighth Army defending the line in front of Tulkarm and Tabsor and the Desert Mounted Corps which rode north to capture the Esdrealon Plain. Together these two battles, known as the Battle of Megiddo, began the Final Offensive of the war in the Sinai and Palestine campaign.

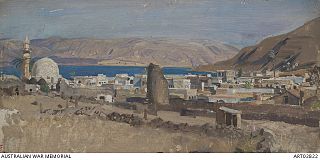
The Capture of Damascus occurred on 1 October 1918 after the capture of Haifa and the victory at the Battle of Samakh which opened the way for the pursuit north from the Sea of Galilee and the Third Transjordan attack which opened the way to Deraa and the inland pursuit, after the decisive Egyptian Expeditionary Force (EEF) victory at the Battle of Megiddo during the Sinai and Palestine Campaign of World War I. Damascus was captured when Desert Mounted Corps and Prince Feisal's Sherifial Hejaz Army encircled the city, after a cavalry pursuit northwards along the two main roads to Damascus. During the pursuit to Damascus, many rearguards established by remnants of the Ottoman Fourth, Seventh and Eighth Armies were attacked and captured by Prince Feisal's Sherifial Army, Desert Mounted Corps' Australian Mounted Division the 4th and the 5th Cavalry Divisions. The important tactical success of capturing Damascus resulted in political manoeuvring by representatives from France, Britain and Prince Feisal's force.
The Third Transjordan attack by Chaytor's Force, part of the British Empire's Egyptian Expeditionary Force (EEF), took place between 21 and 25 September 1918, against the Ottoman Empire's Fourth Army and other Yildirim Army Group units. These operations took place during the Battle of Nablus, part of the Battle of Megiddo which began on 19 September in the final months of the Sinai and Palestine Campaign of World War I. Fought on the right flank and subsidiary to the Battle of Nablus, the Third Transjordan attack began northwards, with the assault on Kh Fasail. The following day a section of Chaytor's Force, attacked and captured the Ottoman Empire's 53rd Division on the main eastwards line of retreat out of the Judean Hills across the Jordan River. Retreating columns of the Yildirim Army Group were attacked during the battle for the Jisr ed Damieh bridge, and several fords to the south were also captured, closing this line of retreat. Leaving detachments to hold the captured bridge and fords, Chaytor's Force began their eastwards advance by attacking and capturing the Fourth Army garrison at Shunet Nimrin on their way to capture Es Salt for a third time. With the Fourth Army's VIII Corps in retreat, Chaytor's Force continued their advance to attack and capture Amman on 25 September during the Second Battle of Amman. Several days later, to the south of Amman, the Fourth Army's II Corps which had garrisoned the southern Hejaz Railway, surrendered to Chaytor's Force at Ziza, effectively ending military operations in the area.
The Capture of Tiberias took place on 25 September 1918 during the Battle of Sharon which together with the Battle of Nablus formed the set piece Battle of Megiddo fought between 19 and 25 September in the last months of the Sinai and Palestine Campaign of the First World War. During the cavalry phase of the Battle of Sharon the Desert Mounted Corps occupied the Esdraelon Plain 40–50 miles (64–80 km) behind the front line in the Judean Hills. One squadron from each of the 3rd and 4th Light Horse Brigades Australian Mounted Division attacked and captured Tiberias, along with the Yildirim Army Group's Ottoman and German garrison.

The Pursuit to Haritan occurred between 29 September and 26 October 1918 when the XXI Corps and Desert Mounted Corps of the Egyptian Expeditionary Force (EEF) pursued the retreating remnants of the Yildirim Army Group advanced north from Damascus after that city was captured on 1 October during the final weeks of the Sinai and Palestine Campaign of the First World War. The infantry and corps cavalry advanced from Haifa and Acre to capture the Mediterranean ports at Beirut and Tripoli between 29 September and 9 October. These captures enabled the inland pursuit to be supplied when the Desert Mounted Corps' 5th Cavalry Division resumed the pursuit on 5 October. The cavalry division occupied one after the other, Rayak, Homs, Hama. Meanwhile, Prince Feisal's Sherifial Force which advanced on the cavalry division's right flank, attacked and captured Aleppo during the night of 25/26 October after an unsuccessful daytime attack. The next day the 15th Cavalry Brigade charged a retreating column and attacked a rearguard during the Charge at Haritan near Haritan which was at first reinforced but subsequently withdrew further north.

The Charge at Irbid occurred on 26 September 1918 as a consequence of the victory at the Battle of Megiddo during the subsequent inland pursuit by Desert Mounted Corps to capture Damascus in the Sinai and Palestine Campaign of World War I. The charge occurred when the 2nd Lancers of the 10th Cavalry Brigade, 4th Cavalry Division, attacked the Ottoman Army garrison defending the town of Irbid.
The Charge at Kaukab took place on 30 September 1918 about 10 miles (16 km) south of Damascus during the pursuit by Desert Mounted Corps following the decisive Egyptian Expeditionary Force victory at the Battle of Megiddo and the Battle of Jisr Benat Yakub during the Sinai and Palestine Campaign of World War I. As the Australian Mounted Division rode along the main road north, which connects the Galilee with Damascus via Quneitra, units of the division charged a Turkish rearguard position located across the main road on the ridge at Kaukab.
Chaytor's Force named after its commander, Major General Edward Chaytor, was a composite division-sized force which served in the British Egyptian Expeditionary Force during the Sinai and Palestine Campaign of the First World War. The force of 11,000 men, consisted of a division headquarters, three mounted and one infantry brigades, four independent infantry battalions and four artillery batteries and was detached from the Desert Mounted Corps for deception operations.
The Charge at Kiswe took place on 30 September 1918 about 9 miles (14 km) south of Damascus, during the pursuit by Desert Mounted Corps following the decisive Egyptian Expeditionary Force victory at the Battle of Megiddo, the Battle of Jisr Benat Yakub and the Charge at Kaukab during the Sinai and Palestine Campaign in World War I. As Desert Mounted Corps rode along the main road from Nablus, units of the 14th Cavalry Brigade, 5th Cavalry Division, were ordered to charge a rearguard north of Kiswe, protecting columns of the Ottoman Fourth Army, retreating towards Damascus.

The Charge at Khan Ayash occurred on 2 October 1918 about 17 miles (27 km) north of Damascus after the pursuit to, and capture of Damascus, which followed the decisive Egyptian Expeditionary Force victory at the Battle of Megiddo on 25 September during the Sinai and Palestine Campaign of World War I. After Damascus had been encircled by Desert Mounted Corps on 30 September, the 3rd Light Horse Brigade advanced through the city on 1 October to charge and capture remnants of the Ottoman Yildirim Army Group withdrawing along the road north to Rayak and Homs.

The Capture of Jisr ed Damieh took place on 22 September 1918 during the Third Transjordan attack of the Battle of Nablus which, along with the main Battle of Sharon formed the Battle of Megiddo fought during the Sinai and Palestine Campaign of the First World War. Units of Chaytor's Force under the commanded by Brigadier-General William Meldrum, and known as "Meldrum's Force", attacked and captured the bridge. This successful attack cut the most direct line of retreat from the Judean Hills for the Seventh and remnants of the Eighth Armies, while units from these two armies were moving towards, and crossing the Jisr ed Damieh bridge over the Jordan River. This victory by Meldrum's Force opened the way for Chaytor's Force to advance along the main Nablus to Es Salt road to capture Es Salt and to continue on to the victory at the Second Battle of Amman.

The Second Battle of Amman was fought on 25 September 1918 during the Third Transjordan attack as part of the Battle of Nablus which together with the main Battle of Sharon form the major set piece offensive known as the Battle of Megiddo of the Sinai and Palestine Campaign in World War I. After cutting the road from Nablus to Es Salt on 22 September Chaytor's Force captured the bridge over the Jordan River at Jisr ed Damieh while units of the Seventh Army and remnants of the Eighth Army were still in retreating towards the bridge from the Judean Hills. Having cut this line of retreat, Chaytor's Force proceeded eastwards to attack and capture Es Salt, before riding on to attack and capture the Ottoman rearguard of the Fourth Army defending Amman. These British Empire victories of the Third Transjordan attack over Yildirim Army Group forces, followed two unsuccessful EEF attacks across the Jordan River in March and April 1918.


