Samakh, in the centre of a rearguard line stretching from Tiberias through Samakh and on to Deraa was intended to cover the retreat of three Ottoman armies. The rearguard was set up to delay the advance of the Egyptian Expeditionary Force (EEF) cavalry in the Desert Mounted Corps after the British Empire infantry victories in the Judean Hills at the Battle of Tulkarm, and the Battle of Tabsor during the Battle of Sharon. These and other battles fought during the Battle of Nablus including the Third Transjordan attack, also part of the Battle of Megiddo, forced the retreat of the Ottoman Fourth, the Seventh and the Eighth Armies north towards Damascus.
On 20 September, German GeneralOtto Liman von Sanders, the commander of the Yildirim Army Group, ordered Samakh's German and Ottoman garrison to prepare a strong rearguard defence of the town. By dawn on 25 September, when a regiment and two squadrons of the Australian 4th Light Horse Brigade attacked Samakh, the rearguard was strongly entrenched. The assault, which began with a mounted cavalry charge, ended two hours later after close quarter fighting in the village and the railway station. After fierce fighting with bayonets and swords, from room to room in the railway buildings, the town was captured. This victory, which captured the centre of the rearguard line, concluded the Battle of Sharon section of the Battle of Megiddo and opened the way for the cavalry pursuit to Damascus, which was captured on 1 October. By the time the Armistice of Mudros between the Allies and the Ottoman Empire was signed at the end of October, Aleppo had been captured and fighting was in progress further north.
Background
Falls Map 33 Megiddo Situation at 21:00 21 September 1918 Sea of Galilee shown as Lake Tiberias
Following the First Transjordan and the Second Transjordan attacks in March–April and April–May 1918, by the Egyptian Expeditionary Force (EEF), which had been responsible for the Sinai and Palestine Campaign since March 1916, its commander GeneralEdmund Allenby ordered the occupation of the Jordan Valley. He also ordered the front line be extended across the Judean Hills to the Mediterranean Sea. Most of the British infantry and Yeomanrycavalry regiments were redeployed to the Western Front to counter Ludendorff'sGerman spring offensive and were replaced by British India Army infantry and cavalry. As part of re-organisation and training, these newly arrived soldiers carried out a series of attacks on sections of the Ottoman front line during the summer months. These attacks were aimed at pushing the front line to more advantageous positions in preparation for a major attack, and to acclimatise the newly arrived infantry. It was not until the middle of September that the consolidated force was ready for large-scale operations.[1]
On 19 September, the XXI Corps commanded by Lieutenant GeneralEdward Bulfin had, with the support of a creeping barrage, broken through the Ottoman front line during the Battle of Sharon. In the afternoon the XX Corps commanded by Lieutenant General Philip Chetwode was then ordered to begin its own attack, supported by an artillery barrage. These attacks by both the XX and XXI Corps continued until midday on 21 September, when a successful flanking attack by the XXI Corps, combined with the XX Corps assault, forced the Seventh and Eighth Armies to disengage. The Seventh Army commanded by the Ottoman ArmyFerik or Birinci Ferik, Mustafa Kemal retreated from the Nablus area towards the Jordan River, crossing at the Jisr ed Damieh bridge before the rearguard at Nablus was captured. The Desert Mounted Corps commanded by Lieutenant General Harry Chauvel advanced through the gap created by the XXI Corps infantry during the morning of 19 September to almost encircle the Ottoman forces fighting in the Judean Hills, capturing Nazareth, Haifa, Afulah and Beisan, Jenin and Samakh before advancing to Tiberias. During this time, Chaytor's Force commanded by Major GeneralEdward Chaytor captured part of the retreating Ottoman and German column at the Jisr ed Damieh bridge to cut off this line of retreat across the Jordan River. To the east of the river, as the Fourth Army began its retreat, Chaytor's Force advanced to capture Es Salt on 23 September. Amman was captured on 25 September during the Second Battle of Amman where a strong Fourth Army rearguard was defeated on 25 September.[2]
It was clear, that only one course remained open to me. The Tiberias sector from Lake Hule to Samakh must be held with all the means at our disposal to prevent the pursuit overtaking us, whilst the formations retiring along the River Jordan and east of Jordan to the Yarmuk Valley sector, from Samakh to Der'a, must form [a] front for at least the time being.
—Commander of Yildirim Army Group, Liman von Sanders' Five years in Turkey[5]
During the unsuccessful attack of the 5th Cavalry Division on Nazareth in the early morning of 20 September, Liman von Sanders accompanied by General Kiazim, Major Prigge and Rittmeister Hecker, had escaped on their way to Damascus. They arrived at Tiberias during the afternoon of 20 September, before continuing on to Samakh and Deraa.[6][7][8] He alerted the garrisons he passed to the advance of the EEF and ordered the establishment of a rearguard line. The line was to run from Deraa down the Yarmuk River Valley, across the Jordan River and west to Samakh, around the shore of the Sea of Galilee to Tiberias and northwards to Lake Huleh. Two main roads and the railway lines to Damascus, would be protected and time gained for the development of the defence of Damascus, if the garrisons were not defeated.[4][9][10] Liman von Sanders described Samakh "as the essential link between the two main sectors of the line" but also "the weak link between the two-halves."[11][12] He reinforced the garrison at Samakh with German machine gunners and ordered the commander, a German officer to hold the town to the last man.[9]
Prelude
Falls Map 21 Cavalry advances 19 to 25 September 1918. Detail shows 5th Cavalry Division advance to Nazareth, 4th Cavalry Division advance to Afulah and Beisan, Australian Mounted Division advance to Lajjun, 3rd Light Horse Brigade advance to Jenin, 19th Lancers advance to Jisr el Majami and 4th Light Horse Brigade advance to Samakh. Also shown are the three main lines of retreat bombed by aircraft and the retreat of the Seventh Ottoman Army and Asia Corps across the Jordan River.
Asia Corps retreat
By the morning of 21 September, German Colonel Gustav von Oppen's Asia Korps remained intact. It consisted of the 16th and 19th Divisions, the 701st Battalion was still complete with a troop and a squadron of cavalry, six machine guns and 18 light Bergmann machine guns, an additional machine gun company of six guns an infantry-artillery platoon with two mountain guns/howitzers, a trench mortar section with four mortars. The 701st Artillery Detachment consisted of two four-gun 77-millimetre (3.0in), one four-gun 105-millimetre (4.1in) howitzer batteries and the "Hentig" Machine Gun Detachment. The remnants of the 702nd and the 703rd Battalions were formed into a battalion to which a rifle company, a machine gun company and a trench mortar detachment were attached.[13]
With about 700 German and 1,300 Ottoman soldiers of the 16th and 19th Divisions, von Oppen succeeded in retreating towards Beisan via Mount Ebal during 21 September but was forced to leave behind all guns or baggage. They suffered some casualties when fired on by artillery, before bivouacking that night at Tammun with the 16th and 19th Divisions at Tubas, unaware that Desert Mounted Corps had already occupied Beisan. They were moving northwards from Tubas towards Beisan when von Oppen learned it had already been captured. He decided to advance during the night of 22 September to Samakh where he correctly guessed Liman von Sanders would order a strong rearguard action. However, Jevad, the commander of the Eighth Army ordered him to cross the Jordan instead; he successfully got all the Germans and some of the Ottoman soldiers across before the 11th Cavalry Brigade attacked and captured the remainder, to finalise the capture of Afulah and Beisan.[14] Liman von Sanders was very critical of Jevad's intervention which considerably weakened the Samakh position, but von Oppen would have had to break through a whole cavalry division to get there.[15]
Reconnaissance by 4th Cavalry Division unit
While the Central India Horse (10th Cavalry Brigade) or the 19th Lancers (12th Cavalry Brigade), 4th Cavalry Division, continued to hold the bridge at Jisr el Mejamie, captured at 05:00 on 21 September, during the Capture of Afulah and Beisan, one of their squadrons made a reconnaissance to Samakh to blow up the railway east of the town. The 10th Brigade relieved the 19th Lancers at Jisr el Mejamie on 23 September, so it was probably the 10th Brigade which carried out the reconnaissance.[16][17] However, the patrol was forced to retire when heavily fired on by two 10.5-centimetre (4.1-inch) guns (also described as "two 4.2 guns,") from north east of the town, but they reported a train had arrived at Samakh which was still there at 11:00 on 24 September.[17][18][19]
Australian Mounted Division advance to Jisr el Mejamie
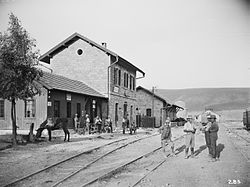
Samakh village shows railway track to jetty and Sea of Gallilee
Chauvel, commander of the Desert Mounted Corps, ordered the capture of the towns of Samakh and Tiberias to complete the strategic and tactical line held by his cavalry across the Esdraelon Plain from Acre north of Haifa on the Mediterranean Sea to Nazareth. On 24 September the Australian Mounted Division commanded by Major GeneralHenry West Hodgson, was ordered to capture Samakh and the railway bridges over the Yarmuk gorge, four days after Liman von Sanders had alerted the rearguard garrison, which "led to the most fiercely–fought action of the whole pursuit" in preparation for a further advance towards Damascus.[4][9][10]
However Hodgson's reserve, the 11th Light Horse Regiment and one squadron of the 12th Light Horse Regiment, with the 4th Light Horse Brigade's headquarters and Machine Gun Squadron, were the only troops available.[4][9] The 5th Light Horse Brigade was ordered at 15:10 on 24 September, while they were at Jenin, to send a regiment to reinforce the attacking force during its approach to Samakh. They sent the 15th Light Horse Regiment which reported at Samakh at 07:00 half an hour after the town was captured.[20][Note 1] Meanwhile, the remainder of the 5th Light Horse Brigade stayed at Jenin until the evening of 25 September when they rode to the railway near Zerin, with Mount Gilboa "on their right," to water for a couple of days.[21]
The 4th Light Horse Brigade (less the 4th Light Horse Regiment and two squadrons or five troops of 12th Light Horse Regiment) arrived at Beisan at 13:45 on 24 September. Here they received Order No. 31 from the Australian Mounted Division to attack Samakh. After leaving Beisan for Jisr el Mejamie, at 16:35 they received a message dropped from an aircraft, which reported that Samakh was defended by 50 rifles and machine guns. They arrived at Jisr el Mejamie at 21:00 and made contact with the regiment of the 4th Cavalry Division, holding the bridge.[12][22] A further order to capture Samakh was received at 22:10, which included the additional objective of reconnoitring towards Tiberias, where they were to cooperate with the 3rd Light Horse Brigade in capturing the town.[22][Note 2] The orders gave the brigade commander, Brigadier GeneralWilliam Grant, the choice of attacking immediately, or waiting for the 4th Light Horse Regiment and the squadrons of the 12th Light Horse Regiment. He decided not to delay attacking the apparently weak rearguard, as he expected to be reinforced by the 15th Light Horse Regiment, 5th Light Horse Brigade, on the way to Samakh.[23][24] If Grant had waited for reinforcements, the attack would have been in daylight, in full view of the defenders in the railway station building, which may have resulted in at least as many casualties, and perhaps many more, during a potentially more protracted fight.[9][25]
Battle
Falls Map 37 Battle of Samakh 25 September 1918
Cavalry charge
The 4th Light Horse Brigade crossed the Jordan and Yarmuk Rivers at Jisr el Mejamie (Mejamie Bridge) at 02:30 on 25 September in order to arrive at Samakh before dawn, advancing along the railway line. Grant ordered the 11th Light Horse Regiment to attack mounted from the southeast at dawn, supported by machine guns which were to be deployed due south, on the railway.[17]
The attack began before dawn, when the two leading light horse squadrons were heavily fired on by rifles and machine guns from several outposts at 04:25, causing nearly 100 horse casualties.[9][17][26] No reconnaissance by the light horse had been possible, but the 19th Lancers reported that the village and station buildings lay at the end of a flat plain 2.5 miles (4.0km) wide, without any cover and no apparent obstacles to a cavalry charge.[17] This unexpected fire revealed the garrison was deployed covering the open plain for some 700 yards (640m) south of Samakh, extending on either side to the mountains. The 11th Light Horse Regiment, commanded by Lieutenant Colonel J. W. Parsons, had planned to attack the garrison's flank, but as no flank attack was possible, he swung the regiment around to attack straight on. A and B squadrons galloped on either side of the railway line, with all 12 machine guns of the 4th Machine Gun Squadron providing covering fire for the charging squadrons. They fired at the flashes created by the Ottoman rifles and machine guns.[17][27]
Both squadrons succeeded in entering the village, while one squadron of 12th Light Horse Regiment moved forward towards the town from the west, in support. The 11th Light Horse Regiment's reserve 'C' squadron moved forward to occupy Hill 377 on the eastern flank, watching the railway from Deraa and the road on the eastern side of the Sea of Galilee. Meanwhile, the 4th Light Horse Brigade Headquarters and the 12th Light Horse Regimental Headquarters, forming the attacking units' reserve, were deployed on the plain south of the town and east of the railway. Here they were heavily fired on by artillery, on the right flank near the Sea of Galilee, and forced to move to cover.[27][28] Preston claims it was the 4th Light Horse Regiment which "was sent in mounted on the west."[29]
This cavalry charge was unique during the whole of the First World War, being the only one carried out in the dark and across country which had not been previously reconnoitred.[25][30] The ground was found to be scattered with clumps of long spiked thistles, and a number of pitfalls causing nine men to be injured from falls during the charge.[17][31]
Dismounted attack
Samakh Railway Station after the battle
As soon as A and B Squadrons of the 11th Light Horse Regiment reached the town and dismounted, the 4th Machine Gun Squadron stopped their covering fire, to target the German or Ottoman machine guns on the right, which they silenced. Then the 4th Machine Gun Squadron galloped forward to take up a position at the western end of the town, while the two attacking squadrons dismounted, to approach the railway station buildings on foot.[32]
The substantial two storied station building, solidly build of stone, made an effective strong redoubt for the garrison, with the windows used by the defenders to fire their automatic rifles and throw their grenades from. At this time several white flags were reported at the station, but when the light horsemen approached they were fired on, and it was in this way that most of the light horsemen who died during the battle were killed. Once they succeeded in entering the station buildings, hand-to-hand fighting from room to room with rifles, bayonets, and swords, followed. Other groups of defenders deployed in the locomotives, tenders and carriages standing in the railway sidings, were also attacked.[11][27][32]
The savage hand-to-hand fighting in the railway buildings and sidings lasted for more than an hour before the light horsemen captured the area. Over 20 Ottoman and German soldiers were killed in the station buildings alone during the fighting. At the same time, 'C' Squadron, of the 11th Light Horse Regiment, and/or one squadron of the 12th Light Horse Regiment, moved up into the village of Samakh and captured the town during less severe fighting.[9][27][32][33]
Casualties, captured kit
Column of prisoners captured at Samakh
There were 98[34] German and Ottoman soldiers killed and 33 wounded while 331 unwounded prisoners were captured. Other captures included one 77mm field gun, seven heavy machine guns, three automatic rifles, a large dump of rifles, bayonets, automatic pistols and ammunition, which was subsequently burnt. A motor boat escaped but another was destroyed by fire and its occupants were captured. Two locomotives, eight carriages, 12 goods wagons along with an aircraft and a wireless were also captured. The light horsemen suffered 17 killed and 60 wounded with one man missing and 77 horses killed, the 11th Light Horse Regiment lost two captains, one lieutenant and 11 other ranks killed, while four officers and 25 other ranks were wounded.[27][32][35]
While the 4th Light Horse Brigade buried their dead and the field ambulance treated the wounded, a squadron of the 12th Light Horse Regiment advanced along the western shore of the Sea of Galilee, to meet with the 3rd Light Horse Brigade which had captured Jenin, which had advanced directly over the hills from Nazareth at 15:00 on 25 September, to capture Tiberias.[36][37][38][39] Strong patrols also advanced up the Yarmuk River valley east of Samakh, but every bridge across the Jordan River was found to be strongly guarded, 30 defenders at one and 60 Germans in a redoubt with an engine and tender, at another. The rugged Jebel Ain en Nimr mountain, 1,800 feet (550m) above the Sea of Galilee and less than two miles (3.2km) from its southern shore was occupied by 500 Ottoman infantry and one gun.[38]
The capture of Samakh and operations around the Sea of Galilee concluded the Battles of Megiddo.[30] Chauvel's Desert Mounted Corps had captured Haifa, Nazareth and Tiberias, two Ottoman armies had been eliminated from the Judean Hills and the Fourth Army east of the Jordan was in full retreat to Deraa and Damascus. Allenby acknowledged in a cable to the Australian Government that "the completeness of our victory is due to the action of the Desert Mounted Corps under General Chauvel."[40] "The battle had been as brilliant in execution as it had been in conception; it had no parallel in France or on any other front, but rather looked forward in principle and even in detail to the Blitzkrieg of 1939."[40]
I have your HW wire and that from Troopers proposing a Cavalry raid to Aleppo. I don't think Aleppo possible; but am sending 3 Divisions of Cavalry, as soon as I can, to Damascus. Chaytor's Division of Anzac Light Horse is about Amman now, and will deal with enemy coming from the South. Prisoners number well over 40,000 and are still coming in. I have Australian mounted troops at the S. end of Lake Tiberias, and they are pushing to Tiberias. If I get Damascus, Beirut falls to us certainly; and I hope to push troops, Northwards, thither, by the coast–road from Haifa, feeding from the sea, stage by stage.
—Allenby to Wilson CIGS War Office 25 September 1918[41]
On 27 September, the 4th Light Horse Brigade left Samakh at 06:00 and arrived at Tiberias at 08:00, where they received two days supplies and one day's iron ration, to last until after breakfast on 29 September. They rode out towards Damascus at 10:00, leaving the 15th Light Horse Regiment (5th Light Horse Brigade) to guard Samakh until they were relieved by the Indian 7th (Meerut) Division, XXI Corps.[22]
Legacy in Israel
On 31 October 2017, for the centenary of the Battle of Beersheba, the Beersheba ANZAC Memorial Center was inaugurated. Among the events was a partial reenactment of the battle, with horsemen and horsewomen including descendants of the original cavalrymen. Malcolm Turnbull, the Prime Minister of Australia, and Dame Patsy Reddy, the Governor-General of New Zealand, attended along with numerous fellow ANZACs visiting Israel for the occasion. Israelis present included Prime MinisterBenjamin Netanyahu.[42] The ANZAC Memorial Center is located in the city's British military cemetery dating back to World War I.[43]
On 26 September 2019, a life-size sculpture, 'The Aborigine and His Horse,' was dedicated at Tzemach, commemorating Aboriginal members of the ANZAC forces, dubbed the "Queensland Black Watch", including cavalrymen who fought at Tzemach. Descendants of those horsemen travelled from Australia to participate in the statue's inauguration, "another stage in the historic correction that Australian society is undergoing in their relations with the Aborigines."[44][45]
Notes
↑ It has been stated that a regiment from the 5th Light Horse Brigade accompanied the 4th Light Horse Brigade towards Samakh, but the war diary of the regiment concerned, confirms the Australian Mounted Division's war diary, that it did not arrive at Samakh until after the town was captured. [Preston 1921 pp. 248–9] [15th Light Horse Regiment War Diary AWM4-10-20-2]
↑ Both orders, Appendices 262 and 264, are not with the Australian War Memorial copy of the war diary. [4th Light Horse Brigade War Diary AWM 4-10-4-21] The National Archives, Kew holds the complete and original war diaries.
Baly, Lindsay (2003). Horseman, Pass By: The Australian Light Horse in World War I. East Roseville, Sydney: Simon & Schuster. OCLC223425266.
Bruce, Anthony (2002). The Last Crusade: The Palestine Campaign in the First World War. London: John Murray. ISBN978-0-7195-5432-2.
Carver, Michael, Field Marshal Lord (2003). The National Army Museum Book of The Turkish Front 1914–1918: The Campaigns at Gallipoli, in Mesopotamia and in Palestine. London: Pan Macmillan. ISBN978-0-283-07347-2.{{cite book}}: CS1 maint: multiple names: authors list (link)
Coulthard-Clark, Christopher (2001). The Encyclopaedia of Australia's Battles. Crows Nest, Sydney: Allan & Unwin. OCLC231965802.
Falls, Cyril (1930). Military Operations Egypt & Palestine from June 1917 to the End of the War. Official History of the Great War Based on Official Documents by Direction of the Historical Section of the Committee of Imperial Defence: Volume 2 Part II. A. F. Becke (maps). London: HM Stationery Office. OCLC256950972.
Grainger, John D. (2006). The Battle for Palestine, 1917. Woodbridge: Boydell Press. ISBN978-1-84383-263-8.
Gullett, H. S. (1940). The Australian Imperial Force in Sinai and Palestine. Sydney, Australia: Angus and Robertson. OCLC939621813.
Hill, Alec Jeffrey (1978). Chauvel of the Light Horse: A Biography of General Sir Harry Chauvel, GCMG, KCB. Melbourne: Melbourne University Press. OCLC5003626.
Hughes, Matthew, ed. (2004). Allenby in Palestine: The Middle East Correspondence of Field Marshal Viscount Allenby June 1917– October 1919. Army Records Society. Vol.22. Phoenix Mill, Thrupp, Stroud, Gloucestershire: Sutton Publishing. ISBN978-0-7509-3841-9.
Keogh, E. G.; Joan Graham (1955). Suez to Aleppo. Melbourne: Directorate of Military Training by Wilkie & Co. OCLC220029983.
Maunsell, E. B. (1926). Prince of Wales' Own, the Seinde Horse, 1839–1922. Regimental Committee. OCLC221077029.
Paget, G.C.H.V Marquess of Anglesey (1994). Egypt, Palestine and Syria 1914 to 1919. A History of the British Cavalry 1816–1919. Vol.5. London: Leo Cooper. ISBN978-0-85052-395-9.
Powles, C. Guy; A. Wilkie (1922). The New Zealanders in Sinai and Palestine. Official History New Zealand's Effort in the Great War. Vol.III. Auckland: Whitcombe & Tombs. OCLC2959465.
Wavell, Field Marshal Earl (1968) [1933]. "The Palestine Campaigns". In Sheppard, Eric William (ed.). A Short History of the British Army (4thed.). London: Constable & Co. OCLC35621223.
This page is based on this Wikipedia article Text is available under the CC BY-SA 4.0 license; additional terms may apply. Images, videos and audio are available under their respective licenses.