Henry Macandrew

Last updated

Sir Henry Macandrew

Henry John Milnes MacAndrew.png
Macandrew as a general officer
Birth nameHenry John Milnes Macandrew
Born(1866-08-07)7 August 1866
Inverness, United Kingdom
Died16 July 1919(1919-07-16) (aged 52)
Aleppo, Syria
Buried
Beirut War Cemetery
Allegiance United Kingdom
Service/branch British Army
British Indian Army
Years of service1884–1889 (British Army)
1889–1919 (British Indian Army)
Rank Major-General
Commands held 5th Bengal Cavalry
9th (Sirhind) Brigade
53rd Brigade
2nd Indian Cavalry Division
5th Cavalry Division
Battles/wars
Spouse(s)Esther Ritchie Cooper

Major-General Sir Henry Macandrew KCB DSO (7 August 1866 – 16 July 1919) was a British Indian Army officer. Predominantly serving in the cavalry and also as an intelligence officer, Macandrew fought through the Tirah campaign in India in 1897 and 1898, and then served as a staff officer during the Boer War, participating in several battles and receiving the Distinguished Service Order.

Contents

After serving again on the staff Macandrew was given command of his regiment, the 5th Bengal Cavalry, in 1914, and upon the outbreak of the First World War travelled to France as General Staff Officer Grade 1 of the 1st Indian Cavalry Division. Soon afterwards he was promoted to become Brigadier-General General Staff for the Indian Cavalry Corps. He served at the Battle of Neuve Chapelle before in 1916 he assumed command of the 2nd Indian Cavalry Division, leading it during the Battle of the Somme and Battle of Cambrai. In 1918 he was given command of the newly created 5th Cavalry Division for the Sinai and Palestine campaign. He commanded the division throughout the campaign, including at the Capture of Damascus and Battle of Aleppo. Staying with his division after the war, Macandrew died of wounds received in an accidental explosion of petrol fumes in Aleppo.

Military career

Early service

Henry John Milnes Macandrew was born on 7 August 1866, the son of Sir Henry Macandrew of Aisthorpe, Inverness. [1] Macandrew was educated at The Inverness College before he joined the British Army on 6 August 1884 as a lieutenant in the 2nd Battalion, Cameron Highlanders. [1] [2] [3] Two years later he transferred to the Lincolnshire Regiment on 10 November 1886. [1] [4]

Macandrew began an eighteen-month period of probationary service in the Bengal Staff Corps on 30 March 1888, serving as a squadron officer in the 5th Bengal Cavalry of the British Indian Army. On 22 November 1889 he was admitted to the Bengal Staff Corps, having completed his probationary period, as a lieutenant and continued with the 5th Bengal Cavalry. [1] [5] On 13 May the following year he was appointed as the regiment's adjutant. [6]

Macandrew served as brigade transport officer to Brigadier-General Alfred Gaselee's 2nd Brigade in the Tirah campaign between 1897 and 1898, and was promoted to captain on 10 November 1897. [7] [8] [9] For his service in this campaign, Macandrew was awarded the India Medal with two clasps and mentioned in dispatches. [7]

Boer War

Macandrew continued in India until 1900 when he travelled to South Africa to fight in the Boer War. Serving in Kitchener's Horse, from February he operated in the Orange Free State. He was present at the Battle of Paardeberg between 17 and 26 February, the Battle of Poplar Grove on 7 March, and the Battle of Driefontein on 10 March. After several other skirmishes, Macandrew moved to serve in the Transvaal in May, seeing action at the Battle of Doornkop on 29 May and being present at the occupation of Pretoria on 4 June. [7] [10] [11]

Macandrew was subsequently appointed intelligence officer on the Delagoa line, east of Pretoria, in July, in which role he continued until September. At this stage he was assigned as the Deputy Assistant Adjutant-General Intelligence (DAAGI) to Major-General Ralph Arthur Penrhyn Clements's column, serving in the Transvaal and to the west of Pretoria. [7] [11] On 29 November Macandrew was awarded the Distinguished Service Order (DSO) "in recognition of services during the operations in South Africa"; he continued as DAAGI into 1901, moving in February to serve Major-General Neville Lyttelton in the same position. [7] [12]

Having served in operations in the Transvaal, Orange River Colony, and Cape Colony, Macandrew was then promoted to serve Major-General Bruce Hamilton as DAAGI Army Headquarters Staff in May. He stayed in this role until the end of the war, relinquishing his position on 31 May 1902. [7] [11] For his services in the Boer War, Macandrew received the Queen's South Africa Medal with four clasps, the King's South Africa Medal with two clasps, and was mentioned in dispatches a further two times. [1] He travelled to England where, on 24 October, Edward VII presented him with his DSO. [13]

Return to India

Macandrew's lengthy service as a staff officer during the Boer War led him to be considered qualified for formal staff employment after his return to India. [11] On 2 May 1903, he was appointed a Station Staff Officer, 1st Class, but he stayed in this position for only a short while. [14] He was instead appointed brigade major to the Inspector-General of Cavalry in India, Major-General Douglas Haig, on 16 November. Haig chose Macandrew because he had worked with him in the Boer War and been impressed by his intelligence work. The appointment was meant to be for only one year, but Haig had Macandrew stay on until 1905. [7] [15] [16] He was promoted to major on 10 November 1904. [17]

After his appointment with Haig ended, Macandrew continued on as a staff officer, becoming a Deputy Assistant Quartermaster-General at Headquarters, India, on 6 January 1906. [18] [13] Still with the 5th Bengal Cavalry, Macandrew was subsequently promoted to lieutenant-colonel on 10 November 1912 and assumed command of the regiment on 16 February 1914. [19] [20]

Western Front

Staff work

When the First World War began, Macandrew was assigned to serve on the Western Front in France as a General Staff Officer Grade 1 to Major-General Michael Rimington, commander of the 1st Indian Cavalry Division. They arrived on 7 November and subsequently the Indian Cavalry Corps was formed on 18 December, with Rimington in command. He brought Macandrew with him as his Brigadier-General General Staff (BGGS). [21] In April 1915 Macandrew visited Haig, who was now a general, at his headquarters; Macandrew criticised how his cavalry had been utilised during the recent Battle of Neuve Chapelle and disagreed with the view of other staff officers that the war would continue and be won through trench warfare. [15] He believed that the ability to correctly utilise cavalry was a key facet to any successful general officer. [22]

Macandrew's position as a brigadier-general was a temporary rank, and he was still a substantive lieutenant-colonel, until he was promoted to brevet colonel on 3 June. [20] [23] The historian Simon Robbins argues that Macandrew's staff work for the corps was sub-par, with his requirement that all orders to divisions be personally approved by him stifling initiative and creating backlogs. [24] The historian George Morton-Jack says that his work improved, and he succeeded in creating an operational headquarters for the corps after an "uncertain start". [25]

Command

Macandrew fell out with Rimington in September and left his staff on 7 October. [26] [25] He thus relinquished his temporary rank, reverting to his brevet colonelcy. [13] [26] Macandrew was still well thought of by Haig, and the latter quickly appointed to a new command. [25] On 16 November, he was re-promoted to temporary brigadier-general and given the 9th (Sirhind) Brigade, replacing Major-General William Walker after his promotion. [13] [27] [28] He stayed with the 9th only briefly, moving to the 53rd Brigade on 28 November. [29] This brigade, part of 18th (Eastern) Division, did not participate in any battles during Macandrew's command. [30]

Macandrew left the 53rd Brigade on 27 April 1916 and on 7 May was promoted to temporary major-general and given command of the 2nd Indian Cavalry Division at Haig's behest. [31] [32] [29] [25] The division contained the 3rd (Ambala) Cavalry Brigade, the 9th (Secunderabad) Cavalry Brigade and the Canadian Cavalry Brigade. [33]

The Somme

The 20th Deccan Horse of Macandrew's division just prior to their attack on High Wood on 14 July Deccan Horse France 1916.jpg
The 20th Deccan Horse of Macandrew's division just prior to their attack on High Wood on 14 July

Macandrew participated in the Battle of the Somme in July; his division was tasked by Fourth Army to advance through any gaps created by its advance beginning on 1 July. Little occurred for the cavalry in the next two weeks, before a push from Fourth Army on 14 July opened a route for the strategically important High Wood to be taken. In mid-morning, Macandrew took his division forward to capture High Wood, but the ground was too slippery and Macandrew fell twice during the advance. [34] It was called off and infantry were brought in to make the attack instead. [31] On 7 September the Cavalry Corps was re-established in France and all the cavalry divisions were put under its orders. As this occurred, Macandrew's division was renamed the 5th Cavalry Division. [35]

Macandrew was promoted to substantive major-general on 1 January 1917. [36] The Germans began to retreat to the Hindenburg Line in March, with the British following up behind them. [37] The cavalry were very active in these operations, with Haig singling out an action of Macandrew's division where, on 27 March, it drove the Germans out of Villers-Faucon and several surrounding villages. [38] With the retreat having come to a halt, by June Macandrew's division had returned to trench warfare, based around Le Verguier. The obstacles put up by it were complimented by Lieutenant-General Sir William Pulteney, commander of III Corps, as the best he had seen in the country. [37] In October the division travelled into Belgium to take part in the Battle of Passchendaele but was not used. [37]

Cambrai

Macandrew's division next saw action on 20 November, with the start of the Battle of Cambrai. The cavalry divisions were expected to break through gaps in the German line caused by attacking British infantry and tanks. [39] The 5th Cavalry Division was allotted to cross the Dunkirk-Scheldt Canal at Masnieres and Marcoing to capture river crossings over the Sensée near Paillencourt. [40] By the afternoon Macandrew's brigades had reached both Masnieres and Marcoing, and small parts of the division succeeded in crossing the canal. [41] In many cases the infantry had not pushed back the German defenders as expected and the cavalry were too cumbersome to react to new weaknesses in the enemy lines. Unable to advance further, Macandrew's division stayed near the canal overnight and in the afternoon of 21 November again attempted to make crossings. These were, however, broken up by German counter-attacks and in the morning of 22 November the division was withdrawn to Fins. [42]

The advance was called off on 27 November, although the cavalry saw further service defending against the subsequent German counter-attack. [39] On 30 November, Macandrew's division returned to Villers-Faucon, near where the Germans had attacked and retaken Gauche Wood. Macandrew worked with the Guards Division and tank support to push the Germans back out of the heavily defended wood, succeeding on 1 December; it was intended to capture Villers-Guislain beyond the wood as well, but this was not done because of the heavy German defences around it, and the British instead fortified Gauche Wood. [43] [44]

Macandrew, who had observed the 1st Cavalry Division as it failed to break through during the earlier British advance, wrote a report to Haig criticising the communications between the different British units in the attack, and identified a lack of "vigour and determination" in the cavalry brigade and regimental commanders. Haig agreed with Macandrew's assessment. [45] On 1 January 1918 Macandrew was created a Companion of the Order of the Bath. [46] [47]

Divisional reforms

At conferences towards the end of 1917, the British prime minister, Lloyd George, impacted by the failure at Cambrai, argued that the continued use of cavalry on the Western Front was useless, and that the cavalrymen would be of more use in other roles. [45] Internal army politics made it impossible for any cavalry division to be outright disbanded, and instead on 13 January 1918 Haig was ordered to send all his Indian cavalry to Palestine in return for yeomanry that could be converted into machine gunners. [48]

Simultaneous with this, Haig was reviewing the cavalry generals in the army and on 15 January the commander of the Cavalry Corps, Lieutenant-General Charles Kavanagh, requested that Macandrew stay on the Western Front as commander of the 1st Cavalry Division instead of going with his men to Palestine. When the German spring offensive began in March, the commander of 1st Cavalry Division, Major-General Richard Mullens, who Macandrew had been expected to replace, did well enough that Haig decided not to fire him. [49] As such, in the same month, Macandrew travelled to Palestine with the Indian portion of his division and the 1st Indian Cavalry Division, which had since been renamed 4th Cavalry Division. [48]

Joining the Egyptian Expeditionary Force (EEF) for service in the Sinai and Palestine campaign, Macandrew was initially going to take over command of the Yeomanry Mounted Division as the previous commander was forming the new XXIV Corps. On 29 March, the nascent corps was dissolved and Macandrew's orders for the Yeomanry Mounted Division were cancelled on 9 April. [50]

Macandrew's men were used to form the new 1st and 2nd Mounted Divisions, and he instead took command of the latter on 31 May. In an attempt to continue the legacy of the Indian cavalry from the Western Front, on 23 July the two divisions were respectively renamed the 4th and 5th Cavalry Divisions. [51] [48] [52] Macandrew's new division consisted of the 13th and 14th Indian Cavalry Brigades and the 15th (Imperial Service) Cavalry Brigade. [53]

Palestine campaign

Jordan Valley

Macandrew's division joined the Desert Mounted Corps (DMC) on 2 July. [54] It then participated in the occupation of the Jordan Valley. Macandrew, whose units were all equipped as traditional cavalry, ordered his patrols to always charge upon sighting Ottoman Empire soldiers. This had a negative effect on desertion rates amongst Ottoman soldiers because they were too scared of Macandrew's lancers to attempt to surrender to them. [55]

Map of the cavalry movements at the Battle of El Hinu Falls skMap29 1.jpeg
Map of the cavalry movements at the Battle of El Hinu

A joint Ottoman-German force attacked a weak point of the British line in the Jordan Valley on 14 July at the Battle of Abu Tellul, being defeated by a counter-charge by the ANZAC Mounted Division. [56] While this attack was ongoing an Ottoman force of 1,200 cavalry made contact with two of Macandrew's regiments, based between Ghorniye and the Dead Sea. With the British on the other side of the River Jordan to the Turkish force, Brigadier-General Cyril Harbord of the 15th suggested to Macandrew that his two regiments, the Mysore and Jodhpore Lancers, could attack the Ottomans in a pair of flanking manoeuvres. This Macandrew agreed to. [56] [57]

The Jodhpores crossed the Jordan at El Hinu to the south of the Ottoman force while the Mysores did similarly to the north. Supported by machine gun fire, both regiments charged portions of the Ottoman force in the scrubland around the river. Over thirty Turkish soldiers were killed in the charges with more captured before the two Indian regiments withdrew, exhausted by the mid-day heat. [58] [59] The Ottomans afterwards entrenched themselves along the crossings of the river, but a portion of the 34th Poona Horse came up as reinforcements and charged across a ford, forcing the Ottomans to abandon their positions and ending the Battle of El Hinu. The three Indian regiments killed around ninety Turkish soldiers and took a further ninety-one prisoner. [60] [61]

Battle of Sharon

General Sir Edmund Allenby, the commander-in-chief of the EEF, began in July to plan a large operation to destroy the Ottoman Army Group F which faced him. [62] XXI Corps was assigned to break through the Ottoman defences around Sharon plain, which would allow Macandrew's and two other divisions to charge into the flat terrain beyond the defences and cut off the line of retreat of the Turkish Seventh and Eighth Armies. [63] To avoid alarming Ottoman intelligence, the cavalry divisions formed up in secret behind XXI Corps, only moving at night as they took their positions. [64] By 17 September, Macandrew's division was in place, hiding in an orange grove 8 miles (12.9 kilometres) behind the front line. [65] Macandrew's force was to advance behind the attack of the 60th (2/2nd London) Division, attacking along the coast of the Mediterranean Sea, and he spent the night sleeping at the headquarters of Major-General John Shea, who commanded the 60th and had served with Macandrew in the Indian cavalry. [66]

XXI Corps' attack began in the night of 18 September. [66] The push forward was highly successful, with 60th Division capturing Tulkarm in the early evening on 19 September. [67] Macandrew's division had passed through the Turkish lines in the morning and ran along the beaches, hidden from Turkish fire by the cliffs. At around mid-day the division began to engage Turkish defences as it charged across Sharon plain; by 3 p.m. it had reached Liktera. [68] [69] The division rested there for several hours while preparing to move on to fight the pre-planned Battle of Nazareth in which elements of Macandrew's division were to make a raid on and then capture Nazareth. [70] This was the headquarters of the Ottoman commander-in-chief, General Otto Liman von Sanders, with the goal of the attack being his capture. [71] Slowed by poor guides and long searches of small villages, the 13th Brigade sent to Nazareth attacked only in the early morning of 20 September. It captured 1,200 Ottoman soldiers before it was forced to withdraw; Macandrew was unable to send reinforcements because his horses were too exhausted. Liman remained uncaptured, escaping from Nazareth around an hour after Macandrew had ordered the withdrawal of his force. [72] [73]

Macandrew's commander, Lieutenant-General Sir Harry Chauvel, was highly disappointed to not have captured Liman, although his headquarters and communications had been almost completely destroyed. [71] [74] Macandrew heightened this disappointment by arriving to a meeting with Chauvel in Liman's staff car, only to announce that Liman was not in it. Allenby later on removed the direct commander of the operation, Brigadier-General Philip Kelly, from his command because of the failure to capture Liman. [75] Allenby decided on 22 September that the DMC would take Damascus, but to do this the port of Haifa had to be taken to allow supplies to be landed for the army. Macandrew's division was tasked with this, and to capture Acre 10 miles (16 kilometres) further on. [76] In the morning of 23 September Macandrew ordered the 13th Brigade to capture Acre, which was done without difficulty. 15th Brigade was tasked with the attack on Haifa, with the 14th in reserve. [77] The main attack on Haifa, orchestrated by Harbord, began at 2 p.m. in concert with two flanking attacks. Supported by machine gun fire, the cavalry squadrons completed the attack by 3 p.m. having captured 687 German and Ottoman soldiers. [78]

Capture of Damascus

Chauvel leads his corps through Damascus on 2 October AWMH10659Damascus.jpg
Chauvel leads his corps through Damascus on 2 October

With around 40,000 enemy soldiers retreating between Haifa and Damascus, the rate of the attack was increased by Allenby in order to ensure that German and Turkish soldiers did not reform and provide effective resistance to the British. [79] Macandrew's division was tasked with advancing on the most direct route to Damascus, through the Golan Heights, following behind the Australian Mounted Division (Ausdiv). The enemy units in front of them were the remnants of Seventh and Eighth Armies. Having begun on 27 September, the 5th and Ausdiv reached Quneitra on 28 September. The advance continued and on 30 September Macandrew's 14th Brigade encountered an Ottoman column near Al-Kiswah; it captured the front half of the column, around 2,000 men. The rear half of the column turned around but was intercepted by the 13th and 15th Brigades, which captured much of the rest and funnelled the survivors in the direction of Ausdiv. [80] [81]

The DMC completed the surrounding of Damascus on 1 October, and Chauvel ordered that the city was not to be entered until 2 October. [82] [83] Macandrew, however, entered Damascus in mid-morning on 1 October alongside the 14th Brigade and marched the length of the city. [84] [83] Chauvel assumed temporary command of the city on 2 October and Macandrew ordered his staff to not mention the incursion of the previous day. The British subsequently organised a show of force, with a column consisting of one unit from each regiment in the DMC marching through the city. Chauvel headed the column, alongside Macandrew and Major-Generals George Barrow and Henry Hodgson. [85] [83] This calmed the agitated local population and stopped some incipient looting. [86]

The advance through Ottoman territory continued after this, with Macandrew's division marching on 5 October. [87] Travelling slowly in the knowledge that the Ottoman armies had already left the area, Macandrew occupied Rayak and Zahle on 6 October without resistance. [88] The division then began to advance on Homs, with Macandrew splitting his division into two columns. They reached the city on 16 October to find it also bereft of defences, and Macandrew was given a banquet by the local authorities. [89] Illness had by this point begun to take a heavy toll on Allenby's troops, with the division following up behind Macandrew, the 4th Cavalry, having to stop its advance because of the amount of disease in its ranks. 5th Division, however, was the healthiest remaining. With horse artillery, armoured cars, and a Royal Air Force squadron also under his command, this meant that Macandrew commanded the strongest column available to the British, with 2,500 men. [90] [91]

Pursuit to Haritan

The armoured car, with flag of truce, sent in by Macandrew to request the surrender of Aleppo on 23 October IWMQ12450Aleppo.jpeg
The armoured car, with flag of truce, sent in by Macandrew to request the surrender of Aleppo on 23 October

Macandrew was given the task of capturing Aleppo, as part of the Pursuit to Haritan. [92] [91] On 20 October Chauvel, worried that the defending force at Aleppo would be too strong for Macandrew, ordered him to halt his advance. Macandrew responded "Not understood" and continued on, receiving the support of Allenby to do so. [93] He sent his armoured cars forward first, leaving Homs the same day. [92] [91]

Having pushed the Ottoman rearguard away on 22 October, Macandrew sent a request for surrender to Aleppo on the following day. Mustafa Kemal Pasha, the commander, declined, saying he did not "find it necessary to reply to your note". [92] Macandrew overestimated the condition of the Aleppo walls and defences, which had been maintained poorly, and chose to surround the city with his force rather than directly assault it. [94] The 15th Brigade caught up with the armoured cars on 25 October, but on the same day the allied Arab force of Prince Faisal entered Aleppo and pushed the Ottomans out, completing the Battle of Aleppo. [92] Macandrew entered Aleppo in the morning of 26 October, the same date he had planned to begin his own attack. [95] [96]

On 26 October, the 15th Brigade advanced north to Haritan and encountered a force of Ottoman soldiers that outnumbered them, with around 3,400 men; Harbord attacked in the Charge at Haritan and was repulsed. [97] Macandrew relieved the 15th with the 14th Brigade on 27 October, and the Ottoman force fell back to a strong defensive position with around 7,000 men, outnumbering Macandrew's immediate force around seven to one. The same day Ausdiv was ordered to reinforce Macandrew and he settled to observe the enemy force until it arrived. Before Ausdiv could complete its march the Armistice of Mudros was signed on 31 October and hostilities ended. [98] [99] This completed a campaign in which Macandrew's division had covered around 600 miles (970 kilometres) in thirty-eight days. [100]

Post-war and death

Macandrew was mentioned in dispatches several times for his services during the First World War, bringing his total number of mentions to eight. [1] [101] He also received the Order of the Nile from the Sultanate of Egypt and was appointed colonel of the regiment to his old unit, the 5th Bengal Cavalry, on 13 March 1919. [101] [102] Soon after this, on 3 June, he was created a Knight Commander of the Order of the Bath. [103] He continued with his division through this period, stationed at Aleppo. He was troubled by the increasing number of cases of malaria and influenza in his unit and was himself weakened by sickness. [104] In early July he was smoking a cigarette in his pyjamas when he entered a room where his uniform tunic was hanging to dry, having been recently cleaned with petrol. The cigarette flame ignited the petrol vapours which exploded, severely burning Macandrew. [105] [106]

Macandrew riding in Aleppo in 1918. To his right is his risaldar-major, Mohid Din Khan Major General H J MacAndrew mounted.jpg
Macandrew riding in Aleppo in 1918. To his right is his risaldar-major, Mohid Din Khan

Macandrew was taken to hospital, and while undergoing treatment for his burns, died of heart failure on 16 July. [105] [106] [104] He was buried in the Commonwealth War Graves Commission's Beirut War Cemetery. [101] The military historian Cyril Falls describes Macandrew as a vigorous and headstrong commander, arguing that at the time of his death he had: [92]

...lived to see his theories and the results of his life's work put into practice, and left behind him a record of achievement hardly equalled by any cavalryman of modern times [107]

An American cavalry officer attached as an observer to the British Army in Palestine and Syria, Lieutenant-Colonel Edward Davis, later recorded his opinion of Macandrew: [108]

...he was very unassuming, with an easy, genial, and most friendly manner...that a very bold spirit lay behind his placid, friendly manner was proved by the Aleppo operations [22]

Morton-Jack suggests that if Macandrew had not died prematurely his good war record would have seen him go on to hold more senior appointments within the British Indian Army, as other cavalry officers such as Barrow and Douglas Baird did, both eventually reaching the rank of general. [109] Macandrew's insignia of the Order of the Bath was presented by George V to his daughter, Esther Macandrew, on 5 December 1919. [110]

Personal life

Macandrew married Esther Cooper in a ceremony officiated by George James Cowley-Brown at St John's, Edinburgh on 9 August 1892. [111] She was the youngest daughter of Henry Ritchie Cooper, a justice of the peace from Ballindalloch, Stirlingshire. Together the couple had one son and one daughter. [7] [10] Macandrew, who lived in Aisthorpe, was an enthusiastic horse rider in his spare time, riding both cross-country and on the flat. He was a member of the Cavalry Club. [7]

Dates of rank

Lieutenant Captain Major Lieutenant-Colonel Colonel
British&Empire-Army-Lt(1881-1902).svg British&Empire-Army-Capt(1881-1902).svg British Army (1902-1920) OF-3.svg British Army (1902-1920) OF-4.svg British Army (1902-1920) OF-5.svg
6 August 1884 [3] 10 November 1897 [112] 10 November 1904 [113] 10 November 1912 [114]
  • 3 June 1915 (brevet) [115]
Brigadier-General Major-general
British Army (1920-1922) OF-6.svg British Army (1920-1953) OF-7.svg
  • 18 December 1914 (temporary) [21]
  • 16 November 1915 (temporary) [27]
  • 7 May 1916 (temporary) [32]
  • 1 January 1917 [116]

Citations

  1. 1 2 3 4 5 6 Who Was Who (1967), pp. 656–657.
  2. Army List (1884), p. 791.
  3. 1 2 "No. 25389". The London Gazette . 22 August 1884. p. 3832.
  4. Army List (1895), p. 558a.
  5. Gazette of India (1889), p. 646.
  6. Army List (1896), p. 443a.
  7. 1 2 3 4 5 6 7 8 9 Who Was Who (1967), p. 657.
  8. Gazette of India (1898), pp. 120–121.
  9. The Risings (1898), p. xxix.
  10. 1 2 Burke & Burke (1909), p. 2203.
  11. 1 2 3 4 Indian Army List (1919), p. 327.
  12. Gazette of India (1901), pp. 313–314.
  13. 1 2 3 4 Creagh & Humphris (1924), p. 124.
  14. "No. 27578". The London Gazette . 21 July 1903. p. 4594.
  15. 1 2 Sheffield & Bourne (2006), p. 114.
  16. Scott (2006), p. chap. 8.
  17. Gazette of India (1905), p. 167.
  18. "No. 27897". The London Gazette . 23 March 1906. p. 2067.
  19. Gazette of India (1913), p. 108.
  20. 1 2 Indian Army List (1915), p. 412.
  21. 1 2 Anglesey (1996), pp. 222–223.
  22. 1 2 Davis (1924), p. 48.
  23. Indian Army List (1915), pp. 57–58.
  24. Morton-Jack (2014), p. 24.
  25. 1 2 3 4 Morton-Jack (2014), p. 278.
  26. 1 2 "No. 29372". The London Gazette (Supplement). 16 November 1915. p. 11455.
  27. 1 2 "No. 29409". The London Gazette . 21 December 1915. p. 12686.
  28. Robbins (2001), p. 456.
  29. 1 2 Becke (1938), p. 80.
  30. Becke (1938), p. 84.
  31. 1 2 Sheffield & Bourne (2006), p. 205.
  32. 1 2 "No. 29625". The London Gazette . 16 June 1916. p. 5988.
  33. Gliddon (2016), p. 509.
  34. Gilbert (2006), p. 112.
  35. Badsey (2008), p. 275.
  36. Indian Army List (1919), p. 118.
  37. 1 2 3 Deccan Horse (1923), p. 189.
  38. Boraston (1979), p. 74.
  39. 1 2 Badsey (2008), pp. 290–291.
  40. Pitman (1923), p. 240.
  41. Pitman (1923), pp. 245–246.
  42. Pitman (1923), pp. 246–247.
  43. Rowcroft (1923), pp. 49–50.
  44. Miles (1948), pp. 238–240.
  45. 1 2 Badsey (2008), p. 292.
  46. Indian Army List (1919), p. supp. p. 3..
  47. "No. 30450". The London Gazette (1st supplement). 28 December 1917. p. 2.
  48. 1 2 3 Badsey (2008), p. 293.
  49. Badsey (2008), p. 294.
  50. Becke (1945), p. 263.
  51. Falls (1930), pp. 414–415.
  52. Becke (1945), p. 42.
  53. Anglesey (1994), p. 221.
  54. EEF Record (1919), p. 50.
  55. Anglesey (1994), pp. 223–224.
  56. 1 2 Anglesey (1994), pp. 236–237.
  57. Falls (1930), p. 434.
  58. Anglesey (1994), pp. 239–240.
  59. Falls (1930), p. 435.
  60. Anglesey (1994), p. 240.
  61. Falls (1930), p. 436.
  62. Anglesey (1994), p. 244.
  63. Anglesey (1994), p. 246.
  64. Anglesey (1994), p. 255.
  65. Anglesey (1994), p. 257.
  66. 1 2 Anglesey (1994), p. 260.
  67. Anglesey (1994), p. 263.
  68. Anglesey (1994), pp. 266–267.
  69. Falls (1930), p. 523.
  70. Anglesey (1994), pp. 268–269.
  71. 1 2 Anglesey (1994), p. 273.
  72. Anglesey (1994), pp. 269–273.
  73. Falls (1930), pp. 524–527.
  74. Falls (1930), p. 527.
  75. Anglesey (1994), p. 274.
  76. Anglesey (1994), p. 295.
  77. Anglesey (1994), p. 296.
  78. Anglesey (1994), pp. 298–299.
  79. Anglesey (1994), p. 316.
  80. Anglesey (1994), p. 325.
  81. Falls (1930), pp. 575–576.
  82. Anglesey (1994), p. 327.
  83. 1 2 3 Hughes (1999), p. 98.
  84. Falls (1930), p. 591.
  85. Anglesey (1994), p. 329.
  86. Falls (1930), p. 593.
  87. Falls (1930), p. 601.
  88. Falls (1930), p. 602.
  89. Falls (1930), p. 606.
  90. Anglesey (1994), p. 334.
  91. 1 2 3 Falls (1930), p. 610.
  92. 1 2 3 4 5 Anglesey (1994), p. 335.
  93. Bullock (1988), p. 146.
  94. Palmer (1998), p. 264.
  95. Falls (1930), p. 616.
  96. Massey (1920), p. 308.
  97. Anglesey (1994), pp. 335–338.
  98. Anglesey (1994), p. 339.
  99. Falls (1930), p. 617.
  100. Anglesey (1994), p. 342.
  101. 1 2 3 "Major General Sir Henry John Milnes MacAndrew". Commonweath War Graves Commission. Retrieved 29 January 2023.
  102. Indian Army List (1919), p. 883.
  103. "No. 31395". The London Gazette . 6 June 1919. p. 7420.
  104. 1 2 Massey (1920), p. 313.
  105. 1 2 "General Sir Henry MacAndrew". The Times. London. 24 July 1919.
  106. 1 2 "General MacAndrew Killed by Petrol on Tunic". Daily Mail. London. 28 July 1919.
  107. Falls (1930), p. 624.
  108. Davis (1924), p. 47.
  109. Morton-Jack (2014), p. 280.
  110. "Court and Society". Belfast News-Letter. Belfast. 5 December 1919. p. 7.
  111. "Marriages". The Colonies and India. 13 August 1892. p. 36. Retrieved 4 February 2023.
  112. "No. 26928". The London Gazette . 11 January 1898. p. 167.
  113. "No. 27765". The London Gazette . 17 February 1905. p. 1207.
  114. "No. 28681". The London Gazette . 14 January 1913. p. 329.
  115. "No. 29202". The London Gazette (Supplement). 22 June 1915. p. 6116.
  116. "No. 29987". The London Gazette (Supplement). 16 March 1917. p. 2701.

Related Research Articles

<span class="mw-page-title-main">Edmund Allenby, 1st Viscount Allenby</span> British Field Marshal (1861–1936)

Field Marshal Edmund Henry Hynman Allenby, 1st Viscount Allenby, was a senior British Army officer and Imperial Governor. He fought in the Second Boer War and also in the First World War, in which he led the British Empire's Egyptian Expeditionary Force (EEF) during the Sinai and Palestine Campaign against the Ottoman Empire in the conquest of Palestine.

The Third Battle of Gaza was fought on the night of 1–2 November 1917 between British and Ottoman forces during the Sinai and Palestine Campaign of World War I and came after the British Egyptian Expeditionary Force (EEF) victory at the Battle of Beersheba had ended the Stalemate in Southern Palestine. The fighting occurred at the beginning of the Southern Palestine Offensive, and, together with attacks on Hareira and Sheria on 6–7 November and the continuing Battle of Tel el Khuweilfe, which had been launched by General Edmund Allenby on 1 November, it eventually broke the Gaza-to-Beersheba line defended by the Yildirim Army Group. Despite having held this line since March 1917, the Ottoman Army was forced to evacuate Gaza and Tel el Khuweilfe during the night of 6–7 November. Only Sheria held out for most of 7 November before it too was captured.

<span class="mw-page-title-main">Battle of Megiddo (1918)</span> Part of World War I

The Battle of Megiddo was fought between 19 and 25 September 1918, on the Plain of Sharon, in front of Tulkarm, Tabsor and Arara in the Judean Hills as well as on the Esdralon Plain at Nazareth, Afulah, Beisan, Jenin and Samakh. Its name, which has been described as "perhaps misleading" since very limited fighting took place near Tel Megiddo, was chosen by British commander Edmund Allenby for its biblical and symbolic resonance.

<span class="mw-page-title-main">Sinai and Palestine campaign</span> Campaign of the Middle Eastern theatre of World War I

The Sinai and Palestine campaign was part of the Middle Eastern theatre of World War I, taking place between January 1915 and October 1918. The British Empire, the French Third Republic, and the Kingdom of Italy fought alongside the Arab Revolt in opposition to the Ottoman Empire, the German Empire, and the Austro-Hungarian Empire. It started with an Ottoman attempt at raiding the Suez Canal in 1915 and ended with the Armistice of Mudros in 1918, leading to the cession of Ottoman Syria.

<span class="mw-page-title-main">Battle of Jerusalem</span> 1917 British-Ottoman battle during WWI

The Battle of Jerusalem occurred during the British Empire's "Jerusalem Operations" against the Ottoman Empire, in World War I, when fighting for the city developed from 17 November, continuing after the surrender until 30 December 1917, to secure the final objective of the Southern Palestine Offensive during the Sinai and Palestine Campaign of World War I. Before Jerusalem could be secured, two battles were recognised by the British as being fought in the Judean Hills to the north and east of the Hebron–Junction Station line. These were the Battle of Nebi Samwill from 17 to 24 November and the Defence of Jerusalem from 26 to 30 December 1917. They also recognised within these Jerusalem Operations, the successful second attempt on 21 and 22 December 1917 to advance across the Nahr el Auja, as the Battle of Jaffa, although Jaffa had been occupied as a consequence of the Battle of Mughar Ridge on 16 November.

<span class="mw-page-title-main">Battle of Haifa (1918)</span> Battle of World War I

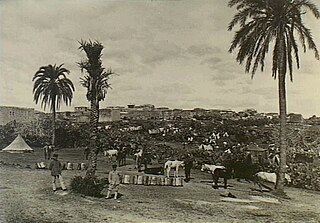
The Battle of Haifa was fought on 23 September 1918 towards the end of the Battle of Sharon which together with the Battle of Nablus formed the set piece Battle of Megiddo fought between 19 and 25 September during the last months of the Sinai and Palestine Campaign of the First World War. During the Battle of Haifa, the Indian 15th Cavalry Brigade, 5th Cavalry Division and part of the Desert Mounted Corps attacked rearguard forces of the Ottoman Empire that resulted in the capture of the towns of Haifa and Acre. This attack took place at the north western edge of the Esdraelon Plain, 40–50 miles (64–80 km) from Sharon.

<span class="mw-page-title-main">Battle of Sharon</span> First World War battle (September 1918)

The Battle of Sharon fought between 19 and 25 September 1918, began the set piece Battle of Megiddo half a day before the Battle of Nablus, in which large formations engaged and responded to movements by the opposition, according to pre-existing plans, in the last months of the Sinai and Palestine Campaign of World War I. The fighting took place over a wide area from the Mediterranean Sea east to the Rafat salient in the Judean Hills. Here the Egyptian Expeditionary Force (EEF) XXI Corps with the French brigade sized Détachement Français de Palestine et de Syrie attacked the Yildirim Army Group Eighth Army's XXII Corps and German Asia Corps. The Battle of Sharon extended well behind the Ottoman front lines when the Desert Mounted Corps rode through a gap in the front line across the Plain of Sharon to occupy the Esdraelon Plain. Meanwhile, during the Battle of Nablus the XX Corps attacked Nablus while Chaytor's Force held the right flank in the Jordan Valley before advancing to secure bridges and fords across the Jordan River, to continue the encirclement the defenders in the Judean Hills. Subsequently, Chaytor's Force advanced against the Fourth Army to capture Es Salt and Amman after the Second Battle of Amman.

<span class="mw-page-title-main">Battle of Samakh</span> Battle of Samakh, fought on 25 September 1918

The Battle of Samakh was fought on 25 September 1918, during the Battle of Sharon which together with the Battle of Nablus formed the set piece Battle of Megiddo fought from 19 to 25 September 1918, in the last months of the Sinai and Palestine Campaign of the First World War. During the cavalry phase of the Battle of Sharon the Desert Mounted Corps commanded by the Australian Lieutenant General Harry Chauvel, captured the Esdraelon Plain 40–50 miles (64–80 km) behind the front line in the Judean Hills on 20 September, when the 3rd Light Horse Brigade captured Jenin. The 4th Light Horse Brigade, Australian Mounted Division was deployed guarding supply columns, and prisoners, before being ordered to attack and capture Samakh on the shore of the Sea of Gallilee. Here the Ottoman and German garrison had been ordered by the commander of the Yildirim Army Group to fight to the last man.

<span class="mw-page-title-main">Battle of Tulkarm</span> 1918 World War I battle

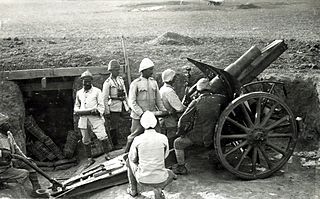
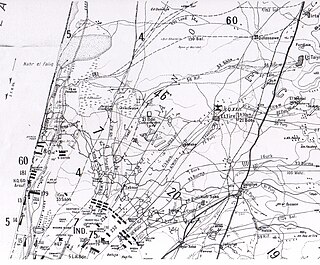
The Battle of Tulkarm took place on 19 September 1918, beginning of the Battle of Sharon, which along with the Battle of Nablus formed the set piece Battle of Megiddo fought between 19 and 25 September in the last months of the Sinai and Palestine Campaign of the First World War. During the infantry phase of the Battle of Sharon the British Empire 60th Division, XXI Corps attacked and captured the section of the front line nearest the Mediterranean coast under cover of an intense artillery barrage including a creeping barrage and naval gunfire. This Egyptian Expeditionary Force (EEF) victory over the entrenched Ottoman Eighth Army, composed of German and Ottoman soldiers, began the Final Offensive, ultimately resulting in the destruction of the equivalent of one Ottoman army, the retreat of what remained of two others, and the capture of many thousands of prisoners and many miles of territory from the Judean Hills to the border of modern-day Turkey. After the end of the battle of Megiddo, the Desert Mounted Corps pursued the retreating soldiers to Damascus, six days later. By the time an Armistice of Mudros was signed between the Allies and the Ottoman Empire five weeks later, Aleppo had been captured.

<span class="mw-page-title-main">Battle of Nazareth</span> 1918 battle in Palestine during World War I

The Battle of Nazareth began on 20 September 1918, during the Battle of Sharon, which together with the Battle of Nablus formed the set piece Battle of Megiddo fought during the last months of the Sinai and Palestine Campaign of the First World War. During the cavalry phase of the Battle of Sharon the Desert Mounted Corps rode to the Esdraelon Plain 40 and 50 miles behind the front line in the Judean Hills. At Nazareth on the plain, the 13th Cavalry Brigade of the 5th Cavalry Division attempted to capture the town and the headquarters of the Yildirim Army Group which was eventually captured the following day after the garrison had withdrawn.

The Capture of Afula and Beisan occurred on 20 September 1918, during the Battle of Sharon which together with the Nablus, formed the set piece Battle of Megiddo fought during the last months of the Sinai and Palestine Campaign of the First World War. During the cavalry phase of the Battle of Sharon, the 4th Cavalry Division of the Desert Mounted Corps attacked and captured the main communications hub at Afula, located in the centre of the Esdraelon Plain, and Beisan on the plain's eastern edge near the Jordan River, some 40–50 miles (64–80 km) behind the front line in the Judean Hills.

<span class="mw-page-title-main">Capture of Jenin</span> Part of the Middle Eastern theatre of World War I

The Capture of Jenin occurred on 20 September 1918, during the Battle of Sharon which together with the Battle of Nablus formed the set piece Battle of Megiddo fought between 19 and 25 September during the last months of the Sinai and Palestine Campaign of the First World War. During the cavalry phase of the Battle of Sharon carried out by the Desert Mounted Corps, the 3rd Light Horse Brigade, Australian Mounted Division attacked and captured the town of Jenin located on the southern edge of the Esdraelon Plain 40–50 miles (64–80 km) behind the front line in the Judean Hills. The Australian light horse captured about 2,000 prisoners, the main supply base and the ordnance depot of the Seventh and the Eighth Armies in and near the town. They also cut the main road from Nablus and a further 6,000 Ottoman Empire and German Empire prisoners, were subsequently captured as they attempted to retreat away from the Judean Hills.

<span class="mw-page-title-main">Battle of Nablus (1918)</span> Middle Eastern battle of WWI

The Battle of Nablus took place, together with the Battle of Sharon during the set piece Battle of Megiddo between 19 and 25 September 1918 in the last months of the Sinai and Palestine Campaign of the First World War. Fighting took place in the Judean Hills where the British Empire's XX Corps attacked the Ottoman Empire's Yildirim Army Group's Seventh Army defending their line in front of Nablus. This battle was also fought on the right flank in the Jordan Valley, where Chaytor's Force attacked and captured the Jordan River crossings, before attacking the Fourth Army at Es Salt and Amman capturing many thousands of prisoners and extensive territory. The Battle of Nablus began half a day after the main Battle of Sharon, which was fought on the Mediterranean section of the front line where the XXI Corps attacked the Eighth Army defending the line in front of Tulkarm and Tabsor and the Desert Mounted Corps which rode north to capture the Esdrealon Plain. Together these two battles, known as the Battle of Megiddo, began the Final Offensive of the war in the Sinai and Palestine campaign.

<span class="mw-page-title-main">Capture of Damascus</span> 1918 battle in the Middle Eastern theatre of World War I

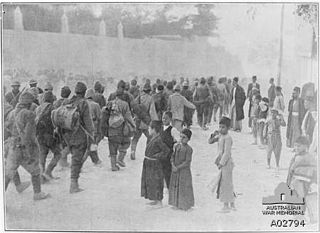
The Capture of Damascus occurred on 1 October 1918 after the capture of Haifa and the victory at the Battle of Samakh which opened the way for the pursuit north from the Sea of Galilee and the Third Transjordan attack which opened the way to Deraa and the inland pursuit, after the decisive Egyptian Expeditionary Force (EEF) victory at the Battle of Megiddo during the Sinai and Palestine Campaign of World War I. Damascus was captured when Desert Mounted Corps and Prince Feisal's Sherifial Hejaz Army encircled the city, after a cavalry pursuit northwards along the two main roads to Damascus. During the pursuit to Damascus, many rearguards established by remnants of the Ottoman Fourth, Seventh and Eighth Armies were attacked and captured by Prince Feisal's Sherifial Army, Desert Mounted Corps' Australian Mounted Division the 4th and the 5th Cavalry Divisions. The important tactical success of capturing Damascus resulted in political manoeuvring by representatives from France, Britain and Prince Feisal's force.

<span class="mw-page-title-main">Pursuit to Haritan</span>

The Pursuit to Haritan occurred between 29 September and 26 October 1918 when the XXI Corps and Desert Mounted Corps of the Egyptian Expeditionary Force (EEF) pursued the retreating remnants of the Yildirim Army Group advanced north from Damascus after that city was captured on 1 October during the final weeks of the Sinai and Palestine Campaign of the First World War. The infantry and corps cavalry advanced from Haifa and Acre to capture the Mediterranean ports at Beirut and Tripoli between 29 September and 9 October. These captures enabled the inland pursuit to be supplied when the Desert Mounted Corps' 5th Cavalry Division resumed the pursuit on 5 October. The cavalry division occupied one after the other, Rayak, Homs, Hama. Meanwhile, Prince Feisal's Sherifial Force which advanced on the cavalry division's right flank, attacked and captured Aleppo during the night of 25/26 October after an unsuccessful daytime attack. The next day the 15th Cavalry Brigade charged a retreating column and attacked a rearguard during the Charge at Haritan near Haritan which was at first reinforced but subsequently withdrew further north.

The Charge at Kiswe took place on 30 September 1918 about 9 miles (14 km) south of Damascus, during the pursuit by Desert Mounted Corps following the decisive Egyptian Expeditionary Force victory at the Battle of Megiddo, the Battle of Jisr Benat Yakub and the Charge at Kaukab during the Sinai and Palestine Campaign in World War I. As Desert Mounted Corps rode along the main road from Nablus, units of the 14th Cavalry Brigade, 5th Cavalry Division, were ordered to charge a rearguard north of Kiswe, protecting columns of the Ottoman Fourth Army, retreating towards Damascus.

<span class="mw-page-title-main">Battle of Aleppo (1918)</span>

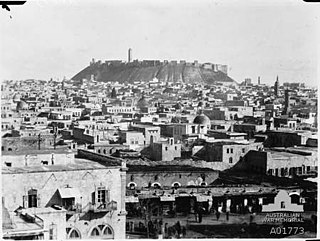
The Battle of Aleppo was fought on 25 October 1918, when Prince Feisal's Sherifial Forces captured the city during the Pursuit to Haritan from Damascus, in the last days of the Sinai and Palestine Campaign in the First World War.

<span class="mw-page-title-main">Charge at Haritan</span>

The Charge at Haritan occurred on 26 October 1918 at the end of the Pursuit to Haritan during the final stages of the Sinai and Palestine Campaign of the First World War. Two regiments of the 15th Cavalry Brigade, 5th Cavalry Division, charged into the retreating remnant column of the Ottoman Army's Yildirim Army Group. Subsequently, six squadrons of the same brigade charged into an Ottoman rearguard position but were counterattacked and forced to retreat.

The Southern Palestine offensive, began on 31 October 1917, with the Battle of Beersheba, when the British Empire's Egyptian Expeditionary Force (EEF) under the Command of Field Marshall Edmund Allenby attacked Ottoman Empire forces at the Palestinian town of Beersheba during the Sinai and Palestine Campaign, of World War I. After the capture of Beersheba, by the EEF, the Gaza to Beersheba line became increasingly weakened and, seven days later, the EEF successfully forced the Ottoman Turkish Empire's Seventh and Eighth Armies to withdraw. During the following seven days of pursuit, the Turkish forces were pushed back to Jaffa. There followed three weeks of hard fighting in the Judean Hills before Jerusalem was captured on 9 December 1917. During five and a half weeks of almost continuous offensive operations, the EEF captured 47.5 miles (76.4 km) of territory.

The Capture of Wadi el Hesi and the associated Sausage Ridge, began during the evening of 7 November 1917, was fiercely fought for during 8 November and not cleared until the early hours of 9 November, at the beginning of the pursuit phase of the Southern Palestine Offensive in the Sinai and Palestine Campaign during World War I. The advancing British Empire units of the Egyptian Expeditionary Force (EEF) were held by rearguard units of the withdrawing Ottoman Empire units of the Yildirim Army Group, holding a strategically strong position to the north of Gaza.

References