This article's lead sectionmay be too short to adequately summarize the key points. Please consider expanding the lead to provide an accessible overview of all important aspects of the article.(August 2024)
1854 gold miners' revolt in Victoria, Australia
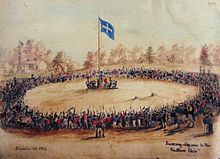
Great Meeting of Gold Diggers Dec 15th 1851 engraved by Thomas Ham and drawn by D. Tulloch, 1851Recreation of the original Monster Meeting flag raised in 1851 at Forest Creek
Following the discovery of gold in Victoria in 1851, a mining licence fee based on time stayed on the goldfields was introduced, and the first gold commissioners were appointed.[2] At the beginning of December 1851, there was discontent when it was announced that the licence fee would be raised to 3 pounds a month, a 200 per cent increase, effective 1 January 1852.[3] On 8 December, the miner's rebellion continued to build momentum with an anti-mining tax banner put on public display at Forest Creek.[4]
After remonstrations, particularly in Melbourne and Geelong, on 13 December 1851, the previous increase was rescinded. The Forest Creek Monster Meeting took place at Mount Alexander on 15 December 1851. This was the first truly mass demonstration of the Eureka Rebellion. According to high-end estimates, up to 20,000 miners turned out in a massive display of support for repealing the mining tax. The only pictorial evidence concerning the flag on display at the meeting is an engraving of the scene by Thomas Ham and David Tulloch that features only part of the design.[5]
Based on the research of Doug Ralph, Marjorie Theobald and others have questioned whether there was an iconic Digger's flag displayed at Forest Creek that spread to other mining settlements.[6][7]
The Bendigo "digger's flag" was unfurled at a rally at View Point, Sandhurst, on 12 August 1853. It was reported that the miners paraded under the flags of several nations, including the Irish tricolour, the saltire of Scotland, the Union Jack, revolutionary French and German flags, and the Stars and Stripes. The delegates returned from Melbourne with news of the failure of the Bendigo Petition. During the winter of 1853, the Red Ribbon Movement was active across the goldfields. Supporters wore red ribbons in their hats and were determined to hand over only 10 shillings for the licence fee and allow the sheer numbers in custody to cause an administrative meltdown.[8][9]Manning Clark states that:
... ten to twelve thousand diggers turned up wearing a red ribbon in their hats. The old cabbage-tree hat of the Sydney radicals and republicans are now decorated with the red of revolution. Foreigners of all descriptions boasted that if the demands of the diggers were not instantly granted, they would lead them on to blood and victory. In alarm, George Thompson called three cheers for the good old Union Jack and asked them to remember that they were pledged to what he called 'necessary reform, not revolution'. William Dexter, waiving the diggers' flag, roared to them about the evils of 'English Tyranny' and the virtues of 'Republicanism'.[10]
The Geelong Advertiser reported that:
Gully after gully hoisted its own flag, around which the various sections rallied, and as they proceeded towards the starting points, formed quite an animated spectacle … But the flag which attracted the greatest attention was the Diggers' Banner, the work of one of the Committee, Mr Dexter, an artist of considerable talent, and certainly no company ever possessed a more appropriate coat of arms, or a motto more in character with themselves.
The design of the Digger's flag was along the same lines as the flag flown at Forrest Creek in 1851. It has four quarters that feature a pick, shovel and cradle, symbolising the mining industry; a bundle of sticks tied together, symbolising unity; the scales of justice, symbolising the remedies the miners sought; and a Kangaroo and Emu, symbolising Australia.[11]
There was a second multinational-style assembly at View Point on 27 August 1853.[12]
The Eureka Flag was flown by the rebel garrison over the Eureka Stockade when it was besieged by colonial forces on 3 December 1854 at Ballarat, Victoria, Australia. It was the culmination of the 1851–1854 Eureka Rebellion during the Victorian gold rush. The fighting resulted in at least 27 deaths and many injuries, the majority of casualties being rebels. The miners had various grievances, chiefly the cost of mining permits and the officious way the system was enforced. There was an armed uprising in Ballarat where tensions were brought to a head following the death of miner James Scobie. On 30 November 1854, the Eureka Flag was raised during a paramilitary display on Bakery Hill that resulted in the formation of rebel companies and the construction of a crude battlement on the Eureka lead.
Origin and symbolism
The earliest mention of a flag was the report of a meeting held on 23 October 1854 to discuss indemnifying Andrew McIntyre and Thomas Fletcher, who had both been arrested and committed for trial over the burning of the Eureka Hotel. The correspondent for the Melbourne Herald stated: "Mr. Kennedy suggested that a tall flag pole should be erected on some conspicuous site, the hoisting of the diggers' flag on which should be the signal for calling together a meeting on any subject which might require immediate consideration."[13]
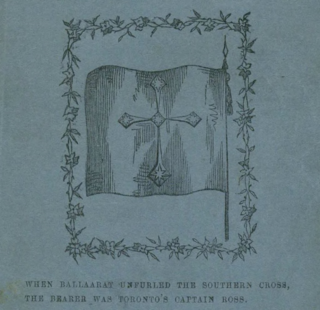
In 1885, John Wilson, whom the Victorian Works Department employed at Ballarat as a foreman, claimed that he had originally conceptualised the Eureka Flag after becoming sympathetic to the rebel cause. He then recalls that it was constructed from bunting by a tarpaulin maker.[14][15] There is another popular tradition where the flag design is credited to a member of the Ballarat Reform League, "Captain" Henry Ross of Toronto, in Ontario, Canada. A. W. Crowe recounted in 1893 that "it was Ross who gave the order for the insurgents' flag at Darton and Walker's".[16] Crowe's story is confirmed in that there were advertisements in the Ballarat Times dating from October–November 1854 for Darton and Walker, manufacturers of tents, tarpaulin and flags, situated at the Gravel Pits.[17]
The Ballarat Times first mentioned the Eureka Flag on 24 November 1854 in an article about a meeting of the Ballarat Reform League to be held the following Wednesday where, "The Australian flag shall triumphantly wave in the sunshine of its own blue and peerless sky, over thousands of Australia's adopted sons."[18] There are also other examples of it being referred to at the time as the Australian flag. The day after the battle, the Age reported that: "They assembled round the Australian flag, which has now a permanent flag-staff."[19] It appeared in public for the first time on the platform at the final, fiery mass meeting of the Ballarat Reform League on 30 November 1854.
Before the oath-swearing ceremony at Bakery Hill on 30 November 1854, another recorded hoisting of the Eureka Flag occurred that day. In his open letter to the colonists of Victoria, dated 7 April 1855, Peter Lalor said that he heard the news that shots were fired on miners at the Gravel Pits. Along with an armed mob, he then headed towards Barker and Hunt's store on Specimen Hill. It was here the Eureka Flag "was procured and hoisted on the flagstaff belonging to Barker and Hunt; but it was almost immediately hauled down, and we moved down to the holes on the Gravel Pits Flat."[20]
When the crowd had assembled on Bakery Hill, Lalor took the initiative of mounting a stump armed with a rifle and proclaiming, "Liberty!" There was a paramilitary display where rebel companies were formed. Near the base of the flagpole, Lalor knelt with his head uncovered, pointed his right hand to the Eureka Flag, and swore to the affirmation of over 10,000 demonstrators: "We swear by the Southern Cross to stand truly by each other and fight to defend our rights and liberties."[21] Raffaello Carboni recalls that Henry Ross was the "bridegroom" of the flag and "sword in hand, he had posted himself at the foot of the flag-staff, surrounded by his rifle division".[21]
In 1931, R. S. Reed claimed that "an old tree stump on the south side of Victoria Street, near Humffray Street, is the historic tree at which the pioneer diggers gathered in the days before the Eureka Stockade to discuss their grievances against the officialdom of the time."[22] Reed called for the formation of a committee of citizens to "beautify the spot, and to preserve the tree stump" upon which Lalor addressed the assembled rebels during the oath swearing ceremony.[22] It was reported that the stump had "been securely fenced in, and the enclosed area is to be planted with floriferous trees. The spot is adjacent to Eureka, which is famed alike for the stockade fight and for the fact that the Welcome Nugget (sold for £10,500) was discovered in 1858 within a stone's throw of it."[23]
It has long been said that women were involved in constructing the Eureka Flag. In a letter to the editor published in the Melbourne Age, 15 January 1855 edition, Fredrick Vern states that he "fought for freedom's cause, under a banner made and wrought by English ladies".[24] According to some of their descendants, Anastasia Withers, Anne Duke and Anastasia Hayes were all involved in sewing the flag.[25][note 1] The stars are made of delicate material, consistent with the story they were made out of their petticoats.[29] The blue woollen fabric "certainly bears a marked resemblance to the standard dressmaker's length of material for making up one of the voluminous dresses of the 1850s"[17] and also the blue shirts worn by the miners.[27]
In his seminal Flag of Stars, Frank Cayley published two sketches he discovered on a visit to the soon-to-be headquarters of the Ballarat Historical Society in 1963, which may be the original plans for the Eureka Flag. One is a two-dimensional drawing of a flag bearing the words "blue" and "white" to denote the colour scheme. Cayley has concluded: "It looks like a rough design of the so-called King Flag."[30] The other sketch was "pasted on the same piece of card shows the flag being carried by a bearded man" that Cayley believes may have been intended as a representation of Henry Ross.[31][note 2]Federation University history professor Anne Beggs-Sunter refers to an article reportedly published in the Ballarat Times "shortly after the Stockade referring to two women making the flag from an original drawing by a digger named Ross. Unfortunately no complete set of the Ballarat Times exists, and it is impossible to locate this intriguing reference."[27][34][35]
The theory that the Eureka Flag is based on the Australian Federation Flag has precedents in that "borrowing the general flag design of the country one is revolting against can be found in many instances of colonial liberation, including Haiti, Venezuela, Iceland, and Guinea".[36][37] Some resemblance to the modern Flag of Quebec has been noted,[38] that was based on a design used by the French-speaking majority of the colony of the Province of Canada at the time Ross emigrated. Ballarat local historian Father Tom Linane thought women from the St Aliphius chapel on the goldfields might have made the flag. This theory is supported by St Aliphius raising a blue and white ecclesiastical flag featuring a couped cross to signal that mass was about to commence.[39][40] Professor Geoffrey Blainey believed that the white cross on which the stars are arrayed is "really an Irish cross rather than being [a] configuration of the Southern Cross".[41]
Cayley has stated that the field "may have been inspired by the sky, but was more probably intended to match the blue shirts worn by the diggers".[42] Norm D'Angri theorises that the Eureka Flag was hastily manufactured, and the number of points on the stars is a mere convenience as eight was "the easiest to construct without using normal drawing instruments".[43]
After the oath-swearing ceremony, the rebels marched in double file behind the Eureka Flag from Bakery Hill to the Eureka lead, where construction of the stockade began.[44][45] In his 1855 memoirs, Raffaello Carboni again mentions the role of Henry Ross, who "was our standard-bearer. He hoisted down the Southern Cross from the flag-staff, and headed the march".[45] It was flying over the ill-fated Eureka Stockade when the colonial forces launched the surprise early morning attack on Sunday, 3 December 1854.
In his report dated 14 December 1854, Captain John Thomas mentioned "the fact of the Flag belonging to the Insurgents (which had been nailed to the flagstaff) being captured by Constable King of the Force".[46] King had volunteered for the honour while the battle was still raging.[47] W. Bourke, a miner residing about 250 yards from the stockade, recalled that: "The police negotiated the wall of the Stockade on the south-west, and I then saw a policeman climb the flag pole. When up about 12 or 14 feet the pole broke, and he came down with a run".[48]
John Lynch, who fought at the Eureka Stockade, said: "I have a vague recollection of its being pulled down by the soldiers amidst a chorus of jeers and ribald shoutings. A private of the 40th Regiment told myself and other prisoners that he was one of those who rough handled it".[49] Theophilus Williams, a Justice of the Peace and later Mayor of Ballarat East, had a tent situated 300 yards away from the Eureka Stockade. He said that he was prepared to "affirm on affidavit that he saw two red uniformed soldiers haul down the flag".[49]
Carboni, an eyewitness to the battle, recalls that: "A wild 'hurrah!' burst out and 'the Southern Cross' was torn down, I should say, among their laughter, such as if it had been a prize from a May-pole... The red-coats were now ordered to 'fall in'; their bloody work was over, and were marched off, dragging with them the 'Southern Cross'".[50]
The Geelong Advertiser reported that the flag "was carried by in triumph to the Camp, waved about in the air, then pitched from one to another, thrown down and trampled on".[51] The soldiers also danced around the flag on a pole that was "now a sadly tattered flag from which souvenir hunters had cut and torn pieces".[52][53] The morning after the battle, "the policeman who captured the flag exhibited it to the curious and allowed such as so desired to tear off small portions of its ragged end to preserve as souvenirs."[54]
At the Eureka state treason trials that began on 22 February 1855, the 13 defendants had it put to them that they did "traitorously assemble together against our Lady the Queen" and attempt "by the force of arms to destroy the Government constituted there and by law established, and to depose our Lady the Queen from the kingly name and her Imperial Crown".[55] Furthermore, concerning the "overt acts" that constituted the actus reus of the offence, the indictment read: "That you raised upon a pole, and collected round a certain standard, and did solemnly swear to defend each other, with the intention of levying war against our said Lady the Queen".[55]
Called as a witness, George Webster, the chief assistant civil commissary and magistrate, testified that upon entering the stockade the besieging forces "immediately made towards the flag, and the police pulled down the flag".[56] John King testified, "I took their flag, the southern cross, down – the same flag as now produced."[57]
In his closing submission, the defence counsel Henry Chapman argued there were no inferences to be drawn from the hoisting of the Eureka Flag, saying:
and if the fact of hoisting that flag be at all relied upon as evidence of an intention to depose Her Majesty... no inference whatever can be drawn from the mere hoisting of a flag as to the intention of the parties, because of the witnesses has said that two hundred flags were hoisted at the diggings; and if two hundred persons on the same spot choose to hoist their particular flag, what each means we are utterly unable to tell, and no general meaning as to hostility to the Government can be drawn from the simple fact that the diggers on that occasion hoisted a flag... I only throw it out to you because it is utterly impossible, in the multiplicity of flags that have been hoisted on the diggings, to draw an exact inference as to the hoisting of any one particular flag at one spot.[58]
A modern variation of the Eureka Flag was central to the landmark architecture of the Eureka Centre prior to its redevelopment as the Museum of Australian Democracy
The Eureka Flag was retained by John King, who quit the police force two days after the state treason trials ended to become a farmer. In the late 1870s, he eventually settled near Minyip in the Victorian Wimmera district. It was here that the flag "made occasional appearances at country bazaars".[59] In his 1870 history of Ballarat, William Withers said he had not been able to find out what had happened to the flag.[60] Professor Anne Beggs-Sunter thinks it is "likely that King read Withers's book, because he wrote to the Melbourne Public Library offering to sell the flag to that institution."[59]
The head librarian, Marcus Clarke, approached Peter Lalor to authenticate the flag. He was unable, replying, "Can you find someone whose memory is more accurate than mine?"[61] The library eventually decided not to acquire the flag due to the uncertainty over its origins. It would remain in the custody of the King family for forty years until 1895, when it was lent to the Ballarat Fine Art Gallery (now the Art Gallery of Ballarat). John King's widow Isabella would post the flag after being approached by art gallery president James Oddie, along with a letter to the secretary which reads:
Kingsley, Minyip,
1st October, 1895
Dear Sir, In connection with the wish of the president of the Ballarat Fine Arts and Public Gallery for the gift or loan of the flag that floated above the Eureka Stockade, I have much pleasure in offering loan of flag to the above association on condition that I may get it at any time I specify, or on demand of myself or my son, Arthur King. The main portion of the flag was torn along the rope that attached it to the staff, but there is still part of it around the rope so that I suppose it would be best to send the whole of it as it now is. You will find several holes, that were caused by bullets that were fired at my late husband in his endeavours to seize the flag at that memorable event:- Yours, &c.,
In a letter to his father, Fred Riley recalled visiting Ballarat in 1912 and acquiring a fragment of the Eureka Flag that now resides at the National Library of Australia. He said:
I went to the Art Gallery to see the flag the men fought under and strange to say no-one there seems to value it in the least. It is hung over a trestle affair exposed to the public. Well I got into conversation with the keeper, and persuaded him to give me a bit of the flag, and much to my surprise and astonishment he gave me a bit. I was with him when he tore it off. It seems wanton sacrilege, vandalism or something worse to tear it still he did and I am in possession of that piece.[63]
As a result of this practice, the pieces of the flag in the art gallery collection represent only 69.01% of the original specimen.[64] In Labour History, Professor Beggs-Sunter states that the art gallery displayed the flag "in various unsuitable ways" until it was put in a glass case alongside the sword of Captain Wise in October 1934, which she described as an "unlikely juxtaposition". When peace activist Egon Kisch visited the gallery the following year, he wrote that the Eureka monument "heroes and minions of the law, fighters and executioners... on the same level".[65]
The Eureka Flag remained unauthenticated at the art gallery. After being told about it by his friend Rem McClintock in December 1944, Sydney journalist Len Fox, who worked with the Communist Party media, published an article about the flag during his investigation that followed on from Withers'. He entered into correspondence with the King family, the art gallery, and Ballarat local historian Nathan Spielvogel. Fox was sent a piece of the flag by the art gallery in March 1945, along with a drawing.[66]
Spielvogel offered to assist, although he had reasons to doubt the authenticity of the flag held by the art gallery. Later that year, Fox visited Ballarat to inspect the flag, and the custodians gave him two more pieces.[66] Fox self-published a booklet in 1963 that advanced his argument as to why the flag at the art gallery was authentic.[67] It was probably due to Fox's interest that in 1963, the flag was transferred to a safe at the art gallery.[68]
Eventually, the librarian discovered that the safe had been broken into. The robber left the flag that was still there wrapped in brown paper. At this point, it was stored in a vault at the National Bank. The final irrefutable validation of its authentication occurred when sketchbooks of Canadian Charles Doudiet were put up for sale at a Christie's auction in 1996. Two sketches, in particular, show the design is the same as the tattered remains of the original flag that were first put on public display at the art gallery in 1973, being unveiled during a ceremony attended by Prime Minister Gough Whitlam.[69][note 3]
The art gallery had received a $1,000 grant from the state government to cover half the estimated cost of repairing and mounting the flag.[72] Ballarat seamstress Val D'Angri did the conservation work in May 1973. Along with a pin, there was a "W" mark discovered at the fly end of the cross that D'Angri believes may be the signature of her great-great-grandmother Anastasia Withers.[73] Later additions to the gallery placed the flag in a dedicated shrine in the building's centre, surrounded by Eureka-related works.[65]
In 2001, legal ownership of the Eureka Flag was transferred to the art gallery. There was a second extensive restoration of the specimen undertaken in 2011 by leading textile conservation specialists Artlab Australia. The City of Ballarat had received a permit from Heritage Victoria to proceed with the conservation work. A full assessment of the state of the flag was commissioned. The report compiled by Artlab described the flag as "arguably the most important historical textile in Australia". The old backing cloth was replaced with state-of-the-art materials that are less prone to deterioration, along with the timber backing board. A new, purpose-built, low-light, temperature-controlled display case was also constructed.[74][75] The art gallery then loaned the flag to the Museum of Australian Democracy at Eureka (MADE) in 2013. When MADE closed in 2018, the interpretive centre came under the management of the City of Ballarat.[76] The flag was retained as the centrepiece of a visitor experience now branded as the Eureka Centre Ballarat while remaining part of the art gallery collection.[77]
Original specifications
The field of the Eureka Flag is Prussian blue, measuring 260 by 400 centimetres (100in ×160in) (2:3.08 ratio) and made from a fine woollen fabric. The horizontal arm of the cross is 37 centimetres (15in) wide, and the vertical arm is 36 centimetres (14in) tall. The central star is slightly larger (8.5%) than the others, being about 65 centimetres (26in), all from point to point and the other stars 60 centimetres (24in). The white stars are made from a fine cotton lawn, and the off-white cross is cotton twill.[78][note 4] In addition to a modern, standardised version, there are also other Eureka Flag variants.
Standardised design
The standardised Eureka Flag design
The standardised Eureka Flag most often seen in circulation today is an enhanced and different version from the original specimen with blue key lines around each of five equal stars. It is frequently made in the proportions of 20:13.[80] The Eureka Flag features the stars of the Southern Cross, a constellation more visible to viewers in the Southern Hemisphere. The stars are arranged differently from the astronomical alignment of the Southern Cross. The "middle" star (Epsilon Crucis) in the constellation is off-centre and near the edge of the "diamond." In contrast, the Eureka Flag features a star in the centre of the white cross.
Other Eureka flags
During his investigation in the late nineteenth century, William Withers found two women, Mrs Morgan and Mrs Oliver, who claimed to have sewn a starry flag at the time, but "they could not positively identify it as the one flown at Eureka".[49] John Wilson recalls that the Eureka Flag was taken down by Thomas Kennedy at sundown on 2 December 1854 and stored in his tent "for safe keeping".[81]
When the government forces arrived in the early hours of the following day, it was already flying above the stockade. Frank Cayley has concluded that: "Wilson's flag was undoubtedly one of several flags, in various designs, that were made at Eureka".[82] His colleague and fellow Eureka investigator, Melbourne journalist Len Fox, has also stated: "Flags were popular on the goldfields, and it may well be that among the diggers at Ballarat were smaller (and different) versions of the Eureka flag".[83]
Star-spangled Eureka Flag
Oath swearing scene from the 1949 motion picture Eureka Stockade featuring the star-spangled Eureka flag
Before the Eureka Flag went on permanent display to the public, it was often featured with no cross and free-floating stars as per the Australian national flag, such as in the 1949 motion picture Eureka Stockade starring Chips Rafferty.[84]
Concerning the provenance of the star-spangled Eureka Flag, Withers also interviewed police officer John McNeil, who recalled a meeting at Bakery Hill where Robert McCandlish "unbuttoned his coat and took out and unfurled a light blue flag with some stars on it, but there was no cross on it".[49]
Since 2012, various theories have emerged, based on the Argus account of the battle dated 4 December 1854 and an affidavit sworn by Private Hugh King three days later as to a flag being seized from a prisoner detained at the stockade, concerning whether a Union Jack, known as the Eureka Jack was also flown by the rebel garrison. Readers of the Argus were told that:
The flag of the diggers, "The Southern Cross," as well as the "Union Jack," which they had to hoist underneath, were captured by the foot police.[1]
In his Eureka: The Unfinished Revolution, Peter FitzSimons has stated:
In my opinion, this report of the Union Jack being on the same flagpole as the flag of the Southern Cross is not credible. There is no independent corroborating report in any other newspaper, letter, diary or book, and one would have expected Raffaello Carboni, for one, to have mentioned it had that been the case. The paintings of the flag ceremony and battle by Charles Doudiet, who was in Ballarat at the time, depicts no Union Jack. During the trial for high treason, the flying of the Southern Cross was an enormous issue, yet no mention was ever made of the Union Jack flying beneath.[85]
Extract of the affidavit by Hugh King, 7 December 1854
... three or four hundred yards a heavy fire from the stockade was opened on the troops and me. When the fire was opened on us we received orders to fire. I saw some of the 40th wounded lying on the ground but I cannot say that it was before the fire on both sides. I think some of the men in the stockade should – they had a flag flying in the stockade; it was a white cross of five stars on a blue ground. – flag was afterwards taken from one of the prisoners like a union jack – we fired and advanced on the stockade, when we jumped over, we were ordered to take all we could prisoners ...[86]
During the committal hearings for the Eureka rebels, there would be another Argus report dated 9 December 1854 concerning the seizure of a second flag at the stockade in the following terms:
The great topic of interest to-day has been the proceedings in reference to the state prisoners now confined in the Camp. As the evidence of the witnesses in these cases is more reliable information than that afforded by most reports, I shall endeavor to give you an abstract of it.[87]
Hugh King was called upon to give further testimony live under oath in the matter of Timothy Hayes. In doing so, he went into more detail than in his written affidavit, as the report states that the Union Jack-like flag was found:
... rollen up in the breast of a[n] [unidentified] prisoner. He [King] advanced with the rest, firing as they advanced ... several shots were fired on them after they entered [the stockade]. He observed the prisoner [Hayes] brought down from a tent in custody.[87]
Fall back with the Eureka Jack by Carlos Barrios (2014)
Military historian and author of Eureka Stockade: A Ferocious and Bloody Battle Gregory Blake, concedes that the rebels may have flown two battle flags as they claimed to be defending their British rights. Blake leaves open the possibility that the flag being carried by the prisoner had been souvenired from the flag pole as the routed garrison was fleeing the stockade. Once taken by Constable John King, the Eureka Flag was placed beneath his tunic in the same fashion as the suspected Union Jack was found on the prisoner.[47]
In 1896, Sergeant John McNeil, who was at the battle, recalled shredding a flag at the Spencer Street Barracks in Melbourne at the time. He claimed it was the Eureka Flag that he had torn down.[88] However, Blake believes it may have been the mystery Eureka Jack.[89]
Another theory is that the Eureka Jack was an 11th-hour response to divided loyalties in the rebel camp.[90][note 5]
The oath swearing ceremony in Eureka Stockade (1949) features the star-spangled Eureka Flag with the Union Jack beneath.[93] In The Revolt at Eureka, part of a 1958 illustrated history series for students, the artist Ray Wenban remained faithful to the first reports of the battle with his rendition featuring two flags flying above the Eureka Stockade.[94]
In 2013, the Australian Flag Society announced a worldwide quest and a $10,000 reward for more information and materials relating to the Eureka Jack mystery.[90] The AFS also released a commemorative artwork, "Fall Back with the Eureka Jack" illustrating Gregory Blake's theory for the 160th anniversary of the battle in 2014.[95]
The 12th Regiment traces its lineage back to the Duke of Norfolk's Regiment of Foot in 1685. In 1686, it became the Earl of Lichfield's Regiment of Foot. There was a reorganisation in 1751 following the War of the Austrian Succession, where it became the 12th Foot. The regiment took part in the Battle of Minden, where an allied army of British, Hanoverian, Hessian, and Prussians under Duke Ferdinand of Brunswick defeated the French commander Marshal Contades. This engagement took place in what became known as the "year of victories" and is commemorated in the regiment's battle honour. The regimental arms commemorate the defence of Gibraltar in 1779-1783. In 1782, it became the 12th (East Suffolk) Regiment. During the British conquest of Mysore in southern India, they were in action at the Battle of Seringapatam. Shortly before the Eureka Rebellion, the regiment was deployed to South Africa in the Kaffir War of 1851-1852. Other units within the regiment had served in Ireland.[96]
During the Eureka Rebellion, there was a skirmish involving the 12th Regiment and a mob of rebellious miners. Foot police reinforcements had already reached the Ballarat government outpost on 19 October 1854. A further detachment of the 40th (2nd Somersetshire) Regiment of Foot arrived a few days behind. On 28 November, the 12th Regiment arrived to reinforce the local government camp. As they moved near where the rebels ultimately made their last stand, there was a clash, where a drummer boy, John Egan and several other members of the convoy were attacked by a mob looking to loot the wagons.[97]
Tradition variously had it that Egan either was killed there and then or was the first casualty of the fighting on the day of the battle. However, his grave in Old Ballarat Cemetery was removed in 2001 after research carried out by Dorothy Wickham showed that Egan had survived and died in Sydney in 1860.[98]
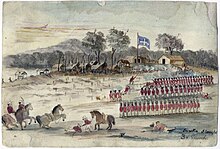
The 40th Regiment arrives at the government camp in Ballarat from Melbourne
The 40th Regiment traces its lineage back to 1717 when it was the Phillip's Regiment of Foot. It became the 40th Foot in 1782, and then in 1751, it was renamed the 40th (2nd Somersetshire) Foot. Its first battle honour was the capture along with other units of Montevideo, now the capital of Uraguay. During the war in Peninsular War, the regiment saw action at Roleia, Vimera, Talavera, Badajoz, Salamanca, and Vittoria. During the invasion of Napoleonic France, further honours were won at the Pyrenees, Nivelle, Orthes, and Toulouse. Later, the regiment saw action at the Battle of Waterloo. During the First Afghan War, the regiment was at Candahar, Ghuznee, and Cabool in 1842, and then at Maharajapore, India.[99]
The 40th Regiment arrived in Victoria from England in October 1852 at the request of Lieutenant Governor Charles LaTrobe.
After the Eureka Rebellion, some members of the 40th Regiment were posted to New Zealand. In 1881, it was amalgamated with the 82nd (The Prince of Wales's Volunteers) to form The South Lancashire Regiment (The Prince of Wales's Volunteers). During the First World War, the regiment saw action on the Western Front and in Gallipoli and Mesopotamia before being posted to Afghanistan in 1919. It took part in the Battle of France in 1940 during the Second World War. The regiment was then sent to the Far East for the Burma campaign and participated in the Normandy D-Day landings in 1944. In 1958, it combined with The East Lancashire Regiment to form The Lancashire Regiment (The Prince of Wales's Volunteers). It amalgamated with The Loyal Regiment to become The Queen's Lancashire Regiment in 1970.[99]
The colour sergeant for the 40th Regiment at the time of the battle was John Macoboy.[100]
Other vexillological aspects
Henry Powell had come from Creswick on 2 December 1854 to visit a friend, William Cox. Cox's tent was close to the Eureka Stockade. When he emerged after the battle, police officer Arthur Akehurst told him he was being taken prisoner. Akehurst then struck Powell on the head with a sword, slashing his body several times, before mounted troopers rode over him. He gave a statement about these events before his death on 9 December 1854 and was buried two days later. There was a note in the Mount Alexander Mail, 22 December 1854 edition, that his coffin draped in a Union Jack was placed on a cart followed by around six mourners. Powell's was the only inquest into any of the deaths that arose from the Eureka Stockade. His testimony, which was given in the presence of Captain Gordon Evans, was disallowed. Akehurst was held liable by the coroner for wilful and felonious death, being later acquitted by a jury in Melbourne.[101][102]
Loyalist sentiment appears to have been at a low ebb among the ordinary Victorian colonists at a public meeting held on 5 December 1854 in Swanston Street, Melbourne. Following the fall of the Eureka Stockade, it attracted a crowd of around four thousand people. Several pro-government motions were proposed and greeted by howls of anger. The seconder of one motion that called for the maintenance of law and order was drowned out when they framed the issue as "would they support the flag of old England...or the new flag of the Southern Cross".[103][104]
Notes
↑ Anastasia Withers was first mentioned in connection with the Eureka Flag in a 1986 article entitled "Women and the Eureka Flag" published in Overland.[26] The author Len Fox had received correspondence from Val D'Argri who had been informed by an aunt, May Flavell, that her great grandmother was one of three women responsible for sewing the Eureka Flag. In 1992, Fox also named Anne Duke for the first time on the basis of oral tradition preserved by the organisation Eureka's Children, which was formed in 1988 by descendants of those who took part in the Eureka Rebellion. Anastasia Hayes was only put forward in 2000 by her descendant Anne Hall, a Children of Eureka committee member.[27] In 1889, William Withers interviewed Anastasia Hayes for his 1870 book on the history of Ballarat. Hayes recalled being present when Peter Lalor's arm was amputated in the St Alipius presbytery. However, she apparently mentioned nothing about the Eureka Flag.[28]
↑ Ballarat militaria consultant Paul O'Brien has carried out an expert analysis of the Cayley sketches concluding that: "This sketch, once in the collection of the Ballarat Historical Society, location now unknown, was originally displayed with another sketch representing the 'Eureka' or 'King' flag and was labelled 'Found in a Tent After the Affair at Eureka'. The sketches were first reproduced in Frank Cayley's book Flag of Stars.[32] The assumption made in the accompanying text was that the sketch was a draft design for the making of the flag. While this assumption is quite plausible, it would seem more likely that the sketch was made after the capture of the flag. Note the tattered leading edge and indistinct star. The number of points to the stars represented also does not tally with those on the surviving 'King' flag. This sketch was, perhaps, drawn after the flag was 'brought in triumph' to the government camp and while it was being savaged by eager souvenir hunters. The two sketches have been drawn by different hands, and many details of design differ considerably (notably the hoist edge and number of star points). The size of the flag in the sketch with figure does not tally with the enormous size of the 'King' flag, and is probably a later, not contemporary, representation."[33]
↑ One notable inconsistency in Carboni's account is that he describes the Eureka Flag as made of silk,[21] and the cover of the first edition has an illustration that features diamond-shaped stars. These incorrect descriptions plagued early Eureka investigators, with the fragments held by the Art Gallery of Ballarat being of cotton and mohair construction.[70] However, the blue ground is said to have "a high sheen that gives a silk-like appearance".[71]
↑ According to measurements made during the 1973 restoration, only seven per cent of the left star remains with about 130 square centimetres (20sqin) missing. Five per cent of the top star remains with 130 square centimetres (20sqin) missing. This star is positioned 18 centimetres (7.1in) from the fly end of the flag and 20 degrees left of vertical. The top star has a number of irregularities and is missing 200 square centimetres (31sqin). It also features several holes and stains. The bottom star is seventy degrees to the right of vertical and is mainly intact with two areas of about 20 square centimetres (3.1sqin) missing, along with a number of smaller holes. Unlike the woollen field, the cotton material used for the cross is in a state of advanced decay. The horizontal arm has large holes along with brittle threads and dishevelled edges.[79]
↑ Peter Lalor made a blunder by choosing "Vinegar Hill" – the site of a battle during the Irish Rebellion of 1798 – as the rebel password. This led to waning support for the Eureka Rebellion as news that the issue of Irish independence had become involved began to circulate.[91][92]
Related Research Articles
The Eureka Rebellion was a series of events involving gold miners who revolted against the British colonial government in Victoria, Australia during the Victorian gold rush. It culminated in the Battle of the Eureka Stockade, which took place on 3 December 1854 at Ballarat between the rebels and the colonial forces of Australia. The fighting left at least 27 dead and many injured, most of the casualties being rebels. There was a preceding period beginning in 1851 of peaceful demonstrations and civil disobedience on the Victorian goldfields. The miners, many of whom such as Raffaello Carboni came from Europe and were veterans of the Revolutions of 1848, had various grievances, chiefly the cost of mining permits and the officious way the system was enforced.
The Eureka Flag was flown at the Battle of the Eureka Stockade, which took place on 3 December 1854 at Ballarat in Victoria, Australia. It was the culmination of the 1851–1854 Eureka Rebellion on the Victorian goldfields. Gold miners protested the cost of mining permits, the officious way the colonial authorities enforced the system, and other grievances. An estimated crowd of over 10,000 demonstrators swore allegiance to the flag as a symbol of defiance at Bakery Hill on 29 November 1854. It was then flown over the Eureka Stockade during the battle that resulted in at least 27 deaths. Around 120 miners were arrested, and many others were badly wounded, including 5 soldiers.
John King (1830-1881) was a police constable at the Battle of the Eureka Stockade who was responsible for seizing the rebel war flag.
The Battle of the Eureka Stockade was fought in Ballarat, Victoria, Australia on 3 December 1854, between gold miners and the colonial forces of Australia. It was the culmination of the 1851–1854 Eureka Rebellion during the Victorian gold rush. The fighting resulted in at least 27 deaths and many injuries, the majority of casualties being rebels. The miners had various grievances, chiefly the cost of mining permits and the officious way the system was enforced.
Since 2012, various theories have emerged, based on the Argus account of the Battle of the Eureka Stockade and an affidavit sworn by Private Hugh King three days later as to a flag being seized from a prisoner detained at the stockade, concerning whether a Union Jack, known as the Eureka Jack was also flown by the rebel garrison. Readers of the Argus were told that:
The flag of the diggers, "The Southern Cross," as well as the "Union Jack," which they had to hoist underneath, were captured by the foot police.
The following bibliography includes notable sources concerning the Eureka Rebellion. This article is currently being expanded and revised.
The Eureka Rebellion, an 1854 gold miner's revolt in Victoria, Australia, has been the inspiration for numerous novels, poems, films, songs, plays and artworks. Much of Eureka folklore relies heavily on Raffaello Carboni's 1855 book, The Eureka Stockade, which is the first and only comprehensive eyewitness account of the uprising. The poet Henry Lawson wrote about Eureka, as have many novelists.
Historians have noted various manifestations of loyalist sentiment throughout the 1851-1854 Eureka Rebellion on the Victorian gold fields. Among the examples that have been cited include a letter from the Mayor of Melbourne to the Lieutenant Governor concerning US Independence Day in 1853, the Bendigo Petition and Red Ribbon Movement protests, the inaugural meeting of the Ballarat Reform League, the Eureka Jack Mystery, and the public protest in Melbourne following the Battle of the Eureka Stockade.
The 1855 Victorian high treason trials took place between 22 February – 27 March in the aftermath of the Battle of the Eureka Stockade. The Goldfields Commission recommended a general amnesty for all on the runs from the fallen Eureka Stockade. Instead, thirteen of the rebels detained were eventually indicted for high treason. The juries all returned a verdict of not guilty by a jury, and the indictment against Thomas Dignum was withdrawn. On 23 January, the trial of Ballarat Times editor Henry Seekamp resulted in a finding of guilt for seditious libel, and a month later, he was sentenced to a term of imprisonment of six months. The trials have been described as farcical, and the colonial secretary would rebuke Governor Sir Charles Hotham over prosecuting the Eureka rebels for the lofty offence of high treason.
There were key people involved in the Eureka Rebellion who subscribed to the ideals of Chartism and saw the struggle on the Victorian goldfields as a continuation of the activism in Britain in the 1840s and "the centuries of heroic struggles in England which preceded the Australian Federation" such as the 1688 Glorious Revolution, that resulted in the enactment of the English Bill of Rights. From 1837 to 1848, 129,607 incomers to Australia arrived from the British mainland, with at least 80 "physical force" chartists sentenced to penal servitude in Van Diemens Land. Currey agrees that the population at the time would have been sufficiently politically awake such that: "it may be fairly assumed that the aims of the Anti-Corn-Law League and the Chartists were very familiar to many of the Victorian miners".
The Eureka Stockade was a crude battlement built in 1854 by rebel gold miners at Ballarat, Australia during the Eureka Rebellion. It stood from 30 November until the Battle of the Eureka Stockade on 3 December. The exact dimensions and location of the stockade are a matter of debate among scholars. There are various contemporary representations of the Eureka Stockade, including the 1855 Victorian high treason trials map and Eureka Slaughter by Charles Doudiet.
The Eureka Stockade is an 1855 novel by Raffaello Carboni, who was present in Ballarat during the Eureka Rebellion. He lived near the Eureka Stockade and witnessed the battle on 3 December 1854 when the government forces defeated the rebel garrison. The Eureka folklore is deeply indebted to Carboni's novel, the first and only comprehensive eyewitness account of the Eureka Rebellion.
The Victorian gold rush led to an influx of foreign nationals, increasing the colony's population from 77,000 in 1851 to 198,496 in 1853. Many such as Raffaello Carboni had experienced the Revolutions of 1848. They supported the protest movement that formed on the goldfields in opposition to the mining tax system, ultimately leading to an armed uprising at Ballarat. It is currently known that the participants in the Battle of the Eureka Stockade on 3 December 1854 came from at least 23 different nations, including Australia, Canada, the United States of America, Jamaica, Mauritius, Russia, Norway, Finland, Sweden, Denmark, Poland, Switzerland, Italy, Greece, The Netherlands, Scotland, Ireland, England, Wales, Germany, France, Portugal and Spain. Carboni recalled that "We were of all nations and colours." During the 1855 Victorian high treason trials, the Argus court reporter observed that of "the first batch of prisoners brought up for examination, the four examined consisted of one Englishman, one Dane, one Italian, and one negro, and if that is not a foreign collection, we do not know what is." However, despite being present on the Ballarat gold fields, there is no record of any Chinese involvement at the Eureka Stockade. According to figures published by Professor Anne Beggs-Sunter, in her sample of 44 rebels, only one hailed from a non-European country.
The Victorian colonial police force of the 1850s operated as an armed paramilitary gendarmerie where troopers and police were garrisoned at central locations, such as the government camp in Ballarat, and there was no interaction with the civilian population. To cope with the expansion of the mining industry, the Victorian government resorted to recruiting at least 130 former convicts from Tasmania who were prone to brutal means. They would get a fifty per cent commission from all fines imposed on unlicensed miners and sly grog sellers. Plainclothes officers enforced prohibition, and those involved in the illegal sale of alcohol were initially handed 50-pound fines. There was no profit for police from subsequent offences, that were instead punishable by months of hard labour. This led to the corrupt practice of police demanding blackmail of 5 pounds from repeat offenders. By January 1853, there were 230 mounted police throughout Victoria. By 1855, the number had risen to 485, including nine mounted detectives.
↑ Nicholls, H.R (May 1890). Reminiscences of the Eureka Stockade. The Centennial Magazine: An Australian Monthly. II: August 1889 to July 1890 (available in an annual compilation). p. 749.
Smith, Whitney (1975b). The Flag Book of the United States: The Story of the Stars and Stripes and the Flags of the Fifty States. New York: William Morrow. ISBN978-0-68-802977-7.
Primary sources
Memoirs
Craig, William (1903). My Adventures on the Australian Goldfields. London: Cassell and Company.
Nicholls, H.R (May 1890). Reminiscences of the Eureka Stockade. The Centennial Magazine: An Australian Monthly. II: August 1889 to July 1890 (available in an annual compilation).
Wilson, John W. (1963). The Starry Banner of Australia: An Episode in Colonial History. Brisbane: Brian Donaghey.
MacFarlane, Ian (1995). Eureka from the Official Records. Melbourne: Public Record Office Victoria. ISBN978-0-73-066011-8.
Seminars
Beggs-Sunter, Anne (2004). "Contesting the Flag: the mixed messages of the Eureka Flag". In Mayne, Alan (ed.). Eureka: reappraising an Australian Legend. Paper originally presented at Eureka Seminar, University of Melbourne History Department, 1 December 2004. Perth, Australia: Network Books. ISBN978-1-92-084536-0.
This page is based on this Wikipedia article Text is available under the CC BY-SA 4.0 license; additional terms may apply. Images, videos and audio are available under their respective licenses.