The 1st Armoured Brigade was a formation of the Australian Army during World War II. The brigade was formed in July 1941, at Greta, New South Wales from volunteers for the Second Australian Imperial Force and was assigned to the 1st Armoured Division. Raised initially for service in the Middle East, following Japan's entry into the war, the brigade was assigned to the defence of Australia in case of an invasion. After garrison duties in New South Wales and Western Australia, it was disbanded in November 1944 without seeing active service, although some of its former units saw action later with other formations.
It was re-raised in the postwar period, serving in the Citizens Military Force between 1948 and 1957. During this period, the brigade was based in New South Wales and formed part of Eastern Command. The brigade's headquarters was broken up when the Australian Army determined that there was no need for large-scale armoured formations as the focus shifted to jungle operations and close infantry-armoured cooperation. Its constituent units were subsequently dispersed to other formations.
History
World War II
In June 1940, the Australian government decided to form an armoured division, designated the 1st Armoured Division. This formation included two armoured brigades drawn from the all-volunteer Second Australian Imperial Force (2nd AIF), and was intended for deployment to the Middle East.[1][2][3] This was by far the largest armoured unit the Australian Army had established, with interwar experimentation being limited to a single armoured car regiment.[4] The armoured division was considered necessary to enable the formation of a self-contained Australian corps including the four infantry divisions that had previously been formed.[5] As a result, the 1st Armoured Brigade was formed on 19 July 1941 when its headquarters opened at Victoria Barracks, Sydney.[6] In line with the standard British Army structure for armoured divisions at the time, it was to command three 2nd AIF armoured regiments and a regiment of motorised infantry; each armoured regiment had an authorised strength of 10 scout cars, 46 cruiser tanks and 6 support tanks.[7][8] The brigade's first commander was Brigadier Frederick Hinton, a World War I veteran who had served with the Australian Light Horse at Gallipoli, and then as a machine gun officer on the Western Front. During the interwar years, he had risen through the ranks as a cavalry officer in the part-time forces.[9]
The regiments assigned to the brigade were the 2/5th, 2/6th and 2/7th Armoured Regiments, which were formed in Queensland and New South Wales after the brigade headquarters was raised. After undertaking individual training, the three regiments and the brigade headquarters were brought together at Greta, New South Wales, in November 1941.[6][10] The brigade moved as a formation to Tamworth, in December 1941 to begin more complex collective training.[10] In early 1942, the brigade moved again to Singleton where training facilities for an armoured brigade were being rapidly constructed.[11] It had initially been planned to raise a new 2nd AIF infantry battalion – the 2/34th – as a motorised unit, but instead it was decided to utilise the existing Militia light horse units as motor regiments. As a result, the 15th Motor Regiment joined the brigade.[10]
A 2/6th Armoured Regiment tank supporting infantry during the Battle of Buna–Gona
Early war plans were made for the brigade to deploy to the Middle East in early 1942; however, Japan's entry into the war in December 1941 meant that this move was cancelled and instead the brigade was reallocated to the defence of Australia in the case of invasion.[12][13] A small element – the 2/1st Independent Light Tank Squadron – was formed from the brigade to deploy to Malaya around this time, but this deployment was also cancelled in February 1942 after the fall of Singapore, and the detachment was reassigned to the 1st Armoured Brigade, adopting the designation of the 2/1st Armoured Brigade Reconnaissance Squadron.[10] In April 1942, Brigadier Robert Nimmo assumed command of the brigade. He held the position only for a short period, and was replaced by Brigadier Denzil Macarthur-Onslow in July.[14]
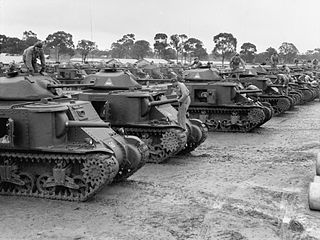
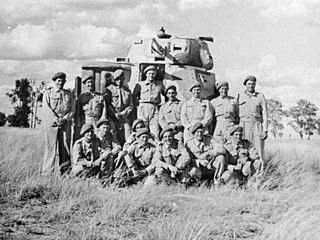
The delivery of tanks to the brigade was slow, and until April 1942 its armoured regiments were equipped only with machine gun carriers.[15][16] US-made M3 Grantmedium tanks and Stuartlight tanks were delivered throughout the first half of 1942. Divisional exercises were undertaken in August 1942 around Narrabri, during which time the brigade occupied a position around Edgeroi Station. The following month, the 2/6th Armoured Regiment was detached and deployed to New Guinea to fight against the Japanese,[10] and subsequently took part in the Battle of Buna–Gona.[15][17]
Meanwhile, in October 1942, the 1st Armoured Division was reorganised to provide some of its more experienced personnel to help raise the 2nd and 3rd Armoured Divisions. Once this was complete, the 1st Armoured Division was ordered to begin moving to Western Australia to undertake garrison duties. The 15th Motor Regiment transferred to the 2nd Armoured Division at this time, while the 2/10th Armoured Regiment, which had been raised in Western Australia, was transferred to the 1st Armoured Brigade to make up for the loss of the 2/6th to combat operations in New Guinea. The 2/1st Armoured Brigade Reconnaissance Squadron was broken up and used to form part of the 2/4th Armoured Regiment, which was assigned to the 2nd Armoured Brigade. The brigade's move to Western Australia began in December 1942, after a preliminary move to Gunnedah.[14] In January 1943, Nimmo resumed command, taking over from Macarthur-Onslow.[14] The following month, the 1st Armoured Brigade had concentrated at Mingenew, and a divisional exercise took place in March 1943.[10]
The 2/10th Armoured Regiment during a training exercise in Western Australia in 1943
As the tide of war in the Pacific turned in favour of the Allies, the threat of invasion passed. The Australian government decided to reallocate some of the manpower that had been tied up in the armoured divisions to other formations that would be utilised for jungle warfare, or civilian industry.[18][19] As a result, in April 1943, the 15th Motor Regiment returned to the 1st Armoured Brigade when the 2nd Armoured Division was disbanded. The 1st Armoured Division was retained in Western Australia, though, and Brigadier Frank Wells assumed command of the brigade in June.[14] In August, the 1st Armoured Brigade was moved to Moora. The following month, the 1st Armoured Division ceased to exist as a formation and was broken up.[20] The 1st Armoured Brigade was retained as an independent brigade group and reported directly to III Corps. It received the new 2/1st Armoured Brigade Reconnaissance Squadron, which was formed from the 1st Armoured Division's headquarters, as well as artillery from the 16th Field Regiment and the 112th Anti-Tank Regiment and engineers from the 2/3rd Independent Field Company.[10][21][22] Various other support units were also attached during this time. Brigade headquarters remained at Moora while the brigade's units undertook training at various locations.[10]
Throughout 1944, Australia's armoured forces continued to be reduced.[20] The combat units in Western Australia were also disbanded or transferred as the threat to the state declined.[23] On 8 March, all elements of III Corps were placed on six hours notice to respond to a Japanese naval force which was believed to be headed for the Fremantle–Perth area. This proved to be a false alarm, and all units returned to normal duties on 14 March.[24] The 2/6th Armoured Regiment returned to the brigade in March 1944, releasing the 2/5th Armoured Regiment to join the 4th Armoured Brigade. Following this, further reductions took place as the 2/7th Armoured Regiment was disbanded in May, followed by the 112th Anti-Tank Regiment in June.[10] In June 1944, the brigade's strength was reported as 5,338 personnel.[25] Brigade headquarters moved to Northam that month,[23] at which time III Corps headquarters was redesignated as Western Command as the process of converting it into a line of communications formation began.[26] Nevertheless, the 1st Armoured Brigade's order of battle remained steady until October when the 15th Motor Regiment was disbanded and both the 2/6th Armoured Regiment and the brigade reconnaissance squadron were transferred to the 4th Armoured Brigade in Queensland. The 16th Field Regiment was also transferred to the east coast, moving to Sydney. Finally, in October – November 1944, the brigade ceased to exist – having never seen combat – being broken up to provide reinforcements for forces deployed elsewhere.[10][27] At this time, both 2/10th Armoured Regiment and the 1st Armoured Brigade's headquarters were disbanded at Northam.[10] The 1st Armoured Brigade Group was the last combat unit to be stationed in Western Australia during the war.[23] From its disbandment until the end of the war, the 4th Armoured Brigade commanded the Army's remaining armoured forces.[28]
Postwar
A former Australian Army Matilda II tank; the 1st Armoured Brigade operated this type between 1948 and 1955
In the postwar period, the Australian Army re-raised two armoured brigades – the 1st and the 2nd – in April 1948 within the part-time Citizens Military Force (CMF). The 1st Armoured Brigade was formed in New South Wales as part of Eastern Command, and was placed under the command of Macarthur-Onslow, who had previously held the post during the war. At this time, the brigade consisted of two armoured regiments – the 1st and 12th/16th – and the 6th Motor Regiment. The two armoured regiments operated reconditioned Matilda IIinfantry tanks in the post-war period. These tanks were considered obsolete, and were later supplemented with small numbers of Centurionmain battle tanks which were issued only for training. The 6th Motor Regiment was issued M3 Scout Cars, which were also obsolete. The 1st Armoured Regiment was based at Parramatta, while the 12th/16th Armoured Regiment was spread across regional New South Wales with depots in Muswellbrook, Armidale, Tamworth, and North Maitland. 'A' Squadron of the Newcastle-based 15th Amphibian Assault Regiment, was assigned to the brigade to provide an amphibious capability, and operated LVT(A)4s.[29][30] As of 1953, the 1st Armoured Brigade's headquarters were located in Lancer Barracks at Parramatta.[31]
Throughout the early 1950s, the brigade's elderly vehicles and equipment became rundown.[32] Plans to purchase Centurion tanks for the CMF armoured regiments were abandoned in 1954 due to the pressure the National Service scheme was placing on the Army's budget.[33] The Matildas were withdrawn from service in 1955, and the 1st Armoured Brigade's two armoured regiments used Staghound armoured cars for training that year.[34] From 1956, tank training was centralised at Puckapunyal, Victoria with units rotating through the Armoured Centre.[35] In 1953, Brigadier Kenneth Arnott took over command of the brigade, remaining in the position until 1956 when Brigadier John James replaced him.[36] In 1957, the director of the Royal Australian Armoured Corps (RAAC) noted that the poor state of the CMF armoured regiments' equipment meant that it was no longer possible for them to become proficient in cooperation between infantry and tanks.[33]
The brigade ceased to exist in September 1957,[36] following a reassessment of the role of armour within the Australian Army. This resulted in a focus upon infantry support in jungle conditions, rather than large-scale armoured warfare. As a result, armoured brigade headquarters were no longer considered unnecessary.[37] Nevertheless, a small armoured headquarters staff was retained underneath the Brigadier, RAAC cell that was established within both Southern and Eastern Commands at this time. This staff was intended as a cadre from which to form a brigade headquarters in an emergency, but represented only about half of the 105 personnel that had previously undertaken the role. It did not command any units, and had an advisory function. The headquarters was disbanded in 1960.[38][39]
The individual regiments previously assigned to the brigade were also affected by the change. The 1st and 15th being amalgamated to form the 1st/15th Royal New South Wales Lancers.[40] The 6th Motor Regiment was converted into an infantry unit designated the 6th Royal New South Wales Rifles, retaining the lineage of its predecessor mounted unit.[41][42] By 1960, with the introduction of the pentropic establishment, the 1st/15th had been assigned to the 3rd Division as a tank unit,[43][44] while the 6th Royal New South Wales Rifles had ceased to exist, being subsumed into the Royal New South Wales Regiment.[45]
Brigade units
The following units served with the brigade during the war:[10][46]
The 1st Armoured Division was an armoured formation of the Australian Army, raised in 1941 as part of the Second Australian Imperial Force (AIF) during World War II. While the Division was originally to be deployed to North Africa in late 1941, it was retained in Australia following the outbreak of the Pacific War. The 1st Armoured Division formed a key element of Australia's defences against a feared Japanese invasion and was disbanded in Western Australia in September 1943.
The 4th Armoured Brigade was an armoured formation of the Australian Army established during the Second World War. It was formed in February 1943 to provide armoured support for infantry units operating in the South West Pacific Area. Its composition varied over time, but usually comprised several armoured regiments equipped with Matilda II or M3 Grant tanks as well as some support units.
The 2nd Armoured Division was an armoured formation of the Australian Army during World War II. Originally raised in 1921 as the 2nd Cavalry Division, based in Victoria and South Australia, the formation had been converted into a motor division in early 1942, before adopting the armoured designation later in the year. A Militia formation, the division undertook garrison duties in Australia and did not see combat before being disbanded in mid-1943.
The 3rd Armoured Division was an armoured unit of the Australian Army during World War II. Originally raised in 1921 as the 1st Cavalry Division, the formation had been converted into a motor division in early 1942, before adopting the armoured designation in November 1942. A Militia formation, the division undertook garrison duties in New South Wales and then Queensland and did not see combat before being disbanded in late 1943 and early 1944.
Armoured units made a relatively small, but important, contribution to Australia’s war effort during World War II. While Australia formed three armoured divisions and two independent armoured brigades during the war, Australian armoured units only saw action as independent regiments and companies supporting larger infantry formations. Early actions were fought in the Middle East by the divisional carrier regiments that supported the 6th, 7th and 9th Divisions, fighting in Libya, Egypt and Syria in 1941–42, before the Australian divisions returned to Australia in 1942–43. During the early fighting in the Pacific, there was a limited role for armoured formations, although one armoured regiment – the 2/6th – took part in the fighting around Buna–Gona in late 1942. Later in the war, though, during the Huon Peninsula, Bougainville and Borneo campaigns of 1943–45, several armoured units were used by Australian forces in the infantry support role.
The 3rd Army Tank Brigade was an armoured brigade of the Australian Army during the Second World War. The brigade was formed in May 1942 and disbanded in September 1943 without seeing combat.
The 2/10th Armoured Regiment was an armoured regiment of the Australian Army. Formed for service during World War II, the regiment was raised in 1941, but was disbanded in late 1944 having never been deployed overseas.
The 2/6th Armoured Regiment was an armoured regiment of the Australian Army that served during World War II. Raised in 1941 the Regiment took part in the Battle of Buna–Gona in 1942–43, however, it did not see further action during the war and was disbanded in September 1945.
The 2/4th Armoured Regiment was an armoured regiment of the Australian Army, which served during World War II. The regiment was formed in November 1942 as part of the Second Australian Imperial Force by amalgamating a number of previously existing armoured units and was disbanded in September 1946 after seeing action in New Guinea and Bougainville Island, where it provided individual squadron-group sized elements which operated in support of infantry operations against the Japanese. During its service the regiment received 10 battle honours.
The 2/5th Armoured Regiment was an armoured regiment of the Australian Army. Raised for service during World War II, the regiment was formed in 1941 and disbanded at the end of the war in 1945 without having been deployed outside of Australia.
The 2/7th Armoured Regiment was an armoured regiment of the Australian Army. Raised for service during World War II in October 1941, it was initially intended to serve in the Middle East, however due to the changing nature of the war and manpower shortages, the regiment never saw service outside of Australia before being disbanded in January 1944.
The 2/9th Armoured Regiment was an armoured regiment of the Australian Army. Raised for service during World War II, the regiment was formed in August 1941 and spent most of the war in Australia. It was disbanded in early 1946 after seeing action in the Borneo campaign late in the war.
The 2/8th Armoured Regiment was an armoured regiment of the Australian Army. It was raised for service during World War II, being formed in July 1941. It deployed to New Guinea in 1943 but did not see any action before being disbanded in February 1944.
The 2/9th Cavalry (Commando) Regiment was one of three commando regiments raised by the Australian Army for service during World War II. It was originally raised in 1940 as an armoured cavalry unit as part of the 8th Division, before being transferred to the 9th Division. Between 1941 and 1942 the regiment saw action in the Middle East before being returned to Australia in early 1943. At this time the regiment was re-organised as the administrative headquarters for the 2/4th, 2/11th and 2/12th Commando Squadrons and it was converted into a commando regiment. Later in 1945 the unit saw action during the landings on Tarakan on Borneo before being disbanded upon the cessation of hostilities.
The 2nd Armoured Brigade was a formation of the Australian Army during World War II. The brigade was formed in July 1941, at Puckapunyal, Victoria, from Second Australian Imperial Force volunteers. It was assigned to the 1st Armoured Division in July 1941, with the intention of deploying it to the Middle East. However, it was reassigned to home defence following Japan's entry into the war, and was then transferred to the 3rd Armoured Division in October 1942. The brigade remained in Australia, undertaking defensive duties in Victoria and Queensland before being disbanded in January 1944. While it did not see any active service as a formation, some of its constituent units eventually took part in the campaigns on Tarakan, Labuan, Bougainville and around Aitape–Wewak in 1944–1945 after transferring to other brigades.
The 6th Australian Armoured Brigade was a formation of the Australian Army during World War II. The brigade was formed in May 1942, by the conversion of the 6th Motor Brigade and was assigned to the 2nd Motor Division. The brigade also absorbed units of the 5th Motor Brigade in June 1942. The brigade remained in Australia and did not see any active service before it was converted into the 4th Armoured Brigade in March 1943.
The 2nd Motor Brigade was a formation of the Australian Army during the interwar years and World War II. Initially raised in 1921 as the 2nd Cavalry Brigade in New South Wales, it was a part-time formation of the Militia. It consisted of three light horse regiments spread across several depots across the Hunter Valley and northern part of the state. During World War II, the brigade was mobilised for defensive duties in December 1941, and assumed positions along the northern coast to defend against a possible invasion. In early 1942, the brigade was converted into a motorised formation, and was redesignated as the 2nd Motor Brigade. In April 1943, when the threat of invasion had passed, it was disbanded and its manpower reallocated.
The 4th Motor Brigade was a formation of the Australian Army during the interwar years and the early part of the World War II. A formation of the part-time Militia, the brigade was formed in 1921 as the 4th Cavalry Brigade. At this time, it consisted of three light horse regiments based in southern and western New South Wales. During World War II, the brigade was mobilised for defensive duties in December 1941, and assumed positions along the southern New South Wales coast to defend against a possible invasion. It was converted into the 4th Motor Brigade in March 1942 when it was motorised. As a motor brigade, the 4th undertook defensive duties on the south coast of New South Wales before it was converted into an armoured formation, designated the 3rd Army Tank Brigade in May 1942.
The Australian Army has used tanks from after the First World War, through the interwar period, the Second World War, the Cold War and to the present day. Throughout this period the Army has primarily been a light infantry force, with its tanks mainly being used in the direct support role. The Australian Army's tanks have seen combat during the Second World War and the Vietnam War, where they proved successful despite some of the designs employed being considered obsolete. The first Australian tanks were a small number of British medium and light tanks which were operated mainly for training purposes during the 1920s and 1930s.
The 14th Armoured Regiment was a unit of the Australian Army, which served during World War II. The regiment was formed in May 1942 as part of the 6th Australian Armoured Brigade. It was originally a Militia unit which originated from the 17th Light Horse Regiment. It was disbanded in early 1943 without seeing combat.
Festberg, Alfred (1972). The Lineage of the Australian Army. Melbourne, Victoria: Allara Publishing. ISBN978-0-85887-024-6.
Hall, Richard John (1968). The Australian Light Horse. Blackburn, Victoria: W.D. Joynt & Co. OCLC59504.
Handel, Paul (1998). Fifty Years of the Royal Australian Armoured Corps, 1948 to 1998. Puckapunyal, Victoria: Royal Australian Armoured Corps Memorial and Army Tank Museum. OCLC222940907.
Handel, Paul (2003). Dust, Sand & Jungle: A History of Australian Armour During Training and Operations, 1927–1948. Puckapunyal, Victoria: RAAC Memorial and Army Tank Museum. ISBN1-876439-75-0.
Handel, Paul (2004). The Vital Factor: A History of 2/6th Australian Armoured Regiment 1941–1946. Loftus, New South Wales: Australian Military History Publications. ISBN1-876439-61-0.
Hopkins, Ronald (1978). Australian Armour: A History of the Royal Australian Armoured Corps 1927–1972. Canberra: Australian Government Publishing Service. ISBN978-0-642-99414-1.
McCarthy, Dayton (2003). The Once and Future Army: A History of the Citizen Military Forces, 1947–1974. Melbourne, Victoria: Oxford University Press. ISBN978-0-19551-569-5.
McKenzie-Smith, Graham (2018). The Unit Guide: The Australian Army 1939–1945, Volume 2. Warriewood, New South Wales: Big Sky Publishing. ISBN978-1-925675-146.
Palazzo, Albert (2001). The Australian Army: A History of its Organisation 1901 to 2001. South Melbourne, Victoria: Oxford University Press. ISBN978-0-19-551506-0.
This page is based on this Wikipedia article Text is available under the CC BY-SA 4.0 license; additional terms may apply. Images, videos and audio are available under their respective licenses.