One of the anti-aircraft guns assigned to the defence of Fremantle in November 1943
Objective
Reinforcement of Western Australia in response to a feared Japanese attack
Date
6–20 March 1944
Outcome
No attack materialised, all units involved returned to their normal dispositions
During March 1944, the Allies of World War II rapidly reinforced the military units located in the state of Western Australia to defend against the possibility that Japanese warships would attack the cities of Fremantle and Perth. This redeployment began on 8 March after concerns were raised about the purpose of Japanese warship movements near the Dutch East Indies, and ended on 20 March, after it was concluded that an attack was unlikely.
In February 1944, the Allies became alarmed that the movement of the main Japanese fleet to Singapore could be a precursor to raids in the Indian Ocean, including against Western Australia. The emergency began when Allied code breakers detected the movement of a powerful force of Japanese warships in the Netherlands East Indies in early March. After a United States Navy submarine made radar contact with two Japanese warships near one of the entrances to the Indian Ocean on 6 March, the Allied military authorities and Australian Government judged that a fleet may have been heading towards the Perth area. In reality, these warships were undertaking a patrol while awaiting a small raiding force to return from attacking ships in the central Indian Ocean.
In response to the perceived threat, the Allied military units stationed in Western Australia were placed on alert, and reinforcements were dispatched. These included six Royal Australian Air Force flying squadrons. Other Allied air units were held at Darwin in the Northern Territory to respond to raids on that town or reinforce Western Australia if the Japanese fleet was sighted. An air raid warning was sounded in Fremantle and Perth on 10 March, but this proved to be a false alarm. Intensive patrols by the Allied militaries did not detect any Japanese warships off Western Australia, and most units stood down on 12 March. On 20 March, it was concluded that the threat of attack had passed, and the air reinforcements that had been sent to Western Australia returned to their bases.
Background
The strategic situation in the Pacific in March 1944. The red-shaded area was controlled by the Allies and the remainder was controlled by Japan, except for the Soviet Union (grey), which was not at war with Japan.
Fremantle, Western Australia was an important port throughout World War II. From the start of the war, it was the assembly point for convoys of Allied ships travelling between Australia, the Middle East, and Europe.[1] Soon after the outbreak of the Pacific War, the city became a key operating and maintenance location for United States Navy submarines. The Fremantle submarine base was established in March 1942, and eventually became the US Navy's second-largest submarine base, after Pearl Harbor in Hawaii.[2]Royal Netherlands Navy submarines were also stationed at Fremantle from 1942, and the Royal Navy began transferring submarines there in mid-1944.[3][4] Allied submarines operating from Fremantle played a key role in the offensive against Japanese shipping; over the course of the war, 154 submarines made 341 combat patrols from the port.[5]
The Australian Government and local civilians regarded the geographically isolated Perth–Fremantle area as being vulnerable to attack. These fears peaked in March 1942 following the rapid Japanese advance through South East Asia during December 1941 and the early months of 1942. No Japanese attack on the region eventuated, though several small towns in the north of Western Australia were bombed. Concerns over Fremantle's security continued; in March 1943 Australian Prime Minister John Curtin noted as part of a message to British Prime Minister Winston Churchill and US President Franklin D. Roosevelt that the port was vulnerable to bombardment by Japanese warships or aircraft flying from aircraft carriers.[6]
Elements of the Australian and United States armed forces were assigned to the defence of the Perth–Fremantle area. Each of Australia's three armed services maintained a separate headquarters in Western Australia, their efforts coordinated by Combined Defence Headquarters. In the event of attack, the Australian Army'sIII Corps would assume overall control.[1] By early 1944, the forces assigned to the region's defence had been reduced from their peak strength.[7] Nevertheless, several anti-aircraft and coastal defence batteries were located in and near Perth and Fremantle to protect the cities from attack. These units were primarily manned by Volunteer Defence Corps (VDC) part-time personnel, who would be called up if a threat developed.[7][8] Three Royal Australian Air Force (RAAF) flying squadrons were also stationed around Perth; No. 85 Squadron provided air defence with CAC Boomerangfighters, No. 14 Squadron patrolled off the Western Australian coast using Bristol Beaufort light bombers and No. 25 Squadron operated Vultee Vengeance dive bombers. The US Navy's Patrol Wing 10 augmented the Australian forces and conducted long-range patrols over the Indian Ocean from Perth with Consolidated PBY Catalina flying boats.[1]
Japanese redeployments
In February 1944, the Combined Fleet, the Imperial Japanese Navy's main striking force, withdrew from its base at Truk in the Central Pacific to Palau and Singapore. The appearance of a powerful naval force at Singapore alarmed the Allies, as it was feared that these ships would conduct raids into the Indian Ocean and against Western Australia.[9] In response, the Allies strengthened the British Eastern Fleet in the central Indian Ocean by transferring two British light cruisers from the Atlantic and Mediterranean as well as several US Navy warships from the Pacific. The number of air units in Ceylon and the Bay of Bengal region was also increased.[10] Reinforcements for the 16 US Navy submarines based at Fremantle were also dispatched, but most of these boats did not arrive until after mid-March. The submarines were tasked with attacking the Japanese fleet in South East Asian waters.[11]
General Douglas MacArthur's General Headquarters, which was responsible for the South West Pacific Area, assessed in February that the Combined Fleet could potentially attack the port of Fremantle. It was thought that the purpose of any such raid would be to divert Allied forces from the offensives they were about to launch in the Pacific. MacArthur did not move any additional forces to Western Australia at this time, but developed plans to reinforce the area if necessary.[12] Land-based aircraft were considered sufficient to counter any attacks on Fremantle and, on 28 February, General Headquarters directed Lieutenant General George Kenney, the commander of the Allied Air Forces, to prepare to:
Concentrate a striking force of sixty heavy bombers in Western Australia on twenty-four hours' notice.
Reinforce this heavy bomber striking force with medium bombers when directed by this headquarters.
Provide three fighter squadrons for the defence of Perth.
Supply the air forces operating in Western Australia by air in an emergency.[12]
On 4 March, Curtin sent a cable to Churchill seeking the British Government's assessment of the likelihood of Japanese raids into the Indian Ocean, and the capacity of the Allied forces in the region to defeat any such attacks. Curtin's cable crossed a message Churchill had sent the previous day, which stated that while Japanese forces could conduct raids against Allied shipping in the Indian Ocean, "it is not thought that serious danger, either to India or to Western Australia, is likely to develop". Churchill's cable also noted that the Japanese would likely seek to preserve their remaining major warships for use in the later stages of the war.[12]
Although the Australian Government was reassured by Britain's assessment of the situation, the Allied military units stationed in Western Australia made preparations to resist a possible attack. The RAAF's Western Area Command improved the readiness of its forces near Perth and Exmouth Gulf in the north-west of the state. It also stockpiled bombs at Cunderdin, north-east of Perth, to be used by any heavy bombers sent as reinforcements.[13] The readiness of the Army garrison units in the Perth–Fremantle area was also increased. The Fremantle Fortress command, which was responsible for defending the port against naval bombardment or air attack, was placed on alert and ordered to station more heavy anti-aircraft guns near the city's docks. On 4 March, VDC units were directed to be able to man their assigned anti-aircraft and coastal-defence positions within 6 hours, rather than the normal warning time of 24 hours.[14]
The emergency
Japanese movements
Despite the Allied concerns, the Japanese did not intend to send the main body of the Combined Fleet into the Indian Ocean. The ships had been withdrawn from the Central Pacific to avoid a major United States offensive that was expected to be launched against the area. Singapore had been selected as the Fleet's new base as it was close to sources of fuel and had suitable facilities to enable the ships to undertake training and maintenance before counter-attacking the Allies in the Pacific. However, it was decided to send a small force of cruisers into the Indian Ocean to conduct the first raid by Japanese surface ships on the area since early 1942.[15]
The Japanese light cruiser Kinu (photographed here in 1931) was one of the ships whose detection by USSHaddo on 6 March sparked the emergency
In late February 1944, Vice-Admiral Shiro Takasu—the Commander in Chief of Japan's Southwest Area Fleet—ordered the heavy cruisers Aoba, Chikuma, and Tone to raid Allied shipping on the main route between Aden and Fremantle.[16] The three ships departed the Combined Fleet's anchorage in the Lingga Islands near Singapore on 27February.[17] The light cruisers Kinu and Ōi and three destroyers (which were designated a "Security and Supply Formation") escorted the raiding force through the Sunda Strait on 1March. These five ships were to remain at sea for the duration of the raid, and then escort the heavy cruisers back through the Sunda Strait.[16] The Allies were not aware of the raiding force or its departure, but Allied code breakers subsequently detected the sailing from Singapore on 4 March of a force comprising two battleships, an aircraft carrier and multiple destroyers, and determined that the ships were headed east towards Surabaya.[13][18][19] Rear-Admiral Ralph W. Christie, the commander of the Allied submarines based at Fremantle, believed that this force could attack the Perth–Fremantle area. In response, he ordered the submarine USSHaddo under the command of Lieutenant Commander Chester Nimitz Jr. to patrol the Lombok Strait and report the movement of any Japanese ships into the Indian Ocean.[19]
On 6 March, Haddo briefly made radar contact with, but did not sight, what Nimitz believed may have been at least two large Japanese warships near the Lombok Strait.[18][20] Nimitz was unsure whether to report this inconclusive contact, but decided to do so to prevent Fremantle from being subjected to a surprise attack; he later wrote that "'Remember Pearl Harbor' was the message that kept sticking in my mind".[21] The Japanese ships detected by Haddo were Kinu and Ōi heading towards the Sunda Strait.[18]
Nimitz's report caused significant concerns. On 8 March, the Australian Chiefs of Staff Committee advised the Australian Government that there was a possibility that the Japanese task force had entered the Indian Ocean with the goal of attacking the Perth–Fremantle area during the full moon period around 9 March. Accordingly, actions were initiated to improve the area's defences.[13][18] Also on 8 March, the commander of the Eastern Fleet, Admiral James Somerville, directed all Allied ships travelling in the Indian Ocean between 80 and 100° east to divert to the south or west.[22]
Based on the radar contact on 6 March, the phase of the Moon and assumptions of the Japanese force's speed and likely flying-off positions if it included any aircraft carriers, the Allied militaries judged that any attack on the Perth–Fremantle area was most likely to occur during the early hours of 11 March. It was also possible that such an attack could be conducted any time between the night of 9/10 March and the morning of 14 March.[18]
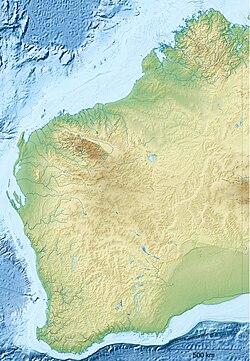
Locations in Western Australia affected by the March 1944 emergency
Allied actions to improve the Perth–Fremantle area's defences began on 8 March. All of the region's defences were manned, air patrols off the coast of Western Australia were increased and the five seaworthy US Navy submarines at the Fremantle submarine base were ordered put to sea and patrol along the expected route of the Japanese force. Two Dutch submarines based at Fremantle took up stations near Rottnest Island, just off the coast of Fremantle. The submariners who were on leave at the start of the emergency were recalled to duty by messages broadcast over public radio stations. The port of Fremantle was closed to shipping, and the merchant ships there at the time were dispersed to the nearby Gage Roads and Cockburn Sound.[13][18][21][23] The two US Navy submarine tenders based at Fremantle sailed to Albany on the south coast of Western Australia. Several US Navy submarines conducting patrols in the Indian Ocean and Netherlands East Indies were also directed to take up stations that would allow them to intercept Japanese ships bound for Fremantle, or attack such a force while it was returning to base.[21]
At a conference held at the Allied Air Headquarters in Brisbane on 8 March, Kenney ordered Air Vice-Marshal William Bostock, the head of RAAF Command, to take personal command of the air defence of Western Australia and to dispatch several RAAF squadrons there as reinforcements. Kenney also directed the United States Army Air Forces' heavy bomber-equipped 380th Bombardment Group to return from New Guinea to Fenton Airfield near Darwin, and be ready to move to Cunderdin or Geraldton if a threat to the Fremantle area developed.[13]
A large force of USAAF transport aircraft was assigned to help move the squadrons' personnel and equipment, and additional fuel supplies and bombs were also transported to Western Australia. The movement of each squadron took place in two parts: their aircraft and crews travelled together as the first echelon, and maintenance personnel with 14 days' worth of supplies formed the second echelon.[13]
Air Commodore Raymond Brownell, the head of Western Area Command, disagreed with Bostock's decision to station three squadrons at Exmouth Gulf. Brownell believed that Exmouth Gulf was unlikely to be attacked, and units stationed there would be too far from Perth to assist that region if it was the target of a Japanese raid. Bostock believed that the Japanese force might attack the Darwin area, and wanted to retain air units at Exmouth Gulf so they could rapidly redeploy to Darwin if necessary.[24]
The RAAF squadrons received orders to redeploy on 8 March and, after hasty preparations, began to depart their home bases the next day.[24] The two Spitfire squadrons encountered difficult weather conditions during their long trip along the west coast from Darwin to Perth. Inadequate servicing equipment and support personnel at the airfields that they used for refuelling also caused delays. One of the Spitfires crashed at Carnarvon, and another made a forced landing at Gingin near Perth. The two squadrons eventually arrived at Guildford outside of Perth on 12 March, two days later than originally planned.[25] The squadrons' replacement at Darwin, No. 84 Squadron, also experienced difficulty moving from Horn Island. The initial attempt by this unit's 24 P-40 Kittyhawk fighters to fly from Horn Island had to be abandoned when they struck bad weather, one of the Kittyhawk pilots dying when his aircraft crashed.[26] No. 120 (Netherlands East Indies) Squadron's long journey from Canberra to Exmouth Gulf was uneventful. Operations by the squadrons stationed at Exmouth Gulf were greatly disrupted on 10 March when a severe cyclone struck the area and flooded the airfield.[26]
Perth–Fremantle defences
The Allied air units in Western and Northern Australia conducted patrols into the Indian Ocean in search of the feared Japanese force. These operations included patrols by Catalinas from Patrol Wing 10, as well as RAAF Beauforts based in Western Australia. No. 43 Squadron RAAF's Catalinas also flew night patrols out of Darwin. None of these aircraft sighted Japanese vessels.[26] The cyclone off the coast of Western Australia greatly hampered the flights, and led to concerns that the Japanese force could be approaching under the cover of bad weather.[14]
The light cruiser HMASAdelaide protected merchant vessels and US Navy submarine tenders during the emergency.
The air defences of the Perth–Fremantle area were improved in response to the threat of attack. No. 85 Squadron was initially the only fighter squadron available in the region, but the two Spitfire squadrons also assumed responsibility for this task within hours of their arrival on 12 March. No. 25 Squadron was assigned to attack any Japanese warships with its dive bombers.[26] As well as these air units, the light cruiser HMASAdelaide and heavy cruiser HMSSussex were anchored near the merchant ships in Gage Roads on 10 March to provide anti-aircraft defence in the event of an attack.[18]
All III Corps units were placed on six hours' notice to respond to attacks from 8 March. Training exercises were cancelled so the Corps' personnel and formations could be concentrated near the threatened region. Soldiers from the 104th Tank Attack Regiment manned anti-aircraft machine gun positions near the flying boat station in the Perth suburb of Crawley. The coastal defences on Rottnest Island were also fully manned, and the 10th Garrison Battalion took up defensive positions on the island.[14] The build-up of the region's defences was noticed by civilians, leading to rumours that a raid or invasion was imminent.[14]
On the afternoon of 10 March, the radar station at Geraldton repeatedly detected what its crew believed was an unidentified aircraft. Acting upon advice from Brownell, the commanding officer of III Corps, Lieutenant General Gordon Bennett, ordered an air raid warning for Fremantle and Perth. This led to No. 85 Squadron being readied, air raid sirens being sounded, air raid wardens taking their posts, and the evacuation of hospitals. No raid eventuated and the "all clear" siren was soon sounded.[18][26] The military authorities and government did not give any reason for the air raid alert until the next day, when the Western Australian minister with responsibility for civil defence, Alexander Panton, released a brief statement noting that the alarms had been sounded on legitimate grounds and the incident had not been a hoax.[27][28]
Further military activity took place on 11 March. That morning one of the Allied submarines patrolling off Western Australia reported radar signals from a Japanese warship, but this proved to be a false alarm.[18] Also that day, Adelaide escorted eight merchant ships to sea and then proceeded to Albany to protect the submarine tenders.[18] The 10th Light Horse Regiment established coast-watching positions, and an exercise practising the full activation of VDC-manned coastal and anti-aircraft defences on the night of 11/12 March was held.[29]
Concerns over the prospect of an attack soon dissipated. Air patrols conducted in improving weather conditions on 11 March did not locate any Japanese warships, and most units other than Fremantle Fortress' anti-aircraft and coastal-defence positions were stood down on 12 March.[29] The units normally stationed in Western Australia returned to their usual locations and activities on 13 March, and the submarine tenders were escorted back to Fremantle by Adelaide.[18] On 20 March, Kenney advised Bostock that the threat of attack had passed, and ordered that all the additional RAAF units sent to Western Australia return to their home bases.[30]
The Japanese raiders dispatched to the Indian Ocean encountered only a single Allied ship: on the morning of 9 March, Tone shelled and sank the British steamer Behar, which was bound from Fremantle to Colombo on a voyage to the United Kingdom. After being attacked, the steamer's crew broadcast a distress signal to warn other Allied ships, causing the commander of the raiding force to abandon the operation.[31] The heavy cruisers were escorted through the Sunda Strait by Kinu, Ōi and five destroyers, and arrived back at the Netherlands East Indies on 16 March.[16][17] Shortly afterwards, 89 of the 104 Behar survivors who had been rescued by Tone's crew were murdered aboard the cruiser. The commander of the raiding force, Vice Admiral Naomasa Sakonju, and Tone's captain were convicted of this crime after the war.[32] The Allies were unaware of the attack on Behar until a ship that had picked up the steamer's distress signal arrived in Fremantle on 17 March.[33] The orders diverting Allied shipping from the central Indian Ocean were cancelled on 18 March.[34]
Aftermath
Allied concerns over the Combined Fleet's presence at Singapore eased considerably during March when it was learned that the ships there were being put through a maintenance program and that the Japanese did not intend to undertake major operations in the Indian Ocean area.[35] Allied military commanders believed that the March 1944 emergency had some beneficial effects. Christie judged that military personnel and civilians in Western Australia had become complacent before the emergency, and the mobilisation had gone some way towards addressing this.[36] The RAAF and USAAF regarded the reinforcement of Western Australia as having provided useful experience in rapidly redeploying combat units.[30] The emergency also demonstrated that the VDC could be rapidly mobilised to man fixed defence positions.[37]
An editorial published in the newspaper The West Australian on 13 March judged that the air raid alert on 10 March had given Perth's population a reminder of the potential threat posed by "hit and run" raids, but was highly critical of the lack of information regarding the cause of the alert, especially in light of the rumours sweeping the city.[28] The Daily News expressed similar views.[38] The rationale for reinforcing Western Australia and the air raid alarms in March 1944 was not revealed by the Australian Government until 17 August 1945, two days after the end of the war.[39]
Blair, Clay (2001). Silent Victory: The U.S. Submarine War Against Japan. Annapolis, Maryland: Naval Institute Press. ISBN978-1557502179.
Cairns, Lynne (2011). Secret Fleets: Fremantle's World War II Submarine Base. Welshpool, Western Australia: Western Australian Museum. ISBN978-1920843526.
Gare, Deborah; Lloyd-Jones, Maddison (2014). When War Came to Fremantle: 1899 to 1945. Fremantle, Western Australia: Fremantle Press. ISBN978-1925161298.
Kirby, S. Woodburn (1961). The War Against Japan. Vol.III: The Decisive Battles. London: Her Majesty's Stationery Office. OCLC929210207.
McCartney, Innes (2006). British Submarines 1939–45. Oxford: Osprey. ISBN978-1846030079.
McKenzie-Smith, Graham (2009). Defending Fremantle, Albany and Bunbury: 1939–1945. Mount Pleasant, Western Australia: Grimwade Publications. ISBN978-0980629101.
Royal Navy Historical Section (1957). War with Japan. Vol.IV: The South–East Asian Operations and Central Pacific Advance. London: Royal Navy. OCLC651943668.
This page is based on this Wikipedia article Text is available under the CC BY-SA 4.0 license; additional terms may apply. Images, videos and audio are available under their respective licenses.