![]() |
In software engineering, the adapter pattern is a software design pattern (also known as wrapper, an alternative naming shared with the decorator pattern) that allows the interface of an existing class to be used as another interface. [1] It is often used to make existing classes work with others without modifying their source code.
An example is an adapter that converts the interface of a Document Object Model of an XML document into a tree structure that can be displayed.
The adapter [2] design pattern is one of the twenty-three well-known Gang of Four design patterns that describe how to solve recurring design problems to design flexible and reusable object-oriented software, that is, objects that are easier to implement, change, test, and reuse.
The adapter design pattern solves problems like: [3]
Often an (already existing) class can not be reused only because its interface does not conform to the interface clients require.
The adapter design pattern describes how to solve such problems:
adapter
class that converts the (incompatible) interface of a class (adaptee
) into another interface (target
) clients require.adapter
to work with (reuse) classes that do not have the required interface.The key idea in this pattern is to work through a separate adapter
that adapts the interface of an (already existing) class without changing it.
Clients don't know whether they work with a target
class directly or through an adapter
with a class that does not have the target
interface.
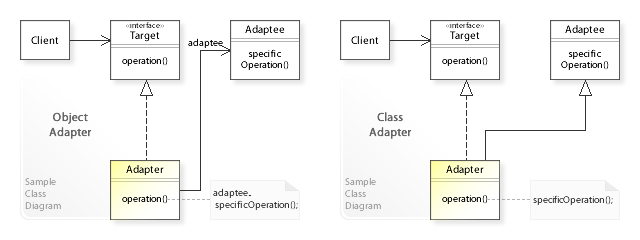
See also the UML class diagram below.
An adapter allows two incompatible interfaces to work together. This is the real-world definition for an adapter. Interfaces may be incompatible, but the inner functionality should suit the need. The adapter design pattern allows otherwise incompatible classes to work together by converting the interface of one class into an interface expected by the clients.
An adapter can be used when the wrapper must respect a particular interface and must support polymorphic behavior. Alternatively, a decorator makes it possible to add or alter behavior of an interface at run-time, and a facade is used when an easier or simpler interface to an underlying object is desired. [4]
Pattern | Intent |
---|---|
Adapter or wrapper | Converts one interface to another so that it matches what the client is expecting |
Decorator | Dynamically adds responsibility to the interface by wrapping the original code |
Delegation | Support "composition over inheritance" |
Facade | Provides a simplified interface |
In the above UML class diagram, the client
class that requires a target
interface cannot reuse the adaptee
class directly because its interface doesn't conform to the target
interface. Instead, the client
works through an adapter
class that implements the target
interface in terms of adaptee
:
object adapter
way implements the target
interface by delegating to an adaptee
object at run-time (adaptee.specificOperation()
).class adapter
way implements the target
interface by inheriting from an adaptee
class at compile-time (specificOperation()
).In this adapter pattern, the adapter contains an instance of the class it wraps. In this situation, the adapter makes calls to the instance of the wrapped object.
This adapter pattern uses multiple polymorphic interfaces implementing or inheriting both the interface that is expected and the interface that is pre-existing. It is typical for the expected interface to be created as a pure interface class, especially in languages such as Java (before JDK 1.8) that do not support multiple inheritance of classes. [1]
It is desired for classA
to supply classB
with some data, let us suppose some String
data. A compile time solution is:
classB.setStringData(classA.getStringData());
However, suppose that the format of the string data must be varied. A compile time solution is to use inheritance:
publicclassFormat1ClassAextendsClassA{@OverridepublicStringgetStringData(){returnformat(toString());}}
and perhaps create the correctly "formatting" object at runtime by means of the factory pattern.
A solution using "adapters" proceeds as follows:
ClassA
in this example, and outputs the data formatted as appropriate: publicinterfaceStringProvider{publicStringgetStringData();}publicclassClassAFormat1implementsStringProvider{privateClassAclassA=null;publicClassAFormat1(finalClassAa){classA=a;}publicStringgetStringData(){returnformat(classA.getStringData());}privateStringformat(finalStringsourceValue){// Manipulate the source string into a format required // by the object needing the source object's datareturnsourceValue.trim();}}
publicclassClassAFormat1AdapterextendsAdapter{publicObjectadapt(finalObjectanObject){returnnewClassAFormat1((ClassA)anObject);}}
adapter
with a global registry, so that the adapter
can be looked up at runtime: AdapterFactory.getInstance().registerAdapter(ClassA.class,ClassAFormat1Adapter.class,"format1");
ClassA
to ClassB
, write: Adapteradapter=AdapterFactory.getInstance().getAdapterFromTo(ClassA.class,StringProvider.class,"format1");StringProviderprovider=(StringProvider)adapter.adapt(classA);Stringstring=provider.getStringData();classB.setStringData(string);
or more concisely:
classB.setStringData(((StringProvider)AdapterFactory.getInstance().getAdapterFromTo(ClassA.class,StringProvider.class,"format1").adapt(classA)).getStringData());
Adapteradapter=AdapterFactory.getInstance().getAdapterFromTo(ClassA.class,StringProvider.class,"format2");
ClassA
as, say, image data in ClassC
: Adapteradapter=AdapterFactory.getInstance().getAdapterFromTo(ClassA.class,ImageProvider.class,"format2");ImageProviderprovider=(ImageProvider)adapter.adapt(classA);classC.setImage(provider.getImage());
ClassB
and ClassC
into ClassA
without having to alter the class hierarchy. In general, it permits a mechanism for arbitrary data flows between objects that can be retrofitted to an existing object hierarchy.When implementing the adapter pattern, for clarity, one can apply the class name [ClassName]To[Interface]Adapter
to the provider implementation; for example, DAOToProviderAdapter
. It should have a constructor method with an adaptee class variable as a parameter. This parameter will be passed to an instance member of [ClassName]To[Interface]Adapter
. When the clientMethod is called, it will have access to the adaptee instance that allows for accessing the required data of the adaptee and performing operations on that data that generates the desired output.
interfaceILightningPhone{voidrecharge();voiduseLightning();}interfaceIMicroUsbPhone{voidrecharge();voiduseMicroUsb();}classIphoneimplementsILightningPhone{privatebooleanconnector;@OverridepublicvoiduseLightning(){connector=true;System.out.println("Lightning connected");}@Overridepublicvoidrecharge(){if(connector){System.out.println("Recharge started");System.out.println("Recharge finished");}else{System.out.println("Connect Lightning first");}}}classAndroidimplementsIMicroUsbPhone{privatebooleanconnector;@OverridepublicvoiduseMicroUsb(){connector=true;System.out.println("MicroUsb connected");}@Overridepublicvoidrecharge(){if(connector){System.out.println("Recharge started");System.out.println("Recharge finished");}else{System.out.println("Connect MicroUsb first");}}}/* exposing the target interface while wrapping source object */classLightningToMicroUsbAdapterimplementsIMicroUsbPhone{privatefinalILightningPhonelightningPhone;publicLightningToMicroUsbAdapter(ILightningPhonelightningPhone){this.lightningPhone=lightningPhone;}@OverridepublicvoiduseMicroUsb(){System.out.println("MicroUsb connected");lightningPhone.useLightning();}@Overridepublicvoidrecharge(){lightningPhone.recharge();}}publicclassAdapterDemo{staticvoidrechargeMicroUsbPhone(IMicroUsbPhonephone){phone.useMicroUsb();phone.recharge();}staticvoidrechargeLightningPhone(ILightningPhonephone){phone.useLightning();phone.recharge();}publicstaticvoidmain(String[]args){Androidandroid=newAndroid();IphoneiPhone=newIphone();System.out.println("Recharging android with MicroUsb");rechargeMicroUsbPhone(android);System.out.println("Recharging iPhone with Lightning");rechargeLightningPhone(iPhone);System.out.println("Recharging iPhone with MicroUsb");rechargeMicroUsbPhone(newLightningToMicroUsbAdapter(iPhone));}}
Output
Recharging android with MicroUsb MicroUsb connected Recharge started Recharge finished Recharging iPhone with Lightning Lightning connected Recharge started Recharge finished Recharging iPhone with MicroUsb MicroUsb connected Lightning connected Recharge started Recharge finished
"""Adapter pattern example."""fromabcimportABCMeta,abstractmethodNOT_IMPLEMENTED="You should implement this."RECHARGE=["Recharge started.","Recharge finished."]POWER_ADAPTERS={"Android":"MicroUSB","iPhone":"Lightning"}CONNECTED="{} connected."CONNECT_FIRST="Connect {} first."classRechargeTemplate(metaclass=ABCMeta):@abstractmethoddefrecharge(self):raiseNotImplementedError(NOT_IMPLEMENTED)classFormatIPhone(RechargeTemplate):@abstractmethoddefuse_lightning(self):raiseNotImplementedError(NOT_IMPLEMENTED)classFormatAndroid(RechargeTemplate):@abstractmethoddefuse_micro_usb(self):raiseNotImplementedError(NOT_IMPLEMENTED)classIPhone(FormatIPhone):__name__="iPhone"def__init__(self):self.connector=Falsedefuse_lightning(self):self.connector=Trueprint(CONNECTED.format(POWER_ADAPTERS[self.__name__]))defrecharge(self):ifself.connector:forstateinRECHARGE:print(state)else:print(CONNECT_FIRST.format(POWER_ADAPTERS[self.__name__]))classAndroid(FormatAndroid):__name__="Android"def__init__(self):self.connector=Falsedefuse_micro_usb(self):self.connector=Trueprint(CONNECTED.format(POWER_ADAPTERS[self.__name__]))defrecharge(self):ifself.connector:forstateinRECHARGE:print(state)else:print(CONNECT_FIRST.format(POWER_ADAPTERS[self.__name__]))classIPhoneAdapter(FormatAndroid):def__init__(self,mobile):self.mobile=mobiledefrecharge(self):self.mobile.recharge()defuse_micro_usb(self):print(CONNECTED.format(POWER_ADAPTERS["Android"]))self.mobile.use_lightning()classAndroidRecharger:def__init__(self):self.phone=Android()self.phone.use_micro_usb()self.phone.recharge()classIPhoneMicroUSBRecharger:def__init__(self):self.phone=IPhone()self.phone_adapter=IPhoneAdapter(self.phone)self.phone_adapter.use_micro_usb()self.phone_adapter.recharge()classIPhoneRecharger:def__init__(self):self.phone=IPhone()self.phone.use_lightning()self.phone.recharge()print("Recharging Android with MicroUSB recharger.")AndroidRecharger()print()print("Recharging iPhone with MicroUSB using adapter pattern.")IPhoneMicroUSBRecharger()print()print("Recharging iPhone with iPhone recharger.")IPhoneRecharger()
publicinterfaceILightningPhone{voidConnectLightning();voidRecharge();}publicinterfaceIUsbPhone{voidConnectUsb();voidRecharge();}publicsealedclassAndroidPhone:IUsbPhone{privateboolisConnected;publicvoidConnectUsb(){this.isConnected=true;Console.WriteLine("Android phone connected.");}publicvoidRecharge(){if(this.isConnected){Console.WriteLine("Android phone recharging.");}else{Console.WriteLine("Connect the USB cable first.");}}}publicsealedclassApplePhone:ILightningPhone{privateboolisConnected;publicvoidConnectLightning(){this.isConnected=true;Console.WriteLine("Apple phone connected.");}publicvoidRecharge(){if(this.isConnected){Console.WriteLine("Apple phone recharging.");}else{Console.WriteLine("Connect the Lightning cable first.");}}}publicsealedclassLightningToUsbAdapter:IUsbPhone{privatereadonlyILightningPhonelightningPhone;privateboolisConnected;publicLightningToUsbAdapter(ILightningPhonelightningPhone){this.lightningPhone=lightningPhone;}publicvoidConnectUsb(){this.lightningPhone.ConnectLightning();}publicvoidRecharge(){this.lightningPhone.Recharge();}}publicvoidMain(){ILightningPhoneapplePhone=newApplePhone();IUsbPhoneadapterCable=newLightningToUsbAdapter(applePhone);adapterCable.ConnectUsb();adapterCable.Recharge();}
Output:
Apple phone connected.Apple phone recharging.