The Western Allies first tried to liberate Arnhem in September 1944 during Operation Market Garden. Poor planning, the unexpected presence of German armoured units and a delayed advance by ground forces resulted in the British 1st Airborne Division being defeated and a new front stabilising south of the city. Fresh planning to take Arnhem began in the new year as the Canadian First Army sought ways to link up its units advancing into the Netherlands. However it was not until April that the liberation of the city became a distinct possibility. After II Canadian Corps secured the eastern bank of the IJssel river and advanced north, I Canadian Corps prepared to assault Arnhem.
The operation began on 12 April 1945 and proceeded to plan, as the three infantry brigades of the 49th Division leapfrogged each other through the city. Within four days Arnhem was totally under Allied control, allowing the Canadians to advance further into the Netherlands. Less than two weeks after the battle a general truce brought major combat operations in the country to an end and on 5 May the German commander in chief in the Netherlands surrendered to the Canadian Army. Three days later Germany unconditionally surrendered, bringing the war in Europe to a close.
In September 1944 the Allies launched Operation Market Garden, an effort to advance around the Siegfried Line and open a route to the Ruhr. The British 1st Airborne Division landed at Arnhem and fought for nine days in the city and surrounding towns and countryside, but the British 2nd Army's advance failed to reach them and they were nearly annihilated.[1] After withdrawing south of the Nederrijn the front line stabilised on the "Island" (the polder between Nijmegen and Arnhem) over the winter.[2]
The residents of Arnhem and Oosterbeek (over 450 of whom had been killed in the battle) were evicted from their homes which were then systematically looted of anything of value to aid refugees in Germany.[2] The shattered settlements were then turned into strong defensive positions to resist future Allied advances.[3] The Arnhem road bridge that the British had fought so hard for was bombed by the Allies in October 1944 to deny its use to the Germans.[2] Arnhem itself was extensively shelled by the Allies over the winter[2] and was even hit by short-falling German-fired V-2 rockets.[4] In retaliation for a Dutch railway workers strike supposed to aid the Allies' September advance, the Germans banned all inland freight movement.[5] This prevented food being grown in the north from reaching the south and west of the country and caused thousands of deaths amongst the Dutch population in the Hongerwinter.[5]
In February 1945 the Allies launched Operations Veritable and Grenade, striking east from land captured during Market Garden directly into Germany. These paved the way for Operations Plunder and Varsity, crossing the River Rhine further upstream from Arnhem. 21st Army Group then advanced rapidly into north-west Germany. Whilst the British 2nd Army advanced east, GeneralHenry Crerar's First Canadian Army was given the task of liberating the Netherlands.[6]
The Canadian Army had been instructed to plan advances across the Lower Rhine when it first assumed responsibility for the Nijmegen salient in November, but any plans were delayed by the winter and the subsequent allocation of resources for Operation Veritable.[7] However, after Operation Veritable Crerar saw advantages to seizing Arnhem and opening a route to Emmerich during the coming crossing of the Rhine.[8] The first draft of the plan to take the city – known as Operation Anger – was compiled in February as a subsidiary operation to Plunder, but Lieutenant-GeneralCharles Foulkes, commander of the recently arrived I Canadian Corps, thought it safer to wait until the Rhine had been crossed before launching an action on Arnhem, and Anger was shelved.[9]
Major Allied operations along the Lower Rhine in 1945.
After Plunder the II Canadian Corps, commanded by Lieutenant-General Guy Simonds, struck west and seized Emmerich, approaching the IJssel from the east.[10] Crerar saw an opportunity to take Arnhem and open a route between the city and Zutphen to the north, and ordered his two Corps commanders to co-ordinate their advances accordingly.[11] However, he was wary of trying to seize Arnhem before the IJssel had been bridged further north.[12]
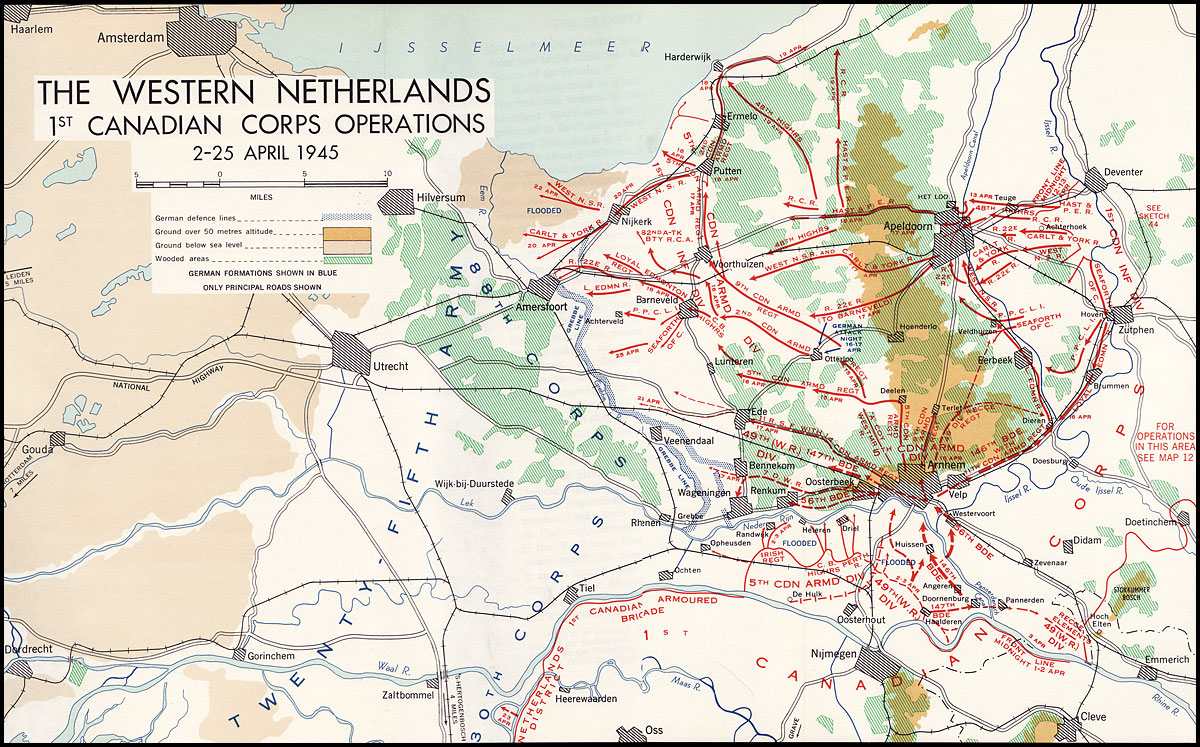
In March the 49th (West Riding) Division (nicknamed The Polar Bears), who had been on the Nijmegen Island since November, came under the command of I Canadian Corps.[12] On 2 April the division, supported by Canadian units, led Operation Destroyer to clear the Island, carefully timing the initial attack to coincide with II Corps' clearance of the east bank of the IJssel.[13] On 3 April elements of I Corps crossed the Nederrijn east of the IJssel and met units from II Corps in the town of Westervoort opposite Arnhem.[14] The rest of the Island was cleared within another day and the Allies occupied the southern bank of the Nederrijn in preparation for the assault on Arnhem.[14]
The original (February) plan for Operation Anger had called for an immediate crossing of the Nederrijn near Oosterbeek as soon as the river was reached, if the situation allowed it (Operation Quick Anger). Alternatively, if the German defenses were considered too strong, a better prepared crossing downstream at Renkum could be made (Operation Anger).[13] However, Crerar had ruled that operations could not be made against Arnhem until II Corps had crossed the IJssel and advanced on Apeldoorn, and so Anger could not yet proceed.[15] Additionally reconnaissance patrols on 3 and 4 April determined that German observation posts and positions on the Westerbouwing Heights overlooking the river would make crossing the Nederrijn dangerous.[16] Attempts were made to create smokescreens obscuring the southern bank of the Nederrijn from the watching Germans, a technique that had proved successful in the buildup to Operation Plunder.[17][18] The screen stretched from the town of Randwijk, 16 kilometres (10 miles) west of Arnhem, along the south bank of the river to Huissen, south of Arnhem, but strong winds and a lack of appropriate generators reduced its effectiveness.[15][17] Additionally the ground on the Island was deteriorating and on 7 April, after considering various alternatives, Foulkes decided Arnhem must be attacked from the east, across the IJssel.[15][19]
Preparations
Allied forces
The attack was necessarily delayed whilst the 49th Division moved to Westervoort and II Canadian Corps prepared to cross the IJssel further north.[16] The move caused serious logistical problems as the roads around the Island and Westervoort became jammed with traffic.[16] This delay caused concern that the enemy would have time to prepare for the assault, but in the event it appeared they had neither the troops or equipment to improve their situation.[20]
The attack was planned to proceed in three phases. The initial assault would be carried out by the 56th British Infantry Brigade who would cross the IJssel at night in amphibious Buffalo IVs of The Ontario Regiment before clearing the eastern and southern districts of the city.[6] In phase two, the 146th British Infantry Brigade would move forward and attack the high ground north of Arnhem.[6] In the third phase, the 147th British Infantry Brigade would advance through 56th's positions and secure the high ground and north bank of the Nederrijn west of the city.[6] With the heights around Arnhem secure the 5th Canadian Armoured Division would advance through the city and I Corps would resume its advance west.[21] The British took several Canadian units under command along with Churchill Crocodile tanks of the 79th British Armoured Division.[22] Most of the 1st Canadian Infantry Division and 5th Canadian Armoured Division were placed in support,[23] and a composite group known as Murphyforce provided a diversion south of the Nederrijn.[24]
The river crossing would be assisted by landing craft of the Royal Navy,[25] including the 509th LCA Flotilla and 660, 661 and 662 LCM Flotillas, a total of 45 craft.[26] The Royal Army Service Corps (RASC) would run DUKWs across the river during the operation.[6] I Corps' Royal Canadian Engineers (RCE), would build four Bailey pontoon ferries as soon as locations on the enemy bank were captured (two across the IJssel and two across the Nederrijn).[25] The RCE would also deploy a prefabricated Bailey bridge as soon as the situation allowed it.[25] The bridge was built in advance further upstream at Doornenburg and floated nearer to the IJssel just prior to the attack.[6] As soon as the situation allowed it this bridge would be floated into position between Westervoort and Arnhem, hopefully allowing armour to cross the river much faster than the enemy would expect.[6] Canadian pioneers would lay a heavy artillery smokescreen over Arnhem during the attack and in the buildup to the battle they maintained the smoke screen along the Nederrijn, in the hope it would deceive the Germans as to the true direction of the crossing.[17]
A Buffalo crosses the IJssel on 13 April. Notice the demolished railway bridge in the background.
The German forces in the Netherlands (under Oberbefehlshaber Niederlande commander-in-chief GeneraloberstJohannes Blaskowitz)[27] had recently been re-designated Fortress Holland (German: Festung Holland), although this name change had little effect on the units on the ground.[20] The rout of forces the previous year, the formation of ad hoc Kampfgruppe (Battle Groups) and cannibalising of units made it difficult for Allied intelligence to determine German strength north of the Rhine, and it was to remain difficult to ascertain their true strength for several years after the war.[28] Approximately 10,000 troops of the 30th Army Corps were believed to be in the Arnhem–Apeldoorn area, under the command of General der KavalleriePhilipp Kleffel.[20] There were believed to be up to 1,000 men of the 346th Infantry Division, the 858th Grenadier Regiment and other miscellaneous units occupying the Arnhem area,[25] including a divisional battle school,[6] paratroopers and Dutch SS.[29][30] As well as the natural defence provided by the rivers and the high ground north and west of the city, Arnhem itself had been turned into a strong defensive position after the battle the previous year.[25] On the very day of the opening assault on Arnhem, Heinrich Himmler issued a decree that all cities should be defended at any price, failure to do so being punishable by death.[31]
Battle
Infantry and a Humber scout car advance through Arnhem, 14 April.
On 11 April, II Corps launched Operation Cannonshot – the crossing of the IJssel further north at Deventer – prior to striking west toward Apeldoorn.[32] On the morning of 12 April Foulkes was informed that the operation was well underway, whereupon he ordered the 49th Division to commence their attack that evening.[33] The whole day was spent bombarding the enemy in Arnhem using artillery and ground attack aircraft. The RAF laid on 36 Spitfire and 83 rocket firingTyphoon sorties to soften up the German positions[24] and the attack was preceded by one of the heaviest artillery barrages ever fired by I Canadian Corps.[33] One field gun battery of eight guns fired 640 rounds in ten minutes (an average rate of eight rounds per gun, per minute),[34] and the Pioneer Corps fired 30,000 smoke shells over the course of the battle.[17] A diversionary barrage from south of the Nederrijn provoked a strong German response suggesting they had probably prepared for an attack to be made from the south rather than the east.[24]
Phase one
The initial assault did not proceed entirely to plan.[35] The crossing was set to begin at 10:40 p.m. but was delayed by the late arrival of several assault craft.[24] Additionally several explosive charges on the eastern bank of the river designed to clear a path through landmines and the 'bund' failed to detonate.[34] The 2nd Battalion The Gloucestershire Regiment then discovered several Buffaloes were inoperative and so the companies were forced to cross separately and not in one assault as planned.[34][35] Despite this the four companies of 2nd Battalion began crossing separately, their way illuminated by Monty's moonlight (searchlights reflecting their light off the clouds overhead) and Bofors guns firing coloured tracers in the direction of attack.[34] Under the cover of heavy machine guns and mortars the first company reached the west bank of the IJssel at 11:15 p.m.[24] They began to take their objectives in the face of light opposition along the riverbank, sustaining 32 casualties.[35] After a slight delay they secured the landing area for the prefabricated Bailey bridge[22] and at 12.50am The Royal Canadian Engineers began floating the components of the bridge into position.[24] The second wave; the 2nd Battalion The South Wales Borderers crossed the river under heavy artillery fire. Their assault craft drifted downstream in the crossing, but once ashore they advanced rapidly into the city.[36] However their advance stalled and the 1/7th Battalion, Duke of Wellington's Regiment, originally due to cross in Phase 3, was sent over the river to support them.[22] By 7:00 a.m. the 2nd Battalion The Essex Regiment were across the river and by 8:45am the RCE had set up a pontoon ferry to begin moving tanks of the Ontario Regiment across as well.[24]
Phase two
Troops patrol the city, 14 April
The Royal Canadian Engineers continued assembling the Bailey bridge throughout the night and 12 hours after H-Hour, traffic was rolling across the IJssel.[24][Note 1] This allowed Phase 2 of the operation to proceed and soon troops of 146th Brigade and tanks of the Ontario Regiment were moving up to 56th Brigade's positions.[24] There was relatively little resistance in the morning, although the South Wales Borderers had to beat back a counterattack near the Railway Junction.[37] In the late morning the British advanced towards a large Enka BV factory complex in the eastern area of the city where a battalion of the 346th Infantry and troops of the 46th Festungs Machine Gun Battalion had set up a strong point.[38] The Germans had moved in from Oosterbeek that morning and had thus escaped the earlier bombardments.[38][39] The 4th Battalion The Lincolnshire Regiment were tasked to clear the complex,[40] although the Germans – being relatively fresh – were able to offer some resistance.[39] With support from the tanks of the Ontario Regiment, and the 79th Division the Germans were eventually overwhelmed in a battle which lasted most of the day.[38] By the evening of 13 April most of the resistance in the city had broken and the 147th Brigade were preparing to cross into Arnhem.[40]
Phase three
The 147th Brigade crossed the Nederrijn from the island overnight[38] and by the morning of 14 April they were ready to move through 56th Brigade's positions.[25] By now the German defence was crumbling, but the battalions of the 147th encountered significant numbers of mines and demolitions as they advanced.[25] D Company of the Duke of Wellington's Regiment ambushed what they believed to be a German counterattack led by three FrenchRenault tanks, although it later transpired that the Germans had no idea that the British were there.[38][41] Later in the day, Dutch soldiers of the 34th SS Volunteer Grenadier Division Landstorm Nederland supported by armour counterattacked the Duke of Wellington's positions.[42] The Dutch were eventually beaten back after heavy fighting knocked out their tanks, but were able to blunt a later British advance into their area.[42] By the end of the day the Allied units had reached all of their objectives and most of Arnhem was secure.[40] The 5th Armoured Division began moving onto the high ground north of the city that night, where they met elements of SAS units who had been operating behind enemy lines since earlier that month.[43][44] On 15 April the Duke of Wellingtons occupied the city's zoo and upon discovering a live polar bear offered it to their brigade commander, who declined.[30][45] The Germans were cleared out of the precinct of Velp and the surrounding area on 15 and 16 April, bringing Operation Anger to an end.[30]
Aftermath
German POWs march past a Churchill AVRE at the end of fighting at Arnhem
The Allies liberated a ruined city. After the looting the previous year, houses were little more than empty wrecks – devoid of furniture, household goods and even doors.[46]Canadian Broadcasting Corporation correspondent Matthew Halton described the city as "a deserted, burning shell"[47] and the 49th Division war diary noted that "a town had never been more wantonly destroyed."[40] Evidence of the first battle of Arnhem lay everywhere and the liberation was likened to "entering an ancient tomb."[45]
The Allied advance continued immediately. The 5th Canadian (Armoured) Division began moving through Arnhem towards the high ground north of the city on the night of 14–15 April. In a change to the original plan to head west, the division was given a new mission known as Operation Cleanser and moved north to secure towns between Arnhem and the IJsselmeer.[48] A large German force counterattacked the 5th Division on the night of the 16th at Otterlo, hoping to break out to the West, but were beaten back after heavy losses (see Battle of Otterlo).[49] On 17 April, the 49th Division attacked Ede, occupied by the Dutch SS, and liberated the town in 24 hours.[50] On 27 April a temporary truce came into effect, allowing the distribution of food aid to the starving Dutch civilians in areas under German control (Operation Manna),[27] and on 5 May Generaloberst Blaskowitz agreed to the unconditional surrender of all German forces in the Netherlands.[51]
The British recorded 62 killed and 134 wounded in the action,[30] although it is unclear if this includes Canadian casualties. German figures are imprecise with prisoners of war being recorded as 601 in some sources[25][40] and up to 1,600 in others.[30] Casualties are similarly unknown, although could have been as high as 3,000.[30] Most of the Allied men killed in the battle were buried at the Arnhem Oosterbeek War Cemetery after the war, whilst Germans who had been buried at localised cemeteries or in field graves were eventually re-interred at Ysselsteyn, along with most Germans killed in the Netherlands.[52] Units involved in the battle were later awarded the battle honourArnhem 1945.[40] In 1999 the Princess Louise Fusiliers were also granted the honour after research by Captain Sanchez King was able to demonstrate the regiment's entitlement.[1]
References
Notes
↑The prefabricated bridge was a unique device, made by assembling a Bailey pontoon bridge and floating it into position later.[6] The Royal Canadian Engineers had originally nicknamed the bridge the "Gremlin"[36] but when officially opened it was christened "Evers", after one of their officers. Major Evers himself called it the "Wing and a Prayer" bridge.[37]
Delaforce, Patrick (2003) [First published in 1995]. The Polar Bears, Monty's Left Flank: From Normandy to the Relief of Holland with the 49th Division. Sutton Publishing. ISBN0-7509-3194-9.
Evans, Martin (1998). The Battle for Arnhem. Pitkin. ISBN0-85372-888-7.
Howcroft, Ivor (1999). "From Beachead to Bridgehead: The Royal Navy's Role in the Amphibious Assault Across the Rhine, Spring 1945". The Mariner's Mirror. 85 (3): 308–319. doi:10.1080/00253359.1999.10656752.
This page is based on this Wikipedia article Text is available under the CC BY-SA 4.0 license; additional terms may apply. Images, videos and audio are available under their respective licenses.


