After overcoming some German resistance, this operation liberated the cities of Tilburg, 's-Hertogenbosch, Roosendaal, Bergen op Zoom, Willemstad and Breda. As a result, the offensive cleared much of Brabant; the German positions which had defended the region along its canals and rivers were broken.[2]
In September 1944, the Allies had launched Operation Market Garden, a major offensive from the Dutch-Belgian border across the south of the Netherlands through Eindhoven and Nijmegen toward the Rhine bridge at Arnhem. The goal was to cross the Rhine and bypass the Siegfried Line in preparation for the final drive towards Berlin. Allied airborne troops managed to take the bridges but delays and toughening resistance resulted in the defeat at the Rhine bridge in Arnhem. The advance stopped south of the Lower Rhine, resulting in a narrow salient that ran from the north of Belgium across the south-east of the Netherlands and was vulnerable to attack. German assaults in this salient, particularly at Nijmegen were repelled, and the allies named this region "the island".[3]
German forces attacked another part of the salient from a bridgehead west of the bend in the river Meuse (known as Maas in Dutch and German) near the city of Venlo. Operation Aintree was launched to destroy this bridgehead and the threat was removed albeit at high cost in taking Overloon and Venray. However this meant that the flank further West towards Tilburg and 's-Hertogenbosch became a threat also which needed to be extinguished as well as to broaden the front line.[4]
An operation was devised in order to liberate the middle and Western sections of the North Brabant Province through a strong thrust westward on the axis from 's-Hertogenbosch to Breda. In order to support the ongoing battle of the Scheldt the Allied 21st Army Group would be launching the attack–the components of the Canadian 1st Army would attack from Belgium known as Operation Suitcase and the British 2nd Army would attack from the Netherlands on the exposed Western flank of the Nijmegen corridor. The overall operation codenamed Pheasant would start on 20 October.[1]
On the first day 53rd Welsh and 7th Armoured (Operation Alan) would clear 's-Hertogenbosch. The city with a population of 50,000 was effectively a medieval fortress with ramparts, a moat and a citadel intersected by waterways: the River Dommel and the Zuid Willems Canal.[6]
Operation Colin would involve the 51st Highland; they would attack along with the 15th Scottish on their left to capture the city of Tilburg and push north. The plan for the divisional attack from Sint-Oedenrode was that 153 Brigade's objective was the town of Schijndel, 152 Brigade to the left would clear the wooded area east of the River Dommel and 154 Brigade, mounted in Kangaroos, would be in reserve to exploit with the aim of taking Esch, Boxtel and Vught as well as the towns and villages south-east and south of 's-Hertogenbosch.[7]
The attack began on the night of 22 October – the Royal Artillery of XII Corps opened fire on known German positions in the village of Nuland.[11] The Corps advanced soon after but the weather conditions were so poor that they prevented air support. Later in the day visibility improved and all calls for immediate air support were met by elements of RAF 2nd Tactical Air Force. With a strong force of medium bombers as well as Hawker Typhoon and Supermarine Spitfire fighter-bombers they attacked the Maas/Hollands Diep bridges at Hedel and Moerdijk. Their biggest success was the destruction of the 15th Army's headquarters at Dordrecht; two generals and seventy other staff officers were killed in the attack.[12] The 53rd Welsh, consisting of the 71st and 160th Brigades with the 158th held in reserve near Oss launched their attack together with the 7th Armoured on Nuland. The 71st Brigade began pushing up from the Vinkel-Papendijk line in the south and the 160th from the Loonschestraat line just west of Geffen. Nuland was cleared by 0745 with two German battalions on the run, later in the day a counterattack was then held off by machine gun fire.[6]
Operation Colin
51st Highland Division infantry, supported by Daimler armoured cars of 2nd Derbyshire Yeomanry, pass a burning house in St Michielsgestel, during Operation Colin
The 51st Highland composing of the 152nd, 153rd and 154th Brigades would attack from the village of Eerde near Veghel, about eleven miles from ‘s-Hertogenbosch. Facing the 51st was the veteran 59th Wehrmacht infantry division holding the 'Eerde Line' to Liempde between Boxtel and Veghel.[7]
The attack took place at dawn on October 23 and the Highlanders took Schijndel with relative ease and then pressed on despite stiffening resistance.[13] 152nd brigade attacked the woods east of the River Dommel and the area opposite Boxtel and the Schijndel dyke. Against hardened paratroopers the Scots took their objectives albeit with some loss. Eventually they reached Vught and liberated the Herzogenbusch concentration camp – a Konzentrationslager ( concentration camp) built on Dutch soil.[14] The position in the town was confusing as 7th Black Watch were subjected to heavy shelling and mortaring from the area of Fort Isabella, but by 1500 this too was also overcome.[15]
Meanwhile, 7th Armoured Brigade had been halted by German guns at Loon op Zand – 153rd Brigade were sent to assist and together they took the town before moving north having reached Sprang on 30 October. 154th Brigade then exploited north west towards Raamsdonk which they reached by end of the day. Germans desperate not to be enveloped tried to keep the route open for as long as possible but the British crossed the Donge after having found an intact bridge and subsequently took the city of Geertruidenberg without any resistance.[7] A small German counterattack failed to halt the British advance and they found the bridge over the River Maas blown up.[2]
After taking Schijndel and having reached Boxtel the Scots moved in only to find it having been abandoned by the Germans. In the wild celebrations that followed 2nd Seaforth managed to rescue 100 escaped soldiers and airmen from 1st Airborne Division who had made it out of Arnhem.[2] The bridge at Hal however was blown and held by the Germans in strength.[7]Colin was now over and the division as a whole had a few days rest. Further to the south, the other Scots division the 15th moved toward Tilburg.[16]
After this successful phase there remained two German pockets south of the river Meuse of which the largest was around 's-Hertogenbosch.
Stiff opposition was met by the Inniskilling Dragoons of 7th Armoured Division, particularly at Middelrode, but in hard fighting the 53rd Division gained a first footing in 's-Hertogenbosch in the early hours.[17] By 04:30 am the leading elements had reached the north eastern edge of the city. They moved with speed against the Germans near the bridges over the small canals surrounding the city.[18] They bridged the network of waterways many of which were still intact which intersected the old citadel. The troops moved in with Churchill tanks in support, in addition C Squadron of 79th Armoured Division with Churchill Crocodile flame thrower tanks were also in support.[6]
The 1/5th Welch attempted to clear the northern part of the city and capture the River Dieze bridge. The latter ended up going awry. A leading platoon of B company got lost and although the bridge was found intact it was later blown leaving the men trapped. German self propelled guns then moved in and within twelve hours an intense battle was fought. One of the self propelled guns was knocked out by a PIAT but with ammunition having run out the trapped platoon were forced to surrender, roughly fifty men in all, some attempting to swim back across the river.[11]
As the rest of the brigade moved in the 1st Battalion the East Lancs had cleared the South of the river. They ambushed a German column that withdrew into the city from the east along the Hintham road. Tanks and armoured carriers of the Inniskilling Dragoons rode on top of the railway line – a bumpy and exposed ride but they had soon linked up with the infantry.[17] Supported by these tanks the East Lancs attempted to capture the two bridges over the River Aa and Zuid-Willemsvaart Canal in line on the road leading from Hintham.[11] The River Aa bridge was taken intact, but the bridge over the Zuid-Willemsvaart Canal was blown. The battalion then took up positions between the two canals then moved into the town. They pushed through the eastern side of the city and their leading two platoons neared the railway bridge over the River Dommel. After some fierce fighting they reached the bridge only to find that it had been blown. By nightfall, however, a nearby lock over the canal opposite the Railway Station was found to be intact.[18]
The following day the 7th Royal Welch under the cover of smoke and supported by mortar fire, tanks and Crocodile flame throwers managed to cross the lock and overcame a German post nearby. Their assault took the Germans by surprise and they captured 25 prisoners – the rest of the battalion crossed and a strong bridgehead was secured on the western bank of the Dommel. Further along a Bailey Bridge was constructed by the Royal Engineers and completed, following which the area North was cleared.[6] The 6th Battalion attempted to cross the canal by boats but after one was sunk they withdrew – the Germans had reinforced the area during the night. The East Lancs from the South continued to work their way northwards along the bank of the Dommel while the Royal Welch cleared the city to their west. The East Lancs linked up with the Welch at around 22:00 which meant all bridgeheads over the Dommel were thus secured.[11]
On October 26 the British worked their way northwards towards the Railway Station, which by this time was burning fiercely. The advance continued into the night. The German garrison resisted fiercely with heavy house to house fighting but gradually the British attackers wore them down and many key buildings were secured and prisoners taken. The German garrison's Commander, Major Riehl was later captured during a sweep of the North.[18]
The next day mopping up operations began with the city largely in British hands. A counterattack developed during the morning as three tanks and five self-propelled guns supported by a company of infantry advanced against the Railway Station from the west. Small arms fire and the mortars of the 7th Royal Welch dispersed the infantry and German armour was engaged by anti-tank guns. With the aid of smoke, two armoured vehicles were knocked out and the counterattack was repelled. Another four knocked out German vehicles were later captured by the 1st Welch.[6]
By the evening of 27 October German resistance had largely ceased and the city was liberated. 160th Infantry Brigade relieved the 158th, less the 7th Royal Welch, in the area to the west of the River Dommel the latter Brigade moved into reserve to the east of the city.[6] The battle had been hard won – 145 British soldiers and 253 Dutch civilians were killed during the battle and many more Germans.
German prisoners are brought in along a ditch past Universal Carriers of 6th Royal Welch Fusiliers during fighting around 's-Hertogenbosch
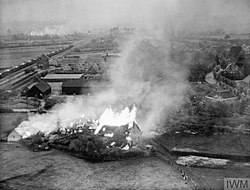
'Crocodile' flame throwing tanks were used against German positions to the East of 's-Hertogenbosch. On the left of the picture is a German Red Cross train intact.
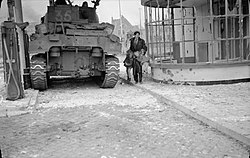
A Dutch civilian lifts his two children away from danger near a Sherman tank during fighting in 's-Hertogenbosch
Tilburg
Royal Netherlands Motorized Infantry Brigade (Prinses Irene Brigade) on the Tilburg Breda road, 26 October
Farther to the south, a column of the 15th Division and 6th Guards Tank Brigade from their position near Moergestel had captured Oisterwijk in a brisk action in the early hours of the October 26. The main body of the 15th then joined in converging assaults on Tilburg, one of the largest industrial cities of Holland. The Scots were assisted by the Royal Netherlands Motorized Infantry Brigade who attacked from the south. The Dutch were unable to get to Tilburg and were stranded at Broekhoven, where fighting took place and four soldiers were killed but this was enough to divert the Germans.[19] As a result, the 44th Lowland Infantry Brigade leading the way into Tilburg encountered only minor resistance and liberated the town on 27 October after the Germans withdrew.[16] There were then wild celebrations as the liberation took the Dutch as well as the Germans by complete surprise. The 15th Scots were thus held up from advancing further. The Scots Greys were able to advance towards the town of Goirle where they were to link up with elements of the Polish 1st armoured Division.[20]
The 15th Division and later the 6th Guards Tank Brigade were ordered to rejoin VIII Corps with all haste on the eastern flank, where a German counterattack had started on the Peel marshes just south-east of Eindhoven.[21]
Operation Suitcase commenced at the same time as Pheasant and the Belgian town of Esschen was taken two days later by the Algonquin Regiment. The advance was hindered by mines and road blocks but actual combat had been scarce so far. This changed dramatically after crossing the Dutch border when Wouwse Plantage was taken after some casualties.[23]
On October 26, 1944, Field Marshal von Rundstedt ordered to
forestall an enemy breakthrough and economize with our strength, I hereby authorize Fifteenth Army to withdraw to the general line Bergen op Zoom/Roosendaal/Breda/Dongen/west of 's-Hertogenbosch.[9]
Sherman tanks of the Canadian South Alberta Regiment in recently liberated Bergen op Zoom, 29 October 1944
Bergen-op-Zoom
On October 27 the Canadian 4th Armoured Division were on the outskirts of Bergen-op-Zoom, two infantry companies from the Lincoln and Welland Regiment had moved ahead on tanks to a roadway just south and east of the city. The Canadian advance towards Bergen op Zoom forced Von Rundstedt to redeploy the elite 6th Parachute Regiment, which until then had been blocking the 2nd Canadian Division on the Beveland isthmus to the defence of Bergen op Zoom.[9] The Algonquin Regiment trying to encircle German positions at Steenbergen just north of Bergen Op Zoom while the Governor General's Foot Guards headed towards Steenbergen.[24]
After some confusion as to who was defending the city, mostly the 711th Infantry Division, the South Alberta Regiment and the Lincoln and Welland Regiment advanced on the town the following day and entered the Grote Market. They then liberated most of the city, in which they reported "the reception of the people of Bergen Op Zoom was as enthusiastic and wild as any yet seen".[9] The Germans however were still holding the north of the city. The elite German 6th Parachute Regiment put up stiff resistance, using panzerfausts and self-propelled guns to knock out the Canadian tanks, but withdrew into Steenbergen when the Foot Guards threatened to cut off their line of retreat.[24] The Germans abandoned Bergen Op Zoom completely on 30 October, and the following day the Algonquin Regiment and the Grenadier Guards attacked the village of Welberg just outside Steenbergen. The village however was defended vigorously by the 6th Parachute Regiment that ultimately most of the Canadian 4th armoured had to be committed to take Welberg over three days of fighting.[24]
Several days passed however before the whole of the I British Corps had been able to cross to the north along the length of the line linking Breda and Bergen-op-Zoom via Roosendaal.[25] After taking Breda the Polish 1st Armoured Division along with the Canadian 2nd Canadian Armoured Brigade drove through towards Moerdijk and its all-important bridges across the Hollands Diep. They soon reached the line of the Mark river and its Canal. There followed hard fighting, but they were unable to establish a bridgehead across the canal before the end of October.[26]
With the Canadian Army already in Esschen and Bergen Op Zoom, the formations of the German LXVII Corps in the area of Korteven were in danger of encirclement and Otto Sponheimer's LXVII corps had already been authorised to start a general withdrawal. The Canadians were thus able to take Korteven and the area between it and the sea were cleared which meant that they were able to turn their attention to the Scheldt battle in which they conducted Operation Vitality.[19]
Breda & Mark Canal bridgehead
The I British Corps had continued to fight its way to the north in the coastal area and by the end of 27 October Stanisław Maczek’s Polish 1st Armoured Division, close to the inter-army boundary (First Canadian and Second British), had embarked on a flanking attack on the city of Breda after cutting the road from Tilburg.[27]
German POWs interrogated by a Lieutenant of the 1st Polish Armoured Division during the campaign to take Breda which they liberated on 29 October 1944
There the Division was divided into two battle-groups to start the liberation of Breda. A southern battle-group advanced from Gilze through Bavel to the southern outskirts of Breda. The northern battle-group attacked via the villages of Molenschot and Dorst, to later encircle the northern outskirts of the town.[8]
In the early hours of October 29 both battle-groups started the attack on the town of Breda. Gilze was soon in Polish hands followed by the villages of Molenschot and Dorst.[27] The advance on Breda though was hampered by German artillery and a German counter-attack near Dorst which, although repelled, delayed the liberation of the town. The Germans retreated to the North and in the course of the next day the whole of the town was liberated. Wild celebrations took hold as the Poles were greeted but in the fighting 42 Polish soldiers were killed (along with two Canadians) and double that number wounded but civilian casualties were light as was damage to the city.[8]
In order to seize the bridges of the River Meuse the Mark Canal had to be crossed which would broaden the allied line. On October 31 the town of Moerdijk was captured by the Poles who were supported by the Royal Artillery4 miles (6.4km) away near Zevenbergen. They noted the steady increase in range called for by the FOOs as the Poles advanced rapidly. The Poles then managed to cross the canal but as reinforcements were brought up however the Poles were hit by a number of heavy German counterattacks. The Poles managed to beat off the attack but the following day the Germans reacted in more strength; throughout the day and into the evening the Poles desperately held on to the bridgehead. Only when artillery was brought down on their own position was when the momentum of the German attack stopped.[28]
US drive to Mark River
The American 104th Timberwolves infantry division had travelled from its staging points in France to join 21st Army group and help assist in the operations there. They were positioned on the left flank of the British 49th Infantry Division and the Polish 1st Armoured Division on the right. They joined in offensive operations from October 20.[29]
On 30 October, after five days of continuous operations the division had pushed about fifteen miles to within sight of the Mark river and had liberated the town of Zundert after a hard fight. Soon after they had gained control of the Breda-Roosendaal Road, and had overrun the Vaart Canal defenses.[29]Achtmaal, Leur and Etten fell as the division advanced to the Mark River, arriving there by 31 October. A coordinated attack over the Mark River at Standdaarbuiten on 2 November established a bridgehead and the rest of the division crossed the river. For the next two days, the Timberwolves pursued German remnants north to the Hollands Diep. Zevenbergen was captured and the Hollands Diep was reached on 5 November.[29]
Operation Rebound – Roosendaal to Willemstad
The British 49th Division along with the 4th Canadian Armoured Division moved in the direction of Breda. The Polar Bears were to attack towards Loenhout, and then unleash Clarkeforce[a] to exploit the breakthrough and move up the main road to Wuustwezel in Operation Rebound. On 20 October Rebound started with a barrage following which Clarkeforce was launched at 16.00, bypassing some strongpoints to be mopped up by supporting troops, and reached an area known as 'Stone Bridge'.[30] The fight for this point took most of the remaining afternoon, but the bridge was seized before it could be completely demolished, and Clarkeforce pushed across it and into Wuustwezel from the rear taking about 500 prisoners during the day. The tanks then pushed on in the darkness until halted by German made roadblocks.[31]
The division then advanced towards Nieuwmoer. The spearhead of Clarkeforce was halted by German held woods, until it was pounded by artillery and the advance continued. On 22 October, Esschen, was reached and taken after clearing scattered German pockets.[32]56th Infantry Brigade prepared the way by advancing from Esschen to Nispen during the night of 25/26 October. Clarkeforce made for its push towards Brembosch the following morning against strong German rearguards. Many obstacles were encountered as well as German resistance – a massive anti-tank ditch had to be crossed which they achieved. Soon the 49th Division would face a German counterattack.[31]
The loss of the Esschen and its vital crossroads angered Oberkommando der Wehrmacht realising this had been its weakest point. Withdrawal was refused and the commander of LXVII Corps Otto Sponheimer launched a large counterattack.[33] The 49th felt the full brunt of 245th Infantry Division's counterattack which had been instructed to retake Wuestwezel with the support of their parent LXVII Corps’ artillery. The counterattack fell heavily on the Leicestershire Regiment when two platoons of its A Company were overrun – and six German tanks then broke through. Nevertheless, the rest of the Leicester's fought back and accompanied by Churchill tanks, four German tanks were knocked out. The Germans continued the attack until the evening when they had withdrawn having suffered heavy losses in men as well as having thirteen tanks and Self propelled guns knocked out in total.[34]
By 31 October, Clarkeforce had moved through Wouw and reached Roosendaal. A requested set-piece artillery and armour supported assault on the city was ordered as they were expecting heavy resistance. A patrol under cover of a mist discovered however that the Germans had in fact pulled out, which saved the city and its populace from further destruction.[2] The 49th Division's final objective was the town of Willemstad on the Hollands Diep. This was 10 miles (16km) away across terrain unsuitable for armour, so Clarkeforce was disbanded and the division carried out a conventional infantry advance. Willemstad was liberated with virtually no resistance on 6 November after the German garrison withdrew across the Hollands Diep.[35]
Von Rundstedt realised the danger of this offensive and intended to divert British manpower. On 26 October two German mechanized divisions struck Dempsey's thinly held positions in the Peel marches much further South.[21] The US 7th Armoured Division bore the brunt of this attack and was in danger of being cut off near the town of Meijel. Dempsey reacted quickly however and moved the 15th Scottish and 6th Guards Tank Brigade from Tilburg so that within a day they concentrated behind the Americans. From October 29 to November 7 in tough fighting often in mud and rain, this force drove the Germans back to their original positions and that threat was removed.[36]
With the complete failure of the counterattack von Rundstedt, in an effort to ensure that the 15th Army was not destroyed, authorised a withdrawal to the line of the Mark river and the Mark Canal.[2] The German front along the line between Bergen-op-Zoom and ‘s-Hertogenbosch via Breda had already been broken as well as the area to the south of the Maas river.[26]
Von Rundstedt reported to Hitler that the 15th Army must pull back across the line of the Waal river, but Hitler ordered that it must stand fast in the area to the south of the Maas. As the situation of the 15th Army continued to deteriorate, von Rundstedt asked for new orders. Hitler's response merely reiterated his demand, and said that a major reinforcement of the 15th Army had been ordered.[36] More significant, in operational terms, was the order that Generaloberst Kurt Student, commanding the 1st Parachute Army on the 15th Army's left, should take command of all German forces in the north-western part of the Netherlands known as Army Group Student. This came formally into existence on 11 November and was later renamed Army Group H with three army groups on the Western Front.[36]
Final operations
On 4 November the 51st Highland Division commenced an attack across the Afwaterings Canal, a small remaining bridgehead just to the west of 's-Hertogenbosch. Known as Operation Guy Fawkes the Highlanders were assisted by the 7th Armoured Division on its left flank. Against scattered resistance they cleared a 24 square mile area and eliminated the bridgehead within a few days. By 5 November the implacable pressure exerted by the formations of I Corps, much assisted by RAF fighter bombers, had broken the German held Mark river line. Over the course of the following three days the corps closed up to the Maas river, though not quickly enough to prevent the Germans from destroying the Moerdijk bridges.[37] This ended the offensive altogether.
Map of Operation's Pheasant and the Scheldt operations
Aftermath
After the completion of Pheasant, Canadian troops then took over responsibility for the line of the Maas river upstream as far as Maren and also the Nijmegen sector from the XXX Corps.[5]
The German retreat never collapsed into a rout; it used delaying tactics in determined resistance against the attacking allies. The allies themselves were unable to deliver a knock-out blow but they were nonetheless able to achieve the principal result of clearing the German forces from the region between Antwerp and the Maas to secure allied supply lines.[2] In addition the offensive completely cut off the Germans who were left holding their positions at the mouth of the Scheldt River.[1] As result, of the end of that offensive in November and with Walcheren fully secured; over 40,000 Germans capitulated. With the Scheldt river cleared of obstacles and German guns, Antwerp became the most important port the allies would need in the coming months.[38]
The Germans had suffered heavy losses; the 15th Army during this operation lost a total of 8,000 prisoners and as many killed or wounded. The 712th Division, which had lost nearly 1,700 prisoners and many killed or wounded during the battle, was reformed and sent to the eastern front. The 59th Infantry Division was withdrawn to the 'island' to defend it from attack.[39] For the Dutch the liberation was a welcome relief – Brabant was now almost completely free.[37] The liberated towns and cities suffered only minor damage; with the exception of 's-Hertogenbosch – Tilburg, Wilemstadt, Breda, Roosendaal and Bergen op Zoom were all captured relatively unscathed and civilian casualties were light. This was because major fighting was spared as the Germans had withdrawn from those places.[19]
After the success of Pheasant and the defeat of the German counter-attack at Meijel, there remained two German pockets to the south of the lower part of the Maas river. This was in the form of a small bridgehead just to the west of ‘s-Hertogenbosch facing XII Corps and another along the line of the Mark river facing British I Corps.
In November and December North-West Limburg was liberated by the 2nd British Army. By this time the vast majority of the Southern Netherlands south of the Rhine was now free from German occupation. Eastern North Brabant was liberated after the Battle of the Bulge. The final step in liberating the Netherlands south of the Rhine was the British and Canadian operations which succeeded in entering northeast Limburg with Operation Blackcock in January 1945, and then finally through to the German Rhineland with Operation Anger in April.
Legacy
49th 'Polar Bear' division monument in Roosendaal
1st Polish armoured memorial in Breda
15th Scottish memorial in Tilburg
Memorial to the 53rd Welsh division in ‘s-Hertogenbosch
In 's-Hertogenbosch there is a memorial which commemorates the fallen soldiers of the 53rd Welsh Division. The square behind the memorial is called the 53rd Welsh Division Square. There is an annual commemoration on October 27. There are memorials or monuments to respective divisions that liberated Tilburg, Breda and Roosendaal.
Media
An episode of Who Do You Think You Are? from 2009 featured British comedian Rory Bremner whose father – Major Donald Bremner of the 1st Battalion, East Lancashires was involved in the fighting of 's-Hertogenbosch.[6][40]
Hughes, Major Richard (2016). Memories of a World War II Gunner. Pen and Sword. ISBN9781473868632.
Delaforce, Patrick (2017). Monty's Highlanders: 51st Highland Division in the Second World War. Pen & Sword Books Limited. ISBN9781526702128.
Delaforce, Patrick (2015). Red Crown & Dragon: 53rd Welsh Division in North-West Europe 1944–1945. Thistle Publishing. ISBN9781910198636.
Delaforce, Patrick (2013). The Polar Bears: Monty's Left Flank: from Normandy to the Relief of Holland with the 49th Division. Fonthill Media. ISBN9781781550724.
Forty, George (2002). Fortress Europe: Hitler's Atlantic Wall – World War 2 Fortifications Series. Ian Allan. ISBN9780711027695.
Haasler, Timm (2011). Hold the Westwall: The History of Panzer Brigade 105, September 1944. Stackpole Books. ISBN9780811744942.
Hart, Russell; Hart, Stephen (2010). World War II: Northwest Europe 1944–1945. The Rosen Publishing Group, Inc. ISBN9781435891296.
Koskodan, Kenneth K (2011). No Greater Ally: The Untold Story of Poland's Forces in World War II. Bloomsbury Publishing. ISBN9781780962221.
Moulton, James Louis (1978). Battle for Antwerp: the liberation of the city and the opening of the Scheldt, 1944. I. Allan. ISBN9780711007697.
Oliver, Dennis (2018). Death Ride of the Panzers: German Armor and the Retreat in the West, 1944–45. Simon and Schuster. ISBN9781510720961.
Renouf, Tom (2011). Black Watch: Liberating Europe and catching Himmler – my extraordinary WW2 with the Highland Division. Hachette UK. ISBN9780748118564.
Sainsbury, John David (1999). The Hertfordshire Yeomanry Regiments, Royal Artillery: An Illustrated History, Part 1. Hart. ISBN9780948527050.
Tout, Ken (2003). In the Shadow of Arnhem: The Battle for the Lower Maas, September–November 1944. Sutton. ISBN9780750928212.
Van Der Zee, Henri A (1998). The Hunger Winter: Occupied Holland, 1944–1945. Bison books. ISBN9780803296183.
Williams, Jeffery (1988). Long Left Flank: The hard Fought Way to the Reich 1944–1945. Pen and Sword. ISBN9780850528800.
Williams, Mary H (1999). United States Army in World War 2, Special Studies, Chronology, 1941–1945. Government Printing Office. ISBN9780160018763.
Zuehlke, Mark (2009). Terrible Victory: First Canadian Army and the Scheldt Estuary Campaign: September 13 – November 6, 1944. D & M Publishers. ISBN9781926685809.
This page is based on this Wikipedia article Text is available under the CC BY-SA 4.0 license; additional terms may apply. Images, videos and audio are available under their respective licenses.