The 25th Battalion was formed in New Zealand in 1940 and after a period of training, it, along with the rest of the 6th Brigade, embarked for the Middle East where it joined up with the 2nd New Zealand Division. Moved to Greece to help defend against a German invasion, the battalion participated in the Battle of Greece but was evacuated at the conclusion of the fighting in the country. It then fought in the North African Campaign and suffered heavy losses during Operation Crusader, when it was effectively destroyed by the 15th Panzer Division. From December 1941 to February 1942 the battalion was brought back up to strength before being transferred to Syria. It returned to Egypt in March 1942 and suffered heavy casualties during the First Battle of El Alamein.
After the fighting in North Africa ceased in 1943, the 25th Battalion participated in the Italian Campaign, fighting in actions at Orsogna and later at Cassino. It finished the war in Trieste, and remained there to counter the presence of Yugoslav partisans that had entered the city. After the withdrawal of the partisans several weeks later, the battalion moved to Florence while its long-serving personnel began returning to New Zealand. Not required for service in the Pacific theatre of operations, the battalion was disestablished in late 1945.
Formation
Following the outbreak of the Second World War, the New Zealand government authorised the formation of the 2nd New Zealand Expeditionary Force (2NZEF), for service at home and abroad.[2] Following consultation with the British government, it was decided that the main New Zealand contribution to the war effort would be in the form of an infantry division, the 2nd New Zealand Division, which would require nine battalions of infantry.[3] Consequently, several infantry battalions were formed from 1939 to 1940 with New Zealand volunteers.[2]
The 25th Battalion was the eighth such unit[Note 1] raised for the 2NZEF and was formed on 15 May 1940 at Trentham Military Camp with personnel drawn largely from Wellington, Hawke's Bay and the Taranaki region.[5] With an establishment of around 780 men,[1] it was organised into four rifle companies, a headquarters company consisting of specialised personnel such as signals and a battalion headquarters. It was one of three infantry battalions[Note 2] that were part of what was initially known as the Third Echelon of the 2NZEF and which would later be designated the 6th Infantry Brigade, one of three infantry brigades of the 2nd New Zealand Division.[5][Note 3]
For a period in 1940, the 25th Battalion was based at Maadi Camp, seen here in 1941 with Cairo in the background
Greece
The British Government anticipated an invasion of Greece by the Germans in 1941 and decided to send troops to support the Greeks, who were already engaged against the Italians in Albania. The 2nd New Zealand Division was one of a number of Allied units dispatched to Greece in early March.[9] The 6th Infantry Brigade was tasked with the defence of the coastal portion of the Aliakmon Line in northern Greece, with the 25th Battalion preparing and manning the defences around Agios Ilias.[10]
On 6 April, the Germans invaded Greece and their advance was so rapid that it quickly threatened to outflank the Aliakmon Line. The brigade had to abandon its positions and was withdrawn to the Olympus Pass on 9 April. This marked the beginning of a gradual retreat down the country, during which a series of rearguard actions were fought by elements of the division.[11] The battalion fought off a sharp attack by the German 5th Panzer Division on its positions around Thermopylae on 24 April, its only major engagement of the campaign in Greece, before it successfully disengaged later that day.[12] It was evacuated from Greece on 29 April along with the rest of the 6th Brigade, the 4th and 5th Brigades having been taken off beaches to the east of Athens. While the latter brigades disembarked at Crete, the 6th Brigade continued onto Egypt.[13]
Casualties during the 25th Battalion's campaign in Greece amounted to nearly 30 killed and wounded with 150 personnel captured and made prisoners of war.[14] The majority of the captured personnel were from the battalion's reinforcement company, which had been left in Athens when the 6th Brigade moved up to the Aliakmon Line, as well as a truckload of infantrymen that had been misdirected to Kalamata during the retreat. One soldier managed to escape and eventually make his way to Turkey by sea, an act for which he was later awarded the Distinguished Conduct Medal.[15]
North Africa
By late May, and after a period of training and refitting, the 25th Battalion was back up to full strength and moved to Kantara West, near the Suez Canal. Here, along with the rest of the 6th Brigade, the battalion manned defences against a possible attack from German Fallschirmjäger (paratroopers), recent events in Crete demonstrating the threat these forces could pose.[16] The battalion shifted to the Baggush Box, near Mersa Matruh and to the west of Alexandria, in September 1941. At the same time, its commander, Wilder, was promoted to brigadier and given command of the New Zealand Training Group at Maadi Camp. The battalion's new commander was Lieutenant Colonel Gifford McNaught who had recently been involved in the fighting on Crete before being evacuated.[17] At Baggush, the battalion improved the defences in the area and underwent intensive training in open desert warfare.[18]
This training was in preparation for the 2nd New Zealand Division's role in the upcoming Operation Crusader, which was planned to lift the siege of Tobruk.[19] The New Zealanders were to be one of the 8th Army's infantry divisions that were to surround and capture the main strong points along the front while the armoured divisions were to seek out and engage Generalleutnant[Note 4]Erwin Rommel's Afrika Korps. At the same time, the Tobruk garrison was to attempt a breakout.[21]
Operation Crusader
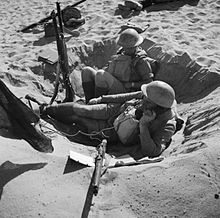
A battalion signal post dug in the sand during an exercise at Maadi, Egypt
In November, the 6th Brigade moved to its starting positions in Libya to be held in reserve while the initial part of the offensive commenced.[22] The brigade entered the fray on 21 November, and moved to Bir el Hariga with the 25th Battalion leading alongside the 24th Battalion,[23] while the 4th Brigade targeted the Bardia–Tobruk highway and the 5th Brigade the area around Bardia and Sollum.[24] However, the following day, the 6th Brigade was ordered to advance to Point 175, set up a perimeter and then make contact with the 5th South African Brigade, which was in some difficulty, at Sidi Rezegh.[25] Leaving early in the morning of 23 November, the 25th and 26th Battalions led the advance. At daybreak, they stopped and bivouacked in a wadi. Units of the Afrika Korps, later discovered to be its headquarters element, moved into the wadi from the far end and this initiated a battle in which the battalion took several prisoners.[26]
The 6th Brigade moved on quickly to take Point 175, which was held by German forces. Point 175 marked the start of the Sidi Rezegh escarpment, 40 kilometres (25mi) from Tobruk.[21] Arriving a few hours after their initial contact with the enemy earlier in the morning, the 25th Battalion made its first attempt to capture Point 175, having received orders to do so from the brigade's commander, Brigadier Harold Barrowclough.[27] Initial impressions that Point 175 was only lightly defended proved incorrect and the attack needed additional support with two companies of the 24th Battalion and a squadron of Valentine tanks from 8th Royal Tank Regiment called upon to assist. After initially proceeding well, a German counterattack caused significant casualties amongst the battalion and the remaining two companies of the 24th Battalion moved forward that evening to help secure the little ground that had been won.[28] Lieutenant Colonel Clayden Shuttleworth, commander of the 24th Battalion, took over command of the overall position following the wounding and subsequent evacuation of McNaught.[29] The losses incurred by 25th Battalion on this day were 100 dead, 125 wounded, and another 100 made prisoners-of-war.[30]
It was not until 27 November that all of Sidi Rezegh was under the control of the New Zealanders,[31] with the 25th Battalion at little more than company strength following the events of 23 November.[32] Barrowclough made the 25th Battalion, together with the 21st Battalion which had been moved to Sidi Rezegh, his brigade reserve.[33] However, Rommel had inflicted a significant defeat on the British armour and was now returning to the Tobruk area with his forces. The 6th Brigade was strung out along Sidi Rezegh in pockets, vulnerable to a counter-attack, and elements of the 15th Panzer Division made contact on 28 November.[31]
By 30 November, the 6th Brigade was surrounded and the Afrika Korps, including the Italian Ariete Division, began attacking after midday with tanks and infantry. Despite the support of anti-tank guns, the New Zealanders were overrun. Shuttleworth was made a prisoner-of-war along with his surviving company commanders.[Note 5] The survivors of the 25th Battalion, now commanded by Major Henry Burton, the sole surviving company commander, had been moved into reserve a few days previously and managed to withdraw before Sidi Rezegh was overrun.[36]
Syria
Soldiers trout fishing using rifles near the Syrian-Turkish border, 1942
The battalion was reformed at Baggush from those who had escaped capture at Sidi Rezegh (about 300-odd) and other personnel who had been left out of battle, along with replacements from New Zealand. The battalion's second-in-command, Major C.D.A. George, who had been left behind at Baggush when the New Zealanders moved into Libya, was promoted to lieutenant colonel and became its commander.[37] The battalion was stationed at Baggush until late January 1942 before being moved to Maadi.[38] Shortly afterwards it was called into Cairo for four days to increase the Allied presence there and counter potential unrest amongst the civilian population of the city. Once tensions decreased it returned to Maadi,[39] and resumed training and this included practice in amphibious operations.[40]
From late February to mid-March, the 2nd New Zealand Division was transferred to Syria. The Allied high command was concerned that the Middle East was at risk from an invasion by the Germans and the New Zealanders were part of the force tasked with blocking their likely route from the Caucasus.[41] The 25th Battalion was stationed close to the border with Turkey, near the town of Idlib, and its platoons manned frontier posts for several weeks.[42] The battalion later shifted to the Djedeide fortress area where it would prepare defences.[43] However, following the attack on the 8th Army's Gazala Line by Panzer Army Africa, the 2nd New Zealand Division was recalled to Egypt. By the end of June, the 25th Battalion, along with the rest of the 6th Brigade, was setting up camp in the Alamein area.[44]
Egypt
The 2nd New Zealand Division was dispatched to the lines of El Alamein and while the 4th and 5th Brigades went south to Minqar Qaim, the 6th Brigade, now commanded by Brigadier George Clifton, was initially held in reserve before being ordered to man the Kaponga Box at Bab el Qattara. Arriving on 28 June, the 25th Battalion guarded the western side of the box, while the 24th and 26th Battalions were responsible for the northern and southern sides respectively.[45] The brigade remained here, watching first the retreating British stream by and then the Germans, at a distance, for several days before moving to Amiriya.[46] It missed the action of 14–15 July at Ruweisat Ridge which saw the destruction of a large part of the 4th and 5th Brigades when, after securing the ridge, no armour was available to defend a counterattack by the Germans.[47] The 6th Brigade was recalled back to the El Alamein lines to relieve what was left of the 4th Brigade. A few days later, it was involved in a night-time attack on the El Mrier Depression. The aim was to secure the depression to create a route through which British armour could penetrate.[48] The brigade, with the 25th Battalion as its reserve,[49] successfully achieved its objective and was consolidating its positions when the 21st Panzer Division attacked on 22 July.[47]
At daylight, German tanks caught the 24th and 25th Battalions, positioned in the relatively shallow El Mrier Depression together with 6th Brigade headquarters, by surprise. Firing from the edge of a low cliff overlooking the depression, the Germans caused heavy losses amongst the 24th and 25th Battalions before passing through their positions in pursuit of the British armour. George, the battalion's commander, was captured along with 149 others. Over 200 other men were also killed or wounded.[50] The survivors, back under the command of Burton who was once again the senior surviving company commander, were aggrieved at the lack of armoured support.[51] The 6th Brigade moved to the southern section of the Alamein line where it manned defensive positions during the Battle of Alam Halfa, Rommel's failed attempt to cut off the 8th Army.[52] The battalion at this time numbered 362 personnel, which included one company which had been left back at Maadi and brought forward to rejoin the survivors of the El Mrier battle.[53] Burton, promoted to lieutenant colonel, commanded the battalion until 12 September at which time he went on leave and was replaced by Lieutenant Colonel Ian Bonifant.[54][Note 6]
The 8th Army was now under the command of General Bernard Montgomery, who was planning for offensive operations against the Panzer Army Africa, which had formed a defensive position at Alamein. Minus its 4th Brigade, which had incurred significant losses at Ruweisat Ridge and had been withdrawn from the front so it could be converted to armour,[56] the 2nd New Zealand Division was to play a major role in the forthcoming attack. In the first of its three phases, beginning on 23 October, the New Zealanders advanced behind a creeping artillery barrage which commenced at 9:40 pm and quickly attained all its objectives and began consolidating them.[52] Bonifant was wounded during a bombing raid the day after the attack and was later awarded the Distinguished Service Order (DSO) for his role in the battle.[57]
The New Zealanders were withdrawn from their positions four days later and remained out of the fighting while the Australian 9th Division took up the offensive in the northern sector of the front. Along with two British infantry brigades, the 2nd New Zealand Division resumed the fight on 2 November in Operation Supercharge, which was intended to break the frontlines in the south. The German defences collapsed and on 4 November they began retreating with the New Zealanders in pursuit.[52] The 9th Armoured Brigade was attached to the 2nd New Zealand Division in support, and led the initial advance along with the 6th Brigade[58] but rain turned the ground boggy and halted the advance temporarily before it could resume on 8 November.[59] In mid-November, the division was withdrawn for rest and re-organisation[52] and shortly afterwards Bonifant, recovered from the wounds that he had received on 24 October, resumed command of the battalion.[60]
Advance into Libya and Tunisia
After a month engaged in reorganisation and training at Sidi Azeiz,[61] the New Zealanders re-entered the campaign in mid-December at El Agheila in an attempt to trap the Panzer Army Africa.[62] On 11 December, the division carried out a flanking move to the south and west, led by the 6th Brigade with the 25th Battalion on the right of the advance. The move was unopposed for five days until the evening of 15 December, when a reconnaissance element that included the brigade's commander, Brigadier William Gentry, came under fire from a ridge. The 25th Battalion supported the 24th Battalion's subsequent attack on the ridge[63] but it was found that the trap had failed, with the Germans slipping through the gap between the 5th and 6th Brigades. A second attempt to trap the Germans was made at Nofilia a few days later but this also failed when the rearguard prevented the 5th Brigade from closing the road along which the retreat was being made. The advance continued and on 23 January 1943, the 2nd New Zealand Division entered Tripoli.[64] Shortly after reaching the city, Bonifant was given command of the New Zealand Divisional Cavalry with Lieutenant Colonel Thomas Morten taking over the 25th Battalion. Initially stationed outside of Tripoli, it moved into the city proper later in February with the rest of the 6th Brigade as part of the occupying force.[65]
In the meantime, the Panzer Army Africa had withdrawn to the Mareth Line in Tunisia[62] and following a failed attack by the Germans on the 8th Army at Medenine in early March, the Allied response was for the New Zealanders, along with British and Free French forces, to drive forward to the Tebaga Gap south of the Mareth Line. On 21 March, the 6th Brigade mounted a night-time attack on a feature known as Point 201, which was defended by Italian forces. The attack was on a two battalion frontage, with the 25th Battalion on the left and tasked with the capture of Point 201 itself, and the 26th Battalion making a corresponding movement forward.[66] Although the objective was achieved with just 50 casualties, of whom 11 were killed, many more were incurred the following day due to artillery fire on Point 201, which was quite exposed.[67] The breach that the attacking battalions made was not exploited by the supporting British armour.[66]
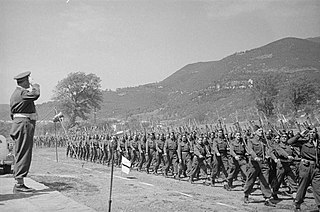
A New Zealand soldier inspecting a signpost on the road to Enfidaville, May 1943
The next attempt to capture the Tebaga Gap was mounted on 27 March by the infantry of the 5th Brigade along with the 6th Brigade's 24th Battalion, supported by a regiment of the British 8th Armoured Brigade.[68] The 25th Battalion only played a minor role, securing the extreme left flank, carrying out diversionary operations, and generally supporting the 24th Battalion during its advance.[69] The attack was a total success and the next day the 2nd New Zealand Division moved forward with the 25th Battalion bringing up the rear of the 6th Brigade.[70]
Over the coming days, the 2nd New Zealand Division, which briefly halted its advance for a week for rest and maintenance of its vehicles, advanced towards the town of Enfidaville, over 130 kilometres (81mi) to the north. Only minor opposition was encountered as it moved forward, with the 25th Battalion leading the 6th Brigade.[71] The outskirts of Enfidaville were reached by the battalion's carriers on 14 April, but resistance prevented the rifle companies from entering the town that day. Preparations for a full-scale attack on the town had begun but the 6th Brigade was relieved before they could be implemented, with the 25th Battalion moving 14 kilometres (8.7mi) to the rear.[72] Focus then shifted to Takrouna, the 2nd New Zealand Division's objective in Operation Oration, X Corps' offensive towards Tunis. The 6th Brigade, with the 25th Battalion in reserve, was to attack north of the Takrouna–Enfidaville road, flanking 5th Brigade's attack on Takrouna.[73] The attack commenced on the evening of 19 April; while the 6th Brigade easily secured its objectives, the 5th Brigade struggled and it took two days for Takrouna to fall.[74] Shortly afterwards, the 25th Battalion was temporarily attached to the 5th Brigade, and relieved its 23rd Battalion.[75] It remained on the frontlines to keep pressure on the enemy while other Allied units broke through to Tunis elsewhere on the front. In early May, the Axis forces in North Africa surrendered and the 2nd New Zealand Division began to return to Egypt.[76]
Italy
With the close of the North African campaign in May 1943, the Allies' attention then turned to the European Theatre of Operations. Despite a preference amongst some sections of the New Zealand government for the 2nd New Zealand Division to be redeployed in the Pacific Theatre of Operations, it was decided that the division, having served with the 8th Army throughout the desert campaign would remain in Europe and take part in the fighting in Italy.[77] Having been based in Maadi Camp since early June,[78] the battalion left Egypt on 6 October as part of the division's shift to Italy and reached Taranto three days later.[79]
The 2nd New Zealand Division, now including the fully armoured 4th Brigade with three regiments of Sherman tanks,[80] moved to the banks of the Sangro River later in the month and the 6th Brigade was scheduled to mount a night crossing on 21 November. Two companies of the 24th Battalion had crossed the previous night to reconnoitre the opposite bank but the attack was postponed due to bad weather.[81] The brigade eventually crossed, with the 25th Battalion in the centre, on 27 November. As the river was forded on foot, several personnel disrobed for the crossing. Although briefly disturbed during the crossing by a German machinegun, there were no casualties, and the battalion pushed forward and seized its objective, a range of hills over 900 metres (980yd) beyond the river.[82]
Orsogna
In the following weeks, the battalion was involved in the 6th Brigade's attack on Orsogna, as part of the Moro River Campaign.[83] The 25th Battalion made the initial attack on Orsogna on the evening of 2 December, which was launched without the use of supporting armour as Brigadier Graham Parkinson, commander of the 6th Brigade, did not anticipate any difficulty. The leading platoons penetrated into the town square but soon robust defence, supported by German tanks of the 26th Panzer Division, forced them back. Two platoons of infantry were captured. Two tank troops from the 18th Armoured Regiment were ordered forward but by the time they had reached the outskirts of Orsogna, the infantry were withdrawing from the town.[84] The battalion supported further attacks on Orsogna by the 5th Infantry Brigade in the following days,[85] but the German defences were too strong and the attack soon faded into a stalemate, with a number of back and forth actions as winter set in.[83] Offensive operations around Orsogna ceased in late December[86] and the 6th Brigade maintained its sector with two battalions, rotating the 24th, 25th and 26th Battalions out of the line in three-day spells.[87] During this time, Morten fell ill and was medically evacuated. The battalion's second-in-command, Major Edward Norman, was made its commander in Morten's stead.[88] The New Zealanders withdrew from the area altogether on 13 January 1944.[89]
Cassino
A depiction of the fighting at Cassino by the official war artist of the 2NZEF, Peter McIntyre
Following its withdrawal from the Orsogna area, the 2nd New Zealand Division was one of a number of divisions that were transferred from the British Eighth Army to the U.S. Fifth Army, then engaged on the western side of the Apennines. This was part of an overall strategy to breach the Gustav Line and break an otherwise deadlocked Italian front. Together with the 4th Indian Division and supporting British and American artillery, the division became part of the newly formed New Zealand Corps, under the command of the New Zealand divisional commander, Lieutenant-GeneralSir Bernard Freyberg. The corps moved to Cassino, the defenders of which had resisted American forces for several weeks.[83] In the interim, the 25th Battalion had rested for several days in the Volturno valley, 50 miles (80km) from Cassino. During this time it received some reinforcements, although these were not enough to bring it up to full strength.[90]
By mid-February, Morten had recovered from his illness and resumed command of the battalion[91] which, along with the rest of the division, was moved forward to the south of Cassino, taking over part of the sector of the U.S. 36th Infantry Division with the 6th Brigade in reserve.[92] An initial attack on Cassino, which involved the 4th Indian Division, the 28th Maori Battalion and New Zealand engineers, was mounted on 15 February but failed due to a lack of air and armoured support.[93] Two days later, the 5th Brigade attempted to capture the town's railway station but this too failed.[94]
It was soon to be the 6th Brigade's turn. It moved out of its reserve positions and relieved the 133rd Infantry Regiment, part of the U.S. 34th Infantry Division, positioned nearly 2 kilometres (1.2mi) to the north of Cassino. The 24th and 25th Battalions manned the front lines, uncomfortably exposed to machinegun fire from an overlooking ridge.[95] It was planned for the 6th Brigade to mount its attack on Cassino on 24 February but rainfall delayed it by over three weeks.[96] In the interim, command of the 25th Battalion passed to Lieutenant Colonel John McDuff, who replaced Major Norman, who in turn had taken over from Morten who, earlier in the month, had once again fallen ill and been evacuated.[97] When the 6th Brigade's attack finally commenced, on 15 March, the town had been thoroughly shelled and bombed during the intervening period. Supported by the 19th Armoured Regiment, the 25th Battalion pushed into Cassino.[98] The 25th Battalion was tasked with capturing the western side of the town up to the Continental Hotel whereupon the 26th Battalion was to take up the advance.[99] However, it was unable to achieve its objectives;[100] the Germans defended strongly, assisted by the rubble that hampered the easy movement of the supporting armour.[98] After spending 16 March consolidating what gains it had made, the next day a further attempt was made but this was again largely unsuccessful with each of the 25th Battalion's rifle companies being whittled down to strengths of around 50 men.[101] The other battalions of the 6th Brigade were in a similar state but Parkinson, now commanding the 2nd New Zealand Division, was reluctant to commit more infantry to the battle.[102] However, he finally ordered the 5th Brigade into the town on 20 March and the 25th Battalion was withdrawn to a secondary defensive position.[103] The 5th Brigade was no more successful than the 6th Brigade and was reduced to simply holding what ground it had gained amongst the rubble of Cassino.[104]
New Zealand infantry moving along the road towards Florence
On 26 March, the New Zealand Corps disbanded and Freyberg reverted to command of the division[105] which, a few days later, began to disengage from Cassino. The 6th Brigade was withdrawn on 1 April and the 25th Battalion moved 24 kilometres (15mi) to the south. Casualties amongst the battalion amounted to 220 personnel killed or wounded in action[106] and it was left to II Polish Corps to capture Cassino in mid-May.[98] In June, McDuff was made commander of the Advance Base of 2NZEF, and Norman, promoted to lieutenant colonel, took up permanent command of 25th Battalion.[107]
Advance to Florence
The 2nd New Zealand Division was held in reserve until 9 July, having spent the intervening period recuperating in Avezzano, and assigned to XIII Corps.[108] Its role was to help the 6th Armoured Division, which was to attack Arezzo and drive onto the Arno River and onto Florence. The battalion was tasked with taking Monte Lignano, one of a series of mountain peaks flanking Arezzo which were held by the Germans. It relieved a battalion of the King's Royal Rifle Corps, below the crest of the mountain, on 13 July.[109] A full-scale attack was mounted early in the morning of 15 July under the cover of an artillery barrage and the battalion's companies began reaching their objectives within two hours.[110] Monte Lignano was secured by the battalion for the loss of 17 men killed and 48 wounded, four later dying of their injuries. It withdrew to the rear on 16 July.[111]
The infantry brigades now shifted to the west, along the Pesa River.[112] They continued to advance onto Florence and duly entered the city in August. After this, the 2nd New Zealand Division was transferred to I Canadian Corps, then on the Adriatic Coast, and advanced up to Rimini.[113] During the move forwards to Rimini, the 25th Battalion formed a "Battalion Battle Group"; this included a squadron of Shermans from 20th Armoured Regiment, a platoon of machineguns and heavy mortars, and an anti-tank troop. The 24th Battalion was similarly expanded, and these two battle groups alternated as the advance guard of 6th Brigade, which in turn led the division in a series of river crossings throughout September up to and beyond Rimini.[114]
The 5th Brigade took over the advance at the end of September and the 25th Battalion was withdrawn into reserve for a rest.[115] After a week, the battalion re-entered the front lines, taking over the positions of the 21st Battalion in preparation for an assault across the Fiumicino River by the 24th and 26th Battalions; the 25th was to be held in reserve.[116] However, weather delayed the attack and it was abandoned altogether when the Canadians took over the sector.[117]
Later in October, the New Zealanders were relieved and sent to Fabriano for rest and recuperation. During this time, the division was reorganised, with each of the infantry brigades expanding from three to four battalions.[118] It reentered the frontlines, near the town of Faenza, in late November, under V Corps. The following month, the battalion crossed the Lamone River and joined the other infantry battalions of the 6th Brigade in attacks in and around Faenza.[119] Along with the rest of the 2nd New Zealand Division, it then wintered along the Senio River, remaining there until March 1945.[120]
Final months
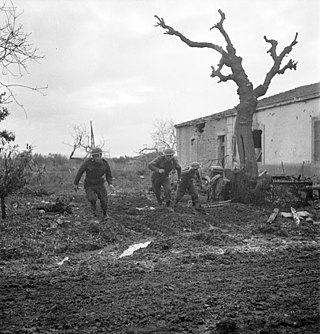
Infantry of the 25th Battalion following closely behind their flame throwing tanks in the attack on the Senio River
On 9 April, the 2nd New Zealand Division crossed the Senio River. The crossing was carried out by the 5th and 6th Infantry Brigades, with the 25th Battalion on the right of the 6th Brigade's frontage, alongside the 24th Battalion. The battalion had armoured support, including a squadron of the 20th Armoured Regiment which was under its direct command. The crossing, covered by artillery, fighter bombers, and flamethrowers, was achieved with minimal opposition; nearly 60 Germans were captured by the leading companies.[121] Despite suffering casualties due to being accidentally bombed by Allied bombers, the battalion continued to lead the advance of the 6th Brigade to the Santerno, which it crossed on 11 April.[122] Ordered to continue its advance to the Scolo Sillaro, the battalion established a bridgehead over which tanks were able to cross. It was relieved by the 23rd Battalion on 16 April, leaving the 25th Battalion as the brigade reserve. Since beginning its attack across the Senio, the battalion had advanced 23 kilometres (14mi), taken at least 68 prisoners-of-war and inflicted numerous casualties on the enemy for the loss of 14 men killed in action.[123]
After a few days out of the line, the battalion resumed its advance on 20 April with the 6th Brigade, still as its reserve. However, a few days later the vehicle in which Norman, the battalion's commander, was travelling ran over a landmine. Norman was wounded and had to be medically evacuated. He was replaced by the second-in-command of the 26th Battalion, Major A. Barnett, who was promoted to lieutenant colonel.[124] The advance continued, effectively unopposed, with the 25th Battalion leading.[125] Despite expecting the worst, it crossed the Po River with minimal difficulty on 25 April and the Adige River was traversed the next day, again with relative ease.[126] The 9th Infantry Brigade then took over the advance, with the 6th Brigade taking over as the divisional reserve.[127] Although the war was nearly over, care was still required as the battalion moved forward through the towns of Padua and Gorizia,[128] before the surrender of all German forces in Italy on 2 May.[127]
On 4 May, the 25th Battalion moved to the village of Sgonico, just to the north of Trieste.[129] Along with other elements of the 2nd New Zealand Division, the battalion remained in and around Trieste for several weeks to counter the presence of Yugoslav partisans, who had laid claim to the city. In mid-June the partisans withdrew from the city and several weeks later the New Zealand government decided that the division would not be required for service in the Pacific Theatre of Operations. In early August, the battalion began demobilisation with long serving men leaving for New Zealand via Bari while the remaining personnel withdrew to wintering positions near Florence.[130] In October, Barnett took over command of what was left of the 6th Brigade. This left command of the battalion in its final days to Major D. Muir, who oversaw its disbandment on 2 December 1945.[131]
During the war, the 25th Battalion lost 531 personnel either killed in action or who later died of their wounds, while nearly 550 others were made prisoners-of-war.[14][Note 7]
Honours
Some of the personnel of the 25th Battalion were highly decorated, including Bonifant, who received the DSO and a bar to the DSO during his time as commander of the battalion. Five other personnel of the battalion, including some of its commanders,[Note 8] were also awarded the DSO. Ten officers were awarded the Military Cross; one of these was Norman who also received the United States Legion of Merit. Four non-commissioned officers were awarded the Distinguished Conduct Medal and 36 were awarded the Military Medal.[133]
The 25th Battalion was awarded the following battle honours:
Lieutenant Colonel A. W. Barnett (April – October 1945);
Major D. F. Muir (October 1945 – disbandment).
Notes
Footnotes
↑ The numbering of the battalions raised for the 2NZEF followed that of the existing 17 infantry battalions of the Territorial Force. Thus, the first battalion formed for the 2NZEF was the 18th Battalion.[4]
↑ The other two infantry battalions were the 24th and 26th.[6]
↑ The other two were the 4th and 5th Brigades. The 1st, 2nd and 3rd Brigades were Territorial Force formations.[4]
↑ Shuttleworth was later recognised for his services in the Middle East with the Distinguished Service Order.[34] He died in May 1945, shortly after being released from a prisoner-of-camp.[35]
↑ Burton, a veteran of the First World War, later commanded 2NZEF training units.[55]
↑ The battalion's fatalities include 62 men who died as prisoners-of-war.[14]
↑ The battle honours awarded for its work as an infantry battalion were entrusted to the Wellington Regiment, The Wellington West Coast and Taranaki Regiment, and The Hawke's Bay Regiment.[134]
↑ Wilder later achieved the rank of major general.[5]
↑ Burton was a major during his first period in command of the battalion.[136]
↑ Bonifant later achieved the rank of brigadier.[54]
The 2nd New Zealand Division, initially the New Zealand Division, was an infantry division of the New Zealand Military Forces during the Second World War. The division was commanded for most of its existence by Lieutenant-General Bernard C. Freyberg. It fought in Greece, Crete, the Western Desert and Italy. In the Western Desert Campaign, the division played a prominent role in the defeat of German and Italian forces in the Second Battle of El Alamein and the British Eighth Army's advance to Tunisia.
Operation Crusader was a military operation of the Western Desert campaign during World War II by the British Eighth Army against the Axis forces in North Africa commanded by Generalleutnant (Lieutenant-General) Erwin Rommel. The operation was intended to bypass Axis defences on the Egyptian–Libyan frontier, defeat the Axis armoured forces near Tobruk, raise the Siege of Tobruk and re-occupy Cyrenaica.
The New Zealand Expeditionary Force (NZEF) was the title of the military forces sent from New Zealand to fight alongside other British Empire and Dominion troops during World War I (1914–1918) and World War II (1939–1945). Ultimately, the NZEF of World War I became known as the First New Zealand Expeditionary Force. The NZEF of World War II was known as the Second New Zealand Expeditionary Force (2NZEF).
The 28th (Māori) Battalion, more commonly known as the Māori Battalion, was an infantry battalion of the New Zealand Army that served during the Second World War.
The Moro River campaign was an important battle of the Italian campaign during the Second World War, fought between elements of the British Eighth Army and LXXVI Panzer Corps of the German 10th Army. Lasting from 4 December 1943 to 4 January 1944, the campaign occurred primarily in the vicinity of the Moro River in eastern Italy. The campaign was designed as part of an offensive launched by General Sir Harold Alexander's Allied 15th Army Group, with the intention of breaching the German Army's Winter Line defensive system and advancing to Pescara—and eventually Rome.
The Battle of Point 175 was a military engagement of the Western Desert Campaign that took place during Operation Crusader from 29 November to 1 December 1941, during the Second World War. Point 175 is a small rise just south of the Trigh Capuzzo, a desert track east of Sidi Rezegh and south of Zaafran. The point was held by Division z.b.V. Afrika. The 2nd New Zealand Division and Infantry tanks of the 1st Army Tank Brigade captured Point 175 on 23 November, early in Operation Crusader.
The Divisional Cavalry Regiment was an armoured cavalry regiment of the 2nd New Zealand Division during the Second World War and was New Zealand's first armoured unit. It served as a reconnaissance force for the 2nd New Zealand Division. Formed on 29 September 1939, the regiment embarked for Egypt on 4 January 1940. It fought with the division, as part of the 2nd New Zealand Expeditionary Force, in Greece, Crete, North Africa and Italy. The regiment formed part of J Force, New Zealand's contribution to the occupation of Japan at the end of the war.
The 23rd Battalion, also known as the Canterbury-Otago Battalion, was an infantry battalion of the New Zealand Military Forces during the Second World War. Formed in November 1939 as part of the 5th Brigade, 2nd Division of the 2nd New Zealand Expeditionary Force. After undertaking training at Burnham Camp the battalion sailed from New Zealand on 1 May 1940. The battalion saw action in Greece, Crete, North Africa, and Italy.
Major General Graham Beresford Parkinson, was a professional soldier in the New Zealand Military Forces who served during the First and Second World Wars.
Lieutenant General Sir Edward Puttick, was an officer who served with the New Zealand Military Forces during the First and Second World Wars. The first New Zealand-born soldier to reach the rank of lieutenant general, he was Chief of the General Staff of the New Zealand Military Forces from 1941 to 1945.
Major-General Lindsay Merritt Inglis, was a New Zealand military officer, lawyer and magistrate. Born in Mosgiel, he volunteered for service in the New Zealand Expeditionary Force during World War I. Inglis served on the Western Front and was awarded the Military Cross for his actions during the Battle of Flers-Courcelette. He ended the war as a company commander and returned to New Zealand in 1919.
The 21st Battalion was an infantry battalion of the New Zealand Military Forces that served during the Second World War. Formed in January 1940, it was part of the 5th Brigade, 2nd New Zealand Division of the 2nd New Zealand Expeditionary Force. The battalion saw action in Greece, Crete, North Africa and Italy before it was disbanded in December 1945.
The 20th Battalion was a formation of the New Zealand Military Forces which served, initially as an infantry battalion and then as an armoured regiment, during the Second World War as part of the 2nd New Zealand Division.
The 5th Infantry Brigade was an infantry brigade formation of the New Zealand Military Forces, active during World War II as part of the 2nd New Zealand Division. It saw service during the Battle of Greece, the Battle of Crete, the North African Campaign and the Italian Campaign before being disbanded in late 1945.
The 6th Infantry Brigade was an infantry brigade of the New Zealand Military Forces, active during World War II as part of the 2nd New Zealand Division. It saw service during the North African Campaign and the Italian Campaign before being disbanded in late 1945.
The 19th Battalion was a formation of the New Zealand Military Forces which served, initially as an infantry battalion and then as an armoured regiment, during the Second World War as part of the 2nd New Zealand Division.
The 18th Battalion was a formation of the New Zealand Military Forces which served, initially as an infantry battalion and then as an armoured regiment, during the Second World War as part of the 2nd New Zealand Division.
The 24th Auckland Battalion was an infantry battalion of the New Zealand Army during the Second World War. The 24th Battalion was formed on 1 February 1940 and embarked for Egypt on 28 October 1940. It was part of the 6th Infantry Brigade, part of the 2nd New Zealand Division. The battalion fought in Greece, North Africa and Italy. After the conclusion of hostilities, the battalion was disbanded in December 1945.
The 26th Battalion was an infantry battalion of the New Zealand Military Forces, which served during the Second World War as part of the New Zealand 2nd Division. Raised in May 1940, it fought in the Battle of Greece, the North African Campaign and the Italian Campaign. It finished the war in Trieste and was disbanded in December 1945.
Brigadier George Herbert Clifton, was a senior officer in the New Zealand Military Forces and a three-time recipient of the Distinguished Service Order.
Harper, Glyn; Tonkin-Covell, John (2013). The Battles of Monte Cassino: The Campaign and its Controversies. Auckland: Allen & Unwin. ISBN978-1-74114-879-4.
McGibbon, Ian, ed. (2000). The Oxford Companion to New Zealand Military History. Auckland: Oxford University Press. ISBN0-19-558376-0.
Mitcham, Samuel W. (2007). German Order of Battle, Volume Three: Panzer, Panzer Grenadier, and Waffen SS Divisions in WWII. Mechanicsburg, PA: Stackpole Books. ISBN978-0-8117-3438-7.
Plowman, Jeffrey (2010). Orsogna: New Zealand's First Italian Battle. Christchurch: Willsonscott. ISBN978-1-877427-32-9.
This page is based on this Wikipedia article Text is available under the CC BY-SA 4.0 license; additional terms may apply. Images, videos and audio are available under their respective licenses.