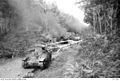
Australian 2 pounder gun of 13th Battery, 2/4th Anti-Tank Regiment, firing on Japanese Type 95 Ha-Go light tanks of the 14th Tank Regiment on the Muar-Parit Sulong road on 18 January 1942.[1] Sergeant Charles Parsons and his crew were credited with destroying six of the nine tanks in this engagement.[2]
Allied soldiers, under the command of Major GeneralGordon Bennett, inflicted severe losses on Japanese forces at the Gemensah Bridge ambush and in a second battle a few kilometres north of the town of Gemas. Members of the Australian 8th Division killed an estimated 600 personnel from the Japanese 5th division, in the ambush at the bridge itself, whilst Australian anti-tank guns destroyed several Japanese tanks in the battle north of Gemas. The battle saw the heaviest Japanese losses of any battle the Japanese had fought in the Malayan campaign and saw the death of one of their commanders Shiegeo Gotanda who was killed by Australian fire while directing his troops, temporarily shattering the morale of many Japanese soldiers.
Although the ambush was successful for the Allies, the defence of Muar and Bakri on the west coast was a complete failure which resulted in the near-annihilation of the 45th Indian Infantry Brigade and heavy casualties for its two attached Australian infantry battalions.[5] This was the first engagement between units of the British 18th Division and Japanese forces in Malaya.
Prelude
The ambush was ordered by the head of Malaya Command, Lieutenant General Arthur Percival's own instructions; he strongly felt that ambush was the way to fight the Japanese.[5] A multinational force under Bennett, codenamed Westforce, was assigned to defend the Muar area.[6] Westforce took up positions covering the front from the mountains to the shore of the Malacca Straits. There were two main areas, and both of these were sub-divided into sectors, which were themselves widely separated and linked with each other chiefly by rather tenuous signal communications.[5]
Gemas positions
The first area was around the central trunk road and the railway beyond Segamat. The three subordinate sectors were:
(b) Further forward along the same road lay the 27th Australian Brigade. They were charged with a counter-offensive role, and had already prepared an advanced ambush, from the 2/29th Australian Infantry Battalion, for the Japanese several kilometres ahead at the Gemensah Bridge.[7]
Allied dispositions and Japanese routes of attack during the battle
B Company of the 2/30th Australian Battalion, under Captain Desmond J. Duffy,[8] entrenched and concealed themselves on one side of the Gemensah Bridge, spanning a stream, as part of the ambush. The bridge itself had been mined with explosives, and a battery of field artillery sited on higher ground behind the infantry whence it could command the Japanese approach to the bridge. The 2/30th Australian Battalion was under the command of Lieutenant Colonel Frederick Galleghan, nicknamed "Black Jack".[9]
For the Japanese side, the Mukaide Force (commanded by Colonel Mukaida) was created to take the lead from the tired Japanese 5th Division and was approaching Gemas and the Australian ambush at Gemensah Bridge.[10] Mukaide Force consisted initially of the 1st Tank Regiment with an infantry battalion and artillery for support under the command of the 9th Brigade. It was reinforced by the 11th Infantry Regiment on 15 January.[11]Colonel Mukaida was the commander of the 1st Tank Regiment, which at the beginning of the Malayan Campaign, consisted of 31 Type 97 Chi-Ha and 17 Type 95 Ha-Gō tanks.[12]
Muar positions
The second area was that which covered the West Coast and the roads which run along it to the Johore Strait. This had two sectors, actually more in line with one another than those of the first area, but even less effectively in touch. The defence of this area was assigned to the 45th Indian Brigade, reinforced by a single battery of field artillery.[7] It included the seaport of Muar, and stretched some 50km (30mi) up into the jungle towards Segamat, along the winding course of the Muar River, with its deep-wooded, creeper-covered banks. Under orders from General Bennett, two of the battalions were disposed along the river line, which they thus divided between them, while the third went into active reserve near the coast.[5]
The Imperial Guards Division was moving down the west coast of Malaya, with a battalion sized force under the command of Col Masakazu Ogaki approaching the Muar river area from the sea,[5] while the 4th and 5th Guards Regiments approached Muar from the north under General Nishimura.[13]
The newly arrived 53rd Infantry Brigade of the British 18th Division formed part of Westforce. The brigade included the 2nd Cambridgeshire Regiment, 5th Norfolk and 6th Norfolk Battalions. Although Percival gave the order to deploy them, they were unfit for immediate employment, having been at sea for 11 weeks.[14]
The ambush occurred at about 16:00 on 14 January, when Japanese troops from the 5th Division approached, mounted on bicycles, and crossed the bridge unharassed.[15] Then came the main column, several hundred strong, also cycling, which was followed by tanks and engineer trucks. At this point, the bridge was detonated, sending timber, bicycles and bodies hurtling through the air. B Company, 2/30th Australian Battalion spread out along either side of the road, concealed in well-protected firing positions, then opened fire and the Japanese column took devastating blows as row upon row of men and equipment were mowed down by machine gun and rifle fire. Most of the Japanese troops tied their rifles to the handlebars of their bicycles making the ambush even more successful for the Australians.[9]
Heavy casualties continued to mount for the ambushed column. However, the bicycle infantry who had passed through the ambush area discovered the field telephone cable hidden in a patchy undergrowth which linked back to the gun positions, and promptly cut it. As a result, the Allied artillery received no signal, and were not able to support the ambush party.[9]
The Australians nonetheless did receive artillery support, from their counterparts. Most of the Japanese shells rained down on the main column at the bridge, adding to the rising death toll.[15] The ambush party, having done a substantial slaughter, duly fell back in several groups that same evening and by next day most of B Company had rejoined their battalion in a position near Gemas. B Company lost one man killed in action and six men missing in the fighting at the bridge.[9] The six missing men were later learned to have been shot after being captured by the Japanese.[16] The Japanese 9th Brigade war diary puts the casualties of the Mukaide Detachment at seventy dead and fifty-seven wounded but this does not include the other attached units.[9]
On the morning of 15 January, Japanese aircraft arrived and began dive-bombing the town of Gemas.[5] Six hours after the ambush the Japanese had repaired the bridge and were moving on their way towards Galleghan's main position at the 61-mile (98km) peg on the Gemas-Tampin road. The surviving members of Mukaide Force were now reinforced by the Japanese 11th Regiment.[5] The 2/30th Battalion were positioned astride the road and railway line with two 2-Pounder Anti-Tank Guns facing the road.[17] By 10:00 on 15 January, Japanese infantry clashed with the Allied defence lines, and as the day wore on they were supported by an increasing number of tanks. In a short but violent battle the Australian anti-tank guns, from the 2/4th Australian Anti-Tank Regiment, destroyed six of eight Japanese tanks and their supporting infantry inflicted heavy casualties on the Japanese infantry following the tanks.[17]
After twenty-four hours of fighting Galleghan withdrew his battalion from the area.[5] The 2/30th Battalion had inflicted heavy casualties on the Japanese with minimal loss to themselves, suffering in all seventeen killed, nine missing and fifty-five wounded.[9] In the two days of fighting, at the bridge and on the Gemas road, Australian historians estimate that the Japanese 5th Division had suffered an estimated 1,000 casualties.[18][Note 2]
The withdrawal went unharassed, and for the next day or so quiet settled over the Segamat area. Bennett, boosted by the initial success, was quoted in the Singapore Times as saying that his troops were confident that they would not only halt the Japanese advance, but compel them to be on the defensive.[5]
Muar
The Muar Ferry Crossing, where the 45th Indian Brigade was disposed along 39km (24mi) of river front with four companies of infantry north of the river and the remainder positioned south of the river, to cover the main coast road at Muar against the advance of the Imperial Guards Division.
On the night of 15 January, the Japanese captured a number of barges moored on the southern bank of the Muar river and towed them overstream to flank both the town of Muar and the Indian garrison's only reserve battalion.[5] Packed barges and junks were making their way across the river mouth, meeting no resistance except a subsequent brush with an Indian patrol, which retired after a brief exchange of shots.[5] The patrol never alerted headquarters that the Japanese were on the south bank. As day broke, the outflanking force surprised a company of the 7/6th Rajputana Rifles, and routed them. The remaining three Indian companies (two from the 18th Royal Garhwal Rifles and another from the Rajputana Rifles) on the north bank were cut off and captured soon after,[5] without the main garrison at Muar even realising that an entire Japanese division was on the other side of the river.[5] By noon, they were attacking from upstream both Muar Town and the garrison's line of communications with its only reserve battalion, 4/9th Jat Regiment, which was located near Bakri, on the main road south from Muar.[5]
At Muar itself, a Japanese attempt to land and seize the harbour was repulsed by Australian artillery, firing at packed barges and junks as they tried to make their way across the river mouth. By late afternoon though the Japanese, who had already made another crossing further up river, were in the town of Muar itself. The commanders of the Rajputana Rifles and the Royal Garhwal Rifles were killed along with most of their officers during the fighting around the town, leaving the mostly teenaged sepoys leaderless.[5] To add to the mounting disasters for 45th Brigade it was at this point in the battle, that an air raid by Japanese aircraft destroyed 45th Brigade Headquarters, killing all the staff officers and concussing Brigadier Duncan (one of only two survivors of the raid).[5] Due to Brigadier Duncan's concussion and the deaths of two of his battalion commanders and most of the HQ staff, command of the 45th Brigade was temporarily handed over to Anderson of the 2/19th Australian Battalion.[5]
By nightfall of 16 January, Muar Town and the harbour had fallen into Japanese hands. The remnants of the 45th Brigade retreated down the coast several kilometres as far as Parit Jawa. Japanese ambushes were soon deployed to repel any Allied counter-attack, while at the same time they continued their relentless charge towards Bakri, Parit Sulong and Batu Pahat.[5]
Siege of Bakri
Australian 25 pounder gun crew preparing to open fire on approaching Japanese at Bakri.The road and open area in front of the high ground at the Bukit Pelandok defile which was held by the 6th Norfolk Battalion.
On 17 January, the surviving units of 45th Indian Brigade, with the Australian 2/19th and 2/29th Battalions serving as reinforcements, were dispatched to re-capture Muar.[5] They rallied around Bakri and organised a rough perimeter defence of it. The 2/29th, led by Lieutenant Colonel John Robertson MC VD, dug in around Bakri-Muar Road with anti-tank, anti-aircraft and mortar emplacements. The commander of the 45th Indian Brigade, Brigadier Herbert Duncan, planned a three-pronged advance from Bakri to Muar; up the main road between the towns, from the jungle island, and along the coast road. The attack went wrong before it could be launched. The 45th brigade ran into one of the Japanese ambushes, and the counter-offensive was cancelled.[5]
The next day at 0645, General Nishimura ordered his own three-pronged attack on Bakri. It was spearheaded by nine Type 95 Ha-Gō light tanks under Captain Shiegeo Gotanda. However, Captain Gotanda, inspired by the Japanese tank's success at Slim River, advanced without infantry against the 2/29th Battalion, and was wiped out.[9] In a repeat performance of the Australian gunners at Gemas, Lieutenant Bill McClure's two anti-tank guns (also from the 2/4th Australian Anti-Tank Regiment) destroyed all nine of Gotanda's tanks. Sergeant Clarrie Thornton, commanding the first gun received a Mention in Dispatches, and Sergeant Charles Parsons, commanding the second gun was awarded the DCM.[5] Thornton's gun fired over seventy rounds during the engagement.[20] Lieutenant Colonel John Robertson, commander of the 2/29th Battalion, was killed soon after, shot while retreating from an attack on a Japanese roadblock. Major Olliff detailed Sergeant Mick Gibbins and a party of three men to bury the battalion commander. Deprived of tank support, the Japanese infantry were unable to break through, an engagement Nishimura later described as "severe and sanguinary".[5] By dawn on the 19th the Japanese were in action on the main road, nearly surrounding the 45th Brigade.[citation needed]
The 6th Norfolk Battalion of the 53rd British Brigade was defending a ridge about 8km (5mi) west of Yong Peng, covering the line of retreat for the 45th Brigade, which was already a practically encircled area.[21] Early in the afternoon of 19 January, two battalions of the Japanese 4th Guards Regiment attacked and drove them off the ridge. The British retired up through the thick jungle to the summit of the northern ridge. The Norfolks were unable to inform headquarters of their position as they had no wireless.[5]
At dawn of 20 January, the 3/16th Punjab Regiment, commanded by Lieutenant Colonel Henry Moorhead (who took part in Operation Krohcol), was ordered to recapture the ridge. By the time they reached it, they came under friendly fire from the Norfolks, who had mistaken them for the Japanese, causing several casualties.[21] After losses on both sides, it was later sorted out. But before a proper defence could be organised, the Japanese attacked, killing Moorhead and driving both the Norfolks and Indian troops off the hill.[9] The 45th Brigade and the two Australian battalions at Bakri were now in danger of being cut off.[citation needed]
That same day, Brigadier Duncan, who had recovered from his concussion and was commanding the rear guard,[9] was killed when he led a successful bayonet charge to recover lost vehicles. With Duncan and Robertson dead, Lieutenant Colonel Charles Anderson assumed full command of the 45th Brigade and all other units around Bakri.[5] Early in the morning of 20 January, Anderson was ordered to pull out from Bakri and attempt to break through to Yong Peng. Anderson decided to delay until the 4/9th Jat Regiment could reach the column.[5] During this delay most of the 2/29th Battalion were cut off from Anderson's position. Only an estimated 200 men from 2/29th Battalion and 1,000 Indian troops from the 45th Brigade were able to join up with Anderson's column.[5] Other survivors from the 2/29th would make it back in small fugitive parties.[9] Within 2km (1mi) or so of Bakri, Anderson's column was held up by a Japanese roadblock. Several efforts to break through failed, until a bayonet charge led by Anderson himself was successful.[5]
The young Indian recruits were helpless. They did not even know how to take cover, and there were not enough officers to control them. I say this in no spirit of disparagement. It was the penalty of years of unpreparedness for war coming out in all its stark nakedness.
More roadblocks lay ahead for the brigade. By sunset, after a struggle which had raged on throughout all the hours of daylight, the column had covered a distance of 5km (3mi). Anderson warned that there was to be no rest that night and ordered the march to go on. The brigade had now reached the edge of some more open country and passage was easier, though the column was laden with wounded.[5]
The young and inexperienced 45th Indian Brigade had ceased to exist as a formation. Most of its officers were killed or wounded, including Brigadier Duncan and all three battalion commanders.[9] In the space of a few days Percival had lost an entire Indian brigade and the best part of two of his Australian battalions as well as one brigadier, three Indian Army battalion commanders and an Australian battalion commander.[citation needed]
Type 95 Ha-Gō tanks belonging to the 3rd Company of the 14th Tank Regiment destroyed by Australian gunfire near Bakri.[23]
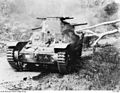
Disabled Type 95 Ha-Gō light tank from the 14th Tank Regiment.
Disabled Type 95 Ha-Gō light tank with its crew lying dead.
The approximate position where Lieutenant Colonel Charles Anderson led the bayonet charge against a Japanese roadblock on the Muar road.
Parit Sulong Bridge
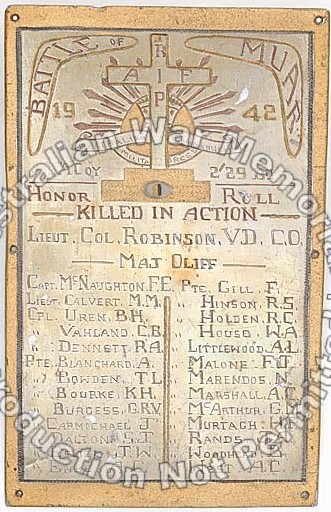
Parit Sulong Bridge in 1963. A memorial plaque commemorating fallen Allies was erected there that same year. The bridge was demolished in 1994 and replaced with a new one.Wreckage from the 45th Brigade still littered on both sides of the road at Parit Sulong on 26 September 1945. The area in which the column was forced into measured a distance of only 1.2 to 1.5 kilometres (1,300 to 1,600 yards).
It took Anderson's column two days to fight their way 24km (15mi) to get near the bridge.[9] Scouts from the column reported at 07:15 that the bridge at Parit Sulong was in Japanese hands. The guards which were placed there by the 6th Norfolks, cut off from all contact and without rations since the Japanese raiding force drove the battalion from the defile a few kilometres further on, had left their post and set off along the river bank to Batu Pahat.[25]
Anderson found a well-fortified Japanese machinegun position at the Parit Sulong Bridge. His brigade made an attempt to dislodge the Japanese from the bridge at dawn on 21 January, but were repulsed by tanks, aircraft and artillery. They were then forced into an area measuring only about 400 metres (440 yards) of roadway. Fighting raged all day, and by 17:00 casualties were getting severe.[9] A wireless message was then received during the morning that a relieving force from Yong Peng was on its way. The sound of distant gunfire between Parit Sulong and Yong Peng gave the column hope.[citation needed]
The rear of the column was repeatedly assailed by tanks and infantry. During the late afternoon and until after dark, two soldiers successfully disabled the leading tank using grenades. Directing an anti-tank gun, the tank burst into flames, forming a temporary roadblock. This gave the rearward defenders an opportunity to disable the other tanks, using grenades and Boys anti-tank rifles with grim resolve.[5]
With ammunition for the mortars and 25 pounders nearly exhausted, Anderson sent a message to General Bennett requesting an airstrike at dawn on Japanese forces holding the far end of the bridge, and for food and morphine be airdropped on the column. He received a reply, "Look up at sparrowfart".[5]
At dusk, with the dead and wounded piling up, Anderson sent two ambulances filled with critically wounded men to the bridge under a flag of truce, requesting that they be allowed to pass through to the Allied lines beyond.[26] The Japanese refused, and instead demanded that the Indian brigade surrender, offering to care for the wounded. Still hopeful of relief, Anderson refused to consider surrendering. The Japanese then ordered that the ambulances were to remain on the bridge to act as a roadblock, and they would be shot if they attempted to move.[27] After dark, Lieutenant Austin[28] and a driver, both of whom were themselves wounded, slipped the brakes of the ambulances, and let them run quietly backwards down the slope from the bridge. Amid the roar of gunfire, they started the engines and drove back to the brigade.[9]
Next morning, two RAFFairey Albacores arrived from Singapore and dropped supplies on the 45th Brigade.[26] Escorted by three RAAFBrewster Buffalos, they then turned their attention on the Japanese holding the far end of the bridge, and bombed them.[5] Soon after, enemy tanks were again active, and made a flank attack supported by troops on the shrinking Allied foothold.[29]
Anderson later received another message from Bennett, "Sorry unable help after your heroic effort. Good luck", stating that there was no hope of relief reaching the column on time, leaving it to his discretion to withdraw. As a last resort, he sent a company to test the resistance at the bridge again that same morning, in the hope that the airstrike had weakened it enough for the column to break through. But the response convinced him there was no chance of success.[5]
At 9am, after destroying guns, vehicles and other equipment, he ordered a retreat. The wounded who could not walk were left to the care of voluntary attendants. Anderson and the remnants of the brigade then dispersed eastward through jungle and swamps to Yong Peng, leaving behind 150 wounded men.[5] Eventually, about 500 Australians and 400 Indians survived to reach British lines, out of more than 4,000 men from the 45th Brigade and two Australian battalions. Stragglers would keep coming in from the units cut off at Bakri.[9]
Some of the prisoners were let out of the bungalow to find their captors waiting for them with water and cigarettes which they held just out of reach while a party of Japanese war correspondents took pictures of the captives, about to receive them. When the correspondents had gone, the water was poured away, the cigarettes pocketed and the men bundled back inside.
While most of the Australians, the majority roped together like a chain gang, were first shot, some of the Japanese officer decided it was time the samurai swords they carried – often family heirlooms – tasted blood, and practiced their skills on the Indians, perhaps because the average Asian's collar size tends to be smaller than a Caucasian's.
For the wounded who were left behind, the Japanese, after mistreating them, massacred all except a handful who escaped.[9] The killed included members of an Australian ambulance column. With kicks, clouts and curses, blows from rifle butts and bayonet jabs, their captors crammed them all into a couple of small rooms in a coolie hutment at Parit Sulong village on the Muar highway. The wounded lay piled upon one another's bodies on the floor. They were denied drinking water by the Japanese, who mocked them by bringing bucketfuls of it as far as the doorway-and then pouring it out upon the ground.[5][9]
The prisoners were soon tied into small groups with rope or wire, pushed into roadside scrub at the point of a bayonet, and machine-gunned. Petrol was poured on the bodies of the shot prisoners, some of whom were still alive, and then set alight, apparently to remove war-crime evidence.[30]
One of the survivors, Lieutenant Ben Hackney of the 2/29th Australian Battalion, crawled away from the area. He found two surviving members of his battalion, one of them Sergeant Ron Croft. Both were soaked in petrol and were among a few who were not tied when the prisoners were shot.[5] They were joined by an English soldier. The man who was with Croft died of his wounds the next day. The remaining three were given shelter in a Malay house for a while. Hackney, unable to stand, persuaded the others to leave him while he remained hidden. Croft is thought to have died on 15 April 1942.[31]
Hackney was soon carried off by the Malays and left some distance from the house. He was often refused help by Malays, who feared reprisals, but was aided by local Chinese. He was caught by a party of Malays, one of them a policeman on 27 February, 36 days after he had begun his attempt to escape. They turned Hackney over to the Japanese at Parit Sulong, and he was beaten up. He survived the war and provided information about the massacre. He and Private Reginald Wharton are the only two Europeans who survived the massacre.[32] Altogether, 145 prisoners lost their lives. Many of the Indian prisoners were beheaded.[9]
General Takuma Nishimura was believed to have ordered the massacre, despite Lieutenant Fujita Seizaburo admitting to have carried it out. The sworn evidence of two sepoy survivors (Lance-Havildar John Benedict and Sapper Periasamy) were confirmed by the post-war discovery of the remains. The War Crimes Court, in 1950, sentenced Nishimura to death for it.[9]
Retreat
On 23 January in the final act of the battle, the 2nd Loyals, covering the last men of Anderson's column to make it into British lines, had two companies positioned as rear guard facing the defile on the road to Yong Peng. At 14:00, as they were about to withdraw, seven Japanese tanks supported by an estimated two battalions of infantry emerged rapidly from the defile and attempted to dismantle the Loyal's road block.[33] In the short battle that followed the 2nd Loyals inflicted heavy casualties on the Japanese infantry attempting to dismantle the road block but ultimately the Loyals, without any anti-tank weapons, were driven off by the tanks and out numbered by the Japanese infantry. During the Battle of Muar and as the rear guard the 2nd Loyals suffered an estimated 200 casualties before withdrawing to Singapore.[34][35]
Losses
45th Brigade's losses were devastating, especially in officers, and the brigade was not able to rebuild in the last few weeks of the Malayan campaign. Only 400 Indian soldiers from the 45th Brigade and 500 soldiers from the two Australian battalions escaped with Anderson's force.[36] The brigade was soon disbanded, and the remaining troops were transferred to other Indian brigades. The two Australian battalions fared little better. 271 men from the 2/19th Battalion made it to British lines, but only 130 from the 2/29th Battalion would make it back to British lines before Singapore surrendered.[3] Many men of both battalions were still in the jungle when the campaign ended.[5] According to Peter Graeme Hobbins; in 22 days of fighting (including on Singapore itself) the 2/19th Battalion suffered "more dead, missing and wounded than any other Australian Infantry Force unit in the Second World War", with 335 killed and 97 wounded.[37]
More than 400 Japanese troops were killed in the ambush at Gemas, making it the biggest loss suffered in any single action at the time. Japan's losses at Muar were a company of tanks and the equivalent of a battalion of men.[5]
Aftermath
Lieutenant Ben Hackney of the 2/29th Australian Battalion, one of only two men to survive the massacre.ML-KNIL Martin B-10 bombers over Malaya, January 1942. 2-VLG-V squadron performed their last sorties in the battle of Muar before their withdrawal from Singapore.
This Brigade had never been fit for employment in a theatre of war. It was not that there was anything wrong with the raw material, but simply it was raw. – Lieutenant General Arthur Percival[39]
Shortage of signal equipment and transport were the cause of the Allies' slow response. During the week, the Japanese were able to operate 250 bombers and 150 fighters from airfields in Malaya and Southern Thailand.[40] Operational Allied aircraft available were probably two or three dozen bombers and about as many fighters by this stage of the campaign.[5] Arthur Percival blamed the 45th Indian Brigade, who were handed the most important tasks despite their lack of training and experience prior to the war, for the failure of the defence of Muar.[citation needed]
To put Duncan's novices in the same ring with Nishimura's Guards, who already had the advantage of aerial superiority and tanks, was ludicrous. – Colin Smith[9]
Despite this, the brigade did achieve a vitally important task in nearly a week of night-and-day fighting. While they fought on from Muar Harbour to Parit Sulong Bridge, stalling the Imperial Guards Division, strongly backed by air and tank support, the three brigades of Westforce in the Segamat area were able to withdraw safely down the central trunk road to Labis, and thence towards the key crossroads at Yong Peng.[5]
Nevertheless, even though they suffered such heavy casualties, Anderson's force had kept the Imperial Guards occupied for four days. Percival recorded in his official record, "The Battle of Muar was one of the epics of the Malayan campaign. Our little force by dogged resistance had held up a division of the Japanese Imperial Guards attacking with all the advantages of air and tank support for nearly a week, and in doing so had saved the Segamat force from encirclement and probable annihilation. The award of the Victoria Cross to Anderson was a fitting tribute both to his own prowess and to the valour of his men."[41]
One criticism aimed at Percival was his decision to deploy the British 53rd Infantry Brigade to the front line. The brigade had disembarked at Singapore on 13 January, just three days earlier before being sent to the front, after nearly three months at sea in crowded troopships, travelling from England to the east coast of Africa, where they had no exercise whatsoever.[42] The brigade, part of the 18th Division, was originally assigned to take part in the North African Campaign, but the troopships were redirected to Singapore when the Japanese invaded Malaya.[5]
News of the ambush at Gemensah Bridge were well received in Singapore. Despite the defeat at Muar, Bakri and Parit Sulong, many Singaporeans thought the action at Gemensah was the long-awaited turning point and that the rout of the Japanese invasion force was not long in coming. A commentator over a Singapore radio, announced flamboyantly that the news gave good reason to believe that the tide of battle was on the turn, "with the AIF as our seawall against the vicious flood".[5]
According to Alan Warren in his book Britain's Greatest Defeat; Tomoyuki Yamashita described the battle at Muar as the most "savage encounter" of the campaign. Warren states that, "Between 16 and 22 January the Imperial Guards lost a company of tanks and a battalion's worth of infantry casualties... The significance of the fighting between Bakri and Parit Sulong is that it was one of the few occasions where the Japanese received as good as they gave."[36]
↑ "The enemy losses in the Muar area were a company of tanks and the equivalent of a battalion of men."[3]
↑ The number of Japanese killed and wounded is disputed. According historian Dr Peter Stanley "Researchers looking at the campaign say there could not possibly have been 1000 Japanese casualties."[19]
Owen, Frank (2001). The Fall of Singapore. London: Penguin Books. ISBN0-14-139133-2.
Smith, Colin (2006). Singapore Burning. London: Penguin Books. ISBN978-0-14-101036-6.
Thompson, Peter (2005). The Battle of Singapore: The True Story of the Greatest Catastrophe of World War II. London: Portrait. ISBN0-7499-5085-4.
Warren, Alan (2006). Britain's Greatest Defeat: Singapore 1942 (Illustrateded.). London: Continuum International Publishing Group. ISBN1-85285-597-5.
Wigmore, Lionel (1957). The Japanese Thrust. Australia in the War of 1939–1945. Series 1 – Army. Vol.4 (Firsted.). Canberra, Australian Capital Territory: Australian War Memorial. OCLC3134219.
This page is based on this Wikipedia article Text is available under the CC BY-SA 4.0 license; additional terms may apply. Images, videos and audio are available under their respective licenses.


