Kota Bharu, the capital of Kelantan State on Malaysia's northeast coast, was, in 1941, the Royal Air Force's (RAF) and Royal Australian Air Force's (RAAF) base of operations in Northern Malaya. There was an airstrip at Kota Bharu and two more at Gong Kedak and Machang. Japanese losses were significant because of sporadic Australian air attacks,[12] Indian coastal defences, and artillery fire.[13]
The Japanese invasion plan involved landing troops from the 5th Division at Pattani and Songkhla on Thailand's east coast, and troops from the 18th Division at Kota Bharu on Malaya's northeast coast. The forces landing in Thailand were to push across to the west coast and invade Malaya through the northwestern state of Kedah, while the eastern landing force would attack down the east coast from Kota Bharu and into the interior of Malaya.
The British plan for defending against an attack from Thailand into northwestern Malaya was a pre-emptive strike into southern Thailand, known as Operation Krohcol, to take strategically vital positions and delay the enemy attack. The British plan for the defence of the east coast of Malaya consisted of fixed beach defences by the Indian 9th Infantry Division along the northern stretch of coastline and two-thirds of the Australian 8th Division defending the southern stretch of coastline (the other third was deployed to Ambon,[14]West Timor,[15] and Rabaul[16])
The Japanese attack force was drawn from Lieutenant General Tomoyuki Yamashita's 25th Army. It sailed from Samah Harbour on Hainan Island on 4 December 1941. Additional ships carrying more troops joined the convoy from Saigon in southern Vietnam, French Indochina. An RAAF reconnaissance Lockheed Hudson discovered the Japanese convoy. Admiral Sir Thomas Phillips, the British naval commander, Far East ordered the battlecruiserHMSRepulse to cancel its trip to Darwin, Australia, and return to Singapore as quickly as possible.[17] The invasion force was spotted again on 7 December by a Catalina flying boat of No. 205 Squadron RAF, but the Catalina was shot down by five Nakajima Ki-27 fighters before it could radio its report to air headquarters in Singapore.[18] Flying Officer Patrick Bedell, commanding the Catalina, and his seven crew members became the first Allied casualties in the war with Japan.[17]
Prior to the invasion the Japanese had recruited a small number of disaffected Malays into a fifth column organization called the "Tortoise Society". The Malayan police were aware of the society's existence and had arrested a number of its leaders just prior to the Japanese landings. At Kota Bharu members of the society provided assistance to the invasion army and acted as guides.[19]
Air Marshal Sir Robert Brooke-Popham, commanding officer of the British Forces in the Far East, fearing that the Japanese Fleet was trying to provoke a British attack and thus provide an excuse to go to war,[20] hesitated to launch Operation Matador on 7 December. Matador was the British plan to destroy the invasion force before or during the landing. He decided to delay the operation, at least for the night. Shortly after midnight on 7/8 December, Indian soldiers patrolling the beaches at Kota Bharu spotted three large shadows: the transport ships Awazisan Maru, Ayatosan Maru, and Sakura Maru, dropping anchor approximately 3km (1.6nmi; 1.9mi) off the coast. The ships were carrying approximately 5,200troops of the Takumi Detachment (Major-General Hiroshi Takumi, aboard Awazisan Maru). Most of these troops were veterans of the war in China.[17]
The Japanese invasion force consisted of units from the 18th Division. The assault troops came from the 56th Infantry Regiment (Colonel Yoshio Nasu, aboard Sakura Maru), supported by one mountain artillery battery of the 18th Mountain Artillery Regiment (Lieutenant Colonel Katsutoshi Takasu), the 12th Engineer Regiment (Lieutenant Colonel Ichie Fujii), the 18th Division Signal Unit, one company of the 12th Transport Regiment, one company of the 18th Division Medical Unit, and No. 2 Field Hospital of the 18th Division Medical Unit. They were escorted by a fleet (Kota Bharu Invasion Force) under the command of Rear-Admiral Shintaro Hashimoto, consisting of the light cruiserSendai, destroyersAyanami, Isonami, Shikinami, and Uranami, minesweepersNo. 2 and No. 3, and submarine chaserNo. 9.[17]
The invasion began with a bombardment at around 00:30 local time on 8 December (2:00 local time in Tokyo on 8 December, 17:00 GMT on 7 December). The Japanese carrier planes flying toward Pearl Harbor were about 50minutes away from their destination. The attack on Pearl Harbor started at 01:48 Kelantan local time (3:18 Japanese time on 8 December, 18:18 GMT, 7:48 Hawaii time on 7 December). As a result, it is usually referred to as the 7 December attack in the USA. The loading of landing craft began almost as soon as the transports dropped anchor. Rough seas and strong winds hampered the operation and a number of smaller craft capsized.[12] Several Japanese soldiers drowned. Despite these difficulties, by 00:45 the first wave of landing craft was heading for the beach in four lines.[17]
Mitsubishi A6M Zeros of 22nd Air Flotilla at RAF Kota Bharu after its capture from Allied forces, c. 1942.
The defending force was the 8th Indian Infantry Brigade (Brigadier B. W. Key) of Indian 9th Infantry Division (Major General A. E. Barstow), supported by four 3.7-inch Mountain Howitzers of the 21st Mountain Battery (IA) (Major J. B. Soper). The 3/17th Bn, Dogra Regiment, under the command of Lieutenant Colonel G.A. Preston,[21] had responsibility for the 10mi (16km) stretch of coast which was the chosen landing site. The British fortified the narrow beaches and islands with land mines, barbed wire, and pillboxes. They were supported by the 73rd Field Battery of the 5th Field Regiment, Royal Artillery, deployed adjacent to the nearby airfield.[22] The area defended by the 3/17th Dogras consisted of the narrow beaches of Badang and Sabak at Kota Bharu. The beaches were split by two estuaries that led to the mouth of the Pengkalan Chepa River through a maze of creeks, lagoons and swampy islands, behind which was the Kota Bharu airfield and the main road inland.[23]
The Dogras immediately opened intense fire on the invasion force with artillery and machine guns. By midnight, the first waves of Japanese troops were heading toward the beach front in landing craft. Colonel Masanobu Tsuji wrote in his book about the Malaya Campaign:
The enemy pillboxes, which were well prepared, reacted violently with such heavy force that our men lying on the beach, half in and half out of the water could not raise their heads.[24]
The first and second waves of Japanese soldiers were pinned down by the intense fire from the Dogra's pillboxes and trenches but after vicious hand-to-hand fighting a breach was made in the defences on the south bank of the estuary.[23] On the northern bank the Japanese were pinned down on an island where dawn found them trapped in the open. Allied aircraft from the nearby airfields began attacking the invasion fleet and the soldiers trapped on the island. Japanese casualties in the first and second waves were heavy.[25][pageneeded] The Japanese managed to get off the beach only after the two pill box positions and supporting trenches were destroyed. Despite their heavy resistance, the Dogras were forced to retreat to their defences in front of the airfield.[21] Brigadier Key brought forward his reserves; the 2/12th Frontier Force Regiment and the 1/13th Frontier Force Rifles to support the Dogras. At 10:30, Key ordered an attempt to retake the lost beaches with the 2/12th Frontier Force Regiment attacking from the south and the 1/13th Frontier Force Rifles attacking from the north. The fighting on the beaches was heavy with both sides suffering more casualties. The British forces made some progress but were unable to close the breach. In the afternoon, a second attack went in but failed again to close the breach.[23]
The airfield at Kota Bharu had been evacuated and by dusk on 8 December, with very low visibility, and Japanese troops were now able to infiltrate between the British units and with possible threats of landings further south, Brigadier Key asked for permission from Major-General Barstow (9th Division commander) and Lieutenant General Heath (III Corps commander) to withdraw if it became necessary.[23]
Air attacks
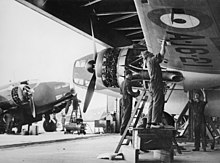
Lockheed Hudson aircraft of No. 1 Squadron under assembly at RAAF Station Richmond. The Hudson in the right foreground was flown by Flt Lt John Lockwood, who led the first Allied attack against the Japanese. He and his wingmen heavily damaged the Japanese freighter, Awazisan Maru, causing its abandonment.
No. 1 Squadron RAAF based at RAF Kota Bharu launched 10 Lockheed Hudson bombers to attack the Japanese transports, each loaded with four 250lb (113kg) bombs. In the 17 sorties flown, they lost two Hudsons shot down and three badly damaged. One Hudson, flown by Flight Lieutenant John Graham Leighton Jones, crashed into a fully laden landing craft after being hit while strafing the beachhead, killing some 60 Japanese soldiers on board. Only five Hudson bombers remained airworthy at the end of the battle.[27]
All three Japanese troopships were significantly damaged, but while the Ayatosan Maru and Sakura Maru were still able to sail, the Awazisan Maru was left burning and abandoned.[28] The attacks by No. 1 Squadron RAAF killed or wounded at least 110 of its crew.[28] The wreck later sunk on its own or was torpedoed by the Dutch submarine K XII on 12 December.[29]
Despite the strong defence, Takumi had three full infantry battalions ashore by mid morning of 8 December. Counter attacks launched by Brigadier Key failed and the Japanese took Kota Bharu town on the 9th. After fierce fighting during the night, threatening the airfield, Lt Col Arthur Cumming's 2/12th Frontier Force Regiment attempted to hold the airfield and put up a brilliant rearguard action.[30][pageneeded] Cumming would later receive the Victoria Cross during the fighting at Kuantan. Key asked for and was given permission to withdraw from Kota Bharu.[22]
The Japanese claim that the landings at Kota Bharu were some of the most violent of the whole Malayan Campaign.[citation needed] It is estimated that they suffered an estimated 300 killed and 500 wounded.[citation needed]
Burton, John (2006). Fortnight of Infamy: The Collapse of Allied Airpower West of Pearl Harbor. Annapolis, Maryland: Naval Institute Press. ISBN1-59114-096-X. OCLC255121507.
Jeffreys, Alan; Anderson, Duncan (2005). British Army in the Far East 1941–45. Battle Orders. Vol.13. Oxford: Osprey Publishing. ISBN1-84176-790-5. OCLC907132823.
Percival, Arthur (1946). "Chapter IX – The Battle For Kedah". Percival's Official Report to the British Government. FEPOW Community. Retrieved 23 May 2009.
Pike, John. "Military". Globalsecurity.com. Retrieved 23 May 2009.
Richards, Denis; Saunders, Hilary St. G. (1954). The Fight Avails. Royal Air Force 1939–1945. Vol.II. London: HMSO. ISBN978-0-11-772114-2. Retrieved 4 October 2020.
Smith, Colin (2006). Singapore Burning. London: Penguin Books. ISBN978-0-14-101036-6.
Tsuji, Masanobu (1997). Howe, H. V. (ed.). Japan's Greatest Victory, Britain's Worst Defeat. Translated by Lake, Margaret E. Staplehurst, Kent: Spellmount. ISBN1-873376-75-8. OCLC38337840.
This page is based on this Wikipedia article Text is available under the CC BY-SA 4.0 license; additional terms may apply. Images, videos and audio are available under their respective licenses.