18th Infantry Division (United Kingdom)

Last updated

18th Infantry Division
18 inf div -vector.svg
According to the historian Michael Chappell, "the map-reading conventional sign for a windmill—an apt device for an East Anglian formation" was only worn on uniforms in Britain. [1]
Active30 September 1939 – 15 February 1942 [2]
Branch Territorial Army
Type Infantry
RoleInfantry
SizeWar establishment strength: 17,298 men [lower-alpha 1]
Far East: ~15,000 men [4]
Engagements Battle of Muar
Battle of Singapore
Commanders
Notable
commanders
Bernard Paget
Merton Beckwith-Smith

The 18th Infantry Division was an infantry division of the British Army which fought briefly in the Malayan Campaign of the Second World War. In March 1939, after the re-emergence of Germany as a European power and its occupation of Czechoslovakia, the British Army increased the number of divisions in the Territorial Army (TA) by duplicating existing units. The 18th Infantry Division was formed in September 1939 as a second-line duplicate of the 54th (East Anglian) Infantry Division, with men from Essex and the East Anglian counties of Norfolk, Suffolk and Cambridgeshire.

Contents

The division was based in Britain from 1939 to 1941, undergoing training and being moved around the country. This included an anti-invasion role in East Anglia, training in Scotland, and redeployment to the North West where the division also helped unload merchant ships during the Liverpool Blitz. Towards the end of 1941, the British government sought to reinforce the British Army in North Africa to demonstrate to the Dominions that the United Kingdom was doing its fair share of fighting in the Middle East and to prepare for Operation Crusader. The division left Britain during October bound for Egypt.

By December, the convoy had reached South Africa and was preparing for the final stretch of its journey when news of the Japanese entry into the war was received. This resulted in most of the 18th Infantry Division being diverted to India to reinforce British forces facing the Japanese. The 53rd Brigade was sent to Singapore, from where it was deployed north to Johore and became embroiled in the Battle of Muar. After several short engagements with Japanese forces, the brigade was withdrawn to Singapore Island. Between 29 January and 5 February, the rest of the division arrived in Singapore having sailed from India. Shortly afterwards, the entire division participated in the Battle of Singapore.

Initially deployed to northeastern Singapore Island, the division remained largely inactive while the Japanese attacked the north-west sector. Following the establishment of a Japanese beachhead, the division was broken up and deployed piecemeal in the battle. One battalion was assigned to a different formation and several units formed two battlegroups. After the initial engagements, the division was regrouped for a final stand in the city of Singapore and repulsed several Japanese attacks. The division, with the rest of the garrison, surrendered to the Japanese on 15 February 1942. It was not reconstituted. Over one-third of the division's personnel died in captivity, including divisional commander Major-General Merton Beckwith-Smith.

Background

During the 1930s, tensions increased between Germany and the United Kingdom and its allies. [5] In late 1937 and throughout 1938, German demands for the annexation of Sudetenland in Czechoslovakia led to an international crisis. To avoid war, the British Prime Minister Neville Chamberlain met with German Chancellor Adolf Hitler in September and brokered the Munich Agreement. The agreement averted a war and allowed Germany to annexe the Sudetenland. [6] Although Chamberlain had intended the agreement to lead to further peaceful resolution of issues, relations between both countries soon deteriorated. [7] On 15 March 1939, Germany breached the terms of the agreement by invading and occupying the remaining Czech provinces of Bohemia and Moravia. [8]

On 29 March, British Secretary of State for War Leslie Hore-Belisha announced plans to increase the Territorial Army (TA), a reserve of the regular army made up of part-time volunteers, from 130,000 to 340,000 men and double the number of TA divisions. [9] [lower-alpha 2] The plan was for existing units to recruit over their establishments, aided by an increase in pay for Territorials, the removal of restrictions on promotion which had hindered recruiting, the construction of better-quality barracks, and an increase in supper rations. The units would then form second-line divisions from cadres which could be increased. [9] [14] The 18th Infantry Division was a second-line unit, a duplicate of the first-line 54th (East Anglian) Infantry Division. [15] In April, limited conscription was introduced. This resulted in 34,500 twenty-year-old militiamen being conscripted into the regular army, initially to be trained for six months before deployment to the forming second-line units. [15] [16] Despite the intention for the army to grow, the programme was complicated by a lack of central guidance on the expansion and duplication processes and a lack of facilities, equipment and instructors. [9] [17]

Formation and home defence

It was envisioned that the duplicating and recruiting processes would take no more than six months. Although some TA divisions had made little progress by the time the Second World War began, others completed this work within weeks. [17] [18] The 18th Infantry Division became active on 30 September 1939; prior to this its units had formed, and were administered by the parent 54th (East Anglian) Infantry Division. The 18th Division was composed of the 53rd, 54th and 55th Infantry Brigades, and divisional support troops. The division was formed with men from the county of Essex and the East Anglian counties of Norfolk, Suffolk and Cambridgeshire. According to the Imperial War Museums, its insignia (windmill sails) denotes "the association of the Division with East Anglia". [19] The 53rd Brigade consisted of the 5th Battalion, Royal Norfolk Regiment (5RNR), 6th Battalion, Royal Norfolk Regiment (6RNR), and the 2nd Battalion, Cambridgeshire Regiment (2CR). [20] The 54th Brigade controlled the 4th Battalion, Royal Norfolk Regiment (4RNR), 4th Battalion, Suffolk Regiment (4SR), and the 5th Battalion, Suffolk Regiment (5SR). [21] The 55th Brigade was made up of the 5th Battalion, Bedfordshire and Hertfordshire Regiment (5BHR), 1st Battalion, Cambridgeshire Regiment (1CR), and the 1/5th Battalion, Sherwood Foresters (1/5SF). [22] The division's first general officer commanding (GOC) was Major-General Thomas Dalby, who had been brought out of retirement. [23] [24]

A lone soldier of the 4RNR, mans a trench near a pillbox at Great Yarmouth, Norfolk, 31 July 1940. The British Army in the United Kingdom 1939-45 H2702.jpg
A lone soldier of the 4RNR, mans a trench near a pillbox at Great Yarmouth, Norfolk, 31 July 1940.

Major-General Bernard Paget assumed command on 30 November 1939, replacing the again-retiring Dalby. [2] [25] The division was initially assigned to Eastern Command, and was based in Norfolk by early 1940. [2] [26] The opening months of the war allowed little time to train, and the division guarded airfields and other key points. [27] By summer, it was under the command of II Corps and was spread throughout Cambridgeshire, Norfolk and Suffolk. [2] [28] [29] On 20 April, Paget left the division temporarily and was replaced by Brigadier Edward Backhouse (commander of 54th Brigade). [30] Paget was deployed to Norway, where he commanded Sickleforce (the 15th and 148th Infantry Brigades) after their landing at Åndalsnes during the Norwegian Campaign. [31] When the campaign failed, Paget returned briefly to the division on 14 May 1940; [2] [32] thirteen days later, he became Chief of Staff, Home Forces and was temporarily replaced by Brigadier Geoffrey Franklyn. [2] [33]

The TA's war deployment envisioned its piecemeal use, as equipment became available, to reinforce the British Expeditionary Force (BEF) already dispatched to Europe. The TA divisions would the join regular army divisions as the divisions completed their training and received their equipment, with the final divisions deployed a year after the war began. [34] The division did not leave Britain at that time, since the BEF was withdrawn from France during the May–June 1940 Dunkirk evacuation. [35] [36] The evacuation had resulted in the abandonment of much of the BEF's equipment, leaving troops in Britain sparsely equipped. Priority for new equipment was given to a handful of formations that would respond to any German landings, leaving the 18th Division with little of what was required. An infantry division should have been equipped with seventy-two 25-pounder field guns; on 31 May 1940, the 18th Division was equipped with four First World War-vintage 18-pounder field guns and eight 4.5-inch howitzers of similar age. The division had no anti-tank guns (compared with the usual 48), and only 47 of the required 307 Boys anti-tank rifles. [37] [38]

During the summer of 1940, the 18th Infantry Division had several changes of command. Major-General Thomas Eastwood took command on 1 June before leaving to become chief of staff of the Second BEF under the command of Lieutenant-General Alan Brooke. [2] [39] [lower-alpha 3] Major-General Lionel Finch, previously Director of Recruiting and Organization and Deputy Adjutant-General to the Forces, took command on 9 June before his replacement by Major-General Merton Beckwith-Smith (who had commanded the 1st Guards Brigade during the Battle of France) on 14 July. [42] [43] He remained with the division for the remainder of its existence. [2] [44]

Although the division was then assigned to an anti-invasion role in East Anglia, a number of training exercises were held in other parts of England as well as in Scotland, and Wales. [27] [29] In the autumn of 1940, it moved permanently to Scotland. Divisional headquarters was established at Melrose, with the troops spread across the Scottish Borders from Dumfries to Duns. Further divisional exercises were conducted, facing contingents of exiled Belgians, Czechs, Norwegians, and Poles. [45] Unfounded rumours began to circulate that the division would soon be deployed overseas. [46]

It was assigned to Western Command and moved to North West England and the West Midlands in April 1941, replacing the 38th (Welsh) Infantry Division. [2] [47] The division was spread out between Liverpool, Manchester and Birmingham, with divisional headquarters at Ribbesford House near Bewdley. [46] During the Liverpool Blitz, several hundred men were deployed to the city for several weeks to help unload cargo ships. This deployment saw the division's first casualties of the war, due to German bombing. [48] On 18 July, Brooke (now Commander-in-Chief, Home Forces) inspected elements of the division which were based in Crewe. [49]

Overseas service

Transfer to Middle East

Winston Churchill, who has succeeded Chamberlain on 10 May 1940, had grown concerned in 1940 about the expansion of British supply services in Egypt under Middle East Command compared to the number of fighting men, and pushed for the dispatch of additional fighting formations. [50] [lower-alpha 4] This had been a source of friction with General Archibald Wavell and his replacement, General Claude Auchinleck, who wanted rear-area personnel and replacements for fighting formations rather than new divisions. Churchill was adamant that additional complete British fighting formations be dispatched, not replacements or logistical troops, "to give the Dominions no cause to feel that the bulk of the fighting was done by their troops". [52] On 1 September 1941, Churchill contacted neutral U.S. President Franklin D. Roosevelt and requested shipping for two infantry divisions from Britain to the Middle East. Roosevelt responded that shipping could be provided for only one division, sailing from Halifax, Nova Scotia. The 18th Infantry Division left Liverpool aboard the heavily escorted convoy CT.5 on 28 October, bound for Nova Scotia. Three days later, an American-escorted convoy left Halifax with six cargo ships provided to the British as part of the Lend-Lease programme. The convoys met in mid-ocean on 2 November, and exchanged escort groups; the British ships and Lend-Lease cargo ships headed for the United Kingdom, and the (now American-escorted) convoy CT.5 continued to Nova Scotia. The division arrived in Halifax on 7 November, and transferred to the waiting American ships of convoy WS.12X over the next few days. The British ships returned home, and convoy WS.12X departed Halifax on 10 November for the Middle East. [2] [52] [53] [54]

Diversion to Far East

Part of the convoy which brought the division's final elements to Singapore Singapore convoy warwick castle.jpg
Part of the convoy which brought the division's final elements to Singapore

During the night of 7/8 December 1941, one hour before its attack on Pearl Harbor, the Empire of Japan began the invasion of Malaya. [55] Four hours after the attack on Pearl Harbor, the Battle of Hong Kong began. [56] Although the immediate British response was to order a number of units to be diverted to the Far East, none based in the Middle East were withdrawn for the moment. Since the convoy containing the 18th Infantry Division had only reached the Cape of Good Hope when Japan entered the war, it was diverted to the Far East on 9 December. Instead of reinforcing Operation Crusader as planned, the division was sent to India. [53] [57] [58] Lionel Wigmore, the Australian historian of the Malayan campaign, wrote that the diversion indicated that "... the security of Singapore and maintenance of Indian Ocean communications were second in importance only to the security of the United Kingdom ..." [59]

Most of the division arrived in Bombay on 27 December. [53] [60] The 53rd Infantry Brigade stopped for a week at Mombasa, Kenya and was diverted on 23 December to Malaya. The brigade, travelling on the USS Mount Vernon with the 135th Field Regiment, Royal Artillery and the 287th Field Company, Royal Engineers, arrived at Singapore on 13 January 1942 without its artillery or transport. [53] [20] [61] Although the rest of the division was under War Office control, the 53rd Brigade was temporarily detached and assigned to Malaya Command. [62] Their equipment, scheduled to arrive on a later convoy, was made up from local sources. It was hoped that the brigade could be put into the line immediately (relieving the 22nd Australian Brigade) but its men were considered unfit for immediate action after eleven weeks at sea. [63] By the time the brigade arrived, the Japanese had forced Allied forces to retreat south. On 11 January, Kuala Lumpur, the capital of British Malaya, fell; Japanese forces reached Johor, the southernmost state of Malaya, soon afterwards. [64]

53rd Brigade: Malaya

Disposition of Allied and Japanese forces in Johore, during the Battle of Muar (click to enlarge). Battle of Muar map.jpg
Disposition of Allied and Japanese forces in Johore, during the Battle of Muar (click to enlarge).

On 17 January, despite reservations about the state of the brigade's fitness, a brigade group based on the 53rd Brigade (under the command of Brigadier Cecil Duke) had arrived in the Ayer Hitam area of Johor and elements were attached to the 11th Indian Infantry Division in III Indian Corps to reinforce the defences from Batu Pahat to Yong Peng. 6RNR was deployed around 10 miles (16 km) to the west to defend a tactically important defile and causeway between Bukit Pelandok (south of the pass) and Bukit Belah (to the north). 2CR relieved the garrison at Batu Pahat, around 15 miles (24 km) southwest of Ayer Hitam. Both battalions were also assigned to patrolling the roads against Japanese infiltration. [65] Japanese patrols were soon encountered by 2CR southwest of Batu Pahat, and 6RNR (near Bukit Pelandok) was attacked from the air. [66] 5RNR was allocated to Westforce (an ad hoc multi-national force assembled under the command of Australian Major-General Gordon Bennett) to relieve the 2/19th Australian Battalion at Jemaluang. [64] [67] Several Australian officers were to remain behind and aid 5RNR in taking over their positions and one said:

They were a fine body of men but almost dazed by the position in which they found themselves. Their training had been for open warfare and not the very close warfare of the Malayan countryside. They demonstrated the unreality of their approach to the situation by lighting up all the buildings in the area, [and] stringing their transport along highly vulnerable and prominent crossroads....

Unnamed Australian officer [67]

The battalion had not completed its move, when on 19 January the troops were ordered to Ayer Hitam. [68] The defile had become a crucial position in the British attempt to delay the Japanese advance and prevent them from cutting off the 45th Indian Infantry Brigade. 6RNR was to be reinforced by the depleted 3rd Battalion, 16th Punjab Regiment (3/16PR) and the untried 2nd Battalion, Loyal Regiment (North Lancashire) (2LR) from the 9th Indian Division as the 45th Indian Infantry Brigade retired through the 53rd Infantry Brigade positions to an area west of Yong Peng and Westforce withdrew to Labis. [68] At 13:30 on 19 January, elements of the Japanese I Battalion, 5th Guards Infantry Regiment, Imperial Guards Division surprised a 6RNR company in Bukit Pelandok and occupied the lower slopes of Bukit Belah, commanding the Bakri road. Another 6RNR company managed to hold on at the northern slope of Bukit Belah and later took over the peak, unknown to battalion headquarters. [69] At 05:00 on 20 January, 3/16PR was to counter-attack and recapture Bukit Belah and the northern ridge by dawn on 20 January and then 6RNR was to attack the Japanese in Bukit Pelandok covered by fire from Bukit Belah. The Punjabi attack began at 04:00, but they were mistaken for a Japanese unit by 6RNR company on the summit of Bukit Belah, who opened fire. The Indians managed to reach the peak, but before it could be consolidated, a Japanese attack forced the British and Indian troops off the ridge with many losses, including the Punjabis' commander. The attack on Bukit Pelandok was repulsed and the British and Indian troops were moved to between the defile and causeway with the left flank covered by 2LR. [70]

The delayed brigade counter-attack was ordered for dawn on 21 January, spearheaded by 2LR, but 6RNR and 3/16PR were incapable of attacking so soon and 2LR had only just arrived; the attack was postponed again, but with orders to begin as soon as possible. At 20:00, Lieutenant-General Arthur Percival, GOC Malaya Command, decided that the Japanese capture of the Pelandok defile seriously endangered Westforce's line of communications. He ordered Bennett to continue to withdraw south of Labis to a line from Paloh to the Sungei Gerchang bridge on the road to Labis, and to detach a brigade as soon as possible to dig in at the Yong Peng road junction. As the 27th Australian Brigade covered Yong Peng, Percival put all troops on the Muar–Yong Peng road back under the command of Westforce at 12:30. The counter-attack by the 53rd Brigade never occurred; at 10:30 on 21 January, Major-General Billy Key (GOC 11th Indian Division) visited the brigade and learned that half his orders had not been transmitted, that the brigade had not planned an attack, and that 2LR had been sent to dig in at the east end of the causeway. An attack could be arranged for 14:00, but more confusion occurred, and the start time was moved to 15:30. The Japanese positions gave a view of the ground east of the ridge, making surprise impossible to achieve, and more time was needed to arrange artillery support and concentrate 2LR. The attack was postponed again to 18:00 and then to the morning of 22 January. The artillery took so long to register that there was another postponement to 09:00, but 2LR, who had assembled under cover of night, were spotted by Japanese reconnaissance aircraft and bombed and strafed. With no prospect of surprise, and doubtful that the attack could succeed, Duke cancelled the operation and redeployed the three battalions to guard the causeway and the ground from there to the defile. [71]

At 06:30 on 22 January, 5RNR and a battalion from Batu Pahat reopened the Batu Pahat–Ayer Hitam road at Milestone 72 and a supply convoy got through to the brigade. Later, the Japanese again blocked the road. Key ordered 5RNR to reopen the road along with an attack by the 15th Indian Infantry Brigade on 23 January, but this attack failed and 5RNR was recalled. At a conference at Yong Peng, also on 23 January, Percival announced a new plan to defend a line from Jemalaung Kluang to Ayer Hitam and Batu Pahat, the 53rd Brigade reverting to the command of the 11th Division. The brigade was to retire on 23 January through the positions of the 27th Australian Brigade at Yong Peng to Ayer Hitam, when the transfer of command would occur. 5RNR was driven by bus to Pontian Kechil, ready to travel with an ammunition convoy to Batu Pahat, next morning. The brigade began to retire from Bukit Pelandok at noon, but the Japanese attacked with tank support and the causeway bridges were blown too soon for all the British to cross. In the chaos the brigade managed to disengage, but with many casualties. With the other battalions assigned to specific duties, the 53rd Brigade was reduced to the 6RNR and 3/16PR and moved south to Benut via Skudai. [72] [73] The brigade was engaged in a series of isolated fights with the Japanese along the road from Benut to Senggarang as they tried to move north to reinforce Batu Pahat. [74] Only isolated elements were able to reach Senggarang, to which the 15th Indian Infantry Brigade, including 2CR and 5RNR, had retired. During the evening, the 15th Indian Brigade was ordered to break out, across country as the roads had been blocked by strong Japanese positions, and retreat south. [75] During the night of 29/30 January, the 53rd Brigade was ordered to withdraw to Singapore Island; the brigade had suffered about 500 casualties. [76] [77]

Singapore

Battle of Singapore

"The battle of Malaya has come to an end and the battle of Singapore has started.... Our task is to hold this fortress until help can come—as assuredly it will come. This we are determined to do. In carrying out this task we want the help of every man and woman in the fortress. There is work for all to do. Any enemy who sets foot in our fortress must be dealt with immediately. The enemy within our gates must be ruthlessly weeded out. There must be no more loose talk and rumour mongering. Our duty is clear. With firm resolve and fixed determination we shall win through."

– Arthur Percival, press statement end of January [78]

On 20 January, Wavell visited Singapore to discuss the defence of the island with Percival. During this conference, it was decided that once the 18th Infantry Division had arrived in full force, it would be allocated to the sector on the island believed to be where the Japanese would land, as it would be the strongest formation available with fresh troops. Percival believed that this would be the northeast part of the island; Wavell disagreed stating it would be the northwest section of the island (where the Australians were to be deployed). However, he did not force the issue and allowed Percival to deploy his forces as he wished. Wigmore commented that Wavell conceded the point "on the ground that [Percival] was the commander responsible for results and had long studied the problem." [79]

The majority of the 18th Infantry Division arrived in Singapore on 29 January, followed by the final elements (the machine-gun and reconnaissance battalions) on 5 February. Once the main body had landed, the 53rd Brigade returned to the division. [80] The 18th was assigned to III Indian Corps and deployed in strength along the northeast section of the coastline. Their objective, as with all other frontline forces, was to prevent the Japanese from landing or if a landing did occur, to stop the Japanese on the beaches and launch counter-attacks to destroy their beachheads. [81]

Map of Singapore Island showing the disposition of Allied forces (click to enlarge). Singapore map 1942.jpg
Map of Singapore Island showing the disposition of Allied forces (click to enlarge).

On 5 February, Japanese forces made obvious movements on the mainland opposite the 18th Division and bombarded the 18th Division positions for several days. [82] The same day, aircraft bombed the Empress of Asia; one of the four vessels that was bringing the remainder of the division to Singapore. Following the attack, Percival and Bennett reviewed Allied dispositions and expressed concern that they would not be able to defend the island without reinforcements. [83]

Three days later, at 22:30 on 8 February, the Japanese began their assault on Singapore Island, landing on the northwest coast against Australian opposition. [84] The 18th Division was ordered to remain where it had been posted in case of a second landing, and took no part in the initial fighting. [85] [86] After two days of fighting, Churchill cabled Wavell, "The 18th Division has a chance to make its name in history. Commanders and senior officers should die with their troops. The honour of the British Empire and of the British Army is at stake. I rely on you to show no mercy to weakness in any form." The character of Churchill's message was then relayed via Wavell to the troops. [87] During the day, by which time Percival had drawn up a provisional plan to withdraw to a smaller perimeter around the city of Singapore, the division was committed piecemeal in the effort to stem the Japanese advance. The 5BHR was taken from the division and assigned to the 1st Malaya Infantry Brigade. [85] [86] [88] Two ad hoc formations: Tomforce, from the divisional reconnaissance battalion, 4RNR, 1/5SF and a battery of the 85th Anti-Tank Regiment, under the command of Lieutenant-Colonel Lechmere Thomas; [89] and Massy Force from 1CR, 4SR, the Indian 5th Battalion, 11th Sikh Regiment (5/11SR), and various other units including artillery and 18 light tanks, under the command of Brigadier Tim Massy-Beresford (commander of the 55th Brigade). [90] The rest of the division remained in its sector. [91]

"It is certain that our troops on Singapore Island heavily outnumber any Japanese, who have crossed the straits. We must destroy them. Our whole fighting reputation is at stake and the honour of the British Empire. The Americans have held out in the Bataan Peninsula against far heavier odds. The Russians are turning back the picked strength of the Germans. The Chinese with an almost complete lack of modern equipment have held the Japanese for four and a half years. It will be disgraceful if we yield our boasted fortress of Singapore to inferior enemy forces.

There must be no thought of sparing the troops or civil population and no mercy must be shown to weakness in any shape or form. Commanders and senior officers must lead their troops and if necessary die with them. There must be no question or thought of surrender. Every unit must fight it out to the end and in close contact with the enemy.

Please see that the above is brought to the notice of all senior officers and by them to the troops. I look to you and your men to fight to the end to prove that the fighting spirit that won our Empire still exists to enable us to defend it."

– Special Order of the Day, 10 Feb 1942, by Archibald Wavell. [92]

On 11 February, Tomforce, having moved to reinforce the Australians, launched a counter-attack on the captured village of Bukit Timah. The reconnaissance battalion was ordered to advance up the main road to the village, with 4RNR to their right and the 1/5SF (reinforced with elements of the 2/29th Australian Battalion, who had been temporarily attached to Tomforce) to their left. The reconnaissance battalion encountered strong Japanese resistance as they tried to enter the village near the railway station and could proceed no further. On their flank, the 1/5SF and the Australians advanced to within 400 yards (370 m) of the village, before being forced back. 4RNR took control of an area of high ground overlooking the village, but could advance no further due to a strong Japanese presence in the area. [93] Meanwhile, Massy Force had assembled on the eastern side of MacRitchie Reservoir and was ordered to defend Bukit Tinggi, west of the reservoir, but Japanese forces arrived first. During the afternoon, Massy Force moved to the northern end of Bukit Timah Race Course and linked up with Tomforce who had pulled back following their failed attack on Bukit Timah. [90] Late in the day, Massy Force absorbed Tomforce and the latter ceased to exist. [94] It was later established that the Japanese 5th and 18th Divisions had occupied the area. [93]

The following day, with half the island under Japanese control, fighting intensified. The Japanese 5th Infantry Division, supported by tanks, attacked along the entire front, including the position held by Massy Force. Elements of Massy Force were pushed back and a Japanese tank attack penetrated deep into the British positions, before they were repulsed. Following the attack, Massy Force was withdrawn 3,000 yards (1.7 mi; 2.7 km) to a position along the Adam and Farrer roads. [95] During the day, the rest of the 18th Infantry Division was ordered to move from their coastal positions. The 53rd Brigade and the 2/30th Australian Battalion covered the withdrawal of the 8th and 28th Indian Infantry Brigades, while the remnants of the division (along with the 11th Indian Division) were ordered to take up positions covering the Peirce and MacRitchie reservoirs. [96]

On 13 February, the division had moved into the final defensive perimeter established around Singapore. This position lacked any fortifications and it was clear all hope of victory had gone. The division was deployed with Brigadier Backhouse's 54th Brigade on the left astride the road to Bukit Timah (north-west of the city), to their right was the 53rd Brigade positioned north of the Chinese cemetery and Massy-Beresford's 55th Brigade (on the right flank) was north of the city from Thomson Road to the Adam Park Estate. [97] The Japanese attacked at numerous points along the final defensive perimeter, including several assaults on the Adam Park Estate. The 1CR fought off several attacks, including bayonet charges, inflicting over 600 casualties for the loss of 165 men. [98] On 14 February, further attacks penetrated between the 53rd and 55th Brigades. Reinforcements from the 11th Indian Division were dispatched, repelled the Japanese attack and sealed the gap. [99]

Surrender, captivity and assessment

British soldiers after the surrender of Singapore British troops surrender in Singapore.png
British soldiers after the surrender of Singapore

Despite the Japanese attacks, the defensive line held; with food, water and ammunition running out, Percival decided on 15 February that counter-attacks would be fruitless. To spare the civilian population of the city further hardship, the decision was made to surrender the Allied garrison. [100] The order to surrender surprised the men; some fled, fearing that the Japanese would not take prisoners and others had to be pressured into laying down their arms. [101] Some, such as Harold Atcherley (an intelligence officer with the division) were ordered off the island, but Atcherley failed to escape. [102] On 15 February, the division ceased to exist and its men entered Japanese captivity. The division was never reconstituted in the United Kingdom. [2] During the next three years, over one-third of the men died in Japanese captivity; Beckwith-Smith succumbed to diphtheria on 11 November 1942. [103]

In the aftermath, the division was a political bargaining chip in a series of telegrams between Churchill and Prime Minister of Australia John Curtin which discussed the possibility of diverting Australian troops to Burma rather than returning home. [104] On 20 February, Churchill sent a telegram,

... your message of January 23, in which you said that the evacuation of Singapore would be "an inexcusable betrayal". Agreeably with your point of view, we therefore put the 18th Division ... into Singapore instead of diverting them to Burma, and ordered them to fight it out to the end. They were lost at Singapore and did not save it, whereas they could almost certainly have saved Rangoon. I take full responsibility with my colleagues on the Defence Committee for this decision; but you also bear a heavy share on account of your telegram.

Churchill [104]

Two days later, Curtin retorted: "In regard to your statement that the 18th Division was diverted from Burma to Singapore because of our message, it is pointed out that the date of the latter was January 23, whereas in your telegram of January 14 you informed me that one brigade of this division was due on January 13 and the remainder on January 27". [105]

According to historian Brian Padair Farrell, Wavell's decision to allow the 18th Infantry Division to be deployed to Singapore was "the least blameworthy of the decisions that he made which had negative consequences—especially for the men of the 18th Division who suffered the terrible years of captivity under barbaric Japanese control". Farrell noted that "Wavell's job was to hold Singapore" and "no other commander in his place would have chosen differently". [106] Gerhard Weinberg wrote that "the constant splitting of divisions ... and the piecemeal tossing of reinforcements into battle all contributed to defeat". [107] This was echoed by Captain Henry Phillips, a former member of the division, who wrote that the division "had been prodigally thrown to the winds", was ill-trained for the situation, and received no intelligence about how the Japanese were armed, dressed, or equipped;

... [T]he division was not permitted to fight as a division ... battalions were divorced from brigades and companies from battalions. Unnecessary difficulties of administration were created and the chain of command disrupted." Phillips called the battle an "unredeemed disaster", and asked for the "misapplication of the 18th Division" to be scrutinised by a public inquiry "to throw more light on the current of events contingent upon so important and so tragic an event in our military history. [108]

General officers commanding

AppointedNameNotes
30 September 1939 Major-General Thomas Dalby
30 November 1939Major-General Bernard Paget
20 April 1940 Brigadier Edward Backhouse Acting
14 May 1940Major-General Bernard Paget
27 May 1940Brigadier Geoffrey Franklyn Acting
1 June 1940Major-General Thomas Ralph Eastwood
9 June 1940Major-General Lionel Finch
14 July 1940Major-General Merton Beckwith-Smith Captured
15 February 1942 [2]

Order of battle

18th Infantry Division

53rd Infantry Brigade (30 September 1939 to 23 November 1941, then 30 January 1942 up to divisional surrender) [62]

  • 5th Battalion, Royal Norfolk Regiment
  • 6th Battalion, Royal Norfolk Regiment
  • 7th Battalion, Royal Norfolk Regiment (until 1 November 1939)
  • 2nd Battalion, Cambridgeshire Regiment (from 1 November 1939)
  • 53rd Infantry Brigade Anti-Tank Company (from 23 September until 14 November 1940)

54th Infantry Brigade [109]

  • 4th Battalion, Royal Norfolk Regiment
  • 4th Battalion, Suffolk Regiment
  • 5th Battalion, Suffolk Regiment
  • 54th Infantry Brigade Anti-Tank Company (from 7 October until 14 December 1940)

55th Infantry Brigade [110] [88]

  • 5th Battalion, Bedfordshire and Hertfordshire Regiment (until 10 February 1942)
  • 1st Battalion, Cambridgeshire Regiment
  • 2nd Battalion, Cambridgeshire Regiment (until 30 October 1939)
  • 1/5th Battalion, Sherwood Foresters (from 8 July 1940)
  • 55th Infantry Brigade Anti-Tank Company (from 9 September until 14 December 1940)

Divisional Troops

See also

Notes

Footnotes

  1. This is the war establishment, the on-paper strength of an infantry division during or after 1941 but before 1944; for information on how division sizes changed during the war, see British Army during the Second World War. [3]
  2. By 1939, the TA's intended role was to be the sole method of expanding the size of the British Armed Forces (compared to the creation of Kitchener's Army during the First World War). First-line territorial formations would create a second-line division using a cadre of trained personnel and, if needed, a third division would be created. All TA recruits were required to take the general service obligation: if the British government decided, territorial soldiers could be deployed overseas for combat. (This avoided the complications of the First World War-era Territorial Force, whose members were not required to leave Britain unless they volunteered for overseas service.) [10] [11] [12] [13]
  3. Following the evacuation at Dunkirk, 140,000 British soldiers remained in France. Most were lines-of-communication troops (including those organised as the Beauman Division), in addition to the 1st Armoured and the 51st (Highland) Infantry Divisions. The British government, determined to reinforce the French, prepared to dispatch a new BEF as soon as forces became available. The first wave of reinforcements would include the 1st Canadian Division and 52nd (Lowland) Infantry Division. Brooke and the vanguard arrived in Cherbourg on 12 June; the French suggested the formation of a national redoubt in Brittany, using the new BEF and whatever French forces could be mustered. With such a plan impractical, the French Army disintegrating and large numbers of the remaining British forces already evacuated, Brooke fought for an end to further deployments and withdrew what forces he could back to the United Kingdom. [40] [41]
  4. Middle East Command was required to establish the accommodation and logistical infrastructure needed to support a proposed 23 divisions based throughout Egypt and Palestine, build roads, increase port facilities, transport supplies and provide communications support in the Western Desert, East Africa, Greece, Crete, Syria and Lebanon, Iraq and Iran. All required manpower, including specialist units such as engineers, signallers, mechanics, medical staff, troops needed to guard prisoners of war, and other administrative forces. [51]

Citations

  1. Chappell 1987, p. 22.
  2. 1 2 3 4 5 6 7 8 9 10 11 12 13 14 15 16 17 Joslen 2003, p. 60.
  3. Joslen 2003, pp. 130–131.
  4. Smith 2005, p. 266.
  5. Bell 1997, pp. 3–4.
  6. Bell 1997, pp. 258–275.
  7. Bell 1997, pp. 277–278.
  8. Bell 1997, p. 281.
  9. 1 2 3 Gibbs 1976, p. 518.
  10. Allport 2015, p. 323.
  11. French 2001, p. 53.
  12. Perry 1988, pp. 41–42.
  13. Simkins 2007, pp. 43–46.
  14. Messenger 1994, p. 47.
  15. 1 2 Messenger 1994, p. 49.
  16. French 2001, p. 64.
  17. 1 2 Perry 1988, p. 48.
  18. Levy 2006, p. 66.
  19. "Badge, formation, 18th Infantry Division". Imperial War Museums. Archived from the original on 14 April 2015. Retrieved 16 March 2015.
  20. 1 2 Joslen 2003, p. 293.
  21. Joslen 2003, p. 294.
  22. Joslen 2003, p. 295.
  23. Joslen 2003, pp. 60–61.
  24. "No. 34680". The London Gazette (Supplement). 12 September 1939. p. 6241.
  25. "No. 34751". The London Gazette (Supplement). 12 December 1939. p. 8245.
  26. Collier 1957, p. 85.
  27. 1 2 Medley 1995, p. 277.
  28. Collier 1957, p. 219.
  29. 1 2 Atcherley 2012, p. 14.
  30. Joslen 2003, pp. 60 and 294.
  31. Fraser 1999, pp. 36–41.
  32. Fraser 1999, pp. 44–45.
  33. Ironside 1962, p. 406.
  34. Gibbs 1976, pp. 455, 507, 514–515.
  35. Joslen 2003, p. 66.
  36. Fraser 1999, pp. 72–77.
  37. Fraser 1999, pp. 83–85.
  38. Collier 1957, p. 125.
  39. Alanbrooke 2001, pp. 79, 738.
  40. Fraser 1999, pp. 72, 76–77.
  41. Ellis 1954, pp. 276, 299–301.
  42. "No. 34823". The London Gazette (Supplement). 2 April 1940. p. 1975.
  43. "No. 34877". The London Gazette (Supplement). 18 June 1940. p. 3765.
  44. Bull 2016, p. 36.
  45. Atcherley 2012, p. 17.
  46. 1 2 Atcherley 2012, p. 21.
  47. Collier 1957, pp. 219, 229.
  48. Atcherley 2012, pp. 23–24.
  49. Alanbrooke 2001, pp. 93, 172.
  50. Playfair et al. 2004b, p. 223.
  51. Playfair et al. 2004b, pp. 223–227.
  52. 1 2 Playfair et al. 2004b, p. 292.
  53. 1 2 3 4 Messenger 1994, p. 77.
  54. Stem 2012, pp. 61–62.
  55. Playfair et al. 2004a, p. 121.
  56. Tsang 2007, pp. 121–124.
  57. Playfair et al. 2004a, pp. 122–123.
  58. Brooke 1995, p. 22.
  59. Wigmore 1957, pp. 189–190.
  60. Joslen 2003, p. 61.
  61. Wigmore 1957, pp. 182–183, 221.
  62. 1 2 Joslen 2003, pp. 60, 293.
  63. Wigmore 1957, p. 221.
  64. 1 2 Fraser 1999, p. 192.
  65. Wigmore 1957, pp. 225, 237.
  66. Wigmore 1957, p. 230.
  67. 1 2 Wigmore 1957, p. 226.
  68. 1 2 Wigmore 1957, p. 231.
  69. Woodburn Kirby 2004, p. 309.
  70. Woodburn Kirby 2004, p. 311.
  71. Woodburn Kirby 2004, pp. 311, 314.
  72. Woodburn Kirby 2004, p. 315.
  73. Wigmore 1957, pp. 259–261.
  74. Wigmore 1957, p. 261.
  75. Wigmore 1957, pp. 261, 265.
  76. Wigmore 1957, p. 273.
  77. Jeffreys 2013, p. 25.
  78. Wigmore 1957, p. 294.
  79. Wigmore 1957, p. 254.
  80. Wigmore 1957, p. 289.
  81. Wigmore 1957, p. 293.
  82. Wigmore 1957, pp. 304–305.
  83. Wigmore 1957, p. 304.
  84. Wigmore 1957, p. 309.
  85. 1 2 Wigmore 1957, pp. 336, 357–358.
  86. 1 2 Atcherley 2012, pp. 70–71.
  87. Wigmore 1957, pp. 341–342.
  88. 1 2 Medley 1995, p. 278.
  89. Wigmore 1957, p. 339.
  90. 1 2 Wigmore 1957, pp. 352–353, 358–360.
  91. Woodburn Kirby 2004, p. 397.
  92. Atcherley 2012, p. 33.
  93. 1 2 Wigmore 1957, pp. 339, 350–352.
  94. Wigmore 1957, p. 359.
  95. Wigmore 1957, pp. 359–360.
  96. Wigmore 1957, pp. 361–364.
  97. Wigmore 1957, pp. 369, 374.
  98. Connelly 2012, p. 347.
  99. Wigmore 1957, p. 373.
  100. Wigmore 1957, pp. 377–378.
  101. Connelly 2012, pp. 347–348.
  102. Atcherley 2012, p. 73 ff.
  103. Davies 2012, p. 209; Bradley 1984, p. 129; Felton 2008, p. 134.
  104. 1 2 Wigmore 1957, pp. 450–451.
  105. Wigmore 1957, pp. 449–451.
  106. Farrell 2004, pp. 215–216.
  107. Weinberg 1994, p. 318.
  108. Medley 1995, p. 277; Davies 2012, p. 209.
  109. Joslen 2003, pp. 60, 294.
  110. Joslen 2003, pp. 60, 295.
  111. Smith 2005, p. 434.

Related Research Articles

<span class="mw-page-title-main">53rd (Welsh) Infantry Division</span> World War-era British Army formation

The 53rd (Welsh) Infantry Division was an infantry division of the British Army that fought in both the First and Second World Wars. Originally raised in 1908 as the Welsh Division, part of the Territorial Force (TF), the division saw service in First World War, being designated 53rd (Welsh) Division in mid-1915, and fought in the Gallipoli Campaign and in the Middle East. Remaining active in the Territorial Army (TA) during the interwar period as a peacetime formation, the division again saw action in Second World War, fighting in North-western Europe from June 1944 until May 1945.

<span class="mw-page-title-main">8th Division (Australia)</span> Former infantry division of the Australian Army

The 8th Division was an infantry division of the Australian Army, formed during World War II as part of the all-volunteer Second Australian Imperial Force. The 8th Division was raised from volunteers for overseas service from July 1940 onwards. Consisting of three infantry brigades, the intention had been to deploy the division to the Middle East to join the other Australian divisions, but as war with Japan loomed in 1941, the division was divided into four separate forces, which were deployed in different parts of the Asia-Pacific region. All of these formations were destroyed as fighting forces by the end of February 1942 during the fighting for Singapore, and in Rabaul, Ambon, and Timor. Most members of the division became prisoners of war, waiting until the war ended in late 1945 to be liberated. One in three died in captivity.

<span class="mw-page-title-main">1st (African) Division</span> Military unit

The 1st (African) Division was a British Empire colonial unit during the Second World War. The division was formed on 24 July 1940 in East Africa. On 24 November of that year, the division was re-designated as the British Army's 11th (African) Division. The division were composed primarily of West African and East African troops. It was disbanded on 23 November 1941 and its component units reassigned.

<span class="mw-page-title-main">Fall of Singapore</span> 1942 World War II battle; Japanese victory

The fall of Singapore, also known as the Battle of Singapore, took place in the South–East Asian theatre of the Pacific War. The Japanese Empire captured the British stronghold of Singapore, with fighting lasting from 8 to 15 February 1942. Singapore was the foremost British military base and economic port in South–East Asia and had been of great importance to British interwar defence strategy. The capture of Singapore resulted in the largest British surrender in its history.

<span class="mw-page-title-main">9th (Highland) Infantry Division</span> Military unit

The 9th (Highland) Infantry Division was an infantry division of the British Army, formed just prior to the start of the Second World War. In March 1939, after the re-emergence of Germany as a significant military power and its occupation of Czechoslovakia, the British Army increased the number of divisions in the Territorial Army (TA) by duplicating existing units. The 9th (Highland) was formed in August 1939, as a second-line duplicate of the 51st (Highland) Infantry Division. The division's battalions were all raised in the Scottish Highlands.

<span class="mw-page-title-main">2/18th Battalion (Australia)</span> Military unit

The 2/18th Battalion was an Australian Army infantry unit that served during World War II. Formed in June 1940, the battalion was assigned to the 22nd Brigade, which formed part of the Australian 8th Division. After completing basic training, the 2/18th was sent to Singapore and Malaya to strengthen the defences of the British colonies in February 1941 against a possible Japanese attack. The 2/18th Battalion subsequently undertook garrison duties throughout the year at various locations in Malaya, where it conducted jungle training and constructed defences along the eastern coast.

<span class="mw-page-title-main">59th (Staffordshire) Infantry Division</span> Second World War British Army unit

The 59th (Staffordshire) Infantry Division was an infantry division of the British Army that was formed during the Second World War and fought in the Battle of Normandy. In March 1939, after Germany re-emerged as a significant military power and invaded Czechoslovakia, the British Army increased the number of divisions in the Territorial Army (TA) by duplicating existing units. The 59th (Staffordshire) Motor Division was formed in September 1939, as a second-line duplicate of the 55th Motor Division. The division's battalions were all, initially, raised in Staffordshire.

<span class="mw-page-title-main">45th Infantry Division (United Kingdom)</span> Infantry division of the British Army

The 45th Infantry Division was an infantry division of the British Army, formed just prior to the start of the Second World War. In March 1939, after the re-emergence of Germany as a significant military power and its occupation of Czechoslovakia, the British Army increased the number of divisions in the Territorial Army (TA) by duplicating existing units. The 45th started forming in August 1939 and became active the following month, as a second-line duplicate of the 43rd (Wessex) Infantry Division. The division's battalions were all raised in the West Country.

<span class="mw-page-title-main">47th (London) Infantry Division</span> Military unit

The 47th (London) Infantry Division was an infantry division of the British Army that was formed during the Second World War and remained in the United Kingdom until the end of the war. In March 1939, after the re-emergence of Germany as a significant military power and its occupation of Czechoslovakia, the British Army increased the number of divisions in the Territorial Army (TA) by duplicating existing units. The 2nd London Division was formed in August 1939 as a second-line duplicate of the 1st London Division; its battalions were all initially London-based.

<span class="mw-page-title-main">61st Infantry Division (United Kingdom)</span> Infantry division of the British Army, raised 1939

The 61st Infantry Division was an infantry division of the British Army, raised in 1939 as part of the expansion of the Territorial Army in response to the German occupation of Czechoslovakia. The division was created as a duplicate of the 48th Infantry Division, and was assigned to home defence duties.

<span class="mw-page-title-main">Battle of Muar</span> Battle of the Malayan Campaign in World War II

The Battle of Muar was the last major battle of the Malayan Campaign during the Second World War. It took place from 14–22 January 1942 around Gemensah Bridge and on the Muar River. After the British defeat at Slim River, General Archibald Wavell, commander of ABDA, decided that Lieutenant General Lewis Heath's III Indian Corps should withdraw 240 kilometres (150 mi) south into the State of Johore to rest and regroup, while the 8th Australian Division would attempt to stop the Japanese advance.

<span class="mw-page-title-main">Battle of Kranji</span> Battle by Japans invasion of Singapore during the Second World War

The Battle of Kranji was the second stage of the Empire of Japan's plan for the invasion of Singapore during the Second World War. On 9 February 1942 the Imperial Japanese Army assaulted the north-western front of Singapore, capital of the Straits Settlements.

The 27th Brigade was a brigade-sized infantry unit of the Australian Army. The brigade was the last Second Australian Imperial Force infantry brigade raised for service during World War II. Initially assigned to the 9th Division, the brigade was transferred to the 8th Division shortly after it was raised. Training was undertaken around Bathurst, New South Wales throughout early 1941, before the brigade was sent to British Malaya in August 1941 to reinforce the 22nd Brigade, which had been dispatched earlier in the year. Following the Japanese invasion of Malaya, the brigade went into action in January 1942, taking part in the fighting along the western side of the Malay Peninsula. Its main action during this period came around Muar before the withdrawal to Singapore. In February, the brigade took part in the short lived Battle of Singapore. When the garrison surrendered on 15 February, the majority of the brigade's personnel were taken prisoner. They subsequently spent the remainder of the war in captivity before being released in August 1945.

<span class="mw-page-title-main">22nd Brigade (Australia)</span> Infantry brigade of the Australian Army during World War II

The 22nd Brigade was a brigade-sized infantry unit of the Australian Army. It was briefly raised in 1912 as a Militia formation providing training as part of the compulsory training scheme. Later, during World War II, the brigade was raised as part of the all volunteer Second Australian Imperial Force in April 1940. Assigned to the 8th Division, in early 1941 the brigade was deployed to British Malaya where it formed part of the defensive garrison that was established there by the British, eventually establishing its headquarters in the Mersing–Endau area.

<span class="mw-page-title-main">2/26th Battalion (Australia)</span> Infantry battalion of the Australian Army

The 2/26th Battalion was an infantry battalion of the Australian Army. Raised in late 1940 for service during the Second World War, the battalion undertook garrison duties in Malaya and Singapore prior to the start of the Pacific War. In 1941–42, following the Japanese invasion of Malaya, the battalion fought during the Malayan campaign. After the fall of the island, however, many of its soldiers became prisoners of war, remaining in captivity until being liberated at the end of the war in 1945. The battalion was never re-raised.

<span class="mw-page-title-main">2/4th Machine Gun Battalion (Australia)</span> Australian Army unit

The 2/4th Machine Gun Battalion was an Australian Army unit raised for service with the all volunteer Second Australian Imperial Force during the Second World War. Formed in late 1940 as part of the 8th Division, the battalion was established to provide direct fire support to the division's infantry brigades. It was the fourth, and last, such unit raised within the 2nd AIF. The unit's personnel were largely drawn from the state of Western Australia and after formation, the battalion concentrated near Perth for basic individual training before moving to the Adelaide Hills to complete more advance manoeuvres.

<span class="mw-page-title-main">2/29th Battalion (Australia)</span> Military unit

The 2/29th Battalion was an infantry battalion of the Australian Army, which served during the Second World War. Formed in October 1940, the battalion served in Malaya as part of the 27th Brigade, which was assigned to the 8th Division. Recruited mainly from volunteers drawn from the state of Victoria, after completing its training around Bonegilla and then Bathurst, the 2/29th Battalion was sent to Malaya in August 1941 along with the rest of the 27th Brigade to bolster the Australian force there and subsequently fought in the Malayan Campaign following the Japanese attack in December 1941. The battalion fought several delaying actions along the west coast, including fighting around Bakri and Muar, and in Johore, before Allied forces withdrew across the Causeway to Singapore. The battalion later took part in the defence of Singapore in February 1942, but was captured after the garrison capitulated on 15 February. They spent the remainder of the war as prisoners of war, with many dying in captivity.

<span class="mw-page-title-main">12th (Eastern) Infantry Division</span> Infantry division of the British Army in the Second World War

The 12th (Eastern) Infantry Division was an infantry division of the British Army, which fought briefly in the Battle of France during the Second World War. In March 1939, after the re-emergence of Germany as a European power and its occupation of Czechoslovakia, the British Army increased the number of divisions within the Territorial Army by duplicating existing units. The 12th (Eastern) Infantry Division was formed in October 1939, as a second-line duplicate of the 44th Infantry Division.

The 2/21st Battalion was an infantry battalion of the Australian Army. Raised for service during Second World War as part of the Second Australian Imperial Force, it was formed on 11 July 1940 at Trawool in central Victoria as part of the 23rd Brigade of the 8th Division. It was subsequently deployed to Ambon as part of Gull Force in December 1941 following the Japanese invasion of Malaya; however, with the defence of the island considered untenable due to the limited military resources available and overwhelming Japanese strength it was subsequently captured despite determined resistance, surrendering on 3 February 1942. Most members of the battalion became prisoners of war, and a large number died in captivity.

<span class="mw-page-title-main">135th (East Anglian) (Hertfordshire Yeomanry) Field Regiment, Royal Artillery</span> Military unit

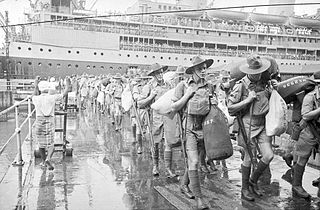
135th Field Regiment was a Royal Artillery (RA) unit being formed in Britain's part-time Territorial Army (TA) on the outbreak of World War II. Spun off from an existing unit, it took over two batteries from Hertfordshire and Northamptonshire and was later granted the double subtitle '(East Anglian) '. As part of the 18th Infantry Division the regiment remained in the United Kingdom until 1941 when it was sent to India. The division was deployed to Fortress Singapore where it was captured by the Japanese. Some of the prisoners were murdered in cold blood, many of the others died working on the Burma Railway. The regiment was never reformed.

References