The 63rd (Royal Naval) Division was a United Kingdom infantry division of the First World War. It was originally formed as the Royal Naval Division at the outbreak of the war, from Royal Navy and Royal Marine reservists and volunteers, who were not needed for service at sea. For RN personnel, the designation HMS Victory IV was used. The division fought at Antwerp in 1914 and at Gallipoli in 1915. In 1916, following many losses among the original naval volunteers, the division was transferred to the British Army as the 63rd (Royal Naval) Division, re-using the number from the disbanded second-line 63rd (2nd Northumbrian) DivisionTerritorial Force. As an Army formation, it fought on the Western Front for the remainder of the war.
When the war began, a Marine Brigade of four infantry battalions was formed from men of the Royal Marine Light Infantry and Royal Marine Artillery. The brigade was to be an Advanced Base Force, according to a pre-war plan to furnish the Admiralty with a means to take, fortify or defend temporary naval bases for fleet operations or the supply of army field forces. The recruits included regular marines and those mobilised from the Fleet Reserve; each battalion was drawn from one of the big naval depot ports—Chatham, Portsmouth, Plymouth and Deal—and named accordingly.[1][2]
Royal Naval Division
On 16 August, Winston Churchill the First Lord of the Admiralty, decided to embody two more naval brigades with surplus men of the Naval Reserve, to join with the Marine Brigade to produce a composite Royal Naval Division. A few petty officers and ratings were transferred from the navy to provide a cadre and some officers were provided by the army but most of the recruits were reservists or men who had volunteered on the outbreak of war. The eight battalions were named after naval commanders, Drake, Benbow, Hawke, Collingwood, Nelson, Howe, Hood and Anson, later being numbered from 1st to 8th. The division was not provided with medical, artillery or engineer units, consisting solely of lightly equipped infantry. Many of the trained men were then reclaimed for fleet service and recruits were taken over at the request of the War Office, from oversubscribed north country regiments. Training was slow, except for the Marine Brigade which had its own infrastructure, because resources were needed for the rapid expansion of the army and naval ratings were not issued with field equipment or khaki uniforms before being embarked for overseas service.[3] On 26 August, the Marine Brigade was sent to Ostend to reinforce the Belgian garrison, after German cavalry had appeared in the area. The brigade returned on 1 September after the scare subsided and on 3 September the Admiralty decided to train the two Naval Reserve brigades as infantry, to form an infantry division with the Marine Brigade.[4] Rifles were drawn from Royal Navy stocks and only arrived at the end of September; these were older Charger-Loading Lee–Enfields rather than the modern Short Magazine Lee–Enfields issued to the army.[5]
Belgium
Ostend
Recruiting poster
Following early Belgian and Entente defeats in the German invasion of Belgium and cut off from the rest of the Allies by the German advance, the majority of the Belgian army fell back towards the fortified port of Antwerp, in late August 1914. Belgian troops were also withdrawn from ports along the Belgian coast. The Admiralty wanted to deny the Germans submarine bases in Belgian ports for operations in the English Channel. On 24 August, German cavalry patrols were reported near Ostend and it was decided to land a small naval detachment to secure the town. Further south, the French armies and the British Expeditionary Force (BEF) conducted the Retreat from Mons, with the German armies driving south-west after them, leaving very few units to guard lines of communication. The Admiralty planned to use the Channel ports as a base to attack German land supply routes, with the Royal Marine Brigade forming the basis of a landing force.[6]
Deal Battalion was still assembling, so only Chatham, Portsmouth and Plymouth battalions were sent to Flanders; two landing at Ostend in the early morning of 27 August and the other the next day. They were ordered to hold the town until Belgian troops who had retreated into France could be transferred and 4,000 Belgian troops arrived on 30 August.[6] The rapid Allied retreat led the War Office to decide that supplies would have to be brought through ports in western France, as the existing arrangements in the Pas de Calais ports were too exposed. This would be more demanding on naval escort ships, leaving too few to support the force at Ostend. The Marines were re-embarked on 31 September and returned to their ports.[7]
The "Race to the Sea" in September–October 1914; the final position of the front-line is west of Ostend. Antwerp is marked by a circle on the right.
The division participated in the Siege of Antwerp. The Royal Marine Brigade arrived opposite Lier in requisitioned London buses on 4 October and occupied a position around the northern fringe of Lier, which turned out to be sections of a shallow trench between hedgerows, with one strand of wire in front.[8] The two naval brigades arrived early on 6 October to reinforce the Marine Brigade but were diverted to forts 1 to 8 of the inner ring, where the trenches were again found to be shallow and the ground cleared for 500 yards (460m) in front, which made them easily visible to German artillery observers.[9] On the night of 6/7 October, intervening trenches between forts 2 and 7 were occupied by the two naval brigades and the 4th and 7th Fortress regiments, with the Belgian 2nd Division and the Marine Brigade in reserve. The British forces under the command of Major-General Archibald Paris were ordered by Winston Churchill to continue the defence for as long as possible and to be ready to cross to the west bank (near The Netherlands frontier) rather than surrender.[10]
The Belgian commanders decided to continue the defence of Antwerp with the garrison troops and move the 2nd Division and the British troops across the Scheldt; it was decided that if forts 1 and 2 were lost, the Royal Naval Division would withdraw at dusk. News arrived that the forts had fallen at 5:00 p.m. and orders were sent to the 2nd Division and the British for a retirement, which began at 7:00 p.m. but the orders failed to reach all of the 1st Naval Brigade, only one battalion of which withdrew. The 2nd Naval Brigade, three of the four Royal Marine battalions and Drake Battalion of the 1st Naval Brigade withdrew with Major-General Paris. They initially marched from the rendezvous at Zwijndrecht to Beveren, where it was believed that trains to Ostend were available. On arrival at that location, it turned out that the railhead had moved to Sint-Gillis-Waas, six miles (9.6km) further west. After a slow and disorganised march, this station was reached and this body of the RND safely returned to their camp at Deal after the crossing from Ostend.
At 9:30 p.m. on October 8th, the error with the delivery of orders was realised by the remaining portion of the RND. This remainder - three battalions of the 1st Naval Brigade and the Portsmouth battalion of the Marine Brigade under Commodore Wilfred Henderson, began to cross the river from 10:00–11:30 p.m. and moved west, parallel to the Netherlands frontier. The 1st Naval Brigade reached the Scheldt at midnight, only to find that the bridges were being demolished and under a German shrapnel bombardment. The troops crossed using barges and boats and set out for a rendezvous at Zwijndrecht, which was reached at 4:00 a.m. on 9 October.
Now aware of the railway situation, and with reports of a German encircling manoeuvre being made from the south west, the RND marched to Sint-Gillis-Waas. The organisation of this march of around 10 miles (16km) became increasingly poor due to the men's fatigue, poor morale and navigation errors caused by lack of accurate maps and understanding of the country. The march broke up into several different formations proceeding by separate roads or cross-country. Trains were arranged and men embarked as they arrived, but before they could depart came information that the German advance had captured the railway station at Moerbeke, westward along the railway line between Sint-Gillis-Waas and Ostend. Deciding there was no alternative, Commodore Henderson marched his formation for the Dutch border to the north and at 10:00 p.m. about 1,500 men, half the original complement, were interned as the crossed into neutral territory. About forty sailors managed to break off from the main group or escape Dutch confinement, sneak along the border and join up with the Paris and the 2nd Brigade before it left Ostend.[11] The other men were to spend the rest of the war at Groningen, where they were held in a camp they dubbed HMS Timbertown, a name inspired by the wooden huts where they were quartered.[12]
The Portsmouth battalion of the Marine Brigade had been ordered to act as a rearguard for the 1st Naval Brigade's withdrawal. This unit made for the railway at Sint-Niklaas. With no trains to be found there, they made for Kemzeke (the station west along the line from Sint-Gillis-Waas). On this march they encountered several hundred sailors (predominantly of Collingwood and Hawke Battalions) who had become separated from the main formation during their march and were lost. This ad-hoc unit of about 800 men boarded trains at Kemzeke, but did not know that the Germans had captured Moerbeke, which they had to pass through. Their train was derailed as it entered that village and a brief exchange of fire occurred. Around 200 men (predominantly Royal Marines) held back the German attack, broke away and then marched cross-country to pick up a train to Ostend at Zelzate. Approximately 550 were captured by the Germans either at Moerbeke or nearby after trying to escape back along the railway line.
The division was shipped to Egypt and fought at the Battle of Gallipoli at Anzac Cove and Cape Helles.[13] Casualties before the campaign began included Rupert Brooke, who died at sea from an infected mosquito bite on 23 April 1915.[14] The RND was one of two British divisions (the other being the regular 29th Division) at the Gallipoli landings. Eleven troopships and Canopus, Dartmouth and Doris, two destroyers and trawlers rendezvoused off Bulair before dawn and the warships began a day-long bombardment, just after daybreak. A destroyer made a close pass off the beach and later on, ships' boats were swung out from the troopships and lines of eight cutters pulled by a trawler made as if to land. In the late afternoon men began to embark on the boats, which headed for the shore just before dark and returned after night fell. During the night Lieutenant-Commander Bernard Freyberg swam ashore and lit flares along the beach, crept inland and observed the Ottoman defences. Freyberg found that the defences were dummies and returned safely to report. Just after dawn, the decoy force sailed south to join the main landings, coming ashore on 30 April.[15]
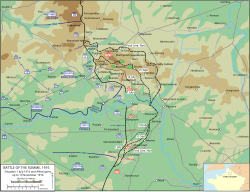
After the evacuation of Gallipoli, the RND moved to France where it participated in the final phase of the Battle of the Somme, advancing along the River Ancre to capture Beaucourt. The division had four objectives during the Battle of Ancre, the Dotted Green Line, the German front trench, then the Green Line, the road to Beaucourt station. The road ran along a fortified ridge. The Yellow Line was a trench which lay beyond the road, around the remains of Beaucourt on its south-west edge and the final objective, the Red Line, was beyond Beaucourt, where the division was to consolidate.[16]
The plan was for the battalions to leap-frog towards the final objective. The 1st RMLI, Howe, Hawke and Hood battalions were assigned the Dotted Green Line and the Yellow Line, the 2nd RMLI, Anson, Nelson and Drake battalions were to take the Green and Red lines. When the battle began in the early hours of 13 November, platoons from the 1st RMLI crawled across no-man's land towards the German line. A creeping barrage was fired by the British artillery but many casualties were suffered in no-man's land, about 50 percent of the total casualties occurring before the first German trench had been captured.[17] German artillery-fire and machine-gun fire was so effective that all company commanders of 1st RMLI were killed before reaching the first objective.[18]
The German trenches had been severely damaged by the British bombardment, the attackers lost direction and leap-frogging broke down. The commander and second-in-command of Drake Battalion were killed and Hawke battalion lost its commander and several company commanders.[19] Freyberg, having been promoted to temporary lieutenant-colonel and command of Hood Battalion, led it to the Green Line and pressed forward with the remaining men of Drake Battalion. The station road served as a landmark and allowed the attackers to orientate themselves and re-organise the attack. The next creeping barrage began on time at 7:30 a.m., and led the British towards the Yellow Line at Beaucourt Station.[20] Nelson, Hawke and Howe battalions had suffered many casualties; Lieutenant-Colonel Burge, Commanding Officer of Nelson Battalion, was killed whilst attacking a fortified section of the Dotted Green Line and Lieutenant-Colonel Wilson DSO, Commanding Officer of Hawke Battalion, was severely wounded attacking the same objective. Lieutenant-Colonel Saunders, Commanding Officer of Anson Battalion, was killed early in the battle[21] but Anson Battalion still managed to capture the Green Line and advance to the Yellow Line, after making contact with the 51st Highland Division to its left.[22] By 10:30 p.m. Beaucourt had been captured.[20]
On 17 October, just before the Battle of the Ancre, Paris was wounded and replaced by Major-General Cameron Shute. Shute was appalled by the un-military "nautical" traditions of the division and made numerous unpopular attempts to stamp out negligent hygiene practices and failures to ensure that weapons were kept clean.[23] Following a particularly critical inspection of the trenches, Sub-Lieutenant A. P. Herbert (later a humorist, legal satirist and Member of Parliament), wrote
"... that shit Shute."
The General inspecting the trenches Exclaimed with a horrified shout "I refuse to command a division Which leaves its excreta about".
But nobody took any notice No one was prepared to refute, That the presence of shit was congenial Compared to the presence of Shute.
And certain responsible critics Made haste to reply to his words Observing that his staff advisors Consisted entirely of turds.
For shit may be shot at odd corners And paper supplied there to suit, But a shit would be shot without mourners If somebody shot that shit Shute.[24]
On the north bank of the Ancre, the 63rd Division attacked on 17 February, with the 188th Brigade and two battalions of the 189th Brigade, to capture 700 yards (640m) of the road north from Baillescourt Farm towards Puisieux, to gain observation over Miraumont and form a defensive flank on the left, back to the existing front line. Two battalions attacked with a third battalion ready on the right flank, to reinforce them or to co-operate with the 18th Division between the Ancre and the Miraumont road. On the northern flank two infantry companies, engineers and pioneers were placed to establish the defensive flank on the left. The divisional artillery and an army field brigade with 54 × 18-pounder field guns and 18 × 4.5-inch howitzers provided covering fire, with three field batteries from the 62nd Division further north, to place a protective barrage along the northern flank. The darkness, fog and mud were as bad as on the south bank but the German defence was far less effective. The creeping barrage moved at 100 yards (91m) in four minutes, slower than the rate on the south bank and the Germans in a small number of strong-points were quickly overcome. The objective was reached by 6:40 a.m. and the defensive flank established, the last German strong-point being captured at 10:50 a.m. A German counter-attack the next day was stopped by artillery-fire. The 63rd Division lost 549 casualties and the three attacking divisions took 599 prisoners.[25]
The division arrived at Ypres just before the Second Battle of Passchendaele (26 October – 10 November).[26] On 26 October, Immediately to the north of the Canadian Corps, the supporting attack by XVIII Corps involved one brigade each from the 63rd and 58th divisions. The 188th Brigade, of the 63rd Division quickly captured Varlet Farm and Banff House. The centre of the attack was held up on the road between Bray Farm and the village of Wallemolen and the troops dug-in near Source Trench. As dark fell, Banff House was abandoned and the line reformed at Berks House, leaving Banff House and Source Trench the only part of the first objective not occupied.[27] On 30 October, the 63rd Division infantry were caught by German artillery fire at their jumping-off line and made only slight progress in deep mud against German machine-gun fire. The infantry were unable to reach their rendezvous with the Canadians, leaving their troops at Source Farm and Vapour Farm in precarious positions.[28] Two companies later advanced through the Canadian sector to capture Source Trench but were only able to reinforce the Canadian outpost at Source Farm, then form a defensive flank to Vapour Farm. The 63rd Division had 3,126 casualties from 26–31 October.[29] The division was able to close up to the Paddebeek by attacking at night from 1/2–4/5 November, a method which took more ground than its attacks in October, for a loss of 14 killed and 148 wounded.[30]
Orders of battle
Gallipoli | France
Organisation details are taken from The British Army in the Great War unless otherwise noted.[5] The division initially comprised eight naval battalions, named after British naval commanders (Anson, Benbow, Collingwood, Drake, Hawke, Hood, Howe and Nelson), plus the Royal Marine Brigade of four battalions from the Royal Marine dépôts at the ports of Deal, Chatham, Portsmouth and Plymouth.[31] Other than a small detachment of Royal Engineers, it had no supporting elements during 1914. It developed a more complex structure before being sent to the Mediterranean and during the Gallipoli campaign, losses forced extensive reorganisation of the brigades.[5]
Organisation at Gallipoli, April 1915
Organisation in April 1915, prior to landing at Gallipoli. Note that the division did not contain any artillery units at this point.
The 1916 reorganisation reduced the division to two brigades of naval infantry and one army brigade. There were changes among the army units. In the 190th Brigade, the Royal Dublin Fusiliers and Honourable Artillery Company battalions were replaced with the 1/28th London Regiment (Artists Rifles) and the 1/4th King's Shropshire Light Infantry during 1917 and the 2nd Royal Irish Regiment joined the 188th Brigade in 1918.[5] Due to the losses the division suffered at Passchendaele and Welsh Ridge, the Howe and Nelson battalions were disbanded with the personnel absorbed into the remaining naval battalions.[32]
Aspinall-Oglander, C. F. (1929). Military Operations Gallipoli: Inception of the Campaign to May 1915. History of the Great War Based on Official Documents by Direction of the Historical Section of the Committee of Imperial Defence. Vol.I (1sted.). London: Heinemann. OCLC464479053.
Corbett, J. S. (2009) [1938]. Naval Operations. History of the Great War based on Official Documents. Vol.I (2nd repr. Imperial War Museum and Naval & Military Pressed.). London: Longmans, Green. ISBN978-1-84342-489-5. Retrieved 27 December 2014.
Edmonds, J. E. (1925). Military Operations France and Belgium, 1914: Antwerp, La Bassée, Armentières, Messines and Ypres October–November 1914. History of the Great War Based on Official Documents by Direction of the Historical Section of the Committee of Imperial Defence. Vol.II (1sted.). London: Macmillan. OCLC220044986.
Falls, C. (1992) [1940]. Military Operations France and Belgium 1917: The German Retreat to the Hindenburg Line and the Battles of Arras. History of the Great War Based on Official Documents by Direction of the Historical Section of the Committee of Imperial Defence. Vol.I (Imperial War Museum and Battery Pressed.). London: HMSO. ISBN0-89839-180-6.
Sellers, Leonard (1995). The Hood Battalion. Barnsley: Pen and Sword Books. ISBN978-1-84468-008-5.
Thompson, J. (2001). The Royal Marines, From Sea Soldiers to a Special Force. London: Pan Books. ISBN0-33037-702-7.
Websites
Baker, C. (1996–2010). "The 63rd (Royal Naval) Division in 1914–1918". The Long Long Trail: The British Army in the Great War of 1914–1918. Chris Baker/Milverton Associates. Retrieved 2 January 2015.
Bashton, N.S. (2015). "Royal Naval Division .info". Royal Naval Division .info. NS Bashton. Retrieved 25 April 2015.
This page is based on this Wikipedia article Text is available under the CC BY-SA 4.0 license; additional terms may apply. Images, videos and audio are available under their respective licenses.