Calibration

Last updated

In measurement technology and metrology, calibration is the comparison of measurement values delivered by a device under test with those of a calibration standard of known accuracy. Such a standard could be another measurement device of known accuracy, a device generating the quantity to be measured such as a voltage, a sound tone, or a physical artifact, such as a meter ruler.

Contents

The outcome of the comparison can result in one of the following:

Strictly speaking, the term "calibration" means just the act of comparison and does not include any subsequent adjustment.

The calibration standard is normally traceable to a national or international standard held by a metrology body.

BIPM Definition

The formal definition of calibration by the International Bureau of Weights and Measures (BIPM) is the following: "Operation that, under specified conditions, in a first step, establishes a relation between the quantity values with measurement uncertainties provided by measurement standards and corresponding indications with associated measurement uncertainties (of the calibrated instrument or secondary standard) and, in a second step, uses this information to establish a relation for obtaining a measurement result from an indication." [1]

This definition states that the calibration process is purely a comparison, but introduces the concept of measurement uncertainty in relating the accuracies of the device under test and the standard.

Modern calibration processes

The increasing need for known accuracy and uncertainty and the need to have consistent and comparable standards internationally has led to the establishment of national laboratories. In many countries a National Metrology Institute (NMI) will exist which will maintain primary standards of measurement (the main SI units plus a number of derived units) which will be used to provide traceability to customer's instruments by calibration.

The NMI supports the metrological infrastructure in that country (and often others) by establishing an unbroken chain, from the top level of standards to an instrument used for measurement. Examples of National Metrology Institutes are NPL in the UK, NIST in the United States, PTB in Germany and many others. Since the Mutual Recognition Agreement was signed it is now straightforward to take traceability from any participating NMI and it is no longer necessary for a company to obtain traceability for measurements from the NMI of the country in which it is situated, such as the National Physical Laboratory in the UK.

Quality of calibration

To improve the quality of the calibration and have the results accepted by outside organizations it is desirable for the calibration and subsequent measurements to be "traceable" to the internationally defined measurement units. Establishing traceability is accomplished by a formal comparison to a standard which is directly or indirectly related to national standards (such as NIST in the USA), international standards, or certified reference materials. This may be done by national standards laboratories operated by the government or by private firms offering metrology services.

Quality management systems call for an effective metrology system which includes formal, periodic, and documented calibration of all measuring instruments. ISO 9000 [2] and ISO 17025 [3] standards require that these traceable actions are to a high level and set out how they can be quantified.

To communicate the quality of a calibration the calibration value is often accompanied by a traceable uncertainty statement to a stated confidence level. This is evaluated through careful uncertainty analysis. Some times a DFS (Departure From Spec) is required to operate machinery in a degraded state. Whenever this does happen, it must be in writing and authorized by a manager with the technical assistance of a calibration technician.

Measuring devices and instruments are categorized according to the physical quantities they are designed to measure. These vary internationally, e.g., NIST 150-2G in the U.S. [4] and NABL-141 in India. [5] Together, these standards cover instruments that measure various physical quantities such as electromagnetic radiation (RF probes), sound (sound level meter or noise dosimeter), time and frequency (intervalometer), ionizing radiation (Geiger counter), light (light meter), mechanical quantities (limit switch, pressure gauge, pressure switch), and, thermodynamic or thermal properties (thermometer, temperature controller). The standard instrument for each test device varies accordingly, e.g., a dead weight tester for pressure gauge calibration and a dry block temperature tester for temperature gauge calibration.

Instrument calibration prompts

Calibration may be required for the following reasons:

In general use, calibration is often regarded as including the process of adjusting the output or indication on a measurement instrument to agree with value of the applied standard, within a specified accuracy. For example, a thermometer could be calibrated so the error of indication or the correction is determined, and adjusted (e.g. via calibration constants) so that it shows the true temperature in Celsius at specific points on the scale. This is the perception of the instrument's end-user. However, very few instruments can be adjusted to exactly match the standards they are compared to. For the vast majority of calibrations, the calibration process is actually the comparison of an unknown to a known and recording the results.

Basic calibration process

Purpose and scope

The calibration process begins with the design of the measuring instrument that needs to be calibrated. The design has to be able to "hold a calibration" through its calibration interval. In other words, the design has to be capable of measurements that are "within engineering tolerance" when used within the stated environmental conditions over some reasonable period of time. [6] Having a design with these characteristics increases the likelihood of the actual measuring instruments performing as expected. Basically, the purpose of calibration is for maintaining the quality of measurement as well as to ensure the proper working of particular instrument.

Frequency

The exact mechanism for assigning tolerance values varies by country and as per the industry type. The measuring of equipment is manufacturer generally assigns the measurement tolerance, suggests a calibration interval (CI) and specifies the environmental range of use and storage. The using organization generally assigns the actual calibration interval, which is dependent on this specific measuring equipment's likely usage level. The assignment of calibration intervals can be a formal process based on the results of previous calibrations. The standards themselves are not clear on recommended CI values: [7]

ISO 17025 [3]
"A calibration certificate (or calibration label) shall not contain any recommendation on the calibration interval except where this has been agreed with the customer. This requirement may be superseded by legal regulations.”
ANSI/NCSL Z540 [8]
"...shall be calibrated or verified at periodic intervals established and maintained to assure acceptable reliability..."
ISO-9001 [2]
"Where necessary to ensure valid results, measuring equipment shall...be calibrated or verified at specified intervals, or prior to use...”
MIL-STD-45662A [9]
"... shall be calibrated at periodic intervals established and maintained to assure acceptable accuracy and reliability...Intervals shall be shortened or may be lengthened, by the contractor, when the results of previous calibrations indicate that such action is appropriate to maintain acceptable reliability."

Standards required and accuracy

The next step is defining the calibration process. The selection of a standard or standards is the most visible part of the calibration process. Ideally, the standard has less than 1/4 of the measurement uncertainty of the device being calibrated. When this goal is met, the accumulated measurement uncertainty of all of the standards involved is considered to be insignificant when the final measurement is also made with the 4:1 ratio. [10] This ratio was probably first formalized in Handbook 52 that accompanied MIL-STD-45662A, an early US Department of Defense metrology program specification. It was 10:1 from its inception in the 1950s until the 1970s, when advancing technology made 10:1 impossible for most electronic measurements. [11]

Maintaining a 4:1 accuracy ratio with modern equipment is difficult. The test equipment being calibrated can be just as accurate as the working standard. [10] If the accuracy ratio is less than 4:1, then the calibration tolerance can be reduced to compensate. When 1:1 is reached, only an exact match between the standard and the device being calibrated is a completely correct calibration. Another common method for dealing with this capability mismatch is to reduce the accuracy of the device being calibrated.

For example, a gauge with 3% manufacturer-stated accuracy can be changed to 4% so that a 1% accuracy standard can be used at 4:1. If the gauge is used in an application requiring 16% accuracy, having the gauge accuracy reduced to 4% will not affect the accuracy of the final measurements. This is called a limited calibration. But if the final measurement requires 10% accuracy, then the 3% gauge never can be better than 3.3:1. Then perhaps adjusting the calibration tolerance for the gauge would be a better solution. If the calibration is performed at 100 units, the 1% standard would actually be anywhere between 99 and 101 units. The acceptable values of calibrations where the test equipment is at the 4:1 ratio would be 96 to 104 units, inclusive. Changing the acceptable range to 97 to 103 units would remove the potential contribution of all of the standards and preserve a 3.3:1 ratio. Continuing, a further change to the acceptable range to 98 to 102 restores more than a 4:1 final ratio.

This is a simplified example. The mathematics of the example can be challenged. It is important that whatever thinking guided this process in an actual calibration be recorded and accessible. Informality contributes to tolerance stacks and other difficult to diagnose post calibration problems.

Also in the example above, ideally the calibration value of 100 units would be the best point in the gauge's range to perform a single-point calibration. It may be the manufacturer's recommendation or it may be the way similar devices are already being calibrated. Multiple point calibrations are also used. Depending on the device, a zero unit state, the absence of the phenomenon being measured, may also be a calibration point. Or zero may be resettable by the user-there are several variations possible. Again, the points to use during calibration should be recorded.

There may be specific connection techniques between the standard and the device being calibrated that may influence the calibration. For example, in electronic calibrations involving analog phenomena, the impedance of the cable connections can directly influence the result.

Manual and automatic calibrations

Calibration methods for modern devices can be manual or automatic.

Manual calibration - US serviceman calibrating a pressure gauge. The device under test is on his left and the test standard on his right. US Navy 040830-N-4565G-002 Fireman Joshua Morgan, of Waco, Texas, calibrates an Engineering pressure gage.jpg
Manual calibration - US serviceman calibrating a pressure gauge. The device under test is on his left and the test standard on his right.

As an example, a manual process may be used for calibration of a pressure gauge. The procedure requires multiple steps, [12] to connect the gauge under test to a reference master gauge and an adjustable pressure source, to apply fluid pressure to both reference and test gauges at definite points over the span of the gauge, and to compare the readings of the two. The gauge under test may be adjusted to ensure its zero point and response to pressure comply as closely as possible to the intended accuracy. Each step of the process requires manual record keeping.
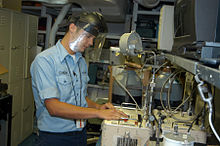
Automatic calibration - A U.S. serviceman using a 3666C auto pressure calibrator US Navy 040829-N-7884F-006 Machinist Mate 2nd Class Frank Cundiff completes calibration testing on pressure gauges using the 3666C auto pressure calibrator.jpg
Automatic calibration - A U.S. serviceman using a 3666C auto pressure calibrator

An automatic pressure calibrator [13] is a device that combines an electronic control unit, a pressure intensifier used to compress a gas such as Nitrogen, a pressure transducer used to detect desired levels in a hydraulic accumulator, and accessories such as liquid traps and gauge fittings. An automatic system may also include data collection facilities to automate the gathering of data for record keeping.

Process description and documentation

All of the information above is collected in a calibration procedure, which is a specific test method. These procedures capture all of the steps needed to perform a successful calibration. The manufacturer may provide one or the organization may prepare one that also captures all of the organization's other requirements. There are clearinghouses for calibration procedures such as the Government-Industry Data Exchange Program (GIDEP) in the United States.

This exact process is repeated for each of the standards used until transfer standards, certified reference materials and/or natural physical constants, the measurement standards with the least uncertainty in the laboratory, are reached. This establishes the traceability of the calibration.

See Metrology for other factors that are considered during calibration process development.

After all of this, individual instruments of the specific type discussed above can finally be calibrated. The process generally begins with a basic damage check. Some organizations such as nuclear power plants collect "as-found" calibration data before any routine maintenance is performed. After routine maintenance and deficiencies detected during calibration are addressed, an "as-left" calibration is performed.

More commonly, a calibration technician is entrusted with the entire process and signs the calibration certificate, which documents the completion of a successful calibration. The basic process outlined above is a difficult and expensive challenge. The cost for ordinary equipment support is generally about 10% of the original purchase price on a yearly basis, as a commonly accepted rule-of-thumb. Exotic devices such as scanning electron microscopes, gas chromatograph systems and laser interferometer devices can be even more costly to maintain.

The 'single measurement' device used in the basic calibration process description above does exist. But, depending on the organization, the majority of the devices that need calibration can have several ranges and many functionalities in a single instrument. A good example is a common modern oscilloscope. There easily could be 200,000 combinations of settings to completely calibrate and limitations on how much of an all-inclusive calibration can be automated.
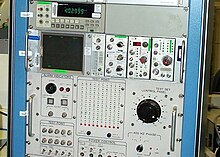
An instrument rack with tamper-indicating seals F18NARack.JPG
An instrument rack with tamper-indicating seals

To prevent unauthorized access to an instrument tamper-proof seals are usually applied after calibration. The picture of the oscilloscope rack shows these, and prove that the instrument has not been removed since it was last calibrated as they will possible unauthorized to the adjusting elements of the instrument. There also are labels showing the date of the last calibration and when the calibration interval dictates when the next one is needed. Some organizations also assign unique identification to each instrument to standardize the record keeping and keep track of accessories that are integral to a specific calibration condition.

When the instruments being calibrated are integrated with computers, the integrated computer programs and any calibration corrections are also under control.
Historical development

Origins

The words "calibrate" and "calibration" entered the English language as recently as the American Civil War, [14] in descriptions of artillery, thought to be derived from a measurement of the calibre of a gun.

Some of the earliest known systems of measurement and calibration seem to have been created between the ancient civilizations of Egypt, Mesopotamia and the Indus Valley, with excavations revealing the use of angular gradations for construction. [15] The term "calibration" was likely first associated with the precise division of linear distance and angles using a dividing engine and the measurement of gravitational mass using a weighing scale. These two forms of measurement alone and their direct derivatives supported nearly all commerce and technology development from the earliest civilizations until about AD 1800. [16]

Calibration of weights and distances (c.1100 CE)

An example of a weighing scale with a
.mw-parser-output .frac{white-space:nowrap}.mw-parser-output .frac .num,.mw-parser-output .frac .den{font-size:80%;line-height:0;vertical-align:super}.mw-parser-output .frac .den{vertical-align:sub}.mw-parser-output .sr-only{border:0;clip:rect(0,0,0,0);clip-path:polygon(0px 0px,0px 0px,0px 0px);height:1px;margin:-1px;overflow:hidden;padding:0;position:absolute;width:1px}
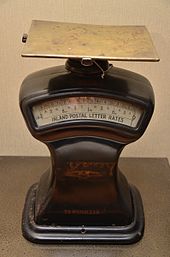
1/2 ounce calibration error at zero. This is a "zeroing error" which is inherently indicated, and can normally be adjusted by the user, but may be due to the string and rubber band in this case Avery postal scale.JPG
An example of a weighing scale with a 12 ounce calibration error at zero. This is a "zeroing error" which is inherently indicated, and can normally be adjusted by the user, but may be due to the string and rubber band in this case

Early measurement devices were direct, i.e. they had the same units as the quantity being measured. Examples include length using a yardstick and mass using a weighing scale. At the beginning of the twelfth century, during the reign of Henry I (1100-1135), it was decreed that a yard be "the distance from the tip of the King's nose to the end of his outstretched thumb." [17] However, it wasn't until the reign of Richard I (1197) that we find documented evidence. [18]

Assize of Measures
"Throughout the realm there shall be the same yard of the same size and it should be of iron."

Other standardization attempts followed, such as the Magna Carta (1225) for liquid measures, until the Mètre des Archives from France and the establishment of the Metric system.

The early calibration of pressure instruments

Direct reading design of a U-tube manometer Utube.PNG
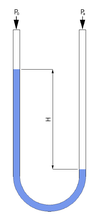
Direct reading design of a U-tube manometer

One of the earliest pressure measurement devices was the Mercury barometer, credited to Torricelli (1643), [19] which read atmospheric pressure using Mercury. Soon after, water-filled manometers were designed. All these would have linear calibrations using gravimetric principles, where the difference in levels was proportional to pressure. The normal units of measure would be the convenient inches of mercury or water.

In the direct reading hydrostatic manometer design on the right, applied pressure Pa pushes the liquid down the right side of the manometer U-tube, while a length scale next to the tube measures the difference of levels. The resulting height difference "H" is a direct measurement of the pressure or vacuum with respect to atmospheric pressure. In the absence of differential pressure both levels would be equal, and this would be used as the zero point.

The Industrial Revolution saw the adoption of "indirect" pressure measuring devices, which were more practical than the manometer. [20] An example is in high pressure (up to 50 psi) steam engines, where mercury was used to reduce the scale length to about 60 inches, but such a manometer was expensive and prone to damage. [21] This stimulated the development of indirect reading instruments, of which the Bourdon tube invented by Eugène Bourdon is a notable example.

WPGaugeFace.jpg
WPPressGaugeMech.jpg
Indirect reading design showing a Bourdon tube from the front (left) and the rear (right).

In the front and back views of a Bourdon gauge on the right, applied pressure at the bottom fitting reduces the curl on the flattened pipe proportionally to pressure. This moves the free end of the tube which is linked to the pointer. The instrument would be calibrated against a manometer, which would be the calibration standard. For measurement of indirect quantities of pressure per unit area, the calibration uncertainty would be dependent on the density of the manometer fluid, and the means of measuring the height difference. From this other units such as pounds per square inch could be inferred and marked on the scale.

See also

Related Research Articles

<span class="mw-page-title-main">Pressure measurement</span> Analysis of force applied by a fluid on a surface

Pressure measurement is the measurement of an applied force by a fluid on a surface. Pressure is typically measured in units of force per unit of surface area. Many techniques have been developed for the measurement of pressure and vacuum. Instruments used to measure and display pressure mechanically are called pressure gauges,vacuum gauges or compound gauges. The widely used Bourdon gauge is a mechanical device, which both measures and indicates and is probably the best known type of gauge.

<span class="mw-page-title-main">Voltmeter</span> Instrument used for measuring voltage

A voltmeter is an instrument used for measuring electric potential difference between two points in an electric circuit. It is connected in parallel. It usually has a high resistance so that it takes negligible current from the circuit.

<span class="mw-page-title-main">Multimeter</span> Electronic measuring instrument that combines several measurement functions in one unit

A multimeter is a measuring instrument that can measure multiple electrical properties. A typical multimeter can measure voltage, resistance, and current, in which case can be used as a voltmeter, ohmmeter, and ammeter. Some feature the measurement of additional properties such as temperature and capacitance.

Accuracy and precision are two measures of observational error.

<span class="mw-page-title-main">Micrometer (device)</span> Tool for the precise measurement of a components length, width, and/or depth

A micrometer, sometimes known as a micrometer screw gauge, is a device incorporating a calibrated screw widely used for accurate measurement of components in mechanical engineering and machining as well as most mechanical trades, along with other metrological instruments such as dial, vernier, and digital calipers. Micrometers are usually, but not always, in the form of calipers. The spindle is a very accurately machined screw and the object to be measured is placed between the spindle and the anvil. The spindle is moved by turning the ratchet knob or thimble until the object to be measured is lightly touched by both the spindle and the anvil.

<span class="mw-page-title-main">Metrology</span> Science of measurement and its application

Metrology is the scientific study of measurement. It establishes a common understanding of units, crucial in linking human activities. Modern metrology has its roots in the French Revolution's political motivation to standardise units in France when a length standard taken from a natural source was proposed. This led to the creation of the decimal-based metric system in 1795, establishing a set of standards for other types of measurements. Several other countries adopted the metric system between 1795 and 1875; to ensure conformity between the countries, the Bureau International des Poids et Mesures (BIPM) was established by the Metre Convention. This has evolved into the International System of Units (SI) as a result of a resolution at the 11th General Conference on Weights and Measures (CGPM) in 1960.

<span class="mw-page-title-main">Pipette</span> Liquid-transferring laboratory tool

A pipette is a type of laboratory tool commonly used in chemistry and biology to transport a measured volume of liquid, often as a media dispenser. Pipettes come in several designs for various purposes with differing levels of accuracy and precision, from single piece glass pipettes to more complex adjustable or electronic pipettes. Many pipette types work by creating a partial vacuum above the liquid-holding chamber and selectively releasing this vacuum to draw up and dispense liquid. Measurement accuracy varies greatly depending on the instrument.

<span class="mw-page-title-main">Hygrometer</span> Instrument for measuring humidity

A hygrometer is an instrument which measures the humidity of air or some other gas: that is, how much water vapor it contains. Humidity measurement instruments usually rely on measurements of some other quantities such as temperature, pressure, mass and mechanical or electrical changes in a substance as moisture is absorbed. By calibration and calculation, these measured quantities can lead to a measurement of humidity. Modern electronic devices use the temperature of condensation, or they sense changes in electrical capacitance or resistance to measure humidity differences. A crude hygrometer was invented by Leonardo da Vinci in 1480. Major leaps came forward during the 1600s; Francesco Folli invented a more practical version of the device, while Robert Hooke improved a number of meteorological devices including the hygrometer. A more modern version was created by Swiss polymath Johann Heinrich Lambert in 1755. Later, in the year 1783, Swiss physicist and Geologist Horace Bénédict de Saussure invented the first hygrometer using human hair to measure humidity.

<span class="mw-page-title-main">Sphygmomanometer</span> Instrument for measuring blood pressure

A sphygmomanometer, also known as a blood pressure monitor, or blood pressure gauge, is a device used to measure blood pressure, composed of an inflatable cuff to collapse and then release the artery under the cuff in a controlled manner, and a mercury or aneroid manometer to measure the pressure. Manual sphygmomanometers are used with a stethoscope when using the auscultatory technique.

<span class="mw-page-title-main">Kibble balance</span> Electromechanical weight measuring instrument

A Kibble balance is an electromechanical measuring instrument that measures the weight of a test object very precisely by the electric current and voltage needed to produce a compensating force. It is a metrological instrument that can realize the definition of the kilogram unit of mass based on fundamental constants.

<span class="mw-page-title-main">Certified reference materials</span> Material traceability inspection

Certified reference materials (CRMs) are 'controls' or standards used to check the quality and metrological traceability of products, to validate analytical measurement methods, or for the calibration of instruments. A certified reference material is a particular form of measurement standard.

A test method is a method for a test in science or engineering, such as a physical test, chemical test, or statistical test. It is a definitive procedure that produces a test result. In order to ensure accurate and relevant test results, a test method should be "explicit, unambiguous, and experimentally feasible.", as well as effective and reproducible.

<span class="mw-page-title-main">Nanometrology</span> Metrology of nanomaterials

Nanometrology is a subfield of metrology, concerned with the science of measurement at the nanoscale level. Nanometrology has a crucial role in order to produce nanomaterials and devices with a high degree of accuracy and reliability in nanomanufacturing.

<span class="mw-page-title-main">Custody transfer</span> Oil and gas industry term for transfer of physical substance from one operator to another

Custody Transfer in the oil and gas industry refers to the transactions involving transporting physical substance from one operator to another. This includes the transferring of raw and refined petroleum between tanks and railway tank cars; onto ships, and other transactions. Custody transfer in fluid measurement is defined as a metering point (location) where the fluid is being measured for sale from one party to another. During custody transfer, accuracy is of great importance to both the company delivering the material and the eventual recipient, when transferring a material.

An optical power meter (OPM) is a device used to measure the power in an optical signal. The term usually refers to a device for testing average power in fiber optic systems. Other general purpose light power measuring devices are usually called radiometers, photometers, laser power meters, light meters or lux meters.

In order to take a scientific measurement with a microphone, its precise sensitivity must be known. Since this may change over the lifetime of the device, it is necessary to regularly calibrate measurement microphones. This service is offered by some microphone manufacturers and by independent testing laboratories. Microphone calibration by certified laboratories should ultimately be traceable to primary standards a (National) Measurement Institute that is a signatory to International Laboratory Accreditation Cooperation. These could include the National Physical Laboratory in the UK, PTB in Germany, NIST in the USA and the National Measurement Institute, Australia, where the reciprocity calibration is the internationally recognised means of realising the primary standard. Laboratory standard microphones calibrated using this method are used in-turn to calibrate other microphones using comparison calibration techniques, referencing the output of the ‘test’ microphone against that of the reference laboratory standard microphone.

<span class="mw-page-title-main">Standard (metrology)</span> Object, system, or experiment which relates to a unit of measurement of a physical quantity

In metrology, a standard is an object, system, or experiment that bears a defined relationship to a unit of measurement of a physical quantity. Standards are the fundamental reference for a system of weights and measures, against which all other measuring devices are compared. Historical standards for length, volume, and mass were defined by many different authorities, which resulted in confusion and inaccuracy of measurements. Modern measurements are defined in relationship to internationally standardized reference objects, which are used under carefully controlled laboratory conditions to define the units of length, mass, electrical potential, and other physical quantities.

Length measurement, distance measurement, or range measurement (ranging) refers to the many ways in which length, distance, or range can be measured. The most commonly used approaches are the rulers, followed by transit-time methods and the interferometer methods based upon the speed of light.

<span class="mw-page-title-main">Mercury pressure gauge</span> Type of manometer

A mercury pressure gauge is a type of manometer using mercury as the working fluid. The most basic form of this instrument is a U-shaped glass tube filled with mercury. More complex versions deal with very high pressure or have better means of filling with mercury.

References

  1. JCGM 200:2008 International vocabulary of metrology Archived 2019-10-31 at the Wayback Machine — Basic and general concepts and associated terms (VIM)
  2. 1 2 ISO 9001: "Quality management systems — Requirements" (2008), section 7.6.
  3. 1 2 ISO 17025: "General requirements for the competence of testing and calibration laboratories" (2005), section 5.
  4. Faison, C. Douglas; Brickenkamp, Carroll S. (March 2004). "Calibration Laboratories: Technical Guide for Mechanical Measurements" (PDF). NIST Handbook 150-2G. NIST. Archived from the original (PDF) on 12 May 2015. Retrieved 14 June 2015.
  5. "Metrology, Pressure, Thermal & Eletrotechnical Measurement and Calibration". Fluid Control Research Institute (FCRI), Ministry of Heavy Industries & Public Enterprises, Govt. of India. Archived from the original on 14 June 2015. Retrieved 14 June 2015.
  6. Haider, Syed Imtiaz; Asif, Syed Erfan (16 February 2011). Quality Control Training Manual: Comprehensive Training Guide for API, Finished Pharmaceutical and Biotechnologies Laboratories. CRC Press. p. 49. ISBN   978-1-4398-4994-1.
  7. Bare, Allen (2006). Simplified Calibration Interval Analysis (PDF). Aiken, SC: NCSL International Workshop and Symposium, under contract with the Office of Scientific and Technical Information, U.S. Department of Energy. pp. 1–2. Archived (PDF) from the original on 2007-04-18. Retrieved 28 November 2014.
  8. "ANSI/NCSL Z540.3-2006 (R2013)". The National Conference of Standards Laboratories (NCSL) International. Archived from the original on 2014-11-20. Retrieved 28 November 2014.
  9. "Calibration Systems Requirements (Military Standard)" (PDF). Washington, DC: U.S. Department of Defense. 1 August 1998. Archived from the original (PDF) on 2005-10-30. Retrieved 28 November 2014.
  10. 1 2 Ligowski, M.; Jabłoński, Ryszard; Tabe, M. (2011), Jabłoński, Ryszard; Březina, Tomaš (eds.), Procedure for Calibrating Kelvin Probe Force Microscope, Mechatronics: Recent Technological and Scientific Advances, p. 227, doi:10.1007/978-3-642-23244-2, ISBN   978-3-642-23244-2, LCCN   2011935381
  11. Military Handbook: Evaluation of Contractor's Calibration System (PDF). U.S. Department of Defense. 17 August 1984. p. 7. Archived (PDF) from the original on 2014-12-04. Retrieved 28 November 2014.
  12. Procedure for calibrating pressure gauges (USBR 1040) (PDF). U.S. Department of the Interior, Bureau of Reclamation. pp. 70–73. Archived (PDF) from the original on 2013-05-12. Retrieved 28 November 2014.
  13. "KNC Model 3666 Automatic Pressure Calibration System" (PDF). King Nutronics Corporation. Archived from the original (PDF) on 2014-12-04. Retrieved 28 November 2014.
  14. "the definition of calibrate". Dictionary.com. Retrieved 18 March 2018.
  15. Baber, Zaheer (1996). The Science of Empire: Scientific Knowledge, Civilization, and Colonial Rule in India. SUNY Press. pp. 23–24. ISBN   978-0-7914-2919-8.
  16. Franceschini, Fiorenzo; Galetto, Maurizio; Maisano, Domenico; Mastrogiacomo, Luca; Pralio, Barbara (6 June 2011). Distributed Large-Scale Dimensional Metrology: New Insights. Springer Science & Business Media. pp. 117–118. ISBN   978-0-85729-543-9.
  17. Ackroyd, Peter (16 October 2012). Foundation: The History of England from Its Earliest Beginnings to the Tudors. St. Martin's Press. pp. 133–134. ISBN   978-1-250-01367-5.
  18. Bland, Alfred Edward; Tawney, Richard Henry (1919). English Economic History: Select Documents. Macmillan Company. pp.  154–155.
  19. Tilford, Charles R (1992). "Pressure and vacuum measurements" (PDF). Physical Methods of Chemistry: 106–173. Archived from the original (PDF) on 2014-12-05. Retrieved 28 November 2014.
  20. Fridman, A. E.; Sabak, Andrew; Makinen, Paul (23 November 2011). The Quality of Measurements: A Metrological Reference. Springer Science & Business Media. pp. 10–11. ISBN   978-1-4614-1478-0.
  21. Cuscó, Laurence (1998). Guide to the Measurement of Pressure and Vacuum. London: The Institute of Measurement and Control. p. 5. ISBN   0-904457-29-X.

Sources