The AIF initially consisted of one infantry division and one light horsebrigade. The first contingent departed Australia by ship for Egypt on 1 November 1914, where it formed part of the Australian and New Zealand Army Corps (ANZAC). The infantry division fought during the Gallipoli Campaign between April and December 1915, reinforced by a second division which was later raised, as well as three light horse brigades. After being evacuated to Egypt the AIF was expanded to five infantry divisions, forming part of the I and II ANZAC Corps, which were committed to the fighting in France and Belgium along the Western Front in March 1916. Meanwhile, two mounted divisions remained in the Middle East to fight against Turkish forces in the Sinai and Palestine Campaign.
Later combined into the Australian Corps in 1917, the AIF divisions in France and Belgium were often used to spearhead operations, playing a significant role in the defeat of the German Army in 1918. By the end of the war the AIF had gained a reputation as a highly effective military force. Following the armistice on 11 November 1918, a process of demobilisation began, with the last Australian personnel being repatriated in late 1919. In all, 416,809 Australians enlisted during the war and 334,000 served overseas. The AIF sustained approximately 210,000 casualties, of which 61,519 were killed or died of wounds, a casualty rate among the highest of any belligerent for the war.
The Commonwealth of Australia was founded on 1 January 1901. On 1 March, 29,010 colonial soldiers, consisting of 1,544 professional soldiers, 16,105 paid militia and 11,361 unpaid volunteers, were transferred to the new Australian Army.[1] However, the units continued to be administered under the various colonial Acts. Major GeneralSir Edward Hutton, a former commander of the New South Wales Military Forces, was appointed as the first commander of the Commonwealth Forces,[2] assuming command in early 1902 with Army Headquarters subsequently formed at Victoria Barracks in Melbourne.[3][4] The Defence Act 1903 brought all of the state units under one piece of legislation; although more significantly, it prevented the raising of standing infantry units, only allowing the establishment of permanent administrative and instructional staff for headquarters, garrison artillery, fortress engineers, submarine mining engineers, and service, medical and ordnance units.[5] It also stipulated that the force could only be maintained by voluntary enlistment and that it could not serve outside Australia. In this it effectively established the pre-eminence of the Citizen Forces,[6] ensuring that the Australian Army would primarily consist of part-time militia and volunteer forces, which would be supported by a small permanent force limited to filling staff, training and garrison roles. It equally ensured that any force sent overseas could only be done so on a voluntary basis.[7]
Yet despite significant reorganisations of the post-Federation Army in 1903 and 1906, the force-in-being was increasingly seen as dysfunctional and inadequate, suffering from perceived institutional problems regarding structure, command, and administration, as well as limited financial resources, lack of modern equipment, and poor training. In time this led the government to decide to adopt an entirely new military system.[8][9] In 1911, two significant changes followed a report by Lord Kitchener following his inspection of local forces in 1909. The Royal Military College, Duntroon was established to train staff officers, and a system of universal national service began with boys aged 12 to 18 becoming cadets, and men aged 18 to 26 serving in the Citizen Forces.[10][11] These reforms were part of a process of raising a large civilian militia to defend the country against a feared attack by Japan. This force was based on conscription, and was intended to be complete in 1920. The resources devoted to this plan greatly exceeded those allocated to preparations to raise an expeditionary force to serve outside Australia.[12] In total, a peacetime force of around 80,000 citizen soldiers, with a wartime establishment of 135,000, was to be raised and would include 84 infantry battalions (later increased to 92), 28 light horseregiments (subsequently raised to 31), 49 field batteries and seven howitzer batteries (total of 224 guns), 14 field engineercompanies, seven communication companies, and various support troops.[13][14][15][Note 1]
Troops from 'A' Company, 15th Battalion march through Melbourne on 17 December 1914.
This force was to be organised into brigades, with no divisional headquarters raised, although it was envisioned that up to six divisions could be formed if required. The infantry was planned to be organised into 21 brigades (later 23) of four battalions each, while the light horse would initially form seven brigades (later eight). The field artillery would be organised into 14 brigades, while eight of the field batteries would be attached to the light horse brigades, and the howitzer batteries would not be brigaded.[17][18][19] A small permanent force of 3,200 men would operate in support.[20] The new scheme also entailed reorganisation of the military districts, with the 1st Military District based on Queensland, the 2nd on New South Wales, the 3rd on Victoria, the 4th on South Australia, the 5th on Western Australia and the 6th on Tasmania. The Northern Territory and New Guinea were not initially allotted, but were later incorporated into the 1st Military District.[21]
Steps had also been taken to expand the pre-Federation network of coastal defences to provide protection against raids from Japanese or German warships prior to World War I.[22] In 1912, these defences were manned by 14 companies of the Australian Garrison Artillery, each of which had a strength of over 100 men.[23] Meanwhile, in September 1912 the government officially approved the formation of an Australian military air arm.[24] In so doing Australia became the first of the Dominions, and one of the few nations outside of Europe, to begin to develop such a capability, even if it was initially only a modest one.[25][26] The Central Flying School was established at Point Cook, Victoria in 1913. Flying training did not begin immediately, though, and it was not until 1914, that the first class of pilots were accepted.[25] No. 1 Flight of the Australian Flying Corps was raised in the 3rd Military District on 14 July 1914.[24]
Following Britain's declaration of war on Imperial Germany on 4 August 1914at the outbreak of the World War I, Australia and the other members of the British Empire were automatically involved, with Prime MinisterJoseph Cook stating on 5 August that "...when the Empire is at war, so also is Australia."[27] Within days, Brigadier GeneralWilliam Bridges and his staff officer, Major Brudenell White, had completed plans for the creation of the Australian Imperial Force (AIF). White proposed an expeditionary force of 18,000men, including 12,000Australians and 6,000New Zealanders. Cook subsequently approved the proposal, although he increased the offer to 20,000men to serve in any destination desired by the British government. On 6 August 1914, London cabled its acceptance of the force and asked that it be sent as soon as possible. Recruiting offices opened on 10 August and by the end of 1914, 52,561volunteers had been accepted, despite strict physical fitness guidelines.[28] Meanwhile, after an additional British request for assistance on 6 August 1914, the Australian government hurriedly prepared another expeditionary force, known as the Australian Naval and Military Expeditionary Force (AN&MEF), to destroy the German wireless stations at Yap in the Caroline Islands, Nauru, and Rabaul in New Britain.[29]
The 6-inch Mk VII gun at Fort Nepean which fired on SS Pfalz. This posed photograph was probably taken shortly after the incident on 5 August 1914.
Despite some progress, by 1914 the Citizen Forces were still incomplete, numbering approximately 45,915 men, with many units still to be raised.[31][Note 2] During the precautionary stage on 2 August 1914 prior to the outbreak of war, Citizen Forces units were called up to guard key infrastructure and essential points and man coastal forts and harbour defences.[34] Militia fortress companies assisted the permanent artillery and engineers in manning defence electric lights at Port Jackson, Port Phillip, Fort Lytton, Fremantle and on the Derwent River.[35] All coastal defence batteries were activated hours before the declaration of war against Germany (which took place at 9:00 am Melbourne time on 4 August).[36] The next morning the first Allied shots of the war were fired by the garrison at Fort Nepean, which was located at the opening of Port Phillip Bay, after the examination battery there fired a shell over the bows of the German cargo ship SS Pfalz when the ship failed to stop.[37][38][39][40][41] In accordance with pre-war plans mines were ready to be laid by the Royal Australian Engineers to protect Port Jackson and Port Phillip; however, the risk of attack was not considered sufficient to justify the establishment of the minefields and their ongoing maintenance.[35]
After the initial call-up of reservists to man the garrison artillery, the commanding officers of the other militia units were directed to begin preparations to raise an infantry division and a light horse division for home defence tasks. By the end of August 1914 the Government had judged that a force of this size was unnecessary given that Australia was distant from the war zones. Instead, it was decided to maintain only a small number of infantry battalions and light horse regiments on active duty at any one time.[42] By the end of 1914 the home defence force comprised 100,000 reservists, of whom 56,000 were members of the Citizen Forces and 51,000 were rifle club volunteers.[42] Despite fears of sabotage and uprisings by German-Australians, no domestic threat eventuated.[43] From 1915, only skeleton garrisons were maintained at coastal forts, but the personnel manning them were forbidden to enlist in the AIF. This ban was lifted in April 1915 but the presence of a German commerce raider in Australian waters caused a mobilisation from February to April 1916, while another occurred in April 1918 for the same reason. In June 1918, 9,215 home service troops were on active duty in Australia, alongside 2,476 regular soldiers.[34] Up to 50,000 militiamen enlisted in the AIF during the war.[44]
The Australian Naval and Military Expeditionary Force (AN&MEF) began forming following a request by the British government on 6 August 1914.[45] The AN&MEF comprised one battalion of infantry of 1,000 men enlisted in Sydney—known as the 1st Battalion, AN&MEF—plus 500 naval reservists and ex-sailors who would serve as infantry.[46] Another battalion of militia from the Queensland-based Kennedy Regiment, which had been hurriedly dispatched to garrison Thursday Island, also contributed 500 volunteers to the force.[47] Under the command of Colonel William Holmes, the AN&MEF departed Sydney on 19 August aboard HMAS Berrima and halted at Palm Island off Townsville until the New Zealand force, escorted by the battlecruiserHMASAustralia, cruiser HMASMelbourne, and the French cruiser Montcalm, occupied Samoa on 30 August.[46] The AN&MEF then moved to Port Moresby where it met the Queensland contingent aboard the transport TSS Kanowna. The force then sailed for German New Guinea on 7 September but the Kanowna was left behind when her stokers refused to work.[48] The soldiers from the Kennedy Regiment were also left in Port Moresby as Holmes felt that they were not trained or equipped well enough to be committed to the fighting that was expected.[46][49] Following the capture of German possessions in the region in September, the AN&MEF provided occupation forces for the duration of the war.[50] Holmes returned to Australia in early 1915 and re-enlisted in the AIF, as did most of his men.[51] They were replaced by the 3rd Battalion, AN&MEF, which was known as the "Tropical Force" because it had been specially enlisted for service in the tropics.[52]
At the start of the war, Australia's military forces were focused upon the part-time militia. The small number of regular personnel were mostly artillerymen or engineers, and were generally assigned to the task of coastal defence.[53] Due to the provisions of the Defence Act 1903, which precluded sending conscripts overseas, upon the outbreak of war it was realised that a totally separate, all volunteer force would need to be raised.[54] The Australian Imperial Force (AIF) began forming shortly after the outbreak of war, officially coming into being on 15 August 1914.[55] Upon formation, the AIF consisted of the 1st Division and the 1st Light Horse Brigade.[56] As part of the Australian and New Zealand Army Corps (ANZAC), the 1st Division subsequently fought alongside the combined New Zealand and Australian Division at Gallipoli between April and December 1915, being reinforced by the 2nd Division which was later raised, as well as three light horse brigades. After being evacuated to Egypt the AIF was expanded to five infantry divisions, which were committed to the fighting in France and Belgium along the Western Front in March 1916 as part of the British Expeditionary Force (BEF). Meanwhile, two mounted divisions remained in the Middle East to fight against Turkish forces in the Sinai and Palestine, serving with the Egyptian Expeditionary Force.[57] In contrast to the static trench warfare that developed in Europe, the troops in the Middle East mostly experienced a more fluid form of warfare involving manoeuvre and combined arms tactics.[58]
Continuing to grow through the war, the AIF eventually consisted of five infantry divisions, two mounted divisions and a mixture of other units.[59][60][61] At the start of the Gallipoli Campaign, the AIF had four infantry brigades with the first three making up the 1st Division. The 4th Brigade was joined with the sole New Zealand infantry brigade to form the New Zealand and Australian Division. The 2nd Division was formed in Egypt in 1915 and was sent to Gallipoli in August to reinforce the 1st Division, doing so without its artillery and having only partially completed its training. After Gallipoli, the infantry underwent a major expansion. The 3rd Division was formed in Australia and sent to France. The New Zealand and Australian Division was broken up with the New Zealand elements forming the New Zealand Division, while the original Australian infantry brigades (1st to 4th) were split in half to form another four brigades which were used to form the 4th and 5th Divisions. This ensured the battalions of the two new divisions had a core of experienced soldiers.[62][63] Organised into I and II ANZAC Corps, the divisions were subsequently deployed to the Western Front.[64] The 6th Division commenced forming in England in February 1917, but was never deployed to France and was broken up in September of that year to provide reinforcements to the other five divisions.[60] In November 1917 the five Australian divisions of I and II ANZAC Corps merged to become the Australian Corps.[65]
A DH.5 aeroplane of No. 2 Squadron, AFC
During the Gallipoli Campaign four light horse brigades had been dismounted and fought alongside the infantry divisions.[66] However, in March 1916 the ANZAC Mounted Division was formed in Egypt (so named because it contained one mounted brigade from New Zealand). Likewise, the Australian Mounted Division—formed in February 1917—was originally named the Imperial Mounted Division because it contained the British 5th and 6th Mounted Brigades.[67] Each division consisted of three mounted light horse brigades, each of which consisted of three regiments.[68] Following the expansion of the Desert Column in August 1917 these divisions formed part of the Desert Mounted Corps, which consisted of the ANZAC Mounted Division, Australian Mounted Division and the Imperial Camel Corps Brigade (which included a number of Australian, British and New Zealand camel companies).[67] The AIF also included the Australian Flying Corps (AFC), which consisted of four operational squadrons—Nos. 1, 2, 3 and 4, and four training squadrons—Nos. 5, 6, 7 and 8.[69][70] More than 2,000 women served with the AIF, mainly in the Australian Army Nursing Service.[71] In addition, a number of other specialist units were also raised,[72] including tunnelling companies,[73] motor transport units,[74] railway,[75] ordnance, workshops and service units,[76][77] and hospitals and other specialist medical and dental units.[78] One small armoured unit was also raised.[79][Note 3]
The AIF was an all volunteer force for the duration of the war. Australia was one of only two belligerents on either side not to introduce conscription during the war (along with South Africa).[82][Note 4] Although a system of compulsory training had been introduced in 1911 for home service, under Australian law it did not extend to overseas service. In Australia, two plebiscites on using conscription to expand the AIF were defeated in October 1916 and December 1917, thereby preserving the volunteer status but stretching the AIF's reserves towards the end of the war.[84] Ultimately, the voluntary system of recruitment proved unable to sustain the force structure of the AIF, failing to provide sufficient replacements for the heavy casualties it sustained and requiring a number of units to be disbanded towards the end of the war.[85][86] Each infantry battalion originated from a geographical region, with men recruited from that area. New South Wales and Victoria, the most populous states, filled their own battalions (and even whole brigades) while the "Outer States"—Queensland, South Australia, Western Australia and Tasmania—often combined to assemble a battalion.[82] The light horse and artillery were also recruited on a territorial basis.[87]
Hastily deployed, the first contingent of AIF was essentially untrained and suffered from widespread equipment shortages.[88] In early 1915 the AIF was largely an inexperienced force, with only a small percentage of its members having previous combat experience. However, many officers and non-commissioned personnel (NCOs) had previously served in the pre-war permanent or part-time forces, and a significant proportion of the enlisted personnel had received some basic military instruction as part of Australia's compulsory training scheme.[89] Predominantly a fighting force based on infantry battalions and light horse regiments, the AIF had a high proportion of close combat troops to support personnel.[90][91] Nevertheless, the AIF eventually included a large number of logistics and administrative units which were capable of meeting most of the force's needs, and in some circumstances provided support to nearby allied units.[92] Each division also included a range of combat support and service units, including artillery, machine-gun, mortar, engineer, pioneer, signals, logistic, medical, veterinary and administrative units.[93] Corps troops included light horse, army artillery,[59] and cyclists.[94] Regardless, the AIF mainly relied on the British Army for medium and heavy artillery support and other weapons systems necessary for combined arms warfare that were developed later in the war, including aircraft and tanks.[95]
Troops of the 1st Australian Division walking on a duckboard track near Hooge, in the Ypres Sector, 5 October 1917
Although operationally placed at the disposal of the British, the AIF was administered as a separate national force, with the Australian government reserving the responsibility for the promotion, pay, clothing, equipment and feeding of its personnel.[96] The AIF was administered separately from the home-based army in Australia, and a parallel system was set up to deal with non-operational matters including record-keeping, finance, ordnance, personnel, quartermaster and other issues.[72] The AIF also had separate conditions of service, rules regarding promotion and seniority, and graduation list for officers.[96] This responsibility initially fell to Bridges, in addition to his duties as its commander; however, an Administrative Headquarters was later set up in Cairo in Egypt. Following the redeployment of the Australian infantry divisions to the Western Front it was relocated to London. Additional responsibilities included liaison with the British War Office as well as the Australian Department of Defence in Melbourne, whilst also being tasked with the command of all Australian troops in Britain. A training headquarters was also established at Salisbury.[97]
By the end of the war the AIF had gained a reputation as a well-trained and highly effective military force, enduring more than two years of costly fighting on the Western Front before playing a significant role in the final Allied victory in 1918, albeit as a smaller part of the wider British Empire war effort.[98][99] Like the other Dominion divisions from Canada and New Zealand, the Australians were viewed as being among the best of the British forces in France,[100] and were often used to spearhead operations.[101] The exploits of the AIF at Gallipoli, and then on the Western Front, subsequently became central to the national mythology.[102] Commemorating and celebrating the AIF became an entrenched tradition following World War I, with Anzac Day forming the centrepiece of remembrance of the war.[103] The soldiers who served in the AIF, known colloquially as "Diggers", in time became "...one of the paramount Australian archetypes."[104]
Following the outbreak of war Australian forces moved quickly to reduce the threat to shipping posed by the proximity of Germany's Pacific colonies. The Australian Naval and Military Expeditionary Force (AN&MEF), a 2000-man volunteer force—separate from the AIF—and consisting of an infantry battalion plus 500 naval reservists and ex-sailors, was rapidly formed under the command of Colonel William Holmes. The objectives of the force were the wireless stations on Nauru, and those at Yap in the Caroline Islands, and at Rabaul in German New Guinea. The force reached Rabaul on 11 September 1914 and occupied it the next day, encountering only brief resistance from the German and native defenders during fighting at Bita Paka and Toma. German New Guinea surrendered on 17 September 1914. Australian losses were light, including six killed during the fighting.[105]
Australian troops charging a Turkish trench at Anzac
After a period of rudimentary training in Australia, the first contingent of the AIF departed by ship in a single convoy from Albany on 1 November 1914. Although they were originally bound for England to undergo further training prior to employment on the Western Front, the Australians were instead sent to British-controlled Egypt in order to pre-empt any Turkish attack against the strategically important Suez Canal, and with a view to opening another front against the Central Powers.[106][Note 5] Aiming to knock Turkey out of the war the British then decided to stage an amphibious lodgement at Gallipoli and following a period of training and reorganisation the Australians were included amongst the British, Indian and French forces committed to the campaign. The combined Australian and New Zealand Army Corps—commanded by British general William Birdwood—subsequently landed at Anzac Cove on the Gallipoli peninsula on 25 April 1915. Although promising to transform the war if successful, the Gallipoli Campaign was ill-conceived and shortly after the landing a blood stalemate developed. This ultimately lasted eight months before Allied commanders decided to evacuate the troops without having achieved the campaign's objectives.[107] Australian casualties totalled 26,111, including 8,141 killed.[108]
After the withdrawal from Gallipoli the Australians returned to Egypt and the AIF underwent a major expansion. In 1916, the infantry began to move to France while the mounted infantry units remained in the Middle East to fight the Turks. Australian troops of the ANZAC Mounted Division and the Australian Mounted Division saw action in all the major battles of the Sinai and Palestine Campaign, playing a pivotal role in fighting the Turkish troops that were threatening British control of Egypt.[109] The Australians first saw combat during the Senussi Uprising in the Libyan Desert and the Nile Valley, during which the combined British forces successfully put down the primitive pro-Turkish Islamic sect with heavy casualties.[110] The ANZAC Mounted Division subsequently saw considerable action in the Battle of Romani between 3 and 5 August 1916 against the Turks who were eventually pushed back.[111] Following this victory the British forces went on the offensive in the Sinai, although the pace of the advance was governed by the speed by which the railway and water pipeline could be constructed from the Suez Canal. Rafa was captured on 9 January 1917, while the last of the small Turkish garrisons in the Sinai were eliminated in February.[112]
The advance entered Palestine and an initial, unsuccessful attempt was made to capture Gaza on 26 March 1917, while a second and equally unsuccessful attempt was launched on 19 April. A third assault occurred between 31 October and 7 November and this time both the ANZAC Mounted Division and the Australian Mounted Division took part. The battle was a complete success for the British, overrunning the Gaza–Beersheba line and capturing 12,000 Turkish soldiers. The critical moment was the capture of Beersheba on the first day, after the Australian 4th Light Horse Brigade charged more than 4 miles (6.4km). The Turkish trenches were overrun, with the Australians capturing the wells at Beersheba and securing the valuable water they contained along with over 700 prisoners for the loss of 31 killed and 36 wounded.[113] Later, Australian troops assisted in pushing the Turkish forces out of Palestine and took part in actions at Mughar Ridge, Jerusalem and the Megiddo. The Turkish government surrendered on 30 October 1918.[114] Units of the Light Horse were subsequently used to help put down a nationalist revolt in Egypt in 1919 and did so with efficiency and brutality, although they suffered a number of fatalities in the process.[115] Total Australian battle casualties in the campaign were 4,851, including 1,374 dead.[116]
Five infantry divisions of the AIF saw action in France and Belgium, leaving Egypt in March 1916.[117] I ANZAC Corps subsequently took up positions in a quiet sector south of Armentieres on 7 April 1916 and for the next two and a half years the AIF participated in most of the major battles on the Western Front, earning a formidable reputation. Although spared from the disastrous first day of the Battle of the Somme, within weeks four Australian divisions had been committed.[118] The 5th Division, positioned on the left flank, was the first in action during the Battle of Fromelles on 19 July 1916, suffering 5,533 casualties in a single day. The 1st Division entered the line on 23 July, assaulting Pozieres, and by the time that they were relieved by the 2nd Division on 27 July, they had suffered 5,286 casualties.[119]Mouquet Farm was attacked in August, with casualties totalling 6,300 men.[120] By the time the AIF was withdrawn from the Somme to reorganise, they had suffered 23,000 casualties in just 45 days.[119]
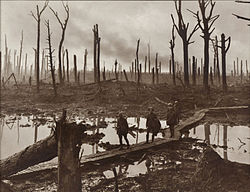
Australian gunners on a duckboard track in Château Wood near Hooge, 29 October 1917.
In March 1917, the 2nd and 5th Divisions pursued the Germans back to the Hindenburg Line, capturing the town of Bapaume. On 11 April, the 4th Division assaulted the Hindenburg Line in the disastrous First Battle of Bullecourt, losing over 3,000 casualties and 1,170 captured.[121] On 15 April, the 1st and 2nd Divisions were counter-attacked near Lagnicourt and were forced to abandon the town, before recapturing it.[122] The 2nd Division then took part in the Second Battle of Bullecourt, beginning on 3 May, and succeeded in taking sections of the Hindenburg Line and holding them until relieved by the 1st Division.[121] Finally, on 7 May the 5th Division relieved the 1st, remaining in the line until the battle ended in mid-May. Combined, these efforts cost 7,482 Australian casualties.[123]
On 7 June 1917, II ANZAC Corps—along with two British corps—launched an operation in Flanders in order to eliminate a salient south of Ypres.[124] The attack commenced with the detonation of a million pounds (454,545kg) of explosives that had been placed underneath the Messines ridge, destroying the German trenches.[125] The advance was virtually unopposed, and despite strong German counterattacks the next day, it succeeded. Australian casualties during the Battle of Messines included nearly 6,800 men.[126] I ANZAC Corps then took part in the Third Battle of Ypres in Belgium as part of the campaign to capture the Gheluvelt Plateau, between September and November 1917.[126] Individual actions took place at Menin Road, Polygon Wood, Broodseinde, Poelcappelle and Passchendaele and over the course of eight weeks of fighting the Australians suffered 38,000 casualties.[127]
On 21 March 1918, the German Army launched its Spring Offensive in a last-ditched effort to win the war, unleashing 63 divisions over a 70-mile (110km) front.[128] As the Allies fell back the 3rd and 4th Divisions were rushed south to Amiens on the Somme.[129] The offensive lasted for the next five months and all five AIF divisions in France were engaged in the attempt to stem the tide. By late May the Germans had pushed to within 50 miles (80km) of Paris.[130] During this time the Australians fought at Dernancourt, Morlancourt, Villers-Bretonneux, Hangard Wood, Hazebrouck, and Hamel.[131] At Hamel the commander of the Australian Corps, Lieutenant General John Monash, successfully used combined arms—including aircraft, artillery and armour—in an attack for the first time.[132]
The German offensive ground to a halt in mid-July and a brief lull followed, during which the Australians undertook a series of raids, known as Peaceful Penetrations.[133] The Allies soon launched their own offensive—the Hundred Days Offensive—ultimately ending the war. Beginning on 8 August 1918 the offensive included four Australian divisions striking at Amiens.[134] Using the combined arms techniques developed earlier at Hamel, significant gains were made on what became known as the "Black Day" of the German Army.[135] The offensive continued for four months, and during the Second Battle of the Somme the Australian Corps fought actions at Lihons, Etinehem, Proyart, Chuignes, and Mont St Quentin, before their final engagement of the war on 5 October 1918 at Montbrehain.[136] While these actions were successful, the Australian divisions suffered considerable casualties and by September 1918 the average strength of their infantry battalions was between 300 and 400, which was less than 50 percent of the authorised strength.[137] The AIF was withdrawn for rest and reorganisation following the engagement at Montbrehain, and was subsequently out of the line when the armistice was declared on 11 November 1918.[138] Although, some artillery units continued to support British and American units into November, and the AFC maintained flying operations until the end of the war.[139] Total Australian casualties on the Western Front numbered 181,000, including 46,000 of whom died. Another 114,000 men were wounded, 16,000 gassed, and approximately 3,850 were taken prisoners of war.[116]
Other theatres
Small numbers of AIF personnel also served in other theatres. Australian troops from the 1st Australian Wireless Signal Squadron provided communications for British forces during the Mesopotamian Campaign. They participated in a number of battles, including the Battle of Baghdad in March 1917[140] and the Battle of Ramadi in September that year.[141] Following the Russian Revolution in 1917, the Caucasus Front collapsed, leaving Central Asia open to the Turkish Army. A special force, known as Dunsterforce after its commander, Major GeneralLionel Dunsterville, was formed from hand-picked British officers and NCOs to organise any remaining Russian forces or civilians who were ready to fight the Turkish forces. Some 20 Australian officers served with Dunsterforce in the Caucasus Campaign and one party under CaptainStanley Savige was instrumental in protecting thousands of Assyrian refugees.[142] Australian nurses staffed four British hospitals in Salonika, and another 10 in India.[143]
The position of Chief of the General Staff (CGS) had been established in 1909 and was responsible for maintaining the war organisation of the Army, preparing defensive plans, the training and examination of officers, and the collection and interpretation of intelligence. In addition, the incumbent also sat as First Military Member of the Military Board.[144] The Military Board was responsible to the Minister for Defence for the administration of the Australian Military Forces (AMF).[145] Colonel James Gordon Legge was appointed CGS on 1 May 1914, replacing Brigadier General Joseph Gordon, but was still en route from Britain when war had broken out. With Bridges occupied in organising the AIF, Legge took over the organisation of the AN&MEF for service in New Guinea. After Bridges departed for overseas, Legge took over responsibility for the training of AIF reinforcements.[146][147]
When originally formed in 1914 the AIF was commanded by Bridges, who also commanded the 1st Division.[148] After Bridges' death at Gallipoli in May 1915, the Australian government appointed Legge, a Boer War veteran, to replace Bridges in command of both.[149] However, British Lieutenant General Sir John Maxwell, the commander of British Troops in Egypt, objected to Legge bypassing him and communicating directly with Australia. The Australian government failed to support Legge, who thereafter deferred to Lieutenant General William Birdwood, the commander of the Australian and New Zealand Army Corps.[150] When Legge was sent to Egypt to command the 2nd Division, Birdwood made representations to the Australian government that Legge could not act as commander of the AIF, and that the Australian government should transfer Bridges' authority to him. This was done on a temporary basis on 18 September 1915.[151] Birdwood was officially confirmed as commander of the AIF on 14 September 1916, backdated to 18 September 1915, while also commanding I ANZAC Corps on the Western Front.[151]
Meanwhile, Colonel Godfrey Irving was appointed temporary CGS on 24 May 1915, replacing Legge.[152] His chief responsibility was overseeing the expansion of the training establishment in Australia to provide reinforcements for the AIF units overseas, and raising and training what would become the 2nd Division.[153] Colonel Hubert Foster took over as CGS in January 1916.[154] However, following a period of ill-health Legge had been relieved of command of his division and returned to Australia. Resuming his post as CGS in October 1917, he remained in the position until 1920.[155] In this position Legge's role was primarily one of dealing with politicians in Australia, and providing reinforcements for the AIF overseas.[156]
Lieutenant General Harry Chauvel, a regular officer who had commanded the 1st Light Horse Brigade upon its formation in 1914 and later the ANZAC Mounted Division, became the first Australian to command a corps, when he took command of the Desert Mounted Corps in 1917.[157] Birdwood was later given command of the Australian Corps on its formation in November 1917. Another Australian, Monash, took over command of the corps on 31 May 1918.[158] Despite being promoted to command the British Fifth Army, Birdwood retained command of the AIF.[159][160] By this time four of the five divisional commanders were Australian officers.[161] The vast majority of brigade commands were also held by Australian officers.[162] As a result of the policy of appointing officers exclusively from enlisted personnel that was later adopted in the AIF, by 1918 the majority of company and battalion commanders had risen from the ranks.[163] A number of British staff officers were attached to the headquarters of the Australian Corps, and its predecessors, due to a shortage of suitably trained Australian officers.[164][165]
A colorized picture showing an early uniform in 1915
The weaponry and equipment of the Australian Army had mostly been standardised on that used by the British Army prior to the outbreak of World War I.[166] Meanwhile, in the years prior to the war basic defence industries had been established in Australia for the production of uniforms, webbing, boots, small arms and explosives and ammunition.[167] Despite this, the majority of the equipment initially issued came from British Army stocks until Australian production was able to be increased to meet the demand that resulted from rapid military expansion at the start of the war. These included such items as heliographs, water bottles, bits, stirrups, spurs and shovels, although saddlery and harnesses were provided by a local government manufacturer.[168] Although Australia had a relatively limited industrial base during the war, it was ultimately able to supply the majority of the Army's more simple requirements; however, the remainder of the more complex equipment had to be purchased from suppliers in Britain.[169][Note 6]
During the war the equipment used changed as tactics evolved, and generally followed British developments. The standard issued rifle was the.303-inch Short Magazine Lee–Enfield Mark III (SMLE), and while a factory had been constructed at Lithgow in New South Wales in 1912, local production was at first limited to 15,000 rifles a year, which proved insufficient. As a result, the AIF was initially equipped from stocks held by the Citizen Forces, until production was increased to 35,000 rifles a year by the end of 1914. A number of Lithgow-made SMLEs were later also supplied to New Zealand forces. Ammunition was supplied from factories in Australia, New Zealand and Britain.[171] Meanwhile, the speed with which the AIF was initially raised meant that it suffered from a range of equipment shortages, especially artillery. These were unable to be rectified prior to the landing at Gallipoli and later impacted on the conduct of the campaign.[172][173] Artillery was unable to be manufactured in Australia, nor were additional weapons able to be obtained from Britain in the short term.[174] In time though these shortfalls were overcome, and as additional AIF divisions were raised the Australian field artillery was also expanded and was equipped from British Army depots on their arrival in France in 1916.[175]
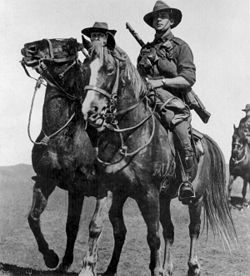
Australian light horsemen on Walers prior to their departure from Australia
The pre-war Australian Army uniform formed the basis of that worn by the AN&MEF and the AIF, which both adopted the broad-brimmed slouch hat and rising sun badge.[176][177] Infantrymen used 1908-pattern webbing, while light horsemen used leather bandoliers and load carriage equipment.[168][177] A large pack was issued as part of marching order.[178] In 1915, infantrymen were issued with the SMLE and long sword bayonet,[179] while periscope rifles were also used.[180] From 1916 they also used manufactured hand grenades and rodded rifle grenades, both of which had been in short supply at Gallipoli (necessitating the use of improvised "jam-tin" grenades). A grenade discharge cup was issued for fitting to the muzzle of a rifle for the projection of the Mills bomb from 1917. Machine-guns initially included a small number of Maxim or Vickers medium machine-guns, but subsequently also included the Lewis light machine-gun, the latter two of which were issued in greater numbers as the war continued so as to increase the firepower available to the infantry in response to the tactical problems of trench warfare.[179] Light horse units underwent a similar process, although were issued Hotchkiss guns to replace their Lewis guns in early 1917.[181]
From 1916 the Stokes light trench mortar was issued to infantry to replace a range of trench catapults and smaller trench mortars, whilst it was also used in a battery at brigade-level to provide organic indirect fire support. In addition, individual soldiers often used a range of personnel weapons including knives, clubs, knuckle-dusters, revolvers and pistols. Snipers on the Western Front used Pattern 1914 Enfield sniper rifles with telescopic sights.[182] Light horsemen also carried bayonets (as they were initially considered mounted infantry), although the Australian Mounted Division adopted cavalry swords in late 1917.[183][184] Artillery included 18-pounders which equipped the field batteries, 4.5-inch howitzers used by the howitzer batteries, and 8-inch and 9.2-inch howitzers which equipped the heavy (siege) batteries. The 9.45-inch heavy mortar equipped a heavy trench mortar battery, while medium trench mortar batteries were equipped with the 2-inch medium mortar, and later the 6-inch mortar.[185] Light Horse units were supported by British and Indian artillery.[186] The main mount used by the light horse was the Waler, while draught horses were used by the artillery and for wheeled transport. Camels were also used, both as mounts and transport, and donkeys and mules were used as pack animals.[187]
Training and doctrine
Embarkation of the Australian Naval and Military Expeditionary Force in Sydney
In 1914, the Australian Army mostly copied British Army doctrine, in as much as one existed semi-officially in the form of the Field Service Regulations.[188] Pre-war planning had largely seen the Australian Army focus on defending the continent from invasion with a relatively small force, and as a result any future war was thought to likely be a highly mobile one. This was in contrast to the offensive focus of many British and European theorists of this time, despite their influence on local professional military debate. As a result, there was an emphasis on entrenchments, and whilst there was a recognition of the problems posed by increasing firepower as a result of the continued development of small arms and artillery technology, there was considered to be little requirement for the direct assault of static defensive positions given the room for manoeuvre afforded by the vastness of the Australian continent.[189] Meanwhile, in order to be compatible with British forces, pre-war agreements ensured that Australian Army units were mostly organised, trained and equipped in accordance with British Army doctrine and establishment tables.[178]
Despite the efforts of the compulsory training scheme in the years before the war, very few of the men who served in the AN&MEF had had previous military experience.[190] It had been hastily equipped and received only rudimentary training prior to its departure within days of its formation. During the stop over at Palm Island the men went ashore almost every day, and although the shingle beach, rocky ground and bush made the terrain unsuited to tactical manoeuvres, they were able to practice maintaining contact in dense jungle, a skill which later proved important during the fighting at Bita Paka. Yet, with the force remaining at Palm Island for only a week this training was limited and was unlikely to have adequately prepared the force if it were more seriously tested. Ultimately though this lack of training did not end up being costly as German resistance proved only limited, with the fighting over in less than a day and resulting in fewer than a dozen Australian casualties.[191]
In the early stages of the AIF's formation training was rudimentary and performed mainly at unit-level. There were no formal schools and volunteers proceeded straight from recruiting stations to their assigned units, which were still in the process of being established. Upon arrival, in makeshift camps the recruits received basic training in drill and musketry from officers and non-commissioned officers, who were not trained instructors and had been appointed mainly because they had previous service in the part-time forces.[192] In some units this training took place over a period of six to eight weeks, although others spent as little as one day on live firing before departing for overseas. Following the embarkation of the initial force to the Middle East, further training was undertaken in the desert. This was more organised than the training provided in Australia, but was still rushed. Individual training was consolidated but progressed quickly into collective training at battalion and brigade-level. Training exercises, marches, drill and musketry practices followed but the standard of the exercises was limited and lacked realism, meaning that commanders did not benefit from handling their troops under battlefield conditions.[193]
Some soldiers had received training through the compulsory training scheme, while others had served as volunteers in the part-time forces before the war or as members of the British Army, but their numbers were limited.[194] In contrast, the majority of officers initially appointed had previous military experience. This was largely through service in the pre-war militia, though, where there had been little to no formal officer training. In addition, there was a small cadre of junior officers who had been trained for the permanent force at the Royal Military College, Duntroon,[195] but their numbers were very small and at the outbreak of the war the first class had to be graduated early in order for them to join the AIF, being placed mainly in staff positions.[196] Other than small numbers of Duntroon graduates, from January 1915 the only means to be commissioned into the AIF was from the ranks of enlisted personnel.[82] While the AIF's initial senior officers had been members of the pre-war military, few had any substantial experience in managing brigade-sized or larger units in the field as training exercises on this scale had been rarely conducted before the outbreak of hostilities. This inexperience contributed to tactical mistakes and avoidable casualties during the Gallipoli Campaign.[197]
After the AIF was transferred to the European battlefield, the training system was greatly improved. Efforts were made at standardisation, with a formal training organisation and curriculum—consisting of 14 weeks basic training for infantrymen—being established. In Egypt, as the AIF was expanded in early 1916, each brigade established a training battalion. These formations were later sent to the United Kingdom and were absorbed into a large system of depots that was established on Salisbury Plain by each branch of the AIF including infantry, engineers, artillery, signals, medical and logistics. After completing their initial instruction at depots in Australia and the United Kingdom, soldiers were posted to in-theatre base depots where they received advanced training before being posted as reinforcements to operational units.[198][199] Like the British Army, the AIF sought to rapidly pass on "lessons learned" as the war progressed, and these were widely transmitted through regularly updated training documents.[200] The experience gained through combat also improved the skills of the surviving officers and men, and by 1918 the AIF was a very well trained and well led force.[201] Indeed, after coming to terms with the conditions on the Western Front the Australians had played a part in the development of new combined arms tactics for offensive operations that occurred throughout the BEF, while in defence they employed patrolling, trench raids, and Peaceful Penetration tactics to dominate no man's land.[101] In this manner the AIF ultimately developed its own tactical doctrine.[202][203]
A group portrait of several men from the 74th (Boothby) Regiment during a training camp in or about 1915
Following the deployment of the AIF a reinforcement system was used to replace wastage. Reinforcements received training in Australia before sailing as drafts and joining their assigned units at the front.[204] To provide officer reinforcements, a series of AIF officer schools, such as that at Broadmeadows,[205] were established in Australia before officer training was eventually concentrated at a school near Duntroon. These schools produced a large number of officers, but they were eventually closed in 1917 due to concerns that their graduates were too inexperienced and after this most replacement officers were drawn from the ranks of the AIF's deployed units, and candidates attended either British officer training units, or in-theatre schools established in France.[206][207] After February 1916, the issue of NCO training was also taken more seriously, and several schools were established, with training initially being two weeks in duration before being increased to two months.[208]
Meanwhile, the Citizen Forces deteriorated during the war as the AIF was given precedence for manpower and other resources. While the size of the force increased during 1915, a high proportion volunteered for overseas service with the AIF. Many officers were used to train AIF recruits, and camp facilities and equipment were also assigned to the expeditionary force. This greatly disrupted the Citizen Forces training activities, with few units conducting camps during late 1915 or 1916.[209] While there were intakes of conscripts to the Citizen Forces during 1916 and 1917, few were ever required to undertake periods of training or active service.[210] In October 1916 approximately 37,000 reservists were called up for a short period of compulsory training ahead of the first plebiscite on conscription.[211] By 1918 the Citizen Forces were close to collapse as many of its best members had transferred to the AIF and the remaining personnel were largely untrained.[212] Attempts were made to revive the Citizen Forces during the last months of the war. The initially successful German Spring Offensive, which began in March, led to concerns Japan could attack Australia. In response, regular training camps for militia units were reinstated.[213] A scheme to set up a reserve force manned by returned AIF veterans attracted 17,000 volunteers, yet they received no training.[214]
Demobilisation
After the war, all AIF units went into camp and began the process of demobilisation. The AIF's involvement in the occupation of former German or Turkish territory was limited as Prime Minister William Hughes requested their early repatriation.[215] The exceptions were No. 4 Squadron, AFC and the 3rd Australian Casualty Clearing Station, which participated in the occupation of the Rhineland.[216] The 7th Light Horse Regiment was also sent to occupy the Gallipoli peninsula for six weeks, along with a New Zealand regiment.[217] At the time of the armistice, there were 95,951 soldiers in France and a further 58,365 in England, 17,255 in the Middle East plus nurses in Salonika and India, all to be transported home.[116] Around 120 Australians decided to delay their departure and instead joined the British Army, serving in Northern Russia during the Russian Civil War. However, officially the Australian government refused to contribute forces to the campaign. [218][219]
By May 1919, the last troops were out of France, and 70,000 were encamped on Salisbury Plain.[220] The men returned home on a "first-come, first go" basis, with the process overseen by Monash in Britain and Chauvel in Cairo.[115] Many of the soldiers undertook government-funded training in civilian occupations while awaiting repatriation to Australia.[217] Only 10,000 Australian soldiers remained in England by September. Monash, the senior Australian commander, was repatriated on 26 December 1919. The last transport organised to repatriate troops was H.T. Naldera, which departed London on 13 April 1920. The AIF officially ceased to exist on 1 April 1921, and on 1 July 1921, the military hospitals in Australia passed into civilian hands.[220] As a volunteer force, all units were demobilised at the end of the war.[221] Australia's part-time military force, the Citizen Forces, was subsequently reorganised to replicate the AIF's divisional structure and the numerical designations of many of its units to perpetuate their identities and battle honours.[222] The AFC remained part of the Australian Army until 1919, when it was disbanded; later forming the basis of the Royal Australian Air Force.[223]
Meanwhile, following the end of hostilities in November 1918, the role of the AN&MEF in the former German colonies in New Guinea had become primarily one of civil administration, although it continued to provide a garrison for the next two and a half years.[224] The military government continued until 1921 when Australia received a mandate from the League of Nations to govern the territory.[225] Despite the AN&MEF having seen no further action following the initial seizure of the colony, in the years that followed the climate and a range of tropical diseases, such as malaria, had resulted in dozens of fatalities before the deployment concluded.[226][227] Although interrupted by Japanese occupation between 1942 and 1945, Australian administration lasted until 1975 when Papua New Guinea gained its independence.[105]
The war exposed deficiencies in Australia's pre-war military system, which emphasised the creation of a large part-time militia. Indeed, despite the considerable effort and resources expended raising it, the Citizen Forces had not been used during the war as no major threat to Australia had emerged, while an expeditionary force of volunteers had had to be raised from scratch in order to fight overseas. After the war, senior military officers advised a range of legislative and organisational reforms; however, the perceived success of the AIF, war-wariness, a general community antipathy toward military matters and preparedness, distrust of militarism, and funding constraints in the inter-war years meant that they were largely not adopted by the government when the Citizen Forces were re-established. Instead, a similar system remained in place until World War II.[228][229] This resulted in an inefficient "two army" system which would once again require the raising of a separate volunteer force to serve overseas on the outbreak of hostilities in 1939.[230]
Casualties
The bodies of nine Australian soldiers wrapped in hessian, laid out in the bottom of a mass grave at Warloy, France in August 1916.
A total of 416,809 men enlisted in the Army during the war and 331,781 men were sent overseas to serve as part of the AIF.[231] A further 3,011 men served in the AN&MEF.[232][Note 7] The AIF sustained approximately 210,000 casualties, of which 61,519 were killed or died of wounds.[231] This represented a total casualty rate of 64.8 percent, which was among the highest of any belligerent for the war.[232] About another 4,000 men were captured.[231] The majority of casualties occurred among the infantry (which sustained a casualty rate of 79 percent); however, the artillery (58 percent) and light horse (32 percent) also incurred significant losses.[91][234]
Notes
Footnotes
↑ Also included were the two remaining submarine mining companies, one at Port Jackson in Sydney, and the other at Port Phillip in Melbourne. In line with similar developments in Canada and New Zealand, submarine mining defences at Australian ports had been gradually reduced in the years prior to the war following the 1906 report of the Committee of Imperial Defence which recommended the dismantling of such defences at Newcastle in New South Wales, Lytton in Queensland, Albany in Western Australia, and in the West Channel in Port Phillip.[16]
↑ Units still to be formed included six light horse regiments, 33 infantry battalions, 30 artillery batteries, and 34 ammunition columns, as well as various field engineer companies, signals, service corps, field ambulances and other units.[31][32][33]
↑ The 1st Armoured Car Section was formed in Australia and initially fought in the Western Desert. After being re-equipped with T Model Fords, it served in Palestine as the 1st Light Car Patrol.[79] In March 1918, the British War Office had offered to provide all necessary equipment to the Australians to form their own tank battalion; however, this was turned down by Birdwood due to a lack of manpower.[80][81]
↑ Although the AIF was the largest force not maintained by conscription during the war, its volunteer status was not unique. The 1st South African Infantry Brigade which fought on the Western Front between 1916 and 1918 was an all-volunteer force. Equally, although Britain had adopted conscription in 1916 it had not extended it to Ireland, and as a consequence the Irish divisions that served with the British Army were almost exclusively made up of volunteers. Meanwhile, many British Army units were also predominately volunteers, including the Pals battalions of Kitchener's Army.[83]
↑ Despite temporarily being disembarked when the convoy reached the Suez Canal at the end of November in order to assist with the defence of the canal against Turkish forces, it had always been intended that the Australians and New Zealanders would eventually go to the Western Front like the Canadians; however, issues involving the availability of accommodation and equipment in the training areas of the Salisbury Plain made the arrival of further troops during the winter impossible, and they remained in Egypt as a result.[106]
↑ Australian industry supplied the bulk of the AIF's uniforms, boots and blankets, and approximately 20 percent of its rifles and ammunition. Production of cartridges proved to be sufficient to meet training needs in Australia only, with most of the ammunition used overseas coming from Britain. The majority of rifles were also made in Britain, not Lithgow.[170]
↑ According to the Australian War Memorial 412,953 men enlisted in the AIF and another 3,651 in the AN&MEF. Total embarkations included 331,781 who served overseas with the AIF, and 3,011 men with the AN&MEF.[232] Of those enlisted, 83,000 men were not sent overseas. The most common reason for this was due to being discharged in Australia for medical reasons; however, some deserted or were otherwise considered unsuitable, or the war ended before they departed.[233]
↑ Mallett, Ross. "Part B: Branches – Ordnance". First AIF Order of Battle 1914–1918. Australian Defence Force Academy. Archived from the original on 28 February 2015. Retrieved 27 December 2014.
↑ Mallett, Ross. "Part B: Branches – Service". First AIF Order of Battle 1914–1918. Australian Defence Force Academy. Archived from the original on 28 February 2015. Retrieved 27 December 2014.
↑ Mallett, Ross. "Part B: Branches – Medical". First AIF Order of Battle 1914–1918. Australian Defence Force Academy. Archived from the original on 28 February 2015. Retrieved 27 December 2014.
Bean, Charles (1941d) [1933]. The Australian Imperial Force in France, 1917. Official History of Australia in the War of 1914–1918. Vol.IV (11thed.). Canberra, Australian Capital Territory: Australian War Memorial. OCLC17648490.
Bean, Charles (1946). Anzac to Amiens. Canberra, Australian Capital Territory: Australian War Memorial. ISBN0140166386.{{cite book}}: ISBN / Date incompatibility (help)
Beaumont, Joan, ed. (1995). Australia's War, 1914–1918. Sydney, New South Wales: Allen & Unwin. ISBN1863734619.
Beaumont, Joan (2013). Broken Nation: Australians in the Great War. Crows Nest, New South Wales: Allen & Unwin. ISBN9781741751383.
Blaxland, John (2006). Strategic Cousins: Australian and Canadian Expeditionary Forces and the British and American Empires. Montreal, Quebec: McGill-Queen's Press. ISBN9780773530355.
Bou, Jean (2010). Light Horse: A History of Australia's Mounted Arm. Port Melbourne, Victoria: Cambridge University Press. ISBN9780521197083.
Bou, Jean; Dennis, Peter; Dalgleish, Paul; Grey, Jeffrey (2016). The Australian Imperial Force. The Centenary History of Australia and the Great War. Vol.V. South Melbourne: Oxford University Press. ISBN9780195576801.
Connor, John; Stanley, Peter; Yule, Peter (2015). The War at Home. The Centenary History of Australia and the Great War. Vol.IV. South Melbourne: Oxford University Press. ISBN9780195576788.
Coulthard-Clark, Christopher (1998). The Encyclopaedia of Australia's Battles (1sted.). St Leonards, New South Wales: Allen & Unwin. ISBN9781864486117.
Coulthard-Clark, Chris (2001). The Encyclopaedia of Australia's Battles (2nded.). Crows Nest, New South Wales: Allen & Unwin. ISBN1865086347.
Dennis, Peter; Grey, Jeffrey; Morris, Ewan; Prior, Robin (1995). The Oxford Companion to Australian Military History (1sted.). Melbourne, Victoria: Oxford University Press. ISBN0195532279.
Dennis, Peter; Grey, Jeffrey; Morris, Ewan; Prior, Robin; Bou, Jean (2008). The Oxford Companion to Australian Military History (2nded.). Melbourne, Victoria: Oxford University Press. ISBN978-0195517842.
Fitzpatrick, Jim (September 1983). "ANZACS at War on Bicycles". Royal Historical Society of Victoria of Victoria Journal. 54 (3). Melbourne, Victoria: Royal Historical Society of Victoria: 31–38. ISSN0813-1295.
Fleming, Robert (2012). The Australian Army in World War I. Men at Arms. Oxford, United Kingdom: Osprey. ISBN978-1849086325.
Grey, Jeffrey (1999). A Military History of Australia (2nded.). Melbourne, Victoria: Cambridge University Press. ISBN0521644836.
Grey, Jeffrey (2001). The Australian Army. The Australian Centenary History of Defence. Vol.I. Melbourne, Victoria: Oxford University Press. ISBN0195541146.
Grey, Jeffrey (2008). A Military History of Australia (3rded.). Melbourne, Victoria: Cambridge University Press. ISBN9780521697910.
Horner, David (1995). The Gunners. A History of Australian Artillery. Sydney, New South Wales: Allen & Unwin. ISBN1863739173.
Isaacs, Keith (1971). Military Aircraft of Australia 1909–1918. Canberra: Australian War Memorial. ISBN9780642993748.
Kuring, Ian (2004). Redcoats to Cams: A History of Australian Infantry 1788–2001. Loftus, New South Wales: Australian Military History Publications. ISBN1876439998.
McNicoll, Ronald (1979). The Royal Australian Engineers 1902 to 1919: Making and Breaking. History of the Royal Australian Engineers. Vol.II. Canberra, Australian Capital Territory: Corps Committee of the Royal Australian Engineers. ISBN9780959687125.
Molkentin, Michael (2010). Fire in the Sky: The Australian Flying Corps in the First World War. Sydney, New South Wales: Allen & Unwin. ISBN9781742370729.
Mordike, John (1992). An Army for a Nation: A History of Australian Military Developments, 1880–1914. North Sydney, New South Wales: Allen & Unwin. ISBN9781863731928.
Morgan, Benjamin (2017). "The Structure of the Post-Federation Australian Army, 1901–1910". Sabretache. LVIII (3, September). Garran, Australian Capital Territory: Military Historical Society of Australia: 37–52. ISSN0048-8933.
Palazzo, Albert (2001). The Australian Army: A History of its Organisation 1901–2001. Melbourne, Victoria: Oxford University Press. ISBN0195515072.
Pedersen, Peter (1988). "The AIF on the Western Front: The Role of Training and Command". In McKernan, M; Browne, M (eds.). Australia, Two Centuries of War & Peace. Canberra: Australian War Memorial in association with Allen & Unwin Australia. pp.167–193. ISBN0642995028.
Pedersen, Peter (2010). The Anzacs: Gallipoli to the Western Front (Paperbacked.). Camberwell, Victoria: Penguin Group. ISBN9780143008460.
Piggott, Michael (April 1988). "Stonewalling in German New Guinea". The Journal of the Australian War Memorial. 12. Canberra: Australian War Memorial: 3–15. ISSN1327-0141.
Roberts, Chris (2013). The Landing at Anzac, 1915. Australian Army Campaigns Series. Sydney, New South Wales: Big Sky. ISBN9781922132208.
Rowley, Charles (1958). The Australians in German New Guinea 1914–1921. Carlton, Victoria: Melbourne University Press. OCLC378150.
Scott, Ernest (1941) [1936]. Australia During the War. Official History of Australia in the War of 1914–1918. Vol.XI (7thed.). Canberra, Australian Capital Territory: Australian War Memorial. OCLC7466425.
Shaw, Peter (2010). "The Evolution of the Infantry State Regiment System in the Army Reserve". Sabretache. LI (4 (December)). Garran, Australian Capital Territory: Military Historical Society of Australia: 5–12. ISSN0048-8933.
Stevenson, Robert (2013). To Win the Battle: The 1st Australian Division in the Great War, 1914–1918. Port Melbourne, Victoria: Cambridge University Press. ISBN9781107028685.
Wilson, Graham (2012). Bully Beef and Balderdash: Some Myths of the AIF Examined and Debunked. Newport, New South Wales: Big Sky Publishing. ISBN9781921941566.
Wood, James (2006). Chiefs of the Australian Army: Higher Command of the Australian Military Forces 1901–1914. Loftus, New South Wales: Australian Military Historical Publications. ISBN1876439408.
Neillands, Robin (2004) [1998]. The Great War Generals on the Western Front 1914–1918. London: Magpie Books. ISBN1841198633.
Perry, F.W. (1992). Order of Battle of Divisions Part 5A. The Divisions of Australia, Canada and New Zealand and Those in East Africa. History of the Great War Based on Official Documents by Direction of the Historical Section of the Committee of Imperial Defence. Newport: Ray Westlake Military Books. ISBN1871167256.
Westerman, William (2017). Soldiers and Gentlemen: Australian Battalion Commanders in the Great War, 1914–1918. Cambridge, United Kingdom: Cambridge University Press. ISBN9781107190627.
This page is based on this Wikipedia article Text is available under the CC BY-SA 4.0 license; additional terms may apply. Images, videos and audio are available under their respective licenses.