Action on the Polderhoek Spur

Last updated

Action on the Polderhoek Spur
Part of the Third Battle of Ypres of the First World War
Dritte Flandernschlacht - Karte-2.png
Diagram showing the front line in November 1917 (Polderhoek Spur is south of Polygon Wood)
Date3 December 1917
Location
Ypres Salient, Belgium
50°50′N02°59′E / 50.833°N 2.983°E / 50.833; 2.983
Result German victory
Belligerents

Flag of the United Kingdom.svg  British Empire

Flag of the German Empire.svg German Empire
Commanders and leaders
Douglas Haig Crown Prince Rupprecht
Units involved
2nd New Zealand Brigade 19th Reserve Division
Casualties and losses
1,198 (1–31 December)
Belgium location map.svg
Red pog.svg
Polderhoek Spur
Site of Polderhoek Spur, west of Becelaere (Beselare)

The Action on the Polderhoek Spur (3 December 1917), was a local operation in the Ypres Salient, by the British Fourth Army (renamed from the Second Army on 8 November) against the German 4th Army during the Third Battle of Ypres in Belgium during the First World War. Two battalions of the 2nd New Zealand Brigade of the New Zealand Division attacked the low ridge from which German observers could view the ground from Cameron Covert to the north and the Menin road to the south-west. A New Zealand advance of 600 yd (550 m) on a 400 yd (370 m) front, would shield the area north of the Reutelbeek stream from German observers on the Gheluvelt spur further south.

Contents

Heavy artillery bombarded the ruins of Polderhoek Château and the pillboxes in the grounds on 28 and 30 November as howitzers fired a wire cutting bombardment. The attack on 3 December was made in daylight, as a ruse, in the hope that the unusual time would surprise the German defenders, who would be under cover sheltering from the bombardments being fired at the same time each day. The British planned smoke and gas bombardments on the Gheluvelt and Becelaere spurs on the flanks and the infantry attack began at the same time as the "routine" bombardment.

The ruse failed; some of the British artillery-fire dropped short on the New Zealanders and the Germans engaged the attackers with small-arms fire from Polderhoek Spur and Gheluvelt ridge. A strong west wind ruined the smoke screens and the British artillery failed to suppress the German machine-guns, which forced the attackers under cover. New Zealand machine-gunners then repulsed a counter-attack by German parties advancing along the Becelaere road. The New Zealanders were 150 yd (140 m) short of the first objective but another attempt after dark was cancelled because of the full moon and sight of German reinforcements reaching Polderhoek Château.

On 4 December, German troops assembling for another counter-attack were dispersed by British artillery-fire and German artillery bombarded the captured area all day. The New Zealanders consolidated the new trench line during the night and defeated a German counter-attack at dawn on 5 December. The New Zealanders handed over to IX Corps and went into reserve as the Germans used an observation balloon, accurately to direct the German guns. A German attack later in the day was stopped by artillery-fire but on 14 December, the ground was re-captured by a German counter-attack.

Background

Strategic developments

Rain had caused the British temporarily to postpone attacks after the offensive began with the Battle of Pilckem Ridge on 31 July but in August the water had dried relatively quickly. In October the rains soaked the ground again and did not dry in sunny spells. (In 1935, the chief engineers of the armies, corps and divisions reported that contact with the front line became much more difficult in early October, which also applied to the French First Army on the northern flank.) Carrying parties were needed to move supplies to the front line and conditions for the artillery became so bad that pack mules were brought in to carry ammunition. Heavy artillery had to be strung out in lines along the plank roads, which made them easily visible to German artillery observers. [1]

Field Marshal Sir Douglas Haig, the commander of the British Expeditionary Force (BEF) was kept informed of conditions and the levels of sickness in the armies in Flanders and judged accurately that conditions for German troops were worse. Haig abandoned the strategic objectives of the offensive in early October but ordered that once the weather had improved, Passchendaele Ridge was to be captured as a suitable winter position. [1] On 21 October, the 4th Army reported that its troops would not be able to continue to resist for much longer, under the constant British artillery-fire and being exposed to the weather in mud-filled shell-holes, with no time for recover because of the tempo of British attacks. [2]

British tactics, late 1917

After the Battle of the Menin Road Ridge on 20 September, British attack planning had reached a stage of development where plans had been reduced to a formula; on 7 November, the Second Army operation order for the next attack was written on less than a sheet of paper. Corps staffs produced more detailed plans, particularly for the artillery and greater discretion granted to divisional commanders than in 1915 and 1916. The tactical sophistication of the infantry had increased during the battle but the chronic difficulty of communication between front and rear during an attack could only partially be remedied by expedients that relied on observation, which was dependent on good visibility. Due to the German system of pillbox defence and the impossibility of maintaining line formations on ground full of flooded shell-craters, waves of infantry had been replaced by a thin line of skirmishers leading small columns, which snaked around shell-holes and mud sloughs. The rifle was re-established as the primary infantry weapon and Stokes mortars were added to creeping barrages; "draw net" barrages were introduced, where field guns began a barrage 1,500 yd (1,400 m) behind the German front line and then moved it towards the German positions several times before an attack. [3]

German tactics

German counter-attacks from the Battle of the Menin Road Ridge on 20 September to the end of the Flanders campaign, were "assaults on reinforced field positions", due to the British infantry making shorter advances after the torrential rains of August turned the ground into a swamp. The British difficulty in co-ordinating infantry advances, artillery-fire, tank and aircraft operations in such weather, left the British infantry vulnerable to the German defensive tactic of Gegenstöße (instant-immediate counter-attacks). The good weather in early September greatly increased the effectiveness of British air observation and artillery-fire and on 20 September, the Battle of Polygon Wood (26 September) and the Battle of Broodseinde (4 October), German counter-attacks had been smashed. [4] On 9 October, the 4th Army dispersed the battalions of front line regiments again and moved reserve battalions back behind the artillery protective line. Eingreifdivisionen were moved closer to the front line quickly to counter-attack and counter-battery fire was increased to protect the Eingreifdivisionen from the British artillery. [5]

Behind a Vorfeldlinie, an outpost zone 500–1,000 yd (460–910 m) deep, was occupied by a few sentries and machine-guns. When the British attacked, the sentries were swiftly to retire across the outpost zone to the main line of resistance (Hauptwiederstandslinie) and the artillery was quickly to bombard the Vorfeldlinie. The rear battalions of the Stellungsdivisionen and its Eingreifdivision would advance to the Hauptwiederstandslinie and conduct a Gegenstoß (swift counter-attack) or a Gegenangriff (methodical counter-attack) after 24–48 hours to prepare. [5] The length of front held by a Stellungsdivision was reduced by half to 2,500 yd (1.4 mi; 2.3 km) with a depth of 8,000 yd (4.5 mi; 7.3 km), because of the difficulties caused by the weather, devastating British artillery-fire and German infantry casualties. Infantry battalions were relieved after two days and the divisions every six days. [6] The revised defensive system helped the German infantry retain the north end of Passchendaele Ridge but by mid-November, the 4th Army had been reduced to hanging on until winter ended the battle. [7]

Prelude

Polderhoek Spur

October–November

Weather
1 November – 6 December 1917 [8] [lower-alpha 1]
DateRain
mm
Temp
°F
10.251dull
20.756dull
30.052dull
40.047dull
50.049fog
61.052dull
71.448dull
82.644dull
91.650dull
1013.446
111.848
12fine
13fine
14rain
15fine
16dull
17dull
18dull
19dull
20dull
21rain
22rain
23rain
24rain
25rain
26snow
27rain
28fine
29fine
30fine
1fine
2cold
3fine
4cold
5fine

A brigade of the 5th Division attacked on 4 October between the Scherriabeek and Reutelbeek towards Polderhoek Spur and the château, against the German 19th Reserve Division (with the 17th Division in reserve as its Eingreif division). The brigade captured pillboxes in the château grounds and parties got into the château but German troops conducted eight Gegenstöße (instant counter-attacks) and recaptured the spur. [10] At 5:20 a.m. on 9 October, the 5th Division attacked again with a fresh brigade, reached the château ruins and attacked the pill-boxes nearby but mud clogged many weapons. Machine-gun fire from Gheluvelt forced the British back to the start line and a night attack was cancelled. The British commander attributed the defeat to the failure to bombard or attack Gheluvelt. [11]

At 5:30 a.m. on 26 October, another 5th Division brigade attacked the spur, the 7th Division attacking Gheluvelt on the right. The 7th Division was held up by mud and the right hand battalion of the 5th Division attack found the Scherriabeek valley a mud slough; rifles and machine-guns were clogged and the attackers were raked by fire from Gheluvelt. The centre battalion reached the château and captured a German battalion headquarters, 100 men and many machine-guns but with rifles out of action and exposed in a salient, the battalion was too vulnerable to a counter-attack and withdrew level with the flanking battalions. [12]

By dark the British were back on the start line and the German artillery deluged the forward British positions and batteries, tracks and roads east of Ypres and hit railheads, dumps and camps west of the city with long-range guns. The Germans fired area bombardments every day at intervals behind the British front but it was soon possible to predict the targets and avoid the worst spots. German shells sank into the mud before exploding, which threw up mud spouts with little explosive effect. British shells fitted with the instantaneous No. 106 Fuze worked better but still with limited effect. [13]

On 6 November, the last fresh brigade of the 5th Division attacked the spur at 6:00 a.m. after the divisional artillery had been reinforced to one 18-pounder for every 9 yd (8.2 m) of front, some firing shrapnel and some with HE shells fitted with Fuze 106. Heavy artillery bombarded the German pillboxes with HE shells but the pillboxes were so small that few were hit. As the British infantry advanced behind the creeping barrage, they were caught by German machine-gun fire; confused fighting began in the château grounds and the British got within 70 yd (64 m) of the ruins. By nightfall a blockhouse in the south-west corner of the grounds had been captured and several German counter-attacks repulsed. [14]

December

The Germans held a line of posts from Joiners' Wood in the north to Journal Wood, Judge Copse and Juniper Wood in the south, with advanced posts on the outskirts of Reutel. The main German defensive positions were on higher ground at Becelaere, 1,000 yd (910 m) to the east. South of the Reutelbeek, the British front line ran westwards and was enfiladed (vulnerable to fire on along it from a flank) at Cameron Covert and Reutel. The northern limit of the II Anzac Corps front was at the Tiber pillboxes 1,000 yd (910 m) south of Passchendaele, from where the line ran 4.5 mi (7.2 km) along Broodseinde Ridge, east of Polygon Wood to the Reutelbeek, which flowed eastwards from the main ridge north of the Menin road and then turned south-east to the Lys. [15]

The New Zealand Division occupied about a 1.5 mi (2.4 km) front on the right flank of the corps. There was salient to the north at the In de Ster Cabaret between Noordemhoek and Reutel and beyond Reutel, the line curved to the south-west to the Polygonebeek, which flowed from Polygon Wood. [15] The Polygonebeek joined the Reutelbeek on flat ground about 500 yd (460 m) in front of the New Zealand positions. South of the Polygonebeek the line continued south-west along the edge of Cameron Covert, which was held by posts rather than a continuous line and then descended towards the Reutelbeek, connecting with IX Corps close to the Menin road. [16]

Polygon Wood was about 1 mi (1.6 km) behind the front line and to the west the ground sloped down to Nonne Boschen. Between the woods and Westhoek Ridge, the Hanebeek flowed northwards. The ground had been devastated by artillery-fire and was covered in shell holes, trees had been toppled and the stream banks and beds had been smashed and were full of dead mules, making revolting swamps. Carts were strewn along the sides of plank roads and knocked out tanks littered the wastes. Shells and all manner of equipment lay around and the II Anzac Corps sent reserve units systematically to salvage equipment. [17]

At the beginning of December, the right flank of the New Zealand Division lay on a small rise at the lip of the plateau, at the high Jericho pillbox, beyond which the ground declined to the Scherriabeek. The left flank was at Joppa, a German shelter in the cellar of a demolished house, behind which the ground fell gradually towards a crater field containing the Veldhoek pillboxes. A duckboard track ran through Veldhoek, past the Tower pillbox and up the slopes of the main ridge to the Menin road, which lay almost unrecognisable to the south, diagonal from the New Zealand front line to Gheluvelt and at Veldhoek it was 500 yd (460 m) away but on the New Zealand front was on the west side of the Scherriabeek valley, about 1,000 yd (910 m) distant. [18]

New Zealand preparations

II Anzac Corps front line from Reutel to Polderhoek Spur and the Menin road Front line Menin road, Polderhoek, Reutel, 5 December 1917.png
II Anzac Corps front line from Reutel to Polderhoek Spur and the Menin road

Patrols reconnoitred no man's land and the German positions and found the opposing infantry to be cautious but the German artillery kept up a constant fire. A wireless message was intercepted during the evening of 16 November, alerting the II Anzac Corps that a gas bombardment was to begin at midnight along the corps front. The bombardment from 11:00 p.m.–1.30 a.m. had little effect and two nights later, a German raid on a post near In de Ster Cabaret was repulsed. On the New Zealand front, communications with the rear and artillery emplacements were overcrowded and under observation and the front line was un-prepared for defence. [19]

The German infantry could assemble on unseen ground to attack and had a large amount of artillery in support, leaving the high ground from the Menin road north to Broodseinde and Passchendaele vulnerable. The loss of Broodseinde Ridge would make Passchendaele indefensible and a smaller attack against the New Zealand positions at In de Ster Cabaret would give the Germans a footing on the plateau and observation over more British positions. On the southern flank where the front line bent back westwards, the loss of the high ground in the IX Corps area from the Reutelbeek to Clapham Junction would endanger the supply routes to the New Zealand Division. [20]

New Zealand plan

General Sir Henry Rawlinson took over command of the Second Army on 8 November. Haig ended the offensive on 20 November but wanted local operations to continue, to prevent the Germans from transferring troops to Cambrai, where the Third Army attacked on the same day. [21] An attack on Polderhoek Spur and Gheluvelt village, to add depth to the British defensive positions, was mooted but the plan was reduced to the occupation of Polderhoek Spur. It was intended to occupy the low, east-running ridge to deny German artillery-observers a view over the area between Cameron Covert, Reutel and Polygon Wood to the north and the Menin road to the south-west. An advance down the slope of 600 yd (550 m) on a 400 yd (370 m) front would deprive the Germans of the commanding view to the north. The spur was opposite the IX Corps (Major-General Alexander Hamilton-Gordon) but II Anzac Corps (Lieutenant-General Alexander Godley) was most exposed and the New Zealanders were chosen for the attack; IX Corps was then to take over the captured ground. [22]

Map showing Allied advances in the Ypres Salient, 1917 (expandable) Third Ypres - Map Showing Progress in the Ypres Area..jpg
Map showing Allied advances in the Ypres Salient, 1917 (expandable)

Brigadier-General William Braithwaite, commander of the 2nd New Zealand Brigade, planned the attack as Major-General Andrew Russell, was on leave. [23] An advance southwards across the Reutelbeek was vulnerable to German machine-gun fire from Becelaere and Juniper Wood and the New Zealand field artillery would have to fire in enfilade. There was no room for troops to assemble and the Reutelbeek was a morass about 20–30 ft (6.1–9.1 m) wide; on the left bank the swamp was within 100 yd (91 m) of the New Zealand posts in Cameron Covert. An attack from the west could use assembly trenches close to the Polderhoek Spur and have a barrage front parallel to the infantry advance. [24] The IX Corps heavy artillery could carry out the preparatory bombardment, avoiding the need to register new guns, which would alert the Germans. Heavy artillery bombarded Polderhoek Château and the pillboxes on 28 and 30 November, while howitzers cut the German wire. [25]

Three field artillery brigades reinforced the New Zealand divisional artillery, for a creeping barrage by 18-pounder field guns just in front of the infantry. Another barrage 150 yd (140 m) beyond was to be fired by 18-pounders and 4.5-inch howitzers. [25] On the right flank, the field artillery of IX Corps was to sweep the Menin road, Gheluvelt and the Scherriabeek valley. North of the Reutelbeek, the German shell-hole positions and emplacements would be bombarded and two machine-gun barrages were to be fired on Polderhoek Spur and the north side of the château. Stokes mortars and five of the new Newton 6-inch medium trench mortars were to fire gas bombs at positions in Juniper Wood. [25]

To surprise the defenders, the attack was to be in daylight and timed to try to catch the Germans as they sheltered from the regular morning bombardment. The attack was to begin with the "routine" bombardment as smoke and gas bombardments blanketed the Gheluvelt and Becelaere spurs. The château was only 200 yd (180 m) away, German outposts were even closer and to make sure that the outposts were hit, the artillery barrage was planned to begin very close to the New Zealand positions. For deception, a few Lewis gunners and snipers were to hold the New Zealand front line, stay below the parapets and keep quiet. The attacking battalions were to assemble in the support trenches, where greatcoats were to be left behind; each soldier was to carry only his fighting equipment, a waterproof, leather jerkin, a mess tin with a soup square and a tin of solidified alcohol. [26]

Attack

3 December

The prudence in assembling troops in the support line was justified, because some shells from the creeping barrage dropped short and caused many casualties as the New Zealanders moved into the open, especially in the left company of the 1st Otago Battalion. The German infantry and machine-gunners were not under cover, despite the regular heavy artillery bombardments before midday and as soon as the New Zealand artillery opened fire, the German machine-gunners replied from the pillboxes near the château and from Gheluvelt Ridge. German artillery bombarded the duck-board track near Veldhoek but the narrowness of no man's land, which had limited the IX Corps heavy bombardment, also prevented the Germans from bombarding the New Zealand assembly positions. The first New Zealand wave pressed on into a wilderness of tree stumps, where the German wire was found to be well cut. [27]

The 12th (Nelson) Company on the right of the 1st Canterbury Battalion was faced by machine-gun fire from a ruined pillbox and dugout. The New Zealand advance stopped until the post was overrun by a few men, who captured the gun and took eight prisoners. [27] [lower-alpha 2] The company was more vulnerable to machine-gun fire from Gheluvelt Ridge, when a strong westerly wind blew away the smoke barrage and the British artillery failed to suppress the machine guns in Gheluvelt village. The Nelson Company suffered many casualties from the enfilade fire and the Germans in their path but kept going. As the New Zealanders advanced, sections were dropped off to form a defensive flank along the southern slope of the spur. The sections used Lewis guns and rifles and inflicted many casualties on the Germans and a Lewis gunner knocked out a German machine-gun. [28] Casualties in the Nelson Company prevented the survivors and the left-hand company of the 1st Canterbury from over-running a big blockhouse and reinforcements from the support company were also defeated. To fill the gap left by the reinforcements, the reserve company moved forward through an artillery barrage at Veldhoek to Jericho. [29]

On the left flank, the 1st Otago Battalion was supported by machine-gun fire from the New Zealand Rifle Brigade, which several times dispersed German troops advancing down the Becelaere road. Medium mortars fired 850 rounds and retaliatory fire from every German gun in range, knocked out one mortar and damaged another. The 1st Otago were less vulnerable to the enfilade fire from Gheluvelt and captured a pillbox. The volume of machine-gun fire from the château stopped the advance level with the 1st Canterbury, about 150 yd (140 m) short of the intermediate objective. Troops from the support companies were sent forward but individual attempts to advance and organised attempts to outflank German positions failed. Several New Zealand machine-guns were knocked out and many of the infantry became casualties, both battalions being reduced by half. Lack of experience among the recent replacements and the volume of machine-gun fire from undamaged pillboxes on the narrow front of attack could not be overcome. About thirty German prisoners had been taken and the New Zealand survivors began to dig in on captured ground that gave a commanding view over the Scherriabeek valley. [29]

German infantry massing for a counter-attack during the afternoon at the higher end of the valley between Polderhoek and the Gheluvelt Spur were easily seen and a Stokes mortar was moved to Jericho. The crew opened rapid fire, which sent the German troops running for cover, casting away rifles and equipment. [29] Very few of the Germans reached Gheluvelt, no attack followed and for several hours German stretcher-bearers under a Red Cross flag were allowed off the Menin road to rescue wounded. During the evening a large number of German reinforcements came up to the château and some were shot down by Lewis gunners. Braithwaite wanted another attack after dark, possibly an enveloping movement from the Reutelbeek but the German reinforcements, the vigilance of the château garrison and the doubtful situation on the New Zealand left led to caution. The only troops available were the reserve companies and parties from the support companies. If these troops attacked, the New Zealand positions would be vulnerable to a repulse on the left flank. During the night, the area on the left flank south of the Reutelbeek was consolidated but the full moon came up and illuminated the ground. New Zealand stretcher-bearers searched shell holes among the trees amidst machine-gun fire and got the wounded away by first light. [30]

Aftermath

Analysis

The diarist of the II Anzac Corps wrote that

...undamaged and strongly garrisoned with troops and MGs, [it] proved so formidable an obstacle that our attacking troops were held up and were compelled to consolidate a line about 150 yards east of the CHÂTEAU grounds, but west of the CHÂTEAU itself.

Stewart [31]

The attacking battalions had suffered about 50 per cent casualties but Braithwaite wanted another attack during the night, possibly a flanking manoeuvre from the Reutelbeek. German reinforcements arrived and the defenders remained alert and with the new moon up, surprise would be impossible and the attack was cancelled. [31] Rawlinson wrote that the attack had failed because pillboxes to the south of Polderhoek Château and a trench behind them commanded the entrance of the château blockhouse; their garrisons had prevented the New Zealanders from getting inside. [32] An after-action report by the 2nd New Zealand Brigade noted that the attackers rehearsed during the four days from 27–30 November on ground specially marked to resemble the spur and the German defences but that this had been insufficient. The advance had begun well but many of the attackers were recent replacements and lacked experience of artillery-fire from both sides. When the experienced officers and NCOs became casualties, the newcomers were unable to take over and continue the attack. [31]

Casualties

In 1921, Hugh Stewart, the New Zealand Division historian, wrote that the New Zealanders had 1,198 casualties in December 1917. [33]

Subsequent operations

On the morning of 4 December, German troops were seen massing on the east and south-east slopes of the spur but were dispersed by British artillery-fire and retired on Becelaere. New Zealand snipers shot many Germans near the château, who were apparently ignorant of the positions of the New Zealand infantry; German artillery bombarded the New Zealanders and the ground as far back as Veldhoek. During the night, the survivors of the two New Zealand battalions were relieved and the ground consolidated by Maori pioneers. Patrols advanced to within 50 yd (46 m) of the château and saw that the Germans had also conducted a relief. [30] The captured ground had great tactical value but Cameron Covert, Reutel and Polygon Wood was still exposed to view from the German lines. [34] At dawn on 5 December, about 80 Germans made a surprise attack on the New Zealand left flank, got to within 30 yd (27 m) and knocked out a Lewis gun. [35]

Another Lewis gun and the riflemen opened fire and about half of the raiding party was shot. After dawn, the Germans used an observation balloon for a systematic artillery bombardment, causing much damage to the New Zealand trenches and several casualties. Prisoners later said that the bombardment was for an attack at 5:00 p.m. but the British artillery, which had been engaged in counter-battery fire all day, bombarded the German assembly area and thwarted the attack. The German bombardment diminished, the New Zealand trenches were rebuilt and the wounded were evacuated. During the evening the position was handed back to IX Corps and the 2nd New Zealand Brigade went into reserve. [35] On 14 December, Infantry Regiment 162 of the 17th Reserve Division recaptured the ground dominating the Scherriabeek valley. [34]

Notes

  1. After 11 November, data for the BEF area in France. [9]
  2. Private Henry Nicholas was awarded the Victoria Cross for his role in this action. [27]

Footnotes

  1. 1 2 LoCicero 2011, pp. 19–20.
  2. Edmonds 1991, pp. 373–379, 345–346.
  3. Simpson 2001, pp. 138–139, 143.
  4. Edmonds 1991, pp. 294–295.
  5. 1 2 Wynne 1976, p. 309.
  6. Wynne 1976, pp. 310–312.
  7. LoCicero 2011, p. 53.
  8. Perry 2014, p. 525; GWW 2012.
  9. GWW 2012.
  10. McCarthy 1995, pp. 97–98.
  11. Hussey & Inman 1921, p. 182; Edmonds 1991, p. 334.
  12. Hussey & Inman 1921, p. 183.
  13. Hussey & Inman 1921, p. 184.
  14. Hussey & Inman 1921, p. 186.
  15. 1 2 Stewart 2014, p. 299.
  16. Stewart 2014, pp. 299, 310.
  17. Stewart 2014, pp. 299–300.
  18. Stewart 2014, p. 310.
  19. Stewart 2014, pp. 300–302.
  20. Stewart 2014, pp. 301–302.
  21. Edmonds 1991, p. 360.
  22. Stewart 2014, pp. 305–308.
  23. LoCicero 2011, p. 329.
  24. Stewart 2014, pp. 305–307.
  25. 1 2 3 Stewart 2014, p. 308.
  26. Stewart 2014, pp. 308–311.
  27. 1 2 3 Stewart 2014, p. 311.
  28. Stewart 2014, p. 312.
  29. 1 2 3 Stewart 2014, p. 313.
  30. 1 2 Stewart 2014, p. 314.
  31. 1 2 3 LoCicero 2011, p. 332.
  32. LoCicero 2011, p. 335.
  33. Stewart 2014, p. 327.
  34. 1 2 LoCicero 2011, p. 368.
  35. 1 2 Stewart 2014, p. 315.

Related Research Articles

<span class="mw-page-title-main">Battle of Passchendaele</span> Military campaign of the First World War

The Third Battle of Ypres, also known as the Battle of Passchendaele, was a campaign of the First World War, fought by the Allies against the German Empire. The battle took place on the Western Front, from July to November 1917, for control of the ridges south and east of the Belgian city of Ypres in West Flanders, as part of a strategy decided by the Allies at conferences in November 1916 and May 1917. Passchendaele lies on the last ridge east of Ypres, 5 mi (8 km) from Roulers, a junction of the Bruges-(Brugge)-to-Kortrijk railway. The station at Roulers was on the main supply route of the German 4th Army. Once Passchendaele Ridge had been captured, the Allied advance was to continue to a line from Thourout to Couckelaere (Koekelare).

<span class="mw-page-title-main">New Zealand Division</span> Infantry division of the New Zealand Expeditionary Force

The New Zealand Division was an infantry division of the New Zealand Expeditionary Force raised for service in the First World War. It was formed in Egypt in early 1916 when the New Zealand and Australian Division was renamed after the detachment of its Australian personnel left the New Zealand Infantry Brigade, together with reinforcements from New Zealand, as the basis of the division. It was commanded by Major General Andrew Hamilton Russell for the duration of the war.

<span class="mw-page-title-main">Battle of Messines (1917)</span> Part of the Western Front in World War I

The Battle of Messines was an attack by the British Second Army, on the Western Front, near the village of Messines in West Flanders, Belgium, during the First World War. The Nivelle Offensive in April and May had failed to achieve its more grandiose aims, had led to the demoralisation of French troops and confounded the Anglo-French strategy for 1917. The attack forced the Germans to move reserves to Flanders from the Arras and Aisne fronts, relieving pressure on the French.

<span class="mw-page-title-main">Battle of Poelcappelle</span> October 1917 World War I battle

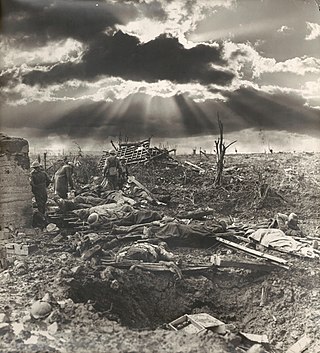
The Battle of Poelcappelle was fought in Flanders, Belgium, on 9 October 1917 by the British Second Army and Fifth Army against the German 4th Army, during the First World War. The battle marked the end of the string of highly successful British attacks in late September and early October, during the Third Battle of Ypres. Only the supporting attack in the north achieved a substantial advance. On the main front, the German defences withstood the limited amount of artillery fire achieved by the British after the attack of 4 October. The ground along the main ridges had been severely damaged by shelling and rapidly deteriorated in the rains, which began again on 3 October, turning some areas back into swamps.

<span class="mw-page-title-main">Battle of Broodseinde</span> Battle in Belgium in 1917 during World War I

The Battle of Broodseinde was fought on 4 October 1917 near Ypres in Belgium, at the east end of the Gheluvelt plateau, by the British Second and Fifth armies against the German 4th Army. The battle was the most successful Allied attack of the Third Battle of Ypres. Using bite-and-hold tactics, with objectives limited to what could be held against German counter-attacks, the British devastated the German defence, which prompted a crisis among the German commanders and caused a severe loss of morale in the 4th Army. Preparations were made by the Germans for local withdrawals and planning began for a greater withdrawal, which would entail the abandonment by the Germans of the Belgian coast, one of the strategic aims of the Flanders offensive.

<span class="mw-page-title-main">Battle of Polygon Wood</span> 1917 battle of the First World War

The Battle of Polygon Wood took place from 26 September to 3 October 1917, during the second phase of the Third Battle of Ypres in the First World War. The battle was fought near Ypres in Belgium, in the area from the Menin road to Polygon Wood and thence north, to the area beyond St Julien. Much of the woodland had been destroyed by the huge quantity of shellfire from both sides since 16 July and the area had changed hands several times.

<span class="mw-page-title-main">Battle of Langemarck (1917)</span> Battle during the First World War

The Battle of Langemarck was the second Anglo-French general attack of the Third Battle of Ypres, during the First World War. The battle took place near Ypres in Belgian Flanders, on the Western Front against the German 4th Army. The French First Army had a big success on the northern flank from Bixschoote to Drie Grachten and the British gained a substantial amount of ground northwards from Langemark to the boundary with the French.

<span class="mw-page-title-main">Second Battle of Passchendaele</span> Part of the Third Battle of Ypres in the First World War

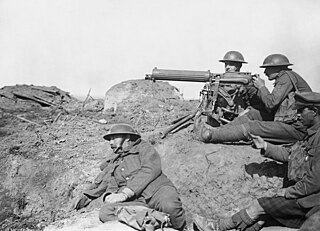
The Second Battle of Passchendaele was the culminating attack during the Third Battle of Ypres of the First World War. The battle took place in the Ypres Salient area of the Western Front, in and around the Belgian village of Passchendaele, between 26 October and 10 November 1917. The Canadian Corps relieved the exhausted II Anzac Corps, continuing the advance started with the First Battle of Passchendaele and ultimately capturing the village. Beyond gaining favourable observation positions, the battle was intended to gain drier winter positions on higher ground.

<span class="mw-page-title-main">First Battle of Passchendaele</span> Battle in World War I, 12 October 1917

The First Battle of Passchendaele took place on 12 October 1917 during the First World War, in the Ypres Salient in Belgium on the Western Front. The attack was part of the Third Battle of Ypres and was fought west of Passchendaele village. The British had planned to capture the ridges south and east of the city of Ypres as part of a strategy decided by the Allies at conferences in November 1916 and May 1917. Passchendaele lay on the last ridge east of Ypres, 5 mi (8.0 km) from the railway junction at Roulers, which was an important part of the supply system of the German 4th Army.

<span class="mw-page-title-main">Battle of Pilckem Ridge</span>

The Battle of Pilckem Ridge was the opening attack of the Third Battle of Ypres in the First World War. The British Fifth Army, supported by the Second Army on the southern flank and the French 1reArmée on the northern flank, attacked the German 4th Army, which defended the Western Front from Lille northwards to the Ypres Salient in Belgium and on to the North Sea coast. On 31 July, the Anglo-French armies captured Pilckem Ridge and areas on either side, the French attack being a great success. After several weeks of changeable weather, heavy rain fell during the afternoon of 31 July.

<span class="mw-page-title-main">Battle of the Menin Road Ridge</span>

The Battle of the Menin Road Ridge, sometimes called "Battle of the Menin Road", was the third British general attack of the Third Battle of Ypres in the First World War. The battle took place from 20 to 25 September 1917, in the Ypres Salient in Belgium on the Western Front. During the pause in British and French general attacks from late August to 20 September, the British changed some infantry tactics, adopting the leap-frog method of advance.

<span class="mw-page-title-main">Capture of Wurst Farm</span>

The Capture of Wurst Farm was an attack by the British 58th Division against the German 36th Division on 20 September 1917, near Ypres, Belgium, during the Battle of the Menin Road Ridge, part of the Third Battle of Ypres. Wurst Farm was at the lower end of Gravenstafel Ridge and several British attacks in the area since 31 July had been repulsed by the Germans. The British began a desultory bombardment on 31 August and the shelling became intense from 13 September, to "soften" the German defences, except in the area of the Fifth Army, where the slow bombardment continued until 24 hours before zero hour, when a surprise hurricane bombardment was to be fired.

<span class="mw-page-title-main">Action of 25 September 1917</span>

The action of 25 September 1917 was a German methodical counter-attack (Gegenangriff) which took place during the Third Battle of Ypres (31 July – 10 November) on the Western Front during the First World War. On the front of the British X Corps at the south-east side of the Gheluvelt Plateau, two regiments of the German 50th Reserve Division attacked on both sides of the Reutelbeek stream, on a 1,800 yd (1,600 m) front. The Gegenangriff was supported by German aircraft and 44 field and 20 heavy batteries of artillery, four times the usual amount of artillery for a German division.

<span class="mw-page-title-main">Actions of 30 September – 4 October 1917</span>

The Actions of 30 September – 4 October 1917 were German methodical counter-attacks during the Third Battle of Ypres, in Flanders, during the First World War. Hasty counter-attacks by the German 4th Army during the Battle of the Menin Road Ridge on 20 September and the Battle of Polygon Wood on 26 September, had been costly failures. On 29 September, a review was held at Roulers by Erich Ludendorff, the Generalquartiermeister with the commanders of Heeresgruppe Kronprinz Rupprecht von Bayern and the 4th Army staffs.

<span class="mw-page-title-main">Gheluvelt Plateau actions, July–August 1917</span>

The Gheluvelt Plateau actions, July–August 1917 took place from 31 July to 27 August, during the Third Battle of Ypres in Belgium, in the First World War. The British Fifth Army and the German 4th Army fought for possession of the plateau at the highest part of the ridges to the south-east, east and north-east of Ypres in West Flanders. The 4th Army had been building defensive positions in the Ypres Salient since 1915 and the Gheluvelt Plateau was the most fortified section of the front. The Fifth Army had made the plateau its main objective during the Battle of Pilckem Ridge but the II Corps advance was contained short of its objectives and German counter-attacks later recaptured some ground.

<span class="mw-page-title-main">Capture of Westhoek</span>

The Capture of Westhoek took place on the Gheluvelt Plateau near Ypres in Belgium, during the Third Battle of Ypres, in the First World War. The British Fifth Army attacked the Gheluvelt Plateau at the Battle of Pilckem Ridge but the German 4th Army had fortified its positions in the Ypres Salient since the Second Battle of Ypres. The British reached the first objective in the south and the second objective on the northern flank, losing some ground to German counter-attacks. A British attack due on 2 August was postponed because torrential rains from the afternoon of 31 July until 5 August washed out the battlefield.

<span class="mw-page-title-main">Action of 22 October 1917</span>

The action of 22 October 1917 was an attack during the Third Battle of Ypres in the First World War by the British Fifth Army and the French First Army against the German 4th Army. British attacks had been repulsed at Passchendaele by the 4th Army at the Battle of Poelcappelle and the First Battle of Passchendaele. While the British waited for another dry spell and the completion of plank roads up to the new front line, the Canadian Corps and fresh British divisions were transferred to Flanders by the British Expeditionary Force (BEF).

<span class="mw-page-title-main">Capture of Wytschaete</span> Part of the Battle of Messines in World War I

The Capture of Wytschaete was a tactical incident in the Battle of Messines on the Western Front during the First World War. On 7 June, the ridge was attacked by the British Second Army; the 36th (Ulster) Division and the 16th (Irish) Division of IX Corps captured the fortified village of Wytschaete on the plateau of Messines Ridge, which had been held by the German 4th Army since the First Battle of Ypres.

<span class="mw-page-title-main">Night action of 1/2 December 1917</span>

The Night action of 1/2 December 1917 during the First World War, was a local operation on the Western Front, in Belgium at the Ypres Salient. The action was a British Fourth Army attack on the German 4th Army. The Third Battle of Ypres proper had ended officially on 20 November but the attack was intended to capture the heads of valleys leading eastwards from the ridge, to gain observation over German positions.

<span class="mw-page-title-main">Action of 22 August 1917</span>

The action of 22 August 1917, took place during the First World War, in the Ypres Salient on the Western Front as part of the Third Battle of Ypres. The engagement was fought by the Fifth Army of the British Expeditionary Force and the German 4th Army. During the Battle of Langemarck, the British had advanced north of the village but had been defeated further south and failed to capture the Wilhelmstellung, the third German defensive position. At a conference with the Fifth Army corps commanders on 17 August, Gough arranged for local attacks to gain jumping-off positions for another general attack on 25 August. At the action of the Cockcroft on 19 August, XVIII Corps and the 1st Tank Brigade had captured five fortified farms and strongpoints for a fraction of the casualties of a conventional attack.

References

Books

Theses

Websites

Further reading

Books

Theses