Melbourne tram route 55

Last updated

Route 55
B2 2092 in Market St on route 55, 2013.JPG
B class tram on Market Street in May 2013
Overview
System Melbourne
Operator Yarra Trams
Depot Essendon
Vehicle Z class
B class
Began service30 April 1995
Ended service30 April 2017
PredecessorsRoute 56 (1946-1995)
Route
Start Coburg West
Via Brunswick West
Parkville
North Melbourne
West Melbourne
William Street
Southbank
End Domain Interchange
Length12.5 kilometres
Timetable Route 55 timetable
Map Route 55 map

Route 55 was a tram route on the Melbourne tram network. The 12.5 kilometre route operated between Coburg West and Domain Interchange, was operated out of Essendon depot with Z and B-class trams. It ceased on 30 April 2017 and was replaced by route 58.

Contents

History

Proposals for a tram or railway route to West Coburg date to the late 19th century. Construction of the tramway began in 1923, initially only to Brunswick West, then extended to Bell Street in 1927. The tramway was extended south to St Kilda Road during World War II to alleviate congestion during the war. [1] Proposed extensions north of Bell Street have not been constructed.

Until November 1986, route 55 operated from West Coburg to St Kilda Beach via William Street, St Kilda Road and Fitzroy Street. [2] [3] Route 56 offered a truncated service that ran from West Coburg to Domain Road. Following the opening of a terminating platform at Domain Interchange on 14 November 1986, through-routing to St Kilda Beach was discontinued. [4] [5] [6]

Between 1971 and July 2005 route 55 and 56 (before 1986) only operated on Mondays to Saturdays. On Sundays, the section from West Coburg to the city was covered by route 68. [3] [7]

During the 2006 Commonwealth Games the route was merged with route 5 to Malvern to alleviate congestion along St Kilda Road. [8]

On 30 April 2017 as part of works associated with the closure of Domain Interchange and construction of Anzac railway station, route 55 ceased. [9] It was replaced by route 58 that traversed the same route as route 55, and then continued south from Domain Interchange to Toorak, partly replacing route 8. [10] [11] [12]

Melbourne tram route 55 evolution
DatesRouteNotes
1946 - 14 November 1986 St Kilda Beach to West Coburg via William Street
15 November 1986 - 6 August 2005 Domain Interchange to West Coburg Monday - Saturday (and Public Holidays with a Saturday timetable)
8 August 2005 - 11 March 2006 Domain Interchange to West Coburg Full-time service
12 March 2006 - 26 March 2006 Malvern to West Coburg Temporarily extended from Domain Interchange to Malvern during Commonwealth Games, replacing part of route 5
27 March 2006 - 30 April 2017 Domain Interchange to West Coburg Merged with route 8 as route 58

Route description

The route ran along Melville Road from the Bell Street intersection, then Dawson Street, Grantham Street, through to Royal Park along a scenic track passing the Royal Park Golf Course and the Melbourne Zoo, coming out at Flemington Road where it intersected Abbotsford Street, then it travelled along Peel Street, William Street, Flinders Lane, Market Street, Queens Bridge, Queensbridge Street, Kings Way and finally Park Street before terminating at the Domain Interchange.

Route 68

Route 68 was a Sunday-only version of the route 55 service from West Coburg, diverting at Haymarket roundabout to operate along Elizabeth Street to Flinders Street station, instead of along William Street from Domain Interchange. First operated on 6 July 1971, the route was withdrawn on 31 July 2005 when route 55 was altered to operate seven days a week. [3] [7]

Operation

Routes 55 was operated out of Essendon depot with Z and B class trams. [13]

Route map

  Route 55
Trams are not wheelchair accessible. Free Tram Zone covers stops 10 to 1. Fare zone 1 applies from stop 45 to 11, and 112 to 20.
Connections
Coburg West
Stop
Bus-logo.svg 513, 527, 903, 951
BSicon uKBHFa.svg
Bell Street
45
BSicon uLSTR.svg
BSicon uHST.svg
Brearley Parade
44
BSicon uHST.svg
Princes Terrace
43
Bus-logo.svg 512
BSicon uBHF.svg
Reynard Street
42
BSicon uHST.svg
Lever Street
41
Bus-logo.svg 510
BSicon uBHF.svg
Moreland Road
40
BSicon uLSTR.svg
BSicon uHST.svg
Mattingley Crescent
39
BSicon uHST.svg
Jacobs Reserve
38
Bus-logo.svg 503
BSicon uBHF.svg
Albion Street
37
Bus-logo.svg 509, 951
BSicon uBHF.svg
Hope Street
36
Bus-logo.svg 508
BSicon uBHF.svg
Victoria Street
35
Bus-logo.svg 506
BSicon uBHF.svg
Smith Street
34
(Melville Road Arrow Blue Up 001.svg)
BSicon uLSTR.svg
(Arrow Blue Up 001.svg Melville Road  Dawson Street Arrow Blue Down 001.svg)
BSicon uSTR.svg
BSicon uHST.svg
Daly Street
33
BSicon uHST.svg
Foden Street
32
(Dawson Street Arrow Blue Up 001.svg)
BSicon uSTR.svg
Bus-logo.svg 504
BSicon uBHF.svg
Grantham Street
31
(Grantham Street Arrow Blue Down 001.svg)
BSicon uSTR.svg
BSicon uHST.svg
Union Square Shopping Centre
30
Bus-logo.svg 504
BSicon uBHF.svg
Brunswick Road
29
(Arrow Blue Up 001.svg Grantham Street   Royal Park  Arrow Blue Down 001.svg)
BSicon uSTR.svg
BSicon uHST.svg
Park Street
28
Towards Jewell  Arrow Blue Right 001.svg
BSicon uSTR.svg
BSicon STR+l.svg
BSicon CONTfq.svg
Bus-logo.svg 505; Aiga railtransportation 25.svg Upfield
BSicon HUBaq.svg
BSicon uACC.svg
BSicon HUBeq.svg
BSicon ACC.svg
Royal Park station
Poplar Road
26
BSicon CONTgq.svg
BSicon umKRZu.svg
BSicon STRr.svg
BSicon uACC.svg
Melbourne Zoo
25
BSicon uACC.svg
State Netball & Hockey Centre
24
BSicon uACC.svg
Macarthur Road
23
BSicon uHST.svg
Royal Park
22
Routes 57 & 59 via Flemington Road  Arrow Blue Left 001.svg
BSicon uCONTgq.svg
BSicon uABZq+r.svg
BSicon uABZg+r.svg
(Arrow Blue Up 001.svg Royal Park   Flemington Road  Arrow Blue Down 001.svg)
BSicon TRAM.svg 57, 59
BSicon HUBaq.svg
BSicon uINT.svg
BSicon HUBeq.svg
BSicon uINTACC.svg
Royal Children's Hospital
Abbotsford Street^
19
Route 57 via Abbotsford Street Arrow Blue Left 001.svg
BSicon uCONTgq.svg
BSicon uSTRr.svg
BSicon uSTR.svg
Bus-logo.svg 951
BSicon uHST.svg
Gatehouse Street
16
BSicon uACC.svg
Park Drive
15
Bus-logo.svg 401, 402, 403
BSicon uACC.svg
Royal Melbourne Hospital
14
BSicon uSTR.svg
BSicon uSTR+l.svg
BSicon uCONTfq.svg
Arrow Blue Right 001.svg Route 19 via Elizabeth Street
(Arrow Blue Up 001.svg Flemington Road  Peel Street Arrow Blue Down 001.svg)
BSicon uABZgl.svg
BSicon uABZg+r.svg
BSicon TRAM.svg 19, 59
BSicon HUBaq.svg
BSicon uINT.svg
BSicon HUBeq.svg
BSicon uINTACC.svg
Haymarket
Flemington Road
12
BSicon uSTR.svg
BSicon uSTRl.svg
BSicon uCONTfq.svg
Arrow Blue Right 001.svg Routes 19 & 59 via Elizabeth Street
BSicon uHSTACC.svg
Queensberry Street
11
Bus-logo.svg 951; BSicon TRAM.svg 57
BSicon uCONTgq.svg
BSicon lINTACC.svg
BSicon uKRZ.svg
BSicon uCONTfq.svg
Victoria Street
10
BSicon uACC.svg
Queen Victoria Market
9
(Peel Street Arrow Blue Up 001.svg)
BSicon uSTR.svg
Bus-logo.svg 220, 232
BSicon uHST.svg
Franklin Street
8
BSicon uSTR.svg
BSicon HUBc2.svg
BSicon uCONTgq.svg
BSicon HUB3.svg
BSicon uTINT.svg
BSicon uCONTfq.svg
Flagstaff station
7
BSicon tCONTgq.svg
BSicon HUB1.svg
BSicon tINTACCq.svg
BSicon HUBc4.svg
BSicon umKRZt.svg
BSicon tCONTfq.svg
Bus-logo.svg 216, 219, 302, 304, 305, 318, 905, 906, 907, 908
BSicon uBHF.svg
Lonsdale Street
6
BSicon TRAM.svg 86, 96
BSicon uCONTgq.svg
BSicon uTINT.svg
BSicon uCONTfq.svg
Bourke Street
5
BSicon TRAM.svg 11, 12, 48, 109
BSicon uCONTgq.svg
BSicon uTINT.svg
BSicon uCONTfq.svg
Collins Street
4
(Arrow Blue Up 001.svg William Street  Queens Bridge Street Arrow Blue Down 001.svg)
BSicon uLSTR.svg
(Arrow Blue Up 001.svg William Street   Flinders Lane  Arrow Blue Down 001.svg)
BSicon uSTR.svg
BSicon uHST(R).svg
William Street
3
(Flinders Lane Arrow Blue Up 001.svg)
BSicon uSTR.svg
BSicon uHST.svg
Market Street*
2
(Market Street Arrow Blue Down 001.svg)
BSicon uSTR.svg
(Arrow Blue Up 001.svg Market Street  Queens Bridge Street Arrow Blue Down 001.svg)
BSicon uSTR.svg
Bus-logo.svg 216, 219, 220, 234, 236; BSicon TRAM.svg 35, 70, 75
BSicon uCONTgq.svg
BSicon uTINT.svg
BSicon uCONTfq.svg
Flinders Street
1
Towards Southern Cross Arrow Blue Left 001.svg
BSicon CONTgq.svg
BSicon umKRZu.svg
BSicon CONTfq.svg
Arrow Blue Right 001.svg Towards Flinders Street
Bus-logo.svg 216, 219, 220
BSicon uACC.svg
Casino/Southbank
112
(Arrow Blue Up 001.svg Queens Bridge Street  Kings Way Arrow Blue Down 001.svg)
BSicon uSTR.svg
Bus-logo.svg 234, 236
BSicon uACC.svg
City Road
114
BSicon uSKRZ-Au.svg
BSicon uHST.svg
York Street
115
BSicon TRAM.svg 1
BSicon uCONTgq.svg
BSicon uTINT.svg
BSicon uCONTfq.svg
Sturt Street
116
(Kings Way Arrow Blue Up 001.svg)
BSicon uSTR.svg
BSicon uHST.svg
Park Street
118
(Park Street Arrow Blue Down 001.svg)
BSicon uSTR.svg
(Arrow Blue Up 001.svg Park Street   St Kilda Road  Arrow Blue Down 001.svg)
BSicon uABZg+l.svg
BSicon uCONTfq.svg
Arrow Blue Right 001.svg Routes 3/3a, 5, 6, 8, 16, 64, 67 & 72 via St Kilda Road
Bus-logo.svg 216, 219, 220; BSicon TRAM.svg 3/3a, 5, 6, 8, 16, 64, 67 & 72
BSicon uINTACC.svg
Domain Interchange
20
Route 8 via Domain Road Arrow Blue Right 001.svg
BSicon uABZgl.svg
BSicon uCONTfq.svg
Routes 3/3a, 5, 6, 16, 64, 67 & 72 via St Kilda Road Arrow Blue Down 001.svg
BSicon uCONTf.svg
Connections
Domain Interchange
Stop
Route map is not to scale.

Related Research Articles

<span class="mw-page-title-main">Melbourne tram route 72</span>

Melbourne tram route 72 is operated by Yarra Trams on the Melbourne tram network from Melbourne University to Camberwell. The 16.8 kilometre route is operated out of Malvern depot with Z and D class trams.

<span class="mw-page-title-main">Melbourne tram route 6</span>

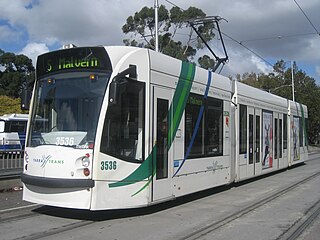
Melbourne tram route 6 is operated by Yarra Trams on the Melbourne tram network from Moreland to Glen Iris. The 19.2 kilometre route is operated out of Brunswick and Malvern depots with Z, B and D class trams.

<span class="mw-page-title-main">Melbourne tram route 5</span>

Melbourne tram route 5 is operated by Yarra Trams on the Melbourne tram network from Melbourne University to Malvern. The 12.6 kilometre route is operated out of Malvern depot with Z and D1 class trams.

<span class="mw-page-title-main">Melbourne tram route 112</span>

Melbourne tram route 112 was operated by Yarra Trams on the Melbourne tram network from West Preston to St Kilda. The 18 kilometre route was operated out of East Preston depot with A, B and D2 class trams.

<span class="mw-page-title-main">Melbourne tram route 96</span>

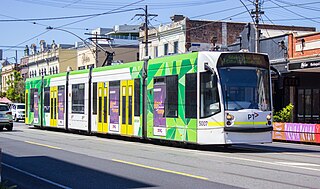
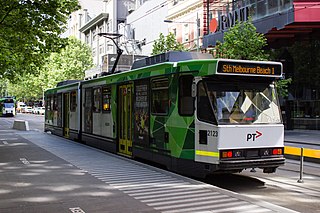
Melbourne tram route 96 is operated by Yarra Trams on the Melbourne tram network from Brunswick East to St Kilda Beach. The 13.9 kilometre route is operated out of Southbank depot with C2 and E class trams.

<span class="mw-page-title-main">Melbourne tram route 59</span>

Melbourne tram route 59 is operated by Yarra Trams on the Melbourne tram network from Airport West to Flinders Street station. The 14.7 kilometre route is operated out of Essendon depot with Z and B class trams.

<span class="mw-page-title-main">Melbourne tram route 57</span>

Melbourne tram route 57 is operated by Yarra Trams on the Melbourne tram network from West Maribyrnong to Flinders Street station. The 11.6 kilometre route is operated out of Essendon depot with Z class trams.

<span class="mw-page-title-main">Melbourne tram route 16</span>

Melbourne tram route 16 is operated by Yarra Trams on the Melbourne tram network from Melbourne University to Kew. The 20.2 kilometre route is operated out of Malvern depot with Z and D1 class trams.

<span class="mw-page-title-main">Melbourne tram route 67</span>

Melbourne tram route 67 is operated by Yarra Trams on the Melbourne tram network from Melbourne University to Carnegie. The 12.7 kilometre route is operated out of Glenhuntly depot with Z and B class trams.

<span class="mw-page-title-main">Melbourne cable tramway system</span> Cable car public transport system in Melbourne, Australia

The Melbourne cable tramway system was a cable car public transport system, which operated between 1885 and 1940 in Melbourne, Victoria, Australia.

<span class="mw-page-title-main">Melbourne tram route 1</span>

Melbourne tram route 1 is operated by Yarra Trams on the Melbourne tram network from East Coburg to South Melbourne Beach. The 13.2 kilometre route is operated out of Brunswick depot with Z and B class trams.

<span class="mw-page-title-main">Southbank tram depot</span>

Southbank tram depot is located in Southbank, a suburb of Melbourne, Australia. Operated by Yarra Trams, it is one of eight tram depots on the Melbourne tram network.

<span class="mw-page-title-main">Melbourne tram route 3</span>

Melbourne tram route 3 is operated by Yarra Trams on the Melbourne tram network from Melbourne University to Malvern East. The 14.9 kilometre route is operated out of Glenhuntly depot with Z and B class trams. On weekends route 3 operates as route 3a and diverts via St Kilda Beach.

<span class="mw-page-title-main">Melbourne tram route 19</span>

Melbourne tram route 19 is operated by Yarra Trams on the Melbourne tram network from Coburg North to Flinders Street station. The 10.2 kilometre route is operated out of Brunswick depot with B and D2 class trams.

<span class="mw-page-title-main">Melbourne tram route 64</span>

Melbourne tram route 64 is operated by Yarra Trams on the Melbourne tram network from Melbourne University to Brighton East. The 18.1 kilometre route is operated out of Glenhuntly depot with Z and B class trams.

<span class="mw-page-title-main">Essendon tram depot</span>

Essendon tram depot is located on Mount Alexander Road, Travancore, a suburb of Melbourne, Australia. Operated by Yarra Trams, it is one of eight tram depots on the Melbourne tram network. Despite the name, the depot is located three kilometres from the suburb of Essendon.

<span class="mw-page-title-main">Domain Interchange</span>

Domain Interchange was a major interchange on the Melbourne tram system. At closure, it featured two island platforms with four tracks, and had dedicated turning tracks and through tracks. It was located on St Kilda Road between Domain Road and Park Street, adjacent to Kings Domain, and was one of the busiest interchanges on the system, being used by eight tram routes. The most recent structure was opened in April 2013, replacing an earlier structure built in 1986.

<span class="mw-page-title-main">Melbourne tram route 12</span> Tram route in metropolitan Melbourne, Victoria, Australia

Melbourne tram route 12 is operated by Yarra Trams on the Melbourne tram network from Victoria Gardens Shopping Centre to St Kilda. The 16.2 kilometre is operated out of Southbank depot with A class trams.

<span class="mw-page-title-main">Melbourne tram route 58</span>

Melbourne tram route 58 is operated by Yarra Trams on the Melbourne tram network from West Coburg to Toorak. The 18.0 kilometre route is operated out of Essendon and Southbank depots with Z, B and E class trams.

The Melbourne tram network began in 1884 with the construction of the Fairfield Horse Tramway. However, the purpose of the line was to increase land prices in the area, and it soon closed during the depression in 1890. The first genuine attempt to construct a tramway network was the construction of the Richmond cable tram line by the Melbourne Tramway & Omnibus Company in 1885. Over the next few years, 16 more cable tram lines were constructed, as well as numerous other horse tramways. The depression of the early 1890s slowed further expansion of the cable network. The first electric tram line was the Box Hill and Doncaster tramway which opened in 1889. This was a pioneering line in what was then the countryside and thus didn't receive much patronage. It closed in 1896. The next attempt at an electric tramway was Victorian Railways' St Kilda to Brighton line, which opened in 1906. Later that year, the North Melbourne Electric Tramway & Lighting Company opened lines to Essendon and Maribyrnong. Many local councils formed their own tramway trusts and built tramways within their own constituency. The most successful of these was the Prahran & Malvern Tramways Trust.

References

  1. Brown, Geoff. "The tram through the park: the origins of the West Coburg tramway". Melbourne Tramway Museum. Retrieved 7 August 2016.
  2. The Plot Thickens Transit News & Views Public Transport Users Association December 1986 page 3
  3. 1 2 3 History of Melbourne tram route numbers (1950-2009) Yarra Trams
  4. Melbourne's William Street Tram Services Changed Transit Australia February 1987 page 23
  5. Here & There Trolley Wire issue 228 February 1987 page 24
  6. "Gunzel". www.classicaustraliantv.com. Retrieved 3 August 2018.
  7. 1 2 Yarra Trams - changing with the times Yarra Trams 5 August 2005
  8. Changes to your tram service during the Commonwealth Games Yarra Trams 28 February 2006
  9. Say hello to Route 58 Public Transport Victoria
  10. Metro Tunnel to Transform Melbourne's Tram Network Minister for Public Transport 25 October 2016
  11. Trams to head west, route 58 to be born in network overhaul next year The Age 25 October 2016
  12. New Tram Timetable Newsrail June 2017 page 182
  13. Route 55 Yarra Trams

Commons-logo.svg Media related to Melbourne tram route 55 at Wikimedia Commons