Report
Morning
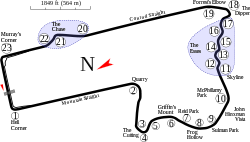
Chaz Mostert led Frédéric Vervisch into Hell Corner as the race started, but there was chaos at the back of the pack as John Goodacre in the Ford Focus-bodied MARC Car was spun on the exit of the Chase, clouting the barrier and requiring a Safety Car after less than half a lap. As the race is restarted, Mostert sprints away from the pack at qualifying pace, aided by Vervischs' struggles as he is passed by Melbourne Performance Centre team-mate Christopher Haase before engaging in a ferocious battle with underdog Luke Youlden in the Peregrine Corporation Lamborghini Gallardo.
As the sun rises the Class B leaders strike trouble – first Ben Barker in the Grove Racing entry receives a drive-through penalty for a Safety Car restart breach, before Chris van der Drift suffers a puncture-induced spin at the Chase in the Carrera Cup Asia entry, pulling off all the windscreen tear-offs in the process. The #100 Steven Richards Motorsport BMW had been sent to the back of the grid for exceeding maximum boost pressure in qualifying; by the end of the opening hour Timo Glock had stormed past the lower classes and tail-end GT3 contenders. At the front of the field, disaster struck for Youlden as he clashed with the lapped Class B Porsche of Aaron Zerefos exiting Griffins' Bend – resulting in suspension damage for the former and a puncture for the latter.
A battle began to form between Jeroen Bleekemolen, Maximilian Buhk and Tristan Vautier – Bleekemolen made a move on 2014 runner-up Buhk into Griffins Bend, before Vautier attempted to follow the Dutchman through. Vautier clashed doors with the German, sending the Strakka Racing Mercedes bouncing off the tyre wall and into the pits with steering damage. After 75 minutes the opening round of pit-stops commenced, Mostert double-stinting the lead car as the Pro-Am/Am entries began plugging their Bronze drivers in to commence their required 100 minutes of driving time. Swede Alexander West was one such driver, taking over from Scott McLaughlin in the YNA McLaren – however he was back in the lane not long after with electrical problems.
The first major incident of the race occurred after 90 minutes, with David Crampton pinballing the #48 KTM X-Bow GT4 off the walls entering Forrests Elbow before coming to a rest in the tyre barrier. The Safety Car was brought out as a result, wiping out Mosterts' 50-second lead. Markus Winkelhock jumped into the second-placed Audi, but was stuck in traffic on the restart and lost 17 seconds to Mostert before the Safety Car was called a lap later. Andrew Bagnall smacked the outside fence at McPhillamy Park before gently drifting across to the inside, backing up the pack behind. Morgan Haber ran up the back of the Hallmarc Audi in the melee, spinning the Audi into the inside wall and puncturing the radiator on the #67. Whilst under Safety Car, Vincent Abril in the Bentley briefly stopped out on track before returning to the garage with gearbox problems.
The Vanthoor brothers went into battle after the restart, Laurens using Roger Lago's Lamborghini to draft past Dries down Conrod Straight for 5th. The pair continued to march forward, passing the #17 Bentley for 4th and Laurens taking Vervisch for P3 before a Safety Car was pre-emptively called for Stephen Grove stuck in the gravel at Murrays Corner – which he would escape before promptly spinning again at Hell Corner. The leaders took the opportunity to swap drivers as a wheelnut sheared off Xavier West's BMW M4 GT4 whilst he attempted to catch the Safety Car train, firing him into the fence at Forrests Elbow.
Tim Slade did not stop in the Objective Racing McLaren and led the field away, however Marco Wittmann – now aboard the Schnitzer Motorsport BMW – was a little too eager and moved to pass some lower class cars before the control line, landing him a drive-through; but before he could serve it, Ash Samadi in the Ashley Seward Motorsport Audi ran straight on at Hell Corner and made heavy contact with the concrete wall. This provided the Am drivers an opportunity to jump out having met their minimum driving times, with Kenny Habul and David Calvert-Jones still sitting inside the top 10 thanks to all the yellow flag running – leaving their effective all-Pro line-ups in very good shape strategically.
Another Safety Car further squandered Wittmann's hopes of getting his penalty out of the way as the Daytona Coupé lost a wheel coming onto the main straight. Craig Lowndes in the other YNA Autosport McLaren came in having snuck up to the top 5 whilst running off-sequence. The ensuing green flag period gave Wittmann the chance to serve his penalty, but also gave the Grove Porsche a chance to serve a 1-minute stop/go penalty for hitting the medical car in one of the previous caution periods.
The penalty for one BMW benefitted another – the #100 car elevated itself up to the lead from the back of the grid after the Objective McLaren made a green-flag pit-stop, but had the two factory Audis from MPC for close company. Taiwanese driver Evan Chen spun into the tyre wall at Forrests Elbow in the Carrera Cup Asia car, damaging the rear suspension and the rear wing but continued around to the pits without another Safety Car.
Having been sent back out onto the circuit with a transaxle transplant, the #18 Bentley suffered a major tyre failure in the braking zone of the Chase, firing off into the sand-trap just centimetres behind McLaughlin in the McLaren. With the car bogged the Safety Car was called, and the top 3 all took the opportunity to pit with exactly 4 hours done followed by Kévin Estre in the #991, promoting Steven Kane to the lead behind the Safety Car in #17. Max Twigg in the Scott Taylor Motorsport Mercedes briefly stopped on Conrod Straight with mechanical dramas, but re-fired before the restart and remained on the lead lap.
Mid-morning / lunchtime
The order on the restart was Kane, Patrick Long, Wittmann, Lowndes, Lewis Williamson, Jamie Whincup, Christopher Mies, Estre, Kelvin van der Linde and Steven Richards. The lapped GT3s of David Russell, McLaughlin and Tomáš Enge plus the Invitational class Dodge Viper were stuck in the train, allowing Kane to bolt away at the front as Lowndes began to fall back through the field. Long and Wittmann were engaged in a battle for second, which became the lead as Kane was pinged with a drive-through for going too early on the Safety Car restart, putting them outside the top 10 behind 12 Hour debutants Manthey Racing. The Viper proved problematic with its immense straight-line speed causing problems for the lead cars caught behind, setting the fastest final sector of the race. Further down the order, Marco Schelp in the Class C GT4 Porsche clouted the wall at Hell Corner and was forced to limp around a full lap with damage.
Lowndes' woes proved to be deeper than a lack of pace; his McLaren was sidelined in the garage with overheating issues. Shane van Gisbergen took the wheel for a few exploratory laps after some bodging, but the car was retired a few laps later. The next round of stops allowed the SunEnergy1 crew to jump the Schnitzer BMW for second, but Maximilian Götz immediately tangled with Chad Parrish in the #54 MARC Car having just jumped into the Strakka Mercedes. Audi squad Team WRT were making their debut on the Mountain in 2018, however it proved a tough start for their Pro entry as Robin Frijns joined a growing list of drivers to fall foul of the Safety Car rules.
Mies, Estre and Garth Tander out in front hadn't taken the chance to stop under green before Andrew Tang ended Team Carrera Cup Asia's eventful day before half-distance having spun into the fence at McPhillamy. Tander in the #22 Audi did not take tyres, enabling it to jump to the front. MPCs strategy hindered the WRT car, putting it a lap down. Tander with the worse tyre condition let the #37 back through on the restart, as Haase in the sister MPC car had a hairy moment trying to lap the Viper around the outside of Reid Park.
Haase used the new tyre advantage to slip past his team-mate into the lead a matter of seconds before another Safety Car was called. Alex Davison in the Competition Motorsports Porsche made wheel-to-wheel contact with the RHC Jorgensen/Strom BMW GT4 through Reid Park, punting the Class C contender into the inside fence before coming to a rest on the exit of the complex. The race settled into a holding pattern for a while after, with the Porsches of Romain Dumas and Davison the only real fight for P4 as they were chased by Augusto Farfus in the Schnitzer BMW. After its earlier incident, the #67 MARC Car returned to the track but had a wild ride through the McPhillamy Park gravel trap, launching out the other side off a bump in the run-off and landing hard enough to require a return to the pits.
The Invitational Class Viper looked to be in trouble with a flame-out requiring a brief stop at Quarry Corner, but worse was to come a few moments later when Paul Morris had an oil line come off the #54 MARC Car coming into the Chase, resulting in a large fire. Morris pulled over at a marshal post on the exit of the Chase and jumped out, commandeering a fire extinguisher himself as the fire was on the circuit side of the car and the nearby marshals were not appropriately attired.
Dumas in the Manthey Porsche did not stop under Safety Car and jumped to the head of the field. His advantage did not last long as Kane in the Bentley made a cut-back pass on the restart and powered into the lead up Mountain Straight. Further back in the field, Sam Fillmore in a Class B Porsche made an ambitious move up the inside of William Tregurtha in a GT4 Ginetta at Griffins Bend, destroying the Ginetta and resulting in another Safety Car. The front two pulled in having reached the end of their stints, revealing Cam Waters in the Strakka Mercedes as the leader. Daniel Stutterd had taken over from Fillmore in the Ash Seward Porsche, and received a 5-minute stop/go penalty for causing the incident.
The Daytona Coupé struck trouble, stopping at the Cutting. The ensuing Safety Car vaulted the MPC Audis of Winkelhock and Van Der Linde back to the lead, but it was becoming clear that the Porsches had a significant advantage on fuel strategy of up to 6 laps. Álvaro Parente in the #56 Strakka Mercedes came close to getting its lap back in the Safety Car train, but suffered a rear-left suspension failure on the exit of Griffins at the restart.
The Audis were formation flying 1–2 with a healthy margin over Matthew Campbell in third when disaster struck; Van Der Linde made a rookie error trying to lap Bryce Fullwood in the MARC Mazda around the outside of the Esses, sliding on the marbles and into the fence – destroying the left-rear suspension. The car returned to the pits without a Safety Car, but the race was effectively over for the #22. Having lost a lap earlier running their Am driver off-sequence, the Objective McLaren now found itself provisionally on the podium after the incident.
Afternoon
Jaxon Evans in the McLaren and Kane in the Bentley were proving the only interlopers in a German marque-dominated race, as the leaders took their third-to-last stops. Raffaele Marciello in the SunEnergy1 car jumped Winkelhock in the cycle but (like Tander earlier) did not take tyres. Schnitzer however did take tyres as Mostert took over from Wittmann and went on a charge – scything past Evans and Dirk Werner, then David Fumanelli before ranging up on the back of Estre and Kane in the battle for P3. Caught behind the #40 Class B Porsche, Mostert attempted to go around the outside of Estre at Forrests Elbow, but was boxed in by the lapped car and clattered into Kane, taking Kean Booker in the #40 out on the spot and leaving both the #43 BMW and the #17 Bentley garaged with major damage – the Schnitzer car retired and the Bentley later returned to the track albeit 6 laps down. Mostert received heavy criticism for causing the incident having already impatiently bumped Estre on the run through the Dipper immediately prior, the Australian later receiving a AU$2,000 fine (half of which was suspended). [5]
Simultaneously, the #74 Audi was brought in for its stop some 50 seconds ahead. Marciello followed suit the next lap as the Safety Car was called to recover the stricken #40 Porsche, handing over to Whincup but losing out to the undercutting #74 and Long in the #12 Porsche. Fumanelli led away at the restart off-sequence, but threw it off the road at Murrays Corner and handed the lead to Winkelhock. Long came in after the Safety Car to hand over to Campbell as the driving time requirements played against them, but a stop late in the Safety Car period for a brake change left Glock in the #100 BMW a lap down as the field climbed Mountain Straight.
As a result of the #12 stopping, Frijns found himself fourth on the road having only recently faced the threat of going a lap down for the second time – then fortuitously passed Whincup for third just as the Safety Car came out yet again for the #777 Lamborghini, parked at the side of Conrod Straight missing a wheel. Fumanelli then came in, elevating the WRT car to P2.
With 2 hours remaining and just one stop left, Winkelhock in the #74 Audi for Melbourne Performance Centre looked to be in the box seat – until the German dropped the car off the end of the Griffins Bend exit kerb and broke the gearbox, grinding to a halt on the outside of the Cutting; out of the race. The WRT Audi, SunEnergy1 Mercedes (with triple-stinted front tyres), Craft-Bamboo Racing Porsche, Black Swan Racing Porsche and Competition Motorsports Porsche all took the chance to stop, leaving Frédéric Makowiecki in the Manthey Porsche in the lead. The Black Swan #540 had remained on the lead lap throughout, but had not been a major factor until this point. The #93 Invitational Class-leading MARC Mazda pulled into the paddock access gate on Mountain Straight with a loose wheel having just come out of the pits.
80 minutes remained and Makowiecki led away on the restart with Fumanelli in hot pursuit. Both cars needed to stop again, but were guaranteed to make the finish once they did. Everyone else on the lead lap – led by Frijns – was running on a fuel conservation knife-edge having taken the stops under Safety Car. The Porsches, sitting 5th, 6th and 8th on the road, were all in a much better position given their previous range and projected race distance. Caught up amongst the leaders on the restart was Jules Gounon in the Bentley, but was removed having received a drive-through penalty for a pit-stop infringement.
Fumanelli was the first to blink with an hour remaining, swapping over with Williamson but not changing tyres. Drama struck another contender however, as the Objective Racing McLaren received a mechanical black flag for failing to start under its own power after a stop. Warren Luff brought the car in, but it failed to restart and was retired from the race. Further down the field, two-time Bathurst 1000 winner Tony Longhurst took over the GT4-class leading BMW for his last ever stint in a race car.
After a 40 lap stint, Makowiecki handed over the Manthey Porsche to Dumas with just 45 minutes remaining – and a slick stop put them seventh a long way ahead of the Strakka car they were fighting previously. Frijns in the #37 Audi now led Whincup in the #75 Mercedes, but it looked increasingly unlikely that they would make it to the finish even with Safety Car intervention. That left the #991 Porsche in third followed by the sister cars #540 and #12; and given the range of Makowiecki those 3 looked comfortable and potentially on-course for an all-Porsche podium.
Finish
With 20 minutes remaining, 2 ratchet straps that were holding the front splitter together on Fullwood's MARC Mazda failed entering the grate section of Sulman Park, resulting in a tangle with Ashley Walsh in the Koundouris brothers Audi and sending both cars into the wall, leaving Walsh splayed across the track at a 90° angle. Garry Jacobson in another MARC entry narrowly avoided the Audi by centimetres, however John Martin in the #19 Mercedes could not avoid the incident, and hit the Audi side-on at full speed leaving both drivers with minor injuries and debris all over the circuit.
Having initially called a Safety Car, race control red-flagged the race with under 15 minutes to go and the clock continuing to count down. As the race was required to finish at 1745h AEDT due to television commitments, the decision was made to declare the race with Team WRT, Frijns, Leonard and Dries Vanthoor victorious – all on debut.