HMS Terror was an Erebus-classmonitor built for the Royal Navy during the First World War in Belfast. Completed in 1916, she was assigned to the Dover Patrol where her primary duties involved bombarding German targets on the coast of occupied Belgium, particularly at the ports of Zeebrugge and Ostend. In October 1917 Terror was hit by three torpedoes, taking severe damage to the bow, and had to be towed into Portsmouth for repair. In April 1918 she participated in the Zeebrugge raid and provided gunnery support for the Fifth Battle of Ypres in September of the same year.
After the war the monitor was attached to HMS Excellent, the Royal Navy's gunnery school in Portsmouth and participated in gunnery trials in the 1920s. In January 1934 Terror became the base ship at Sembawang Naval Base in Singapore where she remained for the rest of the decade. From May 1939 to the end of the year she underwent an extensive refit in Singapore's dockyards.
After the outbreak of the Second World War and the completion of her refit, Terror was ordered home to Europe in January 1940. From early March, she served in the Mediterranean and defended Malta from Italian air raids before supporting the land-based assault of Italian positions in North Africa at the end of the year. In January 1941 the ship helped capture Bardia and Tobruk before attempting to defend Benghazi from German air attacks in February. After being damaged by two air attacks and two mines on 22 and 23 February, Terror was scuttled off the coast of Libya in the early hours of 24 February. The crew were evacuated to the minesweeperFareham and corvetteSalvia before she sank.
Background
During the First World War, the Royal Navy developed several classes of ships which were designed to give close support to troops ashore through the use of naval bombardment.[1] Termed monitors, they owed little to the monitors of the 19th century, though they shared the characteristics of poor seaworthiness, shallow draught and heavy armament in turrets. The size of the various monitor classes of the Royal Navy and their armaments varied greatly. The Marshal Ney class was the United Kingdom's first attempt at a monitor carrying 15in (381mm) guns.[2] Following construction of the first two of the Marshal Ney-class, another four were ordered in May 1915, with the Harland and Wolffshipyard at Govan receiving a contract to construct two hulls, which were given yard numbers 492 and 493. However, all four were cancelled in June when it was realised that there were insufficient gun turrets to complete both the battleship, Royal Oak, and the monitors before 1917.[3]
By August 1915, Marshal Ney, the first of her class, had revealed a very poor performance in her sea trials. The monitor's engines would not start reliably and were prone to stalling,[4] making it impossible for the ship to achieve even the minimum standard for the trial of four hours of continuous sailing at full power. The vessel was also difficult to steer.[5] Disappointed by the failure, the Admiralty began the design of a replacement class on 6 September, which incorporated lessons learned from all of the previous classes of monitor commissioned during the war. Some of the main modifications were an increase in the power supply to guarantee a speed of 12 knots (22km/h; 14mph) and a change to the angles and lines of the hull to improve steering. Another significant change was to raise the top of the anti-torpedo bulge above the waterline and reduce its width; both changes would improve the stability and maneuverability of the ship at sea. The bulge was fitted along each side of the ship and was intended to absorb the impact of any explosions. To maintain protection while reducing the bulge's width, its inner compartment was made water tight and filled with 70 steel tubes, rather than leaving the inner compartment open to the sea as in previous designs.[6][7]
Design and construction
Monitor HMS Terror, before 1920
The new design, which would later be named the Erebus-class, was for a vessel 405ft (123.4m) long, 88ft 2in (26.9m)wide with a draught of 11ft 8in (3.6m). It would have 8,450 long tons (8,586t)loaded displacement,[8][i] with a maximum operational speed of 13 knots (24km/h; 15mph) produced by triple-expansion steam engines with two shafts, and a crew of 204. Power would be provided by four Babcock & Wilcox water-tube boilers, which would generate a combined 6,000ihp (4,500kW). The monitors would have an operational range of 2,480nmi (4,590km; 2,850mi) at a speed of 12knots.[9]
The ships would be armoured to a similar standard to the Abercrombie class, which were launched in April 1915.[9] Deck armour would range from 1in (25mm) on the forecastle, through 2in (51mm) on the upper deck and 4in (102mm) over the magazine and belt.[10] With the main 15 in guns being originally intended for use on a battleship, the armour for the turret was substantially thicker than elsewhere in the design; with 13in (330mm) on the front, 11in (279mm) on the other sides and 5in (127mm) on the roof.[10][9] The main gun's barbette would be protected by 8in (203mm) of armour.[11] The conning tower was protected by 6in (152mm) of armour on the sides and 2.5in (64mm) on the roof.[12] Each anti-torpedo bulge was 13ft (4m) wide with an outer air-filled compartment 9ft (2.7m) wide and an inner compartment 4ft (1.2m) wide containing the steel tubes.[7]
Orders for two vessels of the new design were placed with Harland and Wolff on 29 September with reinstated yard numbers 492 and 493, which were renamed respectively Erebus and Terror on 13 October. Terror was laid down at Harland and Wolff's shipyard in Belfast on 26 October 1915 and launched on 18 May 1916.[13]
The ship's main armament consisted of two BL 15in Mk I naval guns in a single forward turret. Terror's turret had previously been installed on Marshal Ney, which had been rearmed with smaller guns following its poor sea trials.[14][ii] Learning from the earlier experience with Ney, the turrets were adjusted to increase elevation to 30 degrees, which would add greater firing range.[13] Unlike her sister, Terror was launched with a minimal secondary armament of one 3in (76mm)anti-aircraft gun and two "12-pounder" 3-inch (76mm) guns.[iii][16][15]
Terror was commissioned on 22 July 1916 before conducting sea trials, during which the ship was slower than her sister at 13.1 knots (24.3km/h; 15.1mph) compared to 14.1 knots (26.1km/h; 16.2mph) for Erebus. However, under service conditions the maximum speed that could be achieved for both vessels was 13kn (24km/h; 15mph) with a clean hull or 12kn (22km/h; 14mph) with a fouled hull. Terror was recorded as officially completed on 6 August.[17]
Modifications
Within a few months of launch, Terror's armament was supplemented by two QF 6-inch naval guns with a second 3in gun following soon after. Additional guns were fitted while her bow was being repaired from October 1917; two more 6in guns and two 2 pdr (40 mm) "pom-poms", which fired 2lb (0.91kg) projectiles. In the summer of 1918 the 6in guns were replaced with eight BL 4in Mk IX naval guns.[16][15] During the early 1920s, the monitor's armaments were modified temporarily while the ship took part in gunnery trials to test new types of shells and armour.[18]
The 12pdr and 2pdr guns were removed during Terror's 1933 refit while the ship's capacity for oil and ammunition reserves were increased for her journey to Singapore. During the monitor's 1939 refit her eight 4-inch guns were replaced with six QF 4-in Mk V high-angle anti-aircraft guns and the 3in anti-aircraft guns were replaced by eight Vickers 0.5in (12.7mm) machine guns in two quadruple mounts. At the same time, her ageing 15in gun barrels were replaced by partly worn barrels from the old battleship Revenge.[19] At Malta in 1940 Terror had a further refit to increase her armour to 4in on the upper and main deck along with additional plating on her sides.[20]
Service history
First World War
The turret and main armament of Terror, 1915
On completion, Terror immediately departed Belfast and joined the Dover Patrol on 8 August.[21] In August and September she joined with other members of the patrol to bombard minor targets in occupied Belgium. However, the new monitor only fired a small number of shots, as it was felt wiser to conserve her guns for more important targets. On 24 September the ship made an attempt to bombard the port of Zeebrugge but this was soon aborted when the weather conditions prevented the accurate observation of the fall of shot and any subsequent correction of trajectory. Poor weather conditions continued for the rest of 1916 and the patrol made no further attempts that year to bombard the Belgian coast. During the winter of 1916 and 1917, Terror acted as a guard ship for merchant vessels anchored at The Downs, following a spate of attacks by German destroyers.[22]
In early 1917, Terror and the rest of the patrol made several aborted attempts to bombard the lock gates of the Bruges Canal at Zeebrugge but the operation had to be postponed each time. Reasons for postponement included snapped towlines and poor weather conditions. The operation eventually commenced on the evening of 11 May with Terror acting as flagship for Vice-AdmiralReginald Bacon. The flotilla anchored off Zeebrugge and began their bombardment at around 05:00 on 12 May, with the monitors Marshal Soult and Terror concentrating on the south lock gate and her sister ship Erebus concentrating on the north gate. Poor visibility and problems with spotting aircraft meant that the fall of shot couldn't be fully observed or their trajectories corrected. The German shore battery began to return fire but ceased after four rounds due to the same poor visibility, enhanced by a British smoke screen. The British bombardment was called off at 06:00 due to a change in the wind direction clearing their smoke screen and making their ships visible from the shore. The flotilla withdrew to Dover, in the mistaken belief that their bombardment had been successful. Subsequent aerial reconnaissance revealed damage to the surrounding area but the lock gates, the primary targets, were untouched.[23][24]
A bombardment of Ostend on 5 June by Erebus and Terror was more successful, destroying or damaging several vessels and damaging the dockyard.[25][iv] The port's floating docks were not affected by the June attack and remained operational until a subsequent bombardment by Terror on 22 September caused severe damage to both the dockyard and the floating docks.[26]
On 19 October, in an encounter with three German coastal torpedo boats (A59, A60 and A61)[22] off Dunkirk, Terror was hit by three 17.7in (450mm) torpedoes. Two impacted towards the front of the ship on the starboard side, where the anti-torpedo bulge curved inwards towards the bow, blowing away a large proportion of the first 50ft (15m) of the bow below the waterline.[26][22] The third torpedo hit the main section of the anti-torpedo bulge further aft, which absorbed the damage.[6][v] There were no casualties and the ship was beached before being refloated and towed into Dunkirk harbour for temporary repairs.[26][22] Interrupted by German air raids and the rising tide, the repair crew opted to leave the holes in the bow substantially open and focused instead on reinforcing the bulkheads.[26][22]
The refloating and repairs were overseen by John Iron, a civilian sea captain and harbourmaster of Dover, who was appointed by Bacon as the patrol's salvage expert.[28] On 21 October, Iron guided the monitor across the strait to Dover but grew concerned about the pressure exerted on the bulkheads. For the next leg of the journey to Portsmouth, Iron advised Terror's commanding officer, Captain Bruton, to sail the ship stern-first.[28] This would reduce pressure on the bulkheads and also prevent steering problems caused by an incomplete bow.[26][22] Bruton refused the advice and ordered two tug boats to tow the ship bow-first. The monitor departed Dover on the evening of 23 October but encountered rough seas off Hastings at around midnight; the bow began to take on water and the ability to steer deteriorated. Bruton ordered the tugs to turn Terror around so the stern would face into the waves but the manoeuvre failed and the monitor was left wallowing with its broadside to the waves. As the ship continued to take on water, the pressure on the tow lines increased, causing one to snap at around 03:00. With the monitor now being held by a line to a single tug boat and continuing to sink, Bruton ordered the crew to evacuate.[26][22]
By 08:00 the weather had calmed. The crew were able to reboard Terror and brought the monitor back into Dover harbour. During the second attempt to reach Portsmouth on 27 October, Bruton again refused to sail the ship backwards but changed his mind after Iron threatened to leave the ship.[28][vi] She was then towed backwards to Portsmouth, where it took until early January to repair the damage.[28] A Court of Inquiry was called into the 23 October abandonment but focused on events during the journey rather than the initial decision to sail bow-first. Bacon supported Bruton's decision to leave the vessel and Iron was not called to give evidence. The inquiry absolved Bruton and his officers of any blame over the incident.[22]
A painting by John Lavery of Terror's guns at Dover in 1918
On the morning of 21 March 1918 the monitor helped foil a German raid on Dunkirk by nine destroyers and ten torpedo boats, which had been intended to support the Spring Offensive. Two of the torpedo boats were destroyed by the flotilla leaderBotha and the rest withdrew to Ostend under a smoke screen.[29] On the evening of 22 March Terror bombarded Ostend harbour, firing 39 shots before a German smoke screen obscured the harbour from view. Aerial photographs taken the next day revealed that all 39 shots had landed within the target area.[30] In April, Terror was in the Long Range Bombardment force for the Zeebrugge raid with Erebus and destroyers Termagant, Truculent, and Manly.[31]
In September, in preparation for a further offensive, Terror had her 15in gun barrels replaced. Having fired around 340 rounds, it was felt they had become worn and were in no condition to support a prolonged battle.[22] On 27 September, Terror and Erebus provided gunnery support for the Fifth Battle of Ypres; their objective being to bombard positions around Zeebrugge and Ostend, with the aim of diverting German attention from other fronts.[32]
Inter-war years
After the war Terror was attached to HMS Excellent, the Royal Navy gunnery school at Portsmouth, from January 1919 until at least December 1920.[33][34]
In 1919 and the early 1920s, she was used for gunnery trials against several old warships including SMSBaden and HMSSuperb. This included the test firing of over thirty new types of 15in shells in 1921 and testing the amount of damage caused to new types of armour plating in 1922.[35][36] For many of these trials Terror was temporarily fitted with new guns of varying sizes, including a BL 6in Mk XII naval gun. From May 1924 until 1933 the monitor was again attached to Excellent, this time in the role of turret drill ship.[18]
As a result of increased tensions in the Pacific Ocean, following Japan's withdrawal from the League of Nations, Terror was overhauled and recommissioned with new armaments before being dispatched to Singapore in 1933. Her role was to assist in the development of the Sembawang Naval Base and act initially as a moored battery until the base's own 15in guns were completed.[37][38]
She departed Plymouth on 9 October 1933, in company with the salvaged fishing trawler Fastnet and the barrage vessel Sandgate,[18][vii] to begin the journey to the Far East. Never designed for such an arduous journey the ships struggled with storms in the Atlantic and Mediterranean. Fastnet was damaged twice during the voyage, spending three weeks in the dockyard at Gibraltar and receiving a temporary patch at Sabang in Sumatra to allow it to limp the short distance to Singapore. Terror also had an adventure while passing through the Suez Canal; a tow rope was cast off too soon, causing the ship to swing broadside across the channel with the bow and stern touching either bank. However, no damage was caused and she was quickly refloated to resume her journey.[39]
Terror arrived at Singapore on the evening of 14 January 1934 along with the heavy cruiserKent, flagship of the China Station, destroyers Veteran and Wren and the aircraft carrierEagle.[40] A local paper described the monitor's journey from England with Fastnet as a "waddle," pointing out that two destroyers had passed them at Gibraltar and arrived in Singapore in November.[39]
In May 1935, to celebrate the silver jubilee of King George V, Terror was opened to the public of Singapore to host a charity ball.[41]
In 1937 the monitor participated in gunnery trials alongside Singapore's newly completed 15in guns, in order to develop the shore defences' capabilities with indirect fire. Both Terror and the shore batteries practised against a target towed at high speed by the heavy cruiser Berwick.[18] In January and March 1939 Terror participated in live fire drills off the coast of Singapore,[42][43] before entering drydock in May for an extensive refit.[44]
In May 1939 the Colonial Office suggested moving Terror to the West Indies in order to protect the oil fields of Trinidad from growing internal threats, such as an emboldened labour movement and anti-colonial sentiment in the region. However, the Admiralty declined the request, as a floating battery would not be able to offer the required protection and would itself be at considerable risk of submarine attack. They instead ordered a review of Trinidad's naval defence requirements.[45] Alternative postings for Terror at Aden or Trincomalee were also considered.[46]
Second World War
At the outbreak of war on 3 September 1939, Terror was continuing her refit at Singapore, under the command of Commander Henry John Haynes.[47][19] She received orders to return to the English Channel in November but didn't depart Singapore until 29 January 1940, after completing her long refit. The monitor arrived at Suez in early March where her orders were changed to attach the ship to the depleted Mediterranean fleet.[46]
At the end of the month she left the Royal Navy base at Alexandria to lend the strength of her guns to Malta, which the British felt was vulnerable to an expected Italian attack. In particular, Terror's 15in main guns were far superior to the island's 9.2in (230mm) guns.[19] Arriving at Malta on 4 April, she was present for the Italian declaration of war on 10 June and the first air attacks on the island by the Regia Aeronautica, beginning just before 7 am on 11 June.[46][48] In the first day alone the island was hit by 9 separate air raids and an estimated 83 in the first month.[49] For three months the monitor helped to defend Malta from daily air attacks until the arrival of additional anti-aircraft guns allowed a refit of her armour to begin on 4 September.[46]
On 9 November Terror sailed from Malta to the Royal Navy's refuelling base at Souda Bay in Crete to again provide anti-aircraft support.[50][19] She was stationed in the bay on 3 December when two Italian aircraft dropped torpedoes into the harbour, one of which hit and badly damaged the stern of the light cruiserGlasgow.[51]
Operation Compass
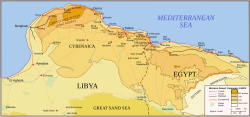
Area of operations December 1940 to February 1941 (click to enlarge)
Terror later moved to North Africa where she supported Operation Compass, the British assault against the Italian Tenth Army in Libya. The monitor shelled Italian positions at Maktila in Egypt on the night of 8 December, as part of the Battle of Sidi Barrani, before coming under the command of Captain Hector Waller's Inshore Squadron off Libya on 13 December.[52][50] During the successful advance by the Western Desert ForceTerror bombarded Italian land forces and fortifications, amongst others the fortified port of Bardia in eastern Libya on 16 December.[53] After the Bardia bombardment concern was raised about the condition of the 15in gun barrels which had been fitted, having been previously used, in 1939. The barrels were inspected by Vice Admiral Sir Andrew Cunningham and the order was given for Terror to reduce the amount of cordite used when firing the main guns, in an attempt to extend the weapons' useful life.[54]
In a further attempt to conserve the monitor's main guns, her duties were changed to concentrate on providing anti-aircraft cover for the rest of the squadron and to ferry supplies from Alexandria.[55] The ship also served as a water carrier for the advancing British and Commonwealth army.[56]
On the morning of 3 January 1941, she participated in a major bombardment of Bardia together with a number of battleships and their destroyer escorts. The formation was protected by a screen of fighters; No. 274 Squadron RAF intercepted five Italian Savoia-Marchetti SM.79 bombers that were attacking Terror nine miles to the north east of Bardia. Three of the bombers were shot down or crashed and a fourth was damaged.[57] The battleships, the destroyers and their fighter cover were withdrawn in the afternoon leaving the monitor to continue the bombardment with the gunboatsAphis and Ladybird. Bardia was captured the following day.[58]
Along with the flotilla leader Stuart, the gunboat Gnat and the destroyers Vampire and Voyager, Terror supported the assault on Tobruk on 21 January by the 6th Australian Division with the port being secured on 22nd.[59] By this point the monitor's main gun barrels had each fired over 600 rounds of ammunition and the rifling had been worn away. While the main guns could still be fired, the shots would rarely land accurately and frequently exploded in mid-air.[55]Terror was now relegated solely to the role of a mobile anti-aircraft platform and her armaments were supplemented by eight 20mm (0.79in) anti-aircraft guns that had been captured from the Italians.[60][viii]
Benghazi and sinking
In early February the British and Commonwealth forces captured the port of Benghazi from the Italians after the Battle of Beda Fomm. Intending to use the port as a key supply point for their armies, the allies recognised that the shortage of anti-aircraft guns, lack of radar and limited air cover from the RAF was a strategic weakness that would have to be addressed. However, the capture of the port coincided with the arrival of the Luftwaffe in North Africa as the advance forces of Operation Sonnenblume. The Germans immediately began an intense series of air raids against both Benghazi and Tobruk, which included the dropping of magnetic mines into the harbours.[61]
The minesweeper Peony cleared a safe channel into Benghazi harbour before the arrival of Terror on 17 February and a supply convoy the day after.[62] While Peony made steady progress in clearing the harbour, work was slow due to the shallow waters reducing the effectiveness of her degaussing equipment. As part of this work, a team from Peony safely detonated a mine close to Terror's mooring.[63] Despite the monitor's efforts to protect the harbour using her anti-aircraft guns, the convoy was unable to offload the majority of its cargo due to the frequent air attacks and sailed on to Tobruk on 20 February. Terror remained in port together with the minesweeper Fareham and corvette Salvia to protect the naval parties clearing the harbour.[64]
Terror was subjected to continued bombing attacks while in harbour and a near miss early on 22 February caused significant damage and flooding of the decks. Haynes protested the lack of air support to Cunningham along with the dangers of remaining at anchor, stating that it was only a matter of time before Terror received a direct hit. Accepting this assessment, Cunningham ordered the ship to sail for Tobruk on the evening tide with Fareham and Salvia.[65] As they were exiting the harbour the monitor triggered two magnetic mines in the previously cleared channel; although again not a direct hit, the explosions in close proximity caused further damage and flooding.[66] On the evening of 23 February she was attacked once more by German Junkers Ju 87Stuka dive-bombers from III/StG 2 under the command of Helmut Mahlke. The gruppe, which had been initially set up as an anti-shipping unit by the Kriegsmarine, had been drafted in to attack shipping in the vicinity.[67] The attack occurred while the ship was 90 miles (140km) from Tobruk; the near misses of this final assault leaving the ship critically damaged. Further floodwater disabled the electric generators and pumps and extinguished the boiler furnaces. The majority of the crew were evacuated to Fareham and Salvia with a skeleton crew of officers and anti-aircraft gunners remaining on board to operate the ship. Terror was taken under tow by Fareham in an attempt to reach Tobruk and additional ships were scrambled from Alexandria and Tobruk. However, the monitor continued to take on water and it was accepted that she would never reach port. Terror was scuttled through the opening of the seacocks and the use of depth charges on the morning of 24 February, 25 miles (40km) to the north west of Derna. The remaining crew were evacuated successfully.[68][ix]
↑Official figures for displacement on completion were not recorded for either vessel of the Erebus-class, leading to historians estimating the true displacement from the completed design and manifest. Buxton suggests a figure of 8,450long tons for loaded displacement at completion.[8] An alternative figure of 7,200 long tons (7,316t) was officially recorded for Terror's 1933 refit, though Buxton reports that this figure appears to be a mistake as it does not align with the ship's recorded loaded displacement for that period.[9]
↑There is some confusion in the sources as to the fate of Marshall Ney's turret. Jane's Fighting Ships (1919) states that it was fitted to Erebus.[15] However Buxton (2008) and Crossley (2013) both agree that Ney's turret was fitted to Terror in Belfast while Erebus received at Clydebank a gun originally intended as a spare for Furious.
↑Sources are unclear on the type of 12-pdr guns installed on Terror, but two models commonly used by the Royal Navy at the time were the QF 12-pdr, 12 cwt and QF 12-pdr, 18 cwt naval guns.
↑Crossley (2013) makes the claim that U-boat UC.70 was destroyed in the 5 June attack. However, Dunn (2017) observes that UC.70 was not destroyed until 1918 and he can find no corresponding record of a U-boat being destroyed on that day. Buxton (2008) clarifies that the U-boat was sunk in the attack but subsequently refloated and repaired.[22]
↑Brown, D. K. credits the anti-torpedo bulges as being responsible for protecting Terror from more severe damage to the main hull.[27] However, Crossly observes that the bulges only protected the ship from the hit further aft and it was the watertight doors that saved the ship by restricting flood water to the forward compartments only.[26]
↑Dunn (2017) says that Iron departed the ship before Bruton changed his mind. Buxton (2008) disagrees and says that Bruton changed his mind after Iron ordered a tug boat to come alongside and take him off. According to Buxton, Iron remained onboard and in control during the voyage to Portsmouth.
↑Fastnet was a former fishing vessel that was abandoned after crashing into the rocks off Iceland. She was sold to the Royal Navy as scrap but refloated and put to a useful purpose. Sandgate was a barrage vessel, designed and launched without an engine in 1917; she would require to be towed in order to move locations.
↑The Italian army at the time used two models of 20mm anti-aircraft guns; the Breda Model 35 and the 20mm Scotti. It is unclear which model was installed on Terror or if a mixture of the two was used.
↑Bechthold (2017) gives the date of the sinking as 26 February, however Brown (2013), Crossley (2013) and Buxton (2008) agree that her final damage was taken on the evening of 23 February and she was scuttled during the night. Buxton gives 04:20 on 24 February as the precise time of her sinking.
Bechthold, Michael (2017). Flying to Victory: Raymond Collishaw and the Western Desert Campaign, 1940–1941. Norman: University of Oklahoma Press. ISBN9780806157863.
Brown, David K. (2012) [First published 1999]. The Grand Fleet; Warship Design and Development 1906–1922. Barnsley, UK: Seaforth Publishing. ISBN9781848320857.
Brown, David K. (2012) [First published 2000]. Nelson to Vanguard; Warship Design and Development 1923–1945. Barnsley, UK: Seaforth Publishing. ISBN9781848321496.
Brown, David (2013). Royal Navy and the Mediterranean: Vol. II: November 1940 – December 1941. Hoboken: Taylor and Francis. ISBN9781136341205.
Buxton, Ian (2008) [First published 1978]. Big gun Monitors: Design, Construction and Operations 1914–1945 (2nd Reviseded.). Barnsley, UK: Pen & Sword. ISBN978-1-84415-719-8.
Clements, Bill (2016). The Fatal Fortress: The Guns and Fortifications of Singapore 1819 – 1953. Pen & Sword. ISBN9781473829619.
Crossley, Jim (2013). Monitors of the Royal Navy: How the Fleet Brought the Great Guns to Bear. Barnsley, UK: Pen & Sword. ISBN9781783830046.
Dunn, Steve R. (2017). Securing the Narrow Sea: The Dover Patrol 1914–1918. Barnsley, UK: Seaforth Publishing. ISBN9781848322516.
Jacobs, Peter (2016). Fortress Island Malta: Defence & Re-supply During the Siege. Barnsley, UK: Pen and Sword. ISBN9781473882560.
Lake, Deborah (2002). The Zeebrugge and Ostend Raids 1918. Barnsley, UK: Leo Cooper. ISBN0850528704.
Lind, L. J.; Payne, A. (1976). Scrap Iron Destroyers: The Story of HMA Ships Stuart, Vampire, Vendetta, Voyager and Waterhen. Garden Island: The Naval Historical Society of Australia. ISBN0909153043.
Murfett, Malcolm H.; Miksic, John; Farell, Brian; Shun, Chiang Ming (2011) [First published 1999]. Between 2 Oceans: A Military History of Singapore from 1275 to 1971 (2nded.). Singapore: Marshall Cavendish Editions. ISBN9789814435451.
Otter, Ken (2001) [First published 1999]. HMS Gloucester: The Untold Story (2nded.). Barnsley, UK: Pen & Sword. ISBN9781526714022.
Parker, Linda (2013). Ice, Steel and Fire: British Explorers in Peace and War, 1921–45. Solihull: Helion & Company. ISBN978-1-909982-45-1.
Playfair, Major-General I.S.O.; Flynn, Captain F.C.; Molony, Brigadier C.J.C.; Toomer, Air Vice-Marshal S.E. (15 August 2014) [First published 1956]. Butler, J.R.M. (ed.). Mediterranean and Middle East. Volume II: The Germans Come to the Help of Their Ally. History of the Second World War, United Kingdom Military Series. Pickle Partners Publishing. ISBN9781782896227.
Prince, Stephen (2012). The Blocking of Zeebrugge: Operation Z-O 1918. Bloomsbury Publishing. ISBN9781849082594.
Raugh, Harold E. (2013). Wavell in the Middle East, 1939–1941: A Study in Generalship. Norman: University of Oklahoma Press. ISBN9780806189789.
Roberts, John (2000). British Warships of the Second World War. London: Chatham Publishing. ISBN1-86176-131-7.
Spence, Daniel Owen (2015). Colonial Naval Culture and British Imperialism, 1922–67. Oxford: Oxford University Press. ISBN9781526102348.
Smith, Peter (2011). The Junkers Ju 87 Stuka: A Complete History. London, UK: Crecy Publishing. ISBN978-0-85979-156-4.
Taylor, Michael J. H. (1990). Jane's Fighting Ships of World War I. Studio. ISBN1-85170-378-0.
Thomas, David A. (1999). Malta Convoys 1940-42: The Struggle at Sea. Barnsley, UK: Leo Cooper. ISBN0850526639.
Warner, Phillip (2008) [First published 1978]. The Zeebrugge Raid. Barnsley, UK: Pen & Sword Books. ISBN978-1-84415-677-1.
Wynn, Kenneth G. (2015). Men of the Battle of Britain: a Biographical Dictionary of the Few. Havertown: Pen & Sword Books. ISBN9781473847682.
This page is based on this Wikipedia article Text is available under the CC BY-SA 4.0 license; additional terms may apply. Images, videos and audio are available under their respective licenses.