Battle of the Hongorai River

Last updated

Battle of the Hongorai River
Part of the Bougainville Campaign of the Pacific Theater (World War II)
AWM 092293 Australian Engineers at Honogai River 1945.jpg
Australian engineers move up the escarpment south of the Hongorai River in May 1945. Engineers played a vital part in the Australian advance.
Date17 April – 22 May 1945 [1] [2]
Location 6°47′49″S155°34′9″E / 6.79694°S 155.56917°E / -6.79694; 155.56917 Coordinates: 6°47′49″S155°34′9″E / 6.79694°S 155.56917°E / -6.79694; 155.56917
Result Allied victory
Belligerents
Flag of Australia (converted).svg  Australia
Flag of New Zealand.svg  New Zealand
Merchant flag of Japan (1870).svg  Japan
Commanders and leaders
Flag of Australia (converted).svg Heathcote Hammer Merchant flag of Japan (1870).svg Tsutomu Akinaga
Units involved
15th Brigade 6th Division
Strength
One infantry brigade, plus two troops of tanks and artillery, engineer and air support One understrength division [Note 1]
Casualties and losses
38 killed, 159 wounded ~275 killed

The Battle of the Hongorai River took place during the Second World War and involved Australian, New Zealand and Japanese forces. Part of the wider Bougainville Campaign of the Pacific theatre, the battle was fought in the southern sector of Bougainville Island. Coming after the Battle of Slater's Knoll in which a strong Japanese counterattack was defeated, the battle occurred in two distinct periods between 17 April and 22 May 1945, as elements of the Australian 15th Brigade advanced south along the Buin Road.

Contents

The initial phase saw the Australians advance towards the Hongorai River. Following the end of the early fighting, the Australian advance towards the main Japanese concentration at Buin continued as they struck out towards the Hari and Mivo Rivers. This continued until torrential rain and flooding brought the advance to a halt short of the objective, washing away many bridges and roads upon which the Australians relied for supplies. As the Australian advance stalled, the Japanese began harassing the Australian line of communications, and as the rain stopped and the flooding subsided in late-July and into August, the Australians began making preparations to resume the advance towards Buin again. Ultimately, though, the war came to an end before the final Australian advance began, bringing the campaign to an end.

Background

Strategic situation

Map of Bougainville. Bougainville campaign 1945.jpg
Map of Bougainville.

Japanese forces had landed on Bougainville in early 1942, capturing it from the small force of Australians garrisoning the island. They had subsequently developed several airbases on the island, using it to conduct operations in the northern Solomon Islands and to attack the Allied lines of communication between the United States, Australia and the Southwest Pacific Area. [4] These bases also helped protect Rabaul, the major Japanese garrison and naval base in Papua New Guinea, and throughout 1943, Allied planners determined that Bougainville was vital for neutralising the Japanese base around Rabaul. [5]

US Marines conducted an amphibious landing at Cape Torokina, on the western coast of the island, north of Empress Augusta Bay, in November 1943. After an initial counter-attack, the US Marines had been replaced by a garrison of US Army troops who began consolidating their position around Torokina, establishing a strong perimeter. In March 1944, the Japanese launched a heavy counter-attack, which was turned back with heavy casualties. After this, the situation on Bougainville became largely static, as the Japanese focused primarily on subsistence, and the US forces chose to adopt a mainly defensive posture focused on maintaining the perimeter around Torokina. [6] [7]

In late 1944, as part of plans to free US troops up for the Philippines campaign, the Australian II Corps—consisting of mainly Militia troops under the command of Lieutenant General Stanley Savige—took over responsibility for Allied operations on Bougainville from the American XIV Corps. Australian forces began arriving on the island between November and December 1944, initially establishing themselves around the US base at Torokina. Due to inaccurate intelligence, Savige mistakenly believed that the Japanese forces on the island numbered just 17,500 men, and he consequently decided that the Australians would pursue an aggressive campaign to clear the Japanese from Bougainville in order to free their troops for subsequent operations elsewhere, rather than maintaining the defensive posture the US forces had adopted. [8] [9] However, Allied estimates of Japanese strength were later found to be grossly inaccurate and after the war it was found that the number of Japanese on the island at this time was closer to 40,000. [10]

The campaign that Australian planners developed entailed three separate drives: in the north, it was planned that Japanese forces would be forced into the narrow Bonis Peninsula and contained; in the centre the seizure of Pearl Ridge would give the Australians control of the east–west avenues of approach, as well as affording them protection against further counter-attacks, while also opening the way for a drive to the east coast; and the main campaign in the south, where the bulk of the Japanese forces were concentrated around Buin. [11]

Preliminary moves

Following the capture of Pearl Ridge in December 1944, the Australian 7th Brigade had been moved south and allocated to the drive towards Buin. In late March and early April 1945, they had fought the Battle of Slater's Knoll after which a brief lull followed as the Australians paused to shorten their supply lines. Meanwhile, the survivors of the Japanese force, heavily demoralised by their defeat, [12] withdrew towards the Hongorai River. The Australian 3rd Division was then ordered to resume its advance south, being tasked with capturing the Hari River, while the Hongorai was also included as an "intermediate objective". [13] Japanese strength in the southern sector was estimated by the Australians at about 10,500 men, [Note 2] of which 2,300 were believed to be directly opposing the 3rd Division. The 15th Brigade was considered to be the most experienced of the Australian units on Bougainville at the time [13] and was moved up to relieve the 7th Brigade, which was in need of rest. [14]

Under the command of Brigadier Heathcote Hammer [15] the 15th Brigade consisted of three infantry battalions as well as two troops of tanks from the 2/4th Armoured Regiment, engineers from the 15th Field Company, a battery of 155-mm guns from 'U' Heavy Battery, field artillery from the 2nd Field Regiment, and a number of smaller support units. [13] [16] The 58th/59th Infantry Battalion took over responsibility for Slater's Knoll replacing the 25th Infantry Battalion while the 24th Infantry Battalion took up a position across the Buin Road. [17] [Note 3] The brigade's third battalion—the 57th/60th Infantry Battalion—did not join them until the beginning of May, and so the 7th Brigade's 9th Infantry Battalion continued patrolling operations north of the Huio River, in the Rumiki area, until the 57th/60th could dispatch elements to relieve them. [14] Further inland, the 2/8th Commando Squadron advanced in a wide arc to the south-east, defending the brigade's left, or eastern, flank. [19]

The Japanese forces opposing the Australians belonged to the 6th Division, under the command of Lieutenant General Tsutomu Akinaga. [20] Akinaga had been ordered to delay the Australian advance between the Hongorai and the Hari for as long as possible, and with these orders in mind he had installed a number of strong points along the Australian's expected line of advance. [20] The division's infantry had suffered heavily in the previous battle around Slater's Knoll [Note 4] and as a consequence, several units had to be reorganized or amalgamated. [23] The front line positions were assigned to the 6th Field Artillery Regiment, while the 13th Infantry Regiment was to hold five strongpoints to their rear along and astride the Buin Road, designated 'A' through to 'E'. The 6th Field and 4th Field Heavy Artillery Regiments both held strongpoints further back, designated 'F' and 'G'. [20] The 23rd Infantry Regiment was placed in the rear, where it was being reconstituted following losses suffered during the attack on Slater's Knoll. [24]

Battle

Advance to the Hongorai

RAAF Boomerang with RNZAF Corsairs on Bougainville 1945 RAAF Boomerang with RNZAF Corsairs on Bougainville 1945.jpg
RAAF Boomerang with RNZAF Corsairs on Bougainville 1945

The 15th Brigade took over the forward positions from the 7th Brigade on 17 April. Initial dispositions had the 24th Infantry Battalion on the Buin Road around Kero Creek, with the 58th/59th around Barara, north-east of Slater's Knoll, and the 57th/60th, when it arrived to relieve the 9th, would be positioned further east astride a secondary, parallel track known to the Australians as the Commando Road. Two days later, Hammer received the order to commence the advance towards the Hongorai from Savige, who offered him the support of the 29th Brigade as a mobile reserve in case of sudden counter-attack. [12] In a change to the tactics that the Australians had previously employed prior to the fighting around Slater's Knoll, from early May they advanced on a two-battalion front, instead of one. [25] The 24th Infantry Battalion was in the van, moving along the Buin Road with the 58th/59th protecting its flank and rear; while 5,000 yd (4,600 m) further inland the 57th/60th Infantry Battalion, commencing on 3 May, advanced along the Commando Road from Rumiki, after taking over from the 9th Infantry Battalion. [26]

Moving forward under a creeping barrage as they moved beyond Tokinotu, the 24th Infantry Battalion was the first to contact the Japanese, carrying out an attack against Japanese positions around Dawe's Creek on 17 April. Supported by a troop of Matilda tanks from the 2/4th Armoured Regiment, an artillery barrage which fired over 700 shells, two infantry companies—'C' and 'D'—from the 24th attacked the position while another—'A' Company—carried out a flanking manoeuvre to cut another track further north towards Kindara and Hatai. [26] [27] The left forward company—'D' Company—reached its objective without trouble; however, 'C' Company—on the right along with the troop of tanks—came up against stiff Japanese resistance and became bogged down. 'A' Company also became embroiled in heavy fighting along the Hatai track. In support of 'A' Company, Matildas came forward and raked the jungle, hacking through the undergrowth to reveal several Japanese pillboxes, which were destroyed by the Australian armour. As night fell, 'C' Company dug in before resuming the attack the next morning. Engineers were brought forward, as was a bulldozer, and the gap was bridged. Amidst heavy fighting, the Australians forced their way across the creek. [27] By the time that the position had been taken in the afternoon and the infantry had advanced to the line of exploitation 400 yd (370 m) beyond the creek, 37 Japanese had been killed for the loss of seven Australians killed and 19 wounded. After this, the Australians continued their advance towards Sindou Creek, which was a further 1 mi (1.6 km) to the southeast. [28] In response, the Japanese launched a number of determined counterattacks over the course of the following week, although these were turned back. [28] During this time, the Australians sent a number of patrols out in front of their forward elements, one of which managed to slip through the Japanese defensive positions either side of the Buin Road and carried out a reconnaissance of the Hongorai River about 1,000 yd (910 m) south of the main crossing. Further patrols were carried out, as well as a number of ambushes, before the advance was resumed on 26 April. [28]

Resuming their advance, the Australians were supported by three squadrons of Corsairs [28] from the Royal New Zealand Air ForceNos. 14, 22 and 26 Squadrons—which bombed and strafed the ground in front of the advancing infantry, as well as a creeping barrage of artillery and mortar fire. With such strong support the Japanese offered little resistance and over the course of two days the 24th Infantry Battalion covered almost a third of the distance to the Hongorai, for just one man wounded. [27] [28] Further progress was made over the next week, but on 4 May the advance was slowed when they encountered a roadblock defended by a field gun along with a machine gun, mines and other improvised explosive devices. After this, the 15th Brigade's engineer support were called upon to regularly carry out route clearance and proving operations as the Japanese became increasingly desperate to destroy the Australian armour, to the extent that they were prepared to sacrifice an artillery piece in order to lure the Australian tanks into a trap where they could be destroyed by mines. [29] The Japanese began to adapt their tactics in other ways also. To negate the effectiveness of the Australian tanks, the Japanese began to position themselves off the roads, forcing the infantry to fight without their armoured support. Additionally, the Japanese began to concentrate their artillery with increasing accuracy upon the advancing infantry, which they kept under constant observation and fire. [30]

A bulldozer clears a path through the jungle so that supplies can be brought up during the 57th/60th Infantry Battalion's advance along Commando Road. AWM 092292 Hongorai River bulldozer 1945.jpg
A bulldozer clears a path through the jungle so that supplies can be brought up during the 57th/60th Infantry Battalion's advance along Commando Road.

Meanwhile, the previous day, 3 May, the 57th/60th Infantry Battalion had begun operating along the parallel Commando Road to the north. Here they had a number of encounters and suffered casualties due to their inexperience in patrolling, which resulted in them being ambushed. [19] [31] They also kept up a steady advance and eventually beat the main force in reaching, and crossing the river, arriving there on 6 May. [32] On 5 May, along the Buin Road, the 24th Infantry Battalion had pressed forward again. Advancing with a tank troop in support, they came up against a concealed field gun defended by approximately 100 Japanese. After the lead Matilda's machine gun jammed, the field gun opened fire on it, damaging it and wounding its crew. Moving around the stricken tank, the second Matilda, armed with a howitzer, opened fire and destroyed the field gun before sweeping the Japanese defenders from the position. [33] That night, the Japanese artillery opened up on the Australian position with a heavy barrage, and the following morning put in a company-sized counter-attack. [14] The fighting lasted for over two-and-a-half hours, but when it was over the Australians remained in possession of the position having repulsed the attack. In doing so, they suffered one killed and nine wounded, while the attacking Japanese had suffered heavily, losing 58 men killed. It was the biggest loss since the action at Slater's Knoll and it spelt the end of their attempt to defend the Hongorai. [33]

After this, the Australians were able to resume their advance to the river on 7 May without further opposition. [33] The previous three weeks in which they had advanced 7,000 yd (6,400 m) to the Hongorai had been costly for them, however, with the Australian 24th Infantry Battalion losing 25 killed and 95 wounded. Against this, the Japanese had lost at least 169 killed. [33] [34]

Crossing the Hongorai

Following the advance to the Hongorai, there was a pause of about a week as the Australians had to wait for roads to be improved and supplies to be brought up, before attempting to cross the Hongorai en masse. [31] [35] This allowed Savige to re-evaluate the situation and to issue new orders for the advance towards the Hari and Mivo Rivers. As they waited for the advance to resume, the Australians carried out reconnaissance patrols deep into Japanese held territory and there were a couple of significant engagements during this time. [36] As a part of these, the 24th Infantry Battalion sent a company across the Hongorai and subsequently located a strong Japanese position on a feature that became known as Egan's Ridge, which, due to its location, commanded the main Australian axis of advance. [37]

Soldiers from the 57th/60th Infantry Battalion cross the Hongorai River Australian 57-60th Inf Bn Crossing the Hongorai River 1945 (AWM image 092280).jpg
Soldiers from the 57th/60th Infantry Battalion cross the Hongorai River

The main crossing was planned for 20 May, with the 58th/59th Infantry Battalion on the right tasked to cut the Buin Road and the Aitara Track to the east of the river, while on the left the 57th/60th Infantry Battalion would divert the attention of the Japanese off the 24th Infantry Battalion which would make the main frontal assault from the centre of the Australian line, crossing at the Pororei ford, advancing straight up the Buin Road. [2] [37] Preliminary moves began before this, and on 15 May a platoon from the 24th Infantry Battalion along with two tanks attempted to carry out an attack on Egan's Ridge. After one of the tanks was held up and knocked out by a Japanese field gun, they were forced to withdraw. Meanwhile, the RNZAF Corsair squadrons—now reinforced by No. 16 Squadron—began an eight-day aerial campaign, attacking along the length of the Buin and Commando Roads. [38] During this period, the New Zealanders flew 381 sorties, while artillery and mortars fired "thousands of rounds". [39]

Two days later, on 17 May, the 57th/60th Infantry Battalion began its diversionary move on the left flank, crossing the Hongorai inland and advancing along the Commando Road with 32 Corsairs and two batteries of artillery in support. [38] Crossing 500 yd (460 m) north of the ford, the centre company carried out an attack along the far bank of the river without its armoured support which had been unable to negotiate the crossing. Nevertheless, shortly before noon they had secured the crossing and began to fan out, carrying out further flanking moves before establishing a firm base to receive supplies and from where it began patrolling operations on 20 May. [40]

Matilda tanks from the 2/4th Armoured Regiment cross the Hongorai River with troops from the 24th Infantry Battalion. AWM 092041 Matilda tanks advance on Hongorai River 1945.jpg
Matilda tanks from the 2/4th Armoured Regiment cross the Hongorai River with troops from the 24th Infantry Battalion.

In the centre, the main attack along the Buin Road began at 08:30 on 20 May after 20 minutes of strafing by New Zealand Corsairs had prepared the ground. [41] Advancing under a creeping barrage, and with mortar and machine gun support, the 24th Infantry Battalion moved forward with three companies up front and one held back in reserve, along with two troops of Matilda tanks. Mostly the forward companies reached their objectives, but one of the companies was halted just short of their objective and was forced to dig-in overnight after coming under heavy small arms and artillery fire and losing four killed and five wounded. [41] The attack was resumed the following day, and the Australians were able to advance to the Pororei ford; however, they were prevented from moving any further as the Japanese were still concentrated in large numbers further to the west where an Australian patrol encountered 70 Japanese and were forced to go to ground. [41] Finally, a company from the 24th Infantry Battalion was able to move on to the high ground on Egan's Ridge, which they found to be heavily mined and booby trapped. Engineers and assault pioneers were called up to clear the feature. [42]

On the right flank, the 58th/59th Infantry Battalion carried out a wide flanking move along a track that had been carved out of the west bank of the Hongorai by bulldozer. Beginning their move two days earlier, a number of patrols had had contacts with the Japanese. Meanwhile, using tractors to drag the tanks through the mud, the Australian armour had crossed the river also and by 16:00 on 20 May the battalion had managed to establish itself in an assembly area to the east of the river, unbeknown to the Japanese. [43] The following day, the battalion left the line of departure and began to advance on its primary objective, which it reached in the early afternoon despite being held up while the tanks attempted to affect a creek crossing, and further delayed by stiff resistance. Later, after one of the battalion's patrols came under heavy fire, the tanks moved up and attacked a Japanese gun position which the defenders quickly abandoned, leaving behind a 70 mm gun and a large amount of ammunition. [43]

By 22 May, although there were still a number of Japanese in the area which continued to harass and ambush their line of communications, most of the Australian objectives had been secured and mopping up operations began. The last remaining defensive location before the Hongorai was Egan's Ridge, where the Japanese were sheltering in tunnels. A heavy aerial and artillery bombardment devastated the position and forced them to abandon the ridge. It was subsequently occupied by a company of Australian infantry. [44] [45] Within a short period of time the Buin Road was subsequently opened, providing the Australians with the means with which to bring up supplies for the next stage of the campaign, being the advance to the Hari, Mobiai, and Mivo Rivers. The final phase of the battle cost the Japanese 106 killed, while the Australians lost 13 killed and 64 wounded. [46]

Aftermath

During the course of the fighting around the Hongorai, the Australians lost 38 men killed and 159 wounded, while the Japanese lost at least 275 men killed. [47] Following the battle, the Australians continued their advance towards Buin at the southern end of the island. [48] Throughout the remainder of the month and into June, the 15th Brigade advanced along the Buin Road, crossing the Hari on 10 June. Beyond the river, the Japanese resolved to hold the food growing areas in order to protect their precarious food supply, and they consequently occupied a series of deep entrenchments. These were steadily reduced with airstrikes and artillery, [49] and the 15th Brigade subsequently crossed Mobiai River before being relieved by Brigadier Noel Simpson's 29th Brigade in early July. [50] [51]

As the 29th Brigade advanced toward the Mivo River, torrential rain and flooding ultimately brought the advance to a halt. The height of the river rose 2 metres (6.6 ft). [52] The Buin Road was reduced, in the words of Gavin Long, "to a sea of mud" [53] and many of the bridges upon which the Australian supply system was dependent were washed away. This rendered large-scale offensive infantry operations impossible and as the situation worsened for a period of time the Australians even ceased patrolling operations across the Mivo; [53] meanwhile, the Japanese continued to harass the Australians, probing their positions and setting mines and traps, targeting the Australian line of communications. On 9 July, the 15th Infantry Battalion fought off a series of attacks around Siskatekori, at the junction of the Mivo River and the Buin Road, which included a heavy Japanese artillery bombardment. [52] Australian patrols were resumed in late July and continued into August. [54] These attacks proved very costly, particularly amongst the Australian engineers that were tasked with rebuilding the bridges and roads that had been destroyed in the flooding. [55] [Note 5]

A mortar crew from the 15th Infantry Battalion around the Mivo River, July 1945 AWM 093913 Australian 15th Inf Bn mortar crew Bougainville July 1945.jpg
A mortar crew from the 15th Infantry Battalion around the Mivo River, July 1945

Fighting in the northern sector continued during this time also, and although preparations in the south for the final advance towards Buin continued into August, combat operations on the island ceased as the war came to an end before these were completed. As a result, the final Australian operations on Bougainville took place on the Ratsua front in the northern sector, [56] where the Australians had been conducting a holding action since the failed landing at Porton Plantation had forced them to abandon plans for an advance into the Bonis Peninsula. [57] By mid-August, however, following the dropping of two atomic bombs on Hiroshima and Nagasaki and Japan's subsequent unconditional surrender, a cease fire was ordered on the island and although there were minor clashes following this, it spelt an end to major combat operations. [58]

Following the end of the war, the Australian Army awarded three battle honours for the fighting around the Hongorai River. The 2/4th Armoured Regiment, and the 9th, 24th, 57th/60th and 58th/59th Infantry Battalions received the battle honour "Hongorai River". A second battle honour—"Egan's Ridge–Hongorai Ford"—was also awarded to the 2/4th Armoured Regiment, and the 24th and 58th/59th Infantry Battalions for the second stage of the fighting, while the 57th/60th Infantry Battalion received the separate battle honour of "Commando Road" for this period. [59]

Notes

Footnotes
  1. Tanaka indicates that the force opposing the Australians during this phase of the campaign was approximately 2,700 men from three infantry regiments, two artillery regiments, and various support units including engineers, signals, transport, and medical units. [3]
  2. Long states it was later determined that there were around 18,000 in the sector, with around 2,300 directly facing them. [13] When considered against Tanaka's figure of 2,700, [3] the Australian estimate of troops engaged was reasonably accurate.
  3. The Japanese name for the Buin Road was "A Road". [18]
  4. The Japanese name for this feature was "Goshu-dai", which can be translated as "Australian Heights". [21] [22]
  5. Australian engineers on Bougainville suffered 33 killed and 55 wounded throughout the course of the campaign. [55]
Citations
  1. Hongorai River.
  2. 1 2 Egan's Ridge–Hongorai River.
  3. 1 2 Tanaka (1980), p. 290.
  4. Keogh (1965), p. 414.
  5. Rentz (1946), p. 1.
  6. James (2012), pp. 29–30.
  7. Shindo (2016), pp. 61–63.
  8. Johnston (2007), p. 30.
  9. James (2016), pp. 30–31.
  10. Grey (2008), p. 191.
  11. Johnston (2007), pp. 30–31.
  12. 1 2 James (2012), p. 219.
  13. 1 2 3 4 Long (1963), p. 177.
  14. 1 2 3 Maitland (1999), p. 122.
  15. James (2012), pp. 219–220.
  16. James (2012), pp. 222–223.
  17. Long (1963), p. 166.
  18. Tanaka (1980), p. 284.
  19. 1 2 Long (1963), p. 180.
  20. 1 2 3 Tanaka (1980), p. 288.
  21. James (2012), p. 191.
  22. Tanaka (1980), p. 283.
  23. James (2012), p. 210.
  24. Tanaka (1980), p. 289.
  25. James (2012), p. 213.
  26. 1 2 Long (1963), p. 178.
  27. 1 2 3 James (2012), p. 223.
  28. 1 2 3 4 5 Long (1963), p. 179.
  29. Long (1963), p. 181.
  30. Long (1963), p. 183.
  31. 1 2 James (2012), p. 224.
  32. Long (1963), p. 185.
  33. 1 2 3 4 Long (1963), p. 184.
  34. Staunton (2010).
  35. Long (1963), p. 186.
  36. Long (1963), pp. 186–187.
  37. 1 2 Long (1963), p. 187.
  38. 1 2 Long (1963), p. 189.
  39. James (2012), p. 225.
  40. Long (1963), pp. 189–190.
  41. 1 2 3 Long (1963), p. 190.
  42. Long (1963), pp. 190–191.
  43. 1 2 Long (1963), p. 191.
  44. Long (1963), p. 192.
  45. James (2012), pp. 225–226.
  46. Long (1963), pp. 191–192.
  47. Long (1963), pp. 184 & 192.
  48. Maitland (1999), p. 107.
  49. James (2012), p. 226.
  50. James (2016), pp. 246–247.
  51. Maitland (1999), pp. 123–124.
  52. 1 2 James (2016), p. 247.
  53. 1 2 Long (1963), p. 222.
  54. Long (1963), p. 224.
  55. 1 2 Long (1963), p. 225.
  56. Long (1963), p. 236.
  57. Long (1963), p. 234.
  58. Long (1963), p. 226.
  59. Maitland (1999), p. 145.

Related Research Articles

3rd Division (Australia) 1916-1991 Australian Army division

The 3rd Division was an infantry division of the Australian Army. Existing during various periods between 1916 and 1991, it is considered the "longest serving Australian Army division". It was first formed during World War I, as an infantry division of the Australian Imperial Force and saw service on the Western Front in France and Belgium. During this time it fought major battles at Messines, Broodseinde Ridge, Passchendaele, Amiens, and the St Quentin Canal.

Bougainville campaign World War II land battle in the Pacific between Allied and Japanese forces

The Bougainville campaign was a series of land and naval battles of the Pacific campaign of World War II between Allied forces and the Empire of Japan, named after the island of Bougainville. It was part of Operation Cartwheel, the Allied grand strategy in the South Pacific. The campaign took place in the Northern Solomons in two phases. The first phase, in which American troops landed and held the perimeter around the beachhead at Torokina, lasted from November 1943 through November 1944.

29th Brigade (Australia) Infantry brigade of the Australian Army during World War II

The 29th Brigade was an infantry brigade of the Australian Army that was raised for service during World War II. Formed in late 1941 as part of the Militia, the brigade was initially formed for home defence in response to Japan's entry into the war. Composed of three Queensland-based infantry battalions and various supporting elements, the brigade initially undertook defensive duties around Townsville in 1941–1942 before deploying to New Guinea in 1943. There, the brigade undertook garrison duties before taking part in the Salamaua–Lae campaign. After a period of almost 18 months overseas, the brigade's elements were returned to Australia for a period of rest and reorganisation before later being assigned to the Bougainville campaign in 1944–1945. After the war, the brigade was disbanded in December 1945, along with its component units.

2/4th Armoured Regiment (Australia) Military unit

The 2/4th Armoured Regiment was an armoured regiment of the Australian Army, which served during World War II. The regiment was formed in November 1942 as part of the Second Australian Imperial Force by amalgamating a number of previously existing armoured units and was disbanded in September 1946 after seeing action in New Guinea and Bougainville Island, where it provided individual squadron-group sized elements which operated in support of infantry operations against the Japanese. During its service the regiment received 10 battle honours.

Battle of Piva Forks

The Battle of Piva Forks, also known as the Battle of Numa–Numa Trail, was an engagement that took place during the Bougainville campaign in World War II. Occurring between 18 and 25 November 1943 on Bougainville Island in the South Pacific, the battle involved troops from the United States Marine Corps and the United States Army fighting against Imperial Japanese Army forces and took place amidst the context of the expansion of a beachhead that US forces had established around Torokina on the western side of the island.

Battle of Slaters Knoll 1945 battle between Japanese and Australian forces during WWII

The Battle of Slater's Knoll was a battle fought between Australian and Japanese forces on Bougainville Island during the Second World War. Part of the Bougainville campaign, the battle occurred as a force of about 3,300 Japanese from the Japanese 6th Division, including artillery and other supporting elements, launched a counterattack against the main Australian offensive which had been pushing south towards Buin, concentrating their attacks on Slater's Knoll near the Puriata River. The Australian troops belonged to the 7th Brigade, with the 25th Infantry Battalion being the most heavily engaged, although the 9th Infantry Battalion and the 61st Infantry Battalion also took part in the fighting.

Battle of Slim River Battle of the Malayan Campaign in World War II

The Battle of Slim River occurred during the Malayan campaign in January 1942 between the Imperial Japanese Army and the British Indian Army on the west coast of Malaya.

Papuan Infantry Battalion WWII Australian infantry unit

The Papuan Infantry Battalion (PIB) was a unit of the Australian Army raised in the Territory of Papua for service during the Second World War. Formed in early 1940 in Port Moresby to help defend the territory in the event of a Japanese invasion, its soldiers were primarily Papuan natives led by Australian officers and non-commissioned officers. Following the outbreak of the Pacific War, the PIB served in many of the Allied campaigns in New Guinea; however, due to the nature of its role its sub-units mainly operated separately, attached to larger Australian and US Army units and formations. Slow in forming, the first members of the PIB were not officially posted in until March 1941. By 1942 it consisted of only three companies, all of which were under-strength and poorly equipped. It was subsequently employed on scouting, reconnaissance and surveillance patrols against the Japanese, where the natural bushcraft of its native soldiers could be used to their advantage. The PIB was sent forward in June 1942 to patrol the northern coast of Papua and was dispersed over a wide area. These small parties were the first to make contact with the Imperial Japanese forces upon their landing in Papua, before participating in the Kokoda Track campaign. As part of Maroubra Force, the PIB fought alongside the Australian 39th Battalion at Kokoda, Deniki, and Isurava as the Japanese forced them back along the Kokoda track, but was withdrawn before the campaign finally turned in favour of the Australians.

24th Battalion (Australia) Military unit

The 24th Battalion was an infantry battalion of the Australian Army. Originally raised in 1915 for service during World War I as part of the 1st Australian Imperial Force, it was attached to the 6th Brigade, 2nd Division and served during the Gallipoli campaign and in the trenches of the Western Front in France and Belgium. Following the end of the war the battalion was disbanded in 1919, however, in 1921 it was re-raised as a unit of the part-time Citizens Forces in Melbourne, Victoria. In 1927, when the part-time forces adopted territorial titles, the battalion adopted the designation of 24th Battalion . In 1939, the 24th Battalion was merged with the 39th Battalion, however, they were split up in 1941 and in 1943, after being allocated to the 15th Brigade, the 24th Battalion was deployed to New Guinea before later taking part in the Bougainville campaign. Following the end of the war, the battalion was disbanded in 1946.

Battle of Porton Plantation WWII battle in the Pacific Theatre

The Battle of Porton Plantation took place near the village of Soraken on Bougainville Island, in the Solomon Islands archipelago during World War II. Involving forces from Australia, New Zealand and Japan, the battle was part of the wider Bougainville campaign, which had begun in late 1943 and lasted until the end of the war in August 1945. The battle formed part of Australian efforts to liberate the northern part of Bougainville.

61st Battalion (Australia) Military unit

The 61st Battalion was an infantry battalion of the Australian Army. It was originally raised in 1917 during the First World War but was disbanded the same year without seeing active service. Later it was re-raised as a part of the Militia in 1938 in Brisbane, Queensland. Upon the outbreak of the Second World War they initially undertook garrison duties in Australia, however, in 1942 they were deployed to New Guinea where they took part in the Battle of Milne Bay, during which the Japanese were defeated for the first time in a major land battle. In late 1943, the 61st Battalion was withdrawn back to Australia for a period of re-organisation and training before being deployed overseas again in late 1944. This time they were deployed to Bougainville, where the Australian 3rd Division had taken over from the American garrison and the battalion joined the drive towards the Japanese stronghold at Buin in the south of the island. Following the end of the war, the 61st Battalion was disbanded as part of the demobilisation process on 8 January 1946.

Battle of Pearl Ridge Part of the Bougainville campaign in World War II

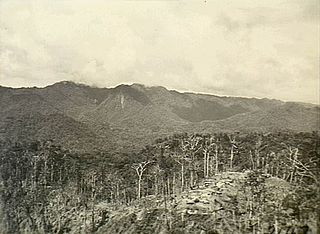
The Battle of Pearl Ridge was an engagement of the Second World War fought between Australian and Japanese forces on Bougainville Island. Part of the wider Bougainville Campaign, the battle took place in the central sector of the island, shortly after the Australians had taken over responsibility from the Americans. Believing that the ridge was held by less than a company of Japanese, on 30 December the Australian 25th Infantry Battalion launched a four-pronged attacked the ridge. The defending force, however, had been greatly reinforced by elements of the 38th Independent Mixed Brigade and was closer to a battalion in strength. After being held up on the right of their advance, the Australians dug in overnight and repulsed a strong Japanese counterattack before resuming the attack on 31 December. By late in the afternoon, the Japanese had been swept off the ridge. The Australians later established an observation post on the ridge, which had commanding views of the whole island, and throughout the remainder of the campaign used it to control artillery fire as they advanced towards Japanese enclaves in the north and south of the island.

Battle of Tsimba Ridge Engagement of the Second World War involving Australian and Japanese forces.

The Battle of Tsimba Ridge was an engagement of the Second World War involving Australian and Japanese forces. Part of the wider Bougainville Campaign of the Pacific theatre, the battle occurred in the northern sector of Bougainville Island between 17 January and 9 February 1945, when the lead battalion of the Australian 11th Brigade—the 31st/51st Infantry Battalion—advanced towards the Genga River as part of a drive north to the Bonis Peninsula.

57th/60th Battalion (Australia) Infantry battalion of the Australian Army

The 57th/60th Battalion was an infantry battalion of the Australian Army which served during the Second World War. It was formed in 1930 as part of the Militia by the amalgamation of the 57th Battalion and the 60th Battalion.

58th/59th Battalion (Australia) Australian Army infantry battalion

The 58th/59th Battalion was an infantry battalion of the Australian Army which served during the Second World War. Raised in 1942 as part of the Militia through the amalgamation of the 58th and 59th Battalions, it formed part of the 15th Brigade, assigned to the 3rd Division. Initially the battalion undertook defensive duties in Australia before being deployed to New Guinea where it took part in the fighting around Salamaua and Lae and then the Finisterre Range campaign. In 1945 they were sent to Bougainville where they took part in the fighting in the southern sector of the island. Following the end of the war, the battalion was disbanded in 1946.

Battle of Ratsua Battle during the Second World War involving Australian and Japanese forces

The Battle of Ratsua occurred during the Second World War and involved Australian and Japanese forces. Part of the wider Bougainville Campaign of the Pacific theatre, the battle took place in the northern sector of Bougainville between June and August 1945. The main forces that took part in the fighting were the Australian 23rd Brigade and the Japanese 87th Naval Garrison Force.
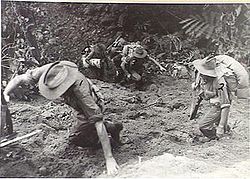
15th Battalion (Australia) Military unit

The 15th Battalion was an infantry battalion of the Australian Army. Formed in 1914 as part of the all-volunteer Australian Imperial Force from Queensland and Tasmanian recruits, the battalion fought during the Gallipoli Campaign and on the Western Front during the First World War. It was disbanded after the war in 1919, but later re-raised as a part-time Citizens Forces unit based in Queensland in 1921, consisting of a mixture of volunteers and conscripts. Economic pressures and limited manpower resulted in the battalion being amalgamated with other battalions a couple of times during the inter-war years. In mid-1939, as rising tensions in Europe led to an expansion of the Australian military, the battalion was re-formed in its own right. During the Second World War the 15th Battalion was mobilised for wartime service and initially undertook defensive duties in Australia before taking part in the fighting against the Japanese in New Guinea and Bougainville in 1943–1945. The battalion was disbanded in 1946 and never re-raised.

Bougainville counterattack Japanese offensive on Bougainville Island during World War II

The Bougainville counterattack was an unsuccessful Japanese offensive against the Allied base at Cape Torokina, on Bougainville Island, during the Pacific War of World War II. The Japanese attack began on 8 March 1944 after months of preparation, and was repulsed by United States Army forces in fighting which lasted until 25 March. The attack was hampered by inaccurate intelligence and poor planning and was defeated by the well-prepared Allied defenders, who greatly outnumbered the Japanese force. The Japanese suffered severe casualties, while Allied losses were light.

42nd Battalion (Australia) Military unit

The 42nd Battalion was an infantry battalion of the Australian Army. Raised as part of the Australian Imperial Force (AIF) during the First World War, it was established at Enoggera in December 1915, forming part of the 11th Brigade in the 3rd Division. It subsequently served on the Western Front in France and Belgium in 1916–18 before being disbanded on 22 October 1918. In 1921, the battalion was reformed as part of the Citizens Forces becoming known as the 42nd Battalion. Following the outbreak of the Second World War the battalion held a number of training exercises and camps until 1941, before being mobilised in March 1942 as part of the 29th Brigade, in the 5th Division. It subsequently served in New Guinea fighting against the Japanese during 1943–44 and on Bougainville in 1945, before being disbanded on 7 May 1946. In 1948, it was reformed as part of the re-raised Citizens Military Forces. Today, its lineage is perpetuated by the 31st/42nd Battalion, Royal Queensland Regiment, a unit which continues to serve in the Australian Army Reserve.

Battle of Beaufort (1945) 1945 battle of World War II

The Battle of Beaufort took place during the Second World War between Allied and Japanese forces. Part of the wider Borneo campaign of the Pacific War, it was fought between 26 and 28 June 1945 in North Borneo. The battle formed part of the Allied efforts to secure North Borneo in the final months of the war and saw two Australian infantry battalions attack the town, which was held by a force of around 800 – 1,000 Japanese. Over the course of several days heavy fighting took place before the Japanese began withdrawing on 29 June. While withdrawing, the Japanese were ambushed and suffered heavy casualties.

References