On the night of 11/12 November 1940, the British incapacitated or destroyed half of the battleships of the Italian fleet in a daring aerial assault as they lay at rest at Taranto. Until then, the Italians had mostly left their capital ships in harbour, hoping its mere presence as a fleet in being would deter British shipping through the area, though they would not decline battle if given the opportunity.[1]
Six days later, on the night of 17 November, an Italian force consisting of two battleships (Vittorio Veneto and Giulio Cesare) and a number of supporting units attempted to intercept two British aircraft carriers, HMSArk Royal and Argus and their cruiser escorts, who were en route to Malta to ferry aeroplanes to reinforce its defences (Operation White). The British were warned of their approach and immediately turned about and returned to Gibraltar, launching their aircraft (two Blackburn Skuas and 12 Hurricanes) prematurely. One Skua and eight Hurricanes ran out of fuel and were lost with the loss of seven airmen.[2][3]
Operation Collar
The Italians' success in disrupting the reinforcement of Malta cast serious doubt upon British plans to send a further convoy to supply the island. The convoy was attempted, with increased support, including Force H from Gibraltar and Force D from Alexandria. The convoy was spotted by the Italian intelligence service and the Italian fleet sailed to intercept it. The first Italian naval unit to make visual contact with the convoy was the torpedo boat Sirio on the night of 26 November. After launching two torpedoes from long range, which missed, Sirio reported seven enemy warships heading eastwards.[4]
Battle
The British knew of the Italian fleet's movements, sent their forces north to intercept them before they could close on the freighters. At 09:45 on 27 November, an IMAM Ro.43 reconnaissance floatplane from the heavy cruiser Bolzano discovered a British squadron steaming to the east, 17nmi (31km; 20mi) north of Chetaïbi.[5][6]
Shortly after, at 9:56, Admiral James Somerville received the report of his own aircraft from the carrier Ark Royal about the presence of five cruisers and five destroyers, and assumed that these were Italian units closing for battle. Force D had not yet arrived from Alexandria and the British were outgunned but 15minutes later, Force D was spotted and the tables turned.[7] The two forces were fairly even; although the Italian ships possessed larger and longer-ranged guns, the British had an aircraft carrier, which had shown several advantages over the battleship at Taranto. The Italian admiral, Inigo Campioni, had been given orders to avoid combat unless it was in his favour, making a decisive battle unlikely.[8]
Somerville deployed his forces into two main groups, with five cruisers (Rear-Admiral Lancelot Holland) in front and two battleships and seven destroyers in a second group following to the south. Further to the south, Ark Royal was preparing to launch its Swordfish. The Italians had organised their fleet into three groups, two composed of the six heavy cruisers and seven of the destroyers and a third group of the two battleships and another seven escorting destroyers bringing up the rear. At 12:07, after a report received from the cruiser Gorizia's floatplane, Campioni realized the closeness in strengths of the two forces and in accordance with his orders commanded the cruiser groups to re-form on the battleships and prepare to depart. By this point, the lead cruiser formation had already angled toward the British and was beginning to engage them in battle.[8]
At 12:22, the lead groups of both cruiser forces came into range and Fiume opened fire at 23,500m (77,100ft). Fire was exchanged as the distance between them closed, but as the range shortened Italian firepower began to put pressure on the outgunned British. The arrival of the battleship HMSRamillies on the British side helped to even the odds but she was too slow to maintain formation and dropped out of battle after a few salvoes at 12:26. Four minutes later, Vice-Admiral Angelo Iachino, commander of the Italian cruiser group, received orders to disengage, although the battle had swung slightly in their favour. Iachino ordered an increase in speed to 30kn (56km/h; 35mph), laid smoke and started to withdraw.
The Italian destroyer Lanciere was hit by a broadside from HMSManchester and seriously damaged, although she was towed to port after the battle. The heavy cruiser HMSBerwick was hit at 12:22 by a 203mm (8.0in) shell, which knocked out "Y" turret, killed seven men, wounded nine others and ignited a fire that took an hour to subdue. A second hit at 12:35 destroyed the after breaker (electrical switchboard) room and cut power to the ship's aft section, including the remaining aft turret.[9] Most sources believe that the first hit was scored by an Italian heavy cruiser from the 1º Cruiser Division, either from Fiume or Pola,[10] The second round came from the 3º Cruiser Division, either from Trieste or Trento, at the time the only Italian warships within range.[9]
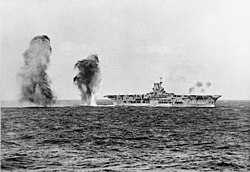
HMSSouthampton was also hit once, by either Gorizia, Fiume, Pola, Trieste or Trento; the shell hit her belt at about 18,000m (59,000ft) range.[11]At around 12:40, eleven Swordfish from Ark Royal attacked Vittorio Veneto with torpedoes, but did not score any hits.
For the next few minutes, the tables turned in favour of the British when the battlecruiserHMSRenown closed the distance on the Italian cruisers and straddled Trieste with two salvoes, hitting it with splinters.[12] At 13:00, Vittorio Veneto opened fire from 27,000m (89,000ft). Vittorio Veneto fired 19 rounds in seven salvoes from long range and that was enough for the outgunned British cruisers, which turned back at the fourth salvo. As giant water-spouts erupted around Berwick and Manchester, Holland ordered smoke and his ships fled south-east to close with Renown.[13]Manchester was holed by splinters from Vittorio Veneto's rounds.[14] Both forces withdrew, the battle lasting for 54 minutes and causing little damage to either side.[15][16][17]
Aftermath
Analysis
The oficial British naval historian, Stephen Roskill, wrote that the Italians had failed to intercept the convoy and the merchant ships of Operation Collar reached Malta and Alexandria unharmed. The Battle of Spartivento was indecisive and the failure of the torpedo bombers on Ark Royal to slow the Italian battle fleet as it withdrew confirmed the concerns Somerville had over their lack of training and inexperience. The cessation of the British pursuit led to Somerville being criticised at the Admiralty, the Prime Minister and the dispatch of a senior officer to chair a court of inquiry into Somerville's leadership, an underhand manoeuvre that was resented in the Mediterranean Fleet and Force H. Cunningham commanded another supply convoy to Malta during December and signalled that "the base was as effective as when war broke out and far better defended against air attack or invasion.[18]
On the Italian side, the aftermath of Cape Spartivento pleased no-one, opinion in the Italian fleet was that it had fled before an inferior opponent, even if they had to face an aircraft carrier and that they had failed to pursue the fleeing opponent.[19] Iachino described the battle as "a minor military episode with no decisive results". "Indeed, the action at Cape Teulada, if it was not a success on the strategic level, as the enemy achieved their objective, was truly a tactical success for us and left everyone with the impression that we could confidently measure ourselves against the enemy in a prolonged gun battle". Giorgerini wrote that while it is correct to acknowledge the British had a strategic success in the passage of the convoy and other ships through the Strait of Sicily, "I find that it takes a certain sense of humour to call that action 'a tactical success for us".[20]
The directives issued by Supermarina to the senior commander at sea, requiring the navy to engage "if the situation was favourable" was too vague, contrary to the principle that a clear intent and the goal to be achieved should be communicated. Vagueness served only to paralyse Campioni's initiative. Giorgerini wrote that after the failure of the British torpedo attacks, it would have been possible to use the large ships to stop the convoy. Even though the political–strategic circumstances of Italy required that the opportunity to achieve a success at sea be taken; 27 November 1940 was a bad day for the Regia Marina.[21] After the operation, Campioni was sacked for timidity and replaced by Iachino and sent to the Dodecanese. Admiral Arturo Riccardi took over from Domenico Cavagnari at Supermarina as Chief of Staff of the Regia Marina.[22] Henceforth, the Italian fleet was to operate with air cover, Aquila to be converted as a fighter aircraft carrier and other ships were to be mounted with catapult-launchers for fighters.[23]
Casualties
The convoy element of Operation Collar suffered no casualties and inflicted none.[24]
Subsequent events
The Italian battle fleet was reorganised as a battle squadron with Vittorio Veneto, Andrea Doria and Giulio Cesare commanded by Iachino, with the 13th destroyer flotilla commanded by Bruno Brivonesi, the three heavy cruisers and a destroyer flotilla commanded by Admiral Sansonetti, three light cruisers and two destroyer flotillas commanded by Admiral Antonio Legnani, three light cruisers and a destroyer flotilla commanded by Admiral Alberto Marenco di Moriondo and three more light cruisers and two destroyer flotillas commanded directly by Supermarina.[25]
Bragadin, M. (1957) [1948]. Fioravanzo, G. (ed.). The Italian Navy in World War II. Translated by Hoffman, G. (Eng. trans.ed.). Annapolis, Maryland: United States Naval Institute. OCLC602717421.
De Toro, Augusto (1 December 2020). Storia Militare Briefing n. 24 dicembre 2020. Incrociatori pesanti Trento, Trieste e Bolzano. Italy: Storia Militare (published 2020).
Giorgerini, Giorgio (2001). La guerra italiana sul mare. La Marina tra vittoria e sconfitta 1940–1943[The Italian War at Sea: The Navy between Victory and Defeat 1940–1943] (in Italian). Milano: Mondadori. ISBN978-8-80-440581-8.
Greene, Jack; Massignani, Alessandro (1998). The Naval War in the Mediterranean, 1940–1943. London: Chatham Publishing. ISBN1-885119-61-5.
Greene, Jack; Massignani, Alessandro (2002) [1998]. The Naval War in the Mediterranean, 1940–1943. Rochester: Chatham. ISBN978-1-86176-057-9.
Hague, Arnold (2000). The Allied Convoy System 1939–1945: It's Organization, Defence and Operation (hbk. repr. Chatham, Londoned.). St. Catherine's, ONT: Vanwell Publishing. ISBN978-1-55125-033-5.
Hobbs, David (2013). British Aircraft Carriers: Design, Development and Service Histories. Barnsley: Seaforth Publishing. ISBN978-1-84832-138-0.
Jordan, Roger W. (2006) [1999]. The World's Merchant Fleets 1939: The Particulars and Wartime Fates of 6,000 Ships (2nded.). London: Chatham/Lionel Leventhal. ISBN978-1-86176-293-1.
O'Hara, Vincent P. (2009). Struggle for the Middle Sea. Annapolis, MD: Naval Institute Press. ISBN978-1-59114-648-3.
Rohwer, Jürgen; Hümmelchen, Gerhard (2005). Chronology of the War at Sea 1939–1945: The Naval History of World War Two (3rd rev.ed.). Annapolis, Maryland: Naval Institute Press. ISBN1-59114-119-2.
Shores, Christopher; Cull, Brian; Malizia, Nicola (1999). Malta: The Hurricane Years (1940–41). London: Grub Street. ISBN0-948817-06-2.
Smith, Peter C. (2011). Critical Conflict: The Royal Navy's Mediterranean Campaign in 1940. Barnsley: Pen & Sword Aviation. ISBN978-1-84884-513-8. First published as Action Imminent: Three Studies of the Naval War in the Mediterranean Theatre during 1940 (1980) William Kimber, London. ISBN978-0-7183-0277-1
Stern, Robert C. (2015). Big Gun Battles: Warship Duels of the Second World War. London: Seaforth Publishing. ISBN1-4738-4969-1.
Dannreuther, Raymond (2005). Somerville's Force H: The Royal Navy's Gibraltar-based Fleet, June 1940 to March 1942. London: Aurum Press. ISBN1-84513-020-0.
This page is based on this Wikipedia article Text is available under the CC BY-SA 4.0 license; additional terms may apply. Images, videos and audio are available under their respective licenses.